|
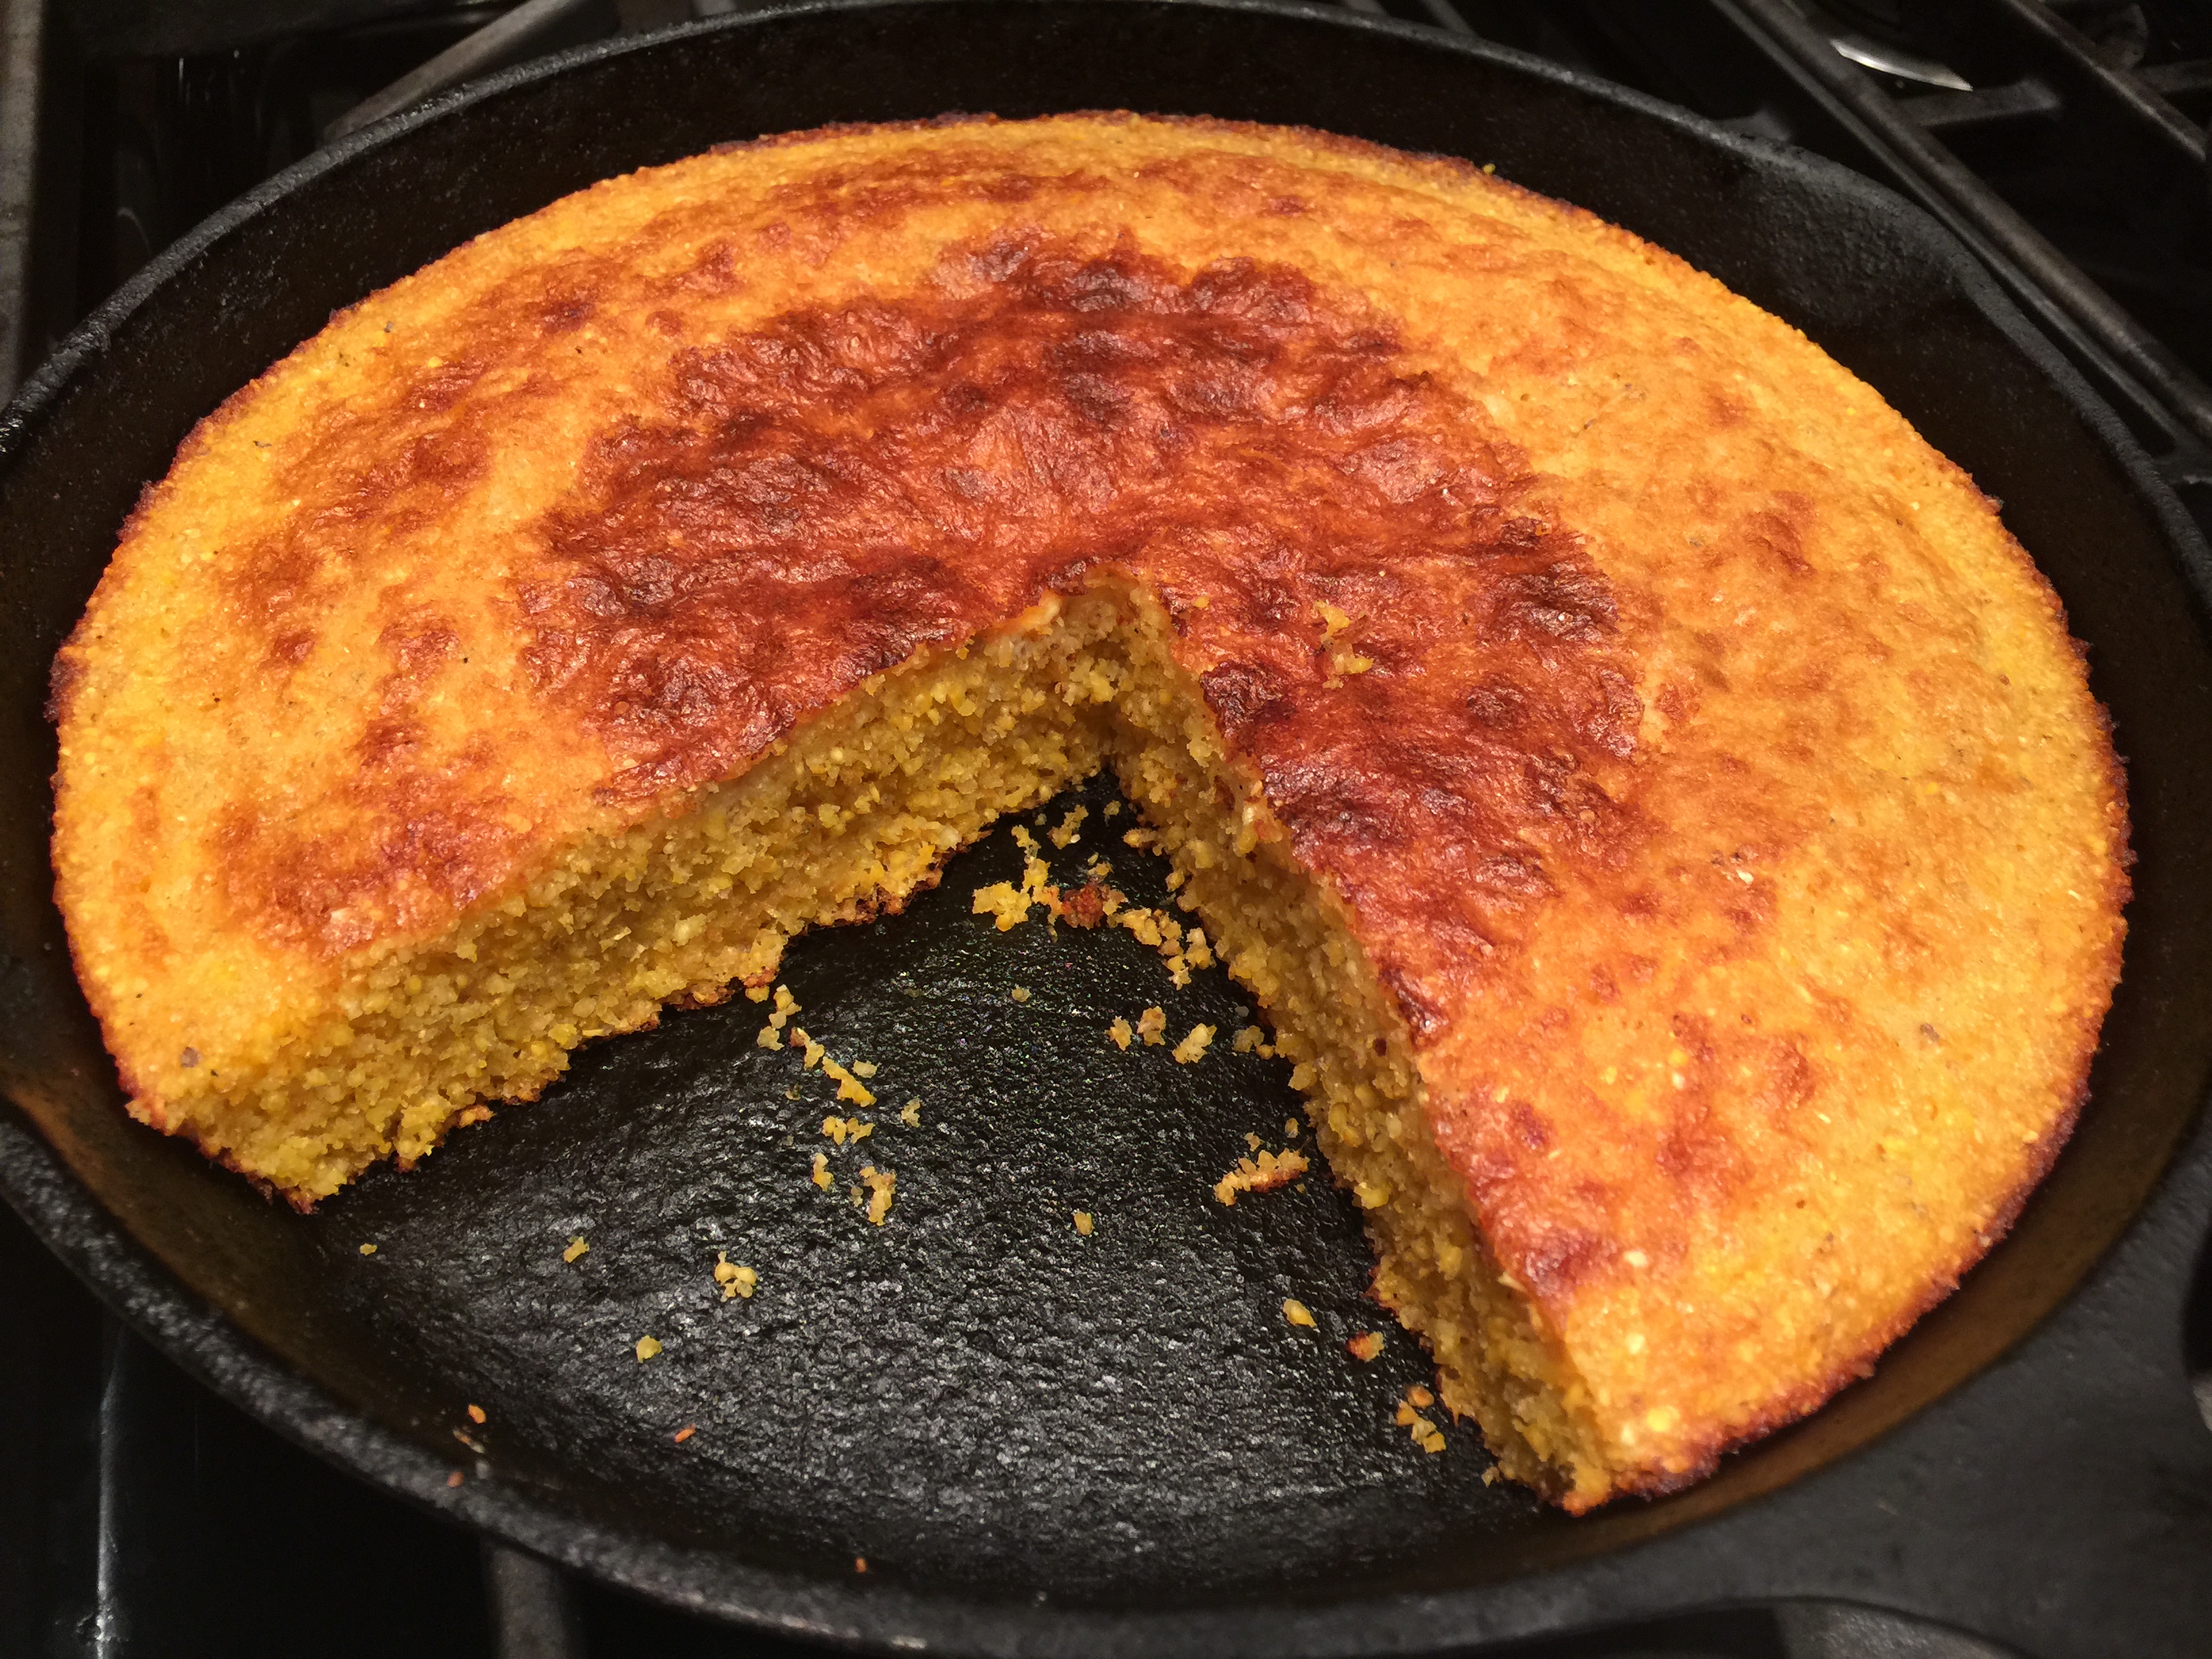
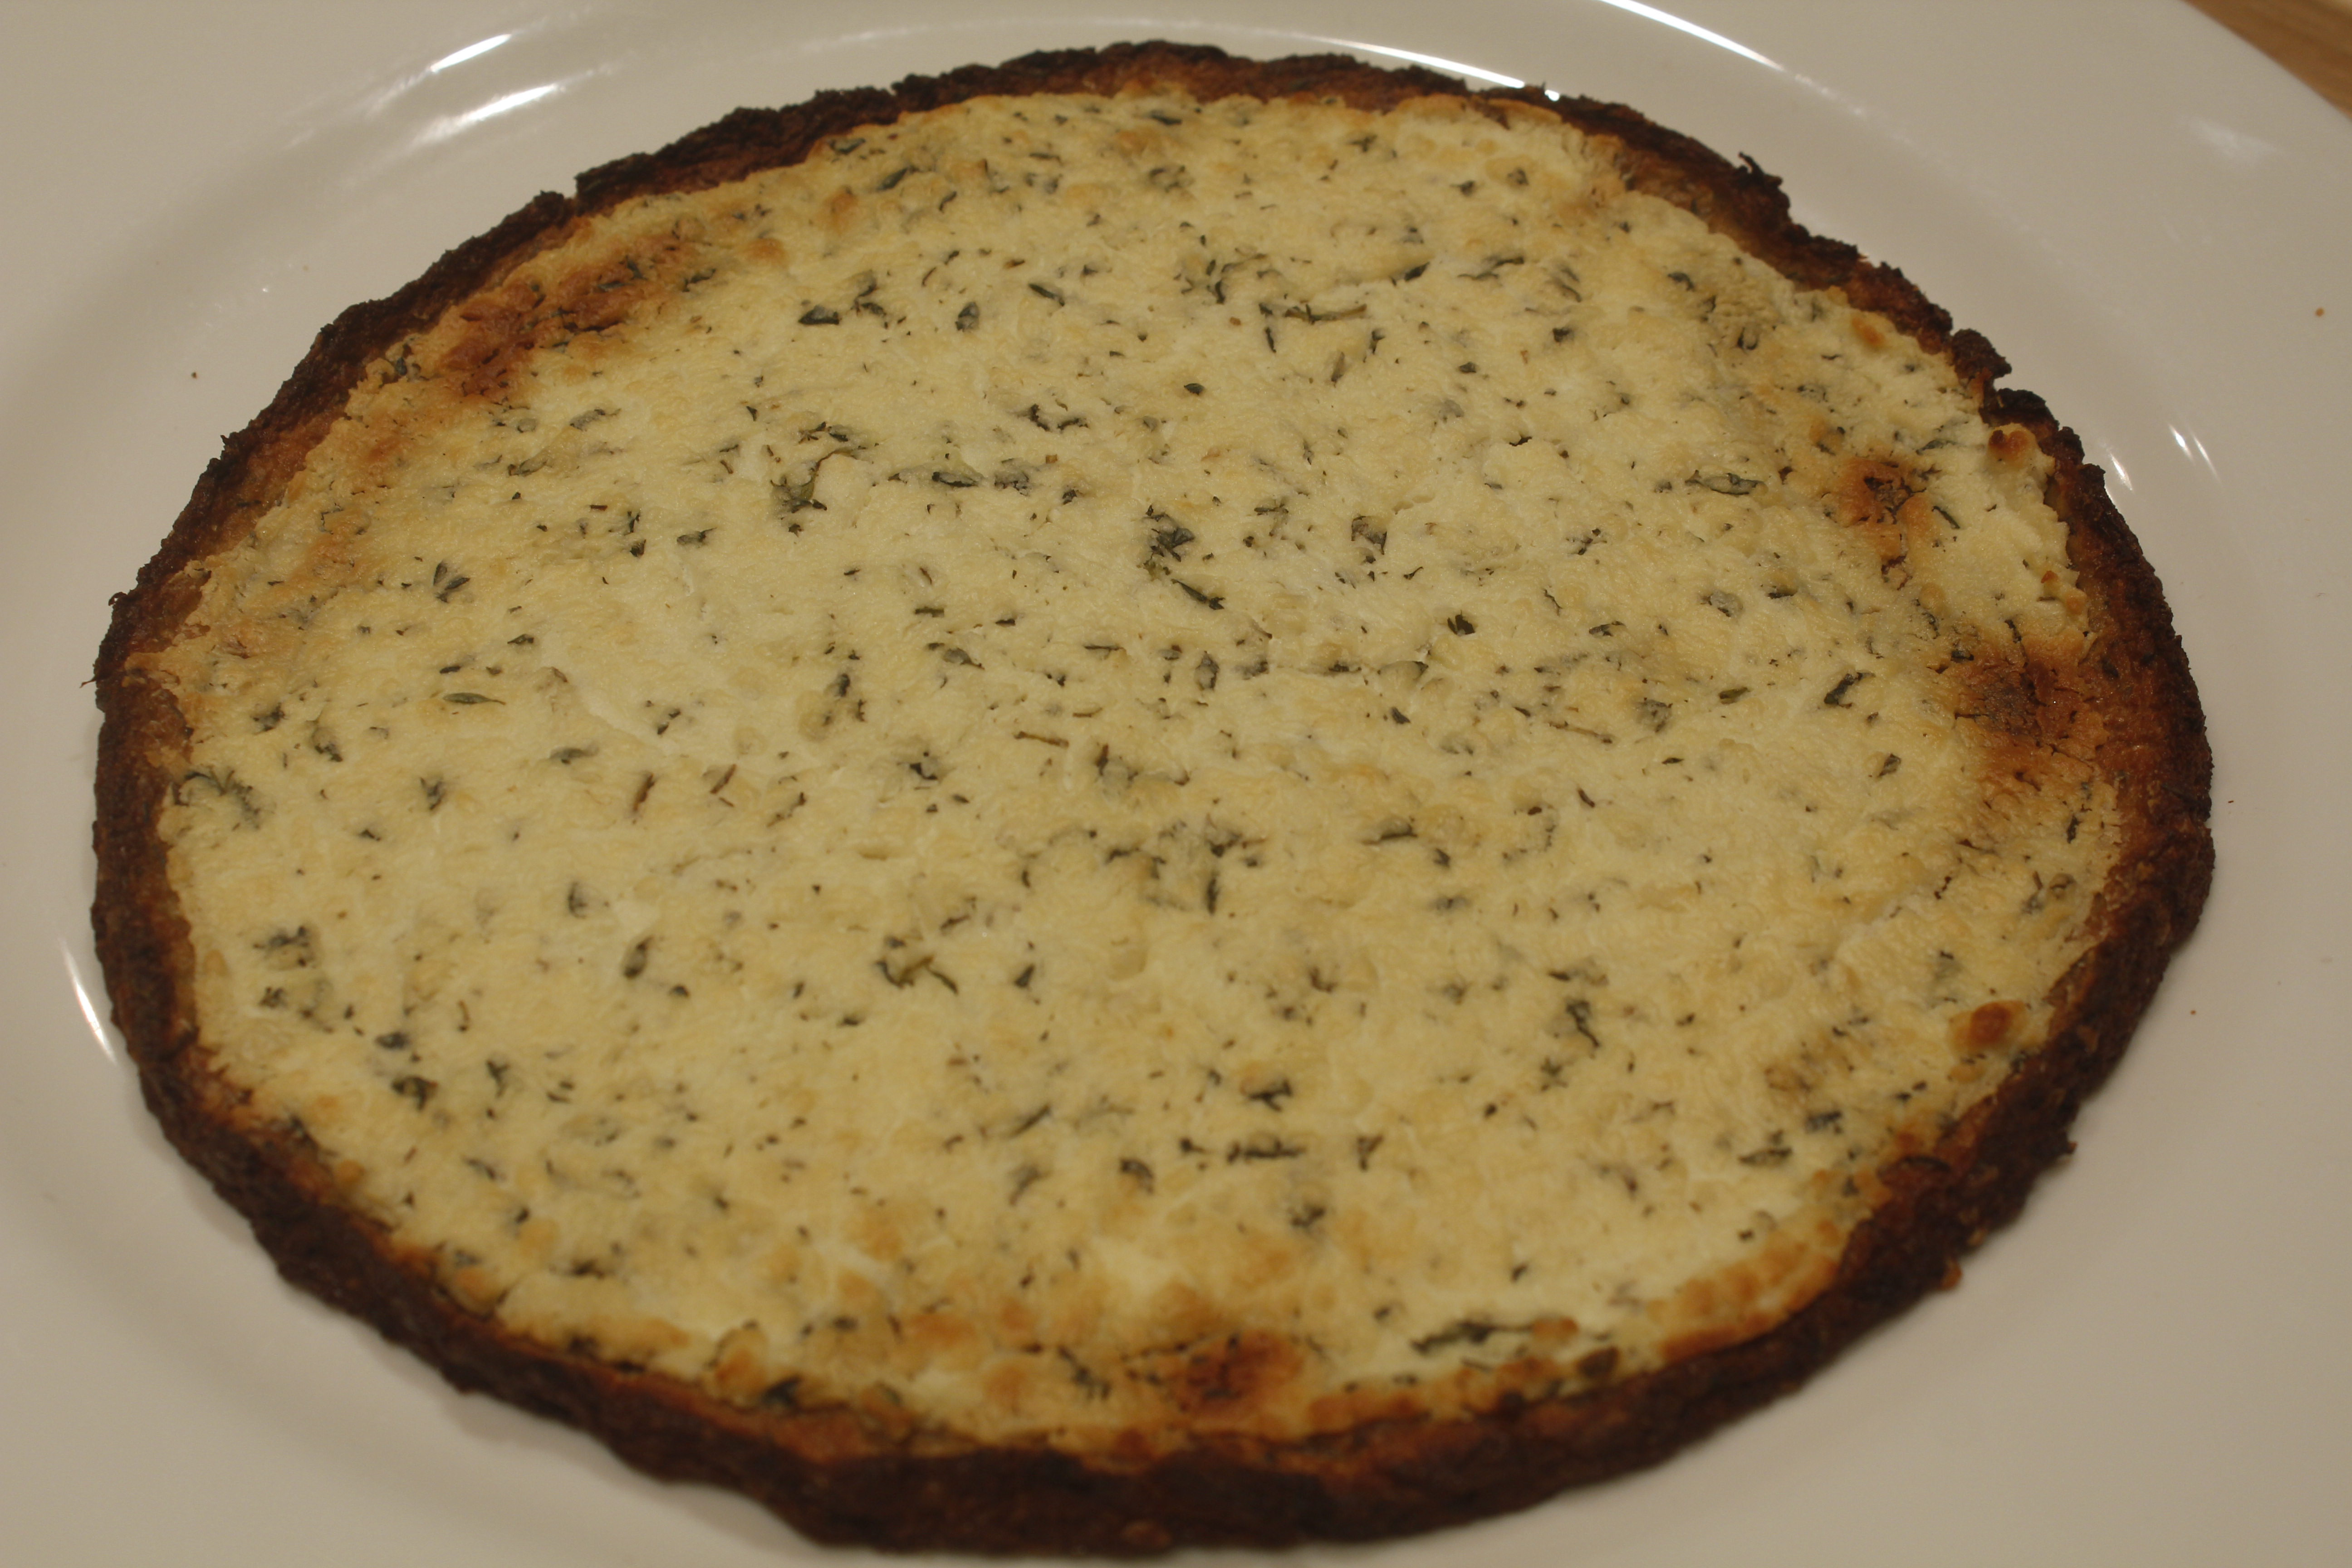
Southern Skillet Cornbread My new favorite cornbread is adapted from a recipe in Cook’s Country magazine. It’s made from pure cornmeal, so it’s got super corny flavor. It’s easy to make, baked at high temperature in a cast iron skillet.
In today’s video, I show how to make a delicious Southern-style skillet cornbread. This cornbread is made completely from cornmeal, without any other flours, making it gluten free. Besides the cornmeal, there are just a few other ingredients besides good quality fat (a mix of coconut oil and butter). The dish is baked in a 10-inch cast iron skillet, and it’s quick to make. The technique for making this dish is also a little unusual. You can make this cornbread using either course cornmeal or fine-grind cornmeal, which yields very different results; or you can mix the two. In the video, I demo a mix; I use 1 1/4 cups of a course-grade polenta and 1 1/4 cups of a fine grind masa harina, cornmeal that’s been treated with edible lime (calcium carbonate) to make it digestible and impart that distinctive tortilla flavor. The two together give the cornbread a delightful texture. To begin, spread both types of cornmeal on a parchment-covered sheet tray and toast in a very hot (450 degree) oven for 10 minutes. Once the cornmeal has been in the oven for 5 minutes, add 1/4 cup aroma-free coconut oil to a 10-inch cast iron skillet, and place that in the oven on a higher shelf to melt and heat. Remove the sheet tray and the cast iron skillet at the same time after 5 more minutes. The cornmeal will have started to brown around the edges. To the melted coconut oil, add 1/4 cup butter and return that to the oven to melt. Transfer the cornmeal to a bowl (it’s still warm) and whisk in 2 cups buttermilk. Add the remaining ingredients: 2 beaten eggs, 1 teaspoon each baking powder and baking soda, and 3/4 teaspoon salt. Notice how the mix starts to bubble as soon as the leaveners are stirred in. By this time, the butter will have melted. Remove the cast iron skillet from the oven, and pour off all of the fat into the bowl with the other ingredients, leaving just enough fat in the skillet to coat the bottom. Thoroughly mix the coconut oil-butter mixture into the other ingredients; then pour the entire contents of the bowl into the prepared skillet. Give the skillet a shake to even and smooth out the batter. Return it to the oven and bake it from 12 -16 minutes, rotating the pan after about 7 minutes. Remove the pan when the top is crusty and golden. Let the cornbread cool for a few minutes before slicing. Make sure to wrap a towel or kitchen mitt around the handle so that you don’t inadvertently touch the skillet. Even though you know you just took it out of the oven, you’re liable to forget out of sheer habit. Cut the cornbread into wedges. Marvel at the lightness of the texture, the corniness of the flavor, and the ease of assembly. Enjoy this luscious treat with your favorite cold weather dish or holiday meal.
Share on Facebook and Twitter | Gluten Free, Grains, Kitchen Tips, Recipes, Side Dishes | No comments
Not Your Ordinary Jello Shot
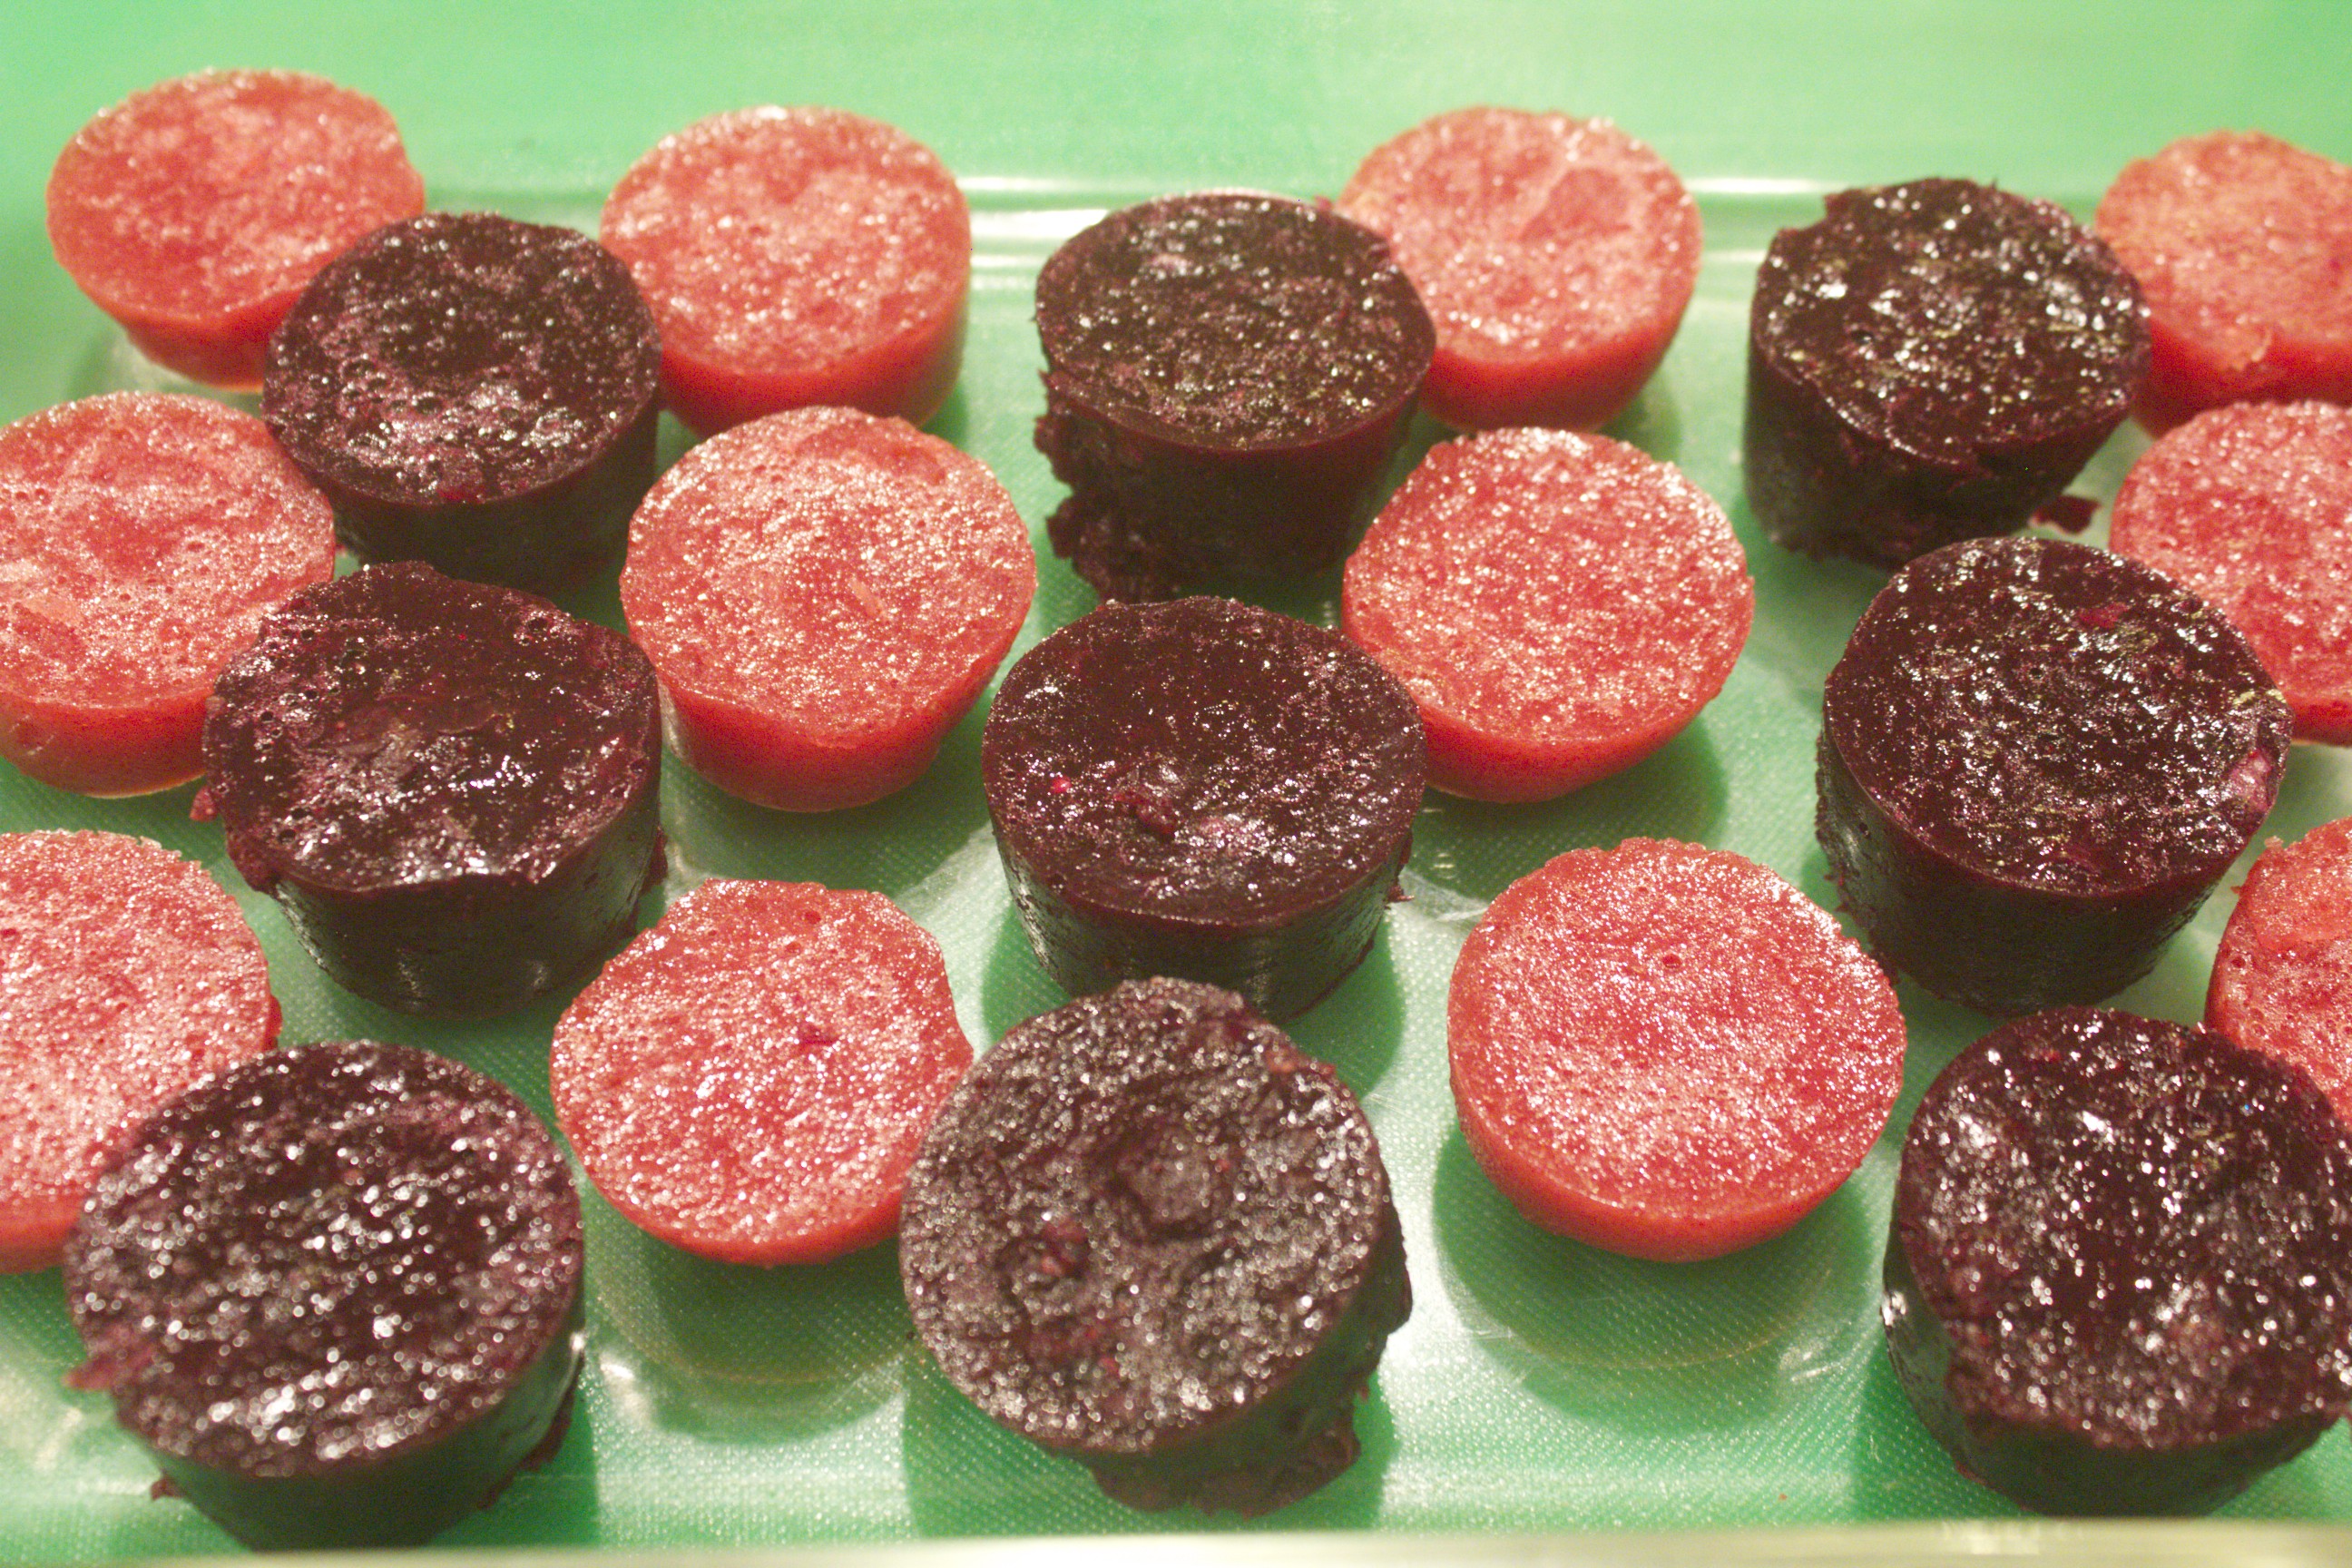
In today’s gelatin shot video, I demonstrate how to make berry jigglers, also known as gelatin shots. In case just hearing the word “gelatin” makes you think of images of wobbly neon molds popular in bygone eras, think again. These delightful bites are made purely from berries, so they’re more like gelled fruit bites. They have only the minimal number of ingredients; and good quality gelatin makes these refreshing nibbles extra nutritious. Gelatin has many healing properties: it soothes the gut lining; it strengthens bones, ligaments, skin and hair; and it regulates blood sugar. And that’s just the short list. To get the most healing benefits from these jiggers, make the effort to obtain powdered gelatin from grassfed cows, which is readily available nowadays. In the video, I demonstrate two flavors of jigglers, beginning with the blueberry version. It hardly matters whether you use fresh or frozen fruit. Add 2 1/2 cups berries to a medium pot or saucepan along with 1/2 cup of liquid. In the demonstration, I use coconut water, but apple or other fruit juice works as well. Let the berries heat to a gentle bubble to soften. Then, blend the berries until smooth. This is a good occasion to use an immersion blender if you have one. Tilt the pot to make sure to blend the berries evenly without splattering. Transfer them to a bowl to cool for about 10 minutes. Gelatin dissolves best in warm liquid, not super hot. I also demonstrate a version made with strawberries and raspberries. Working with berries with seeds requires an extra step; the seeds need to be strained. After the berries are heated and puréed, press them through a fine-meshed wire strainer. Use the bottom of a ladle, rotating it in a circular motion to push the puree through quickly and efficiently. You’ll be left with just a handful of seeds in the strainer basket, which you can discard or give to the compost worms. Make sure to use a spatula to collect any of the puree that is stuck to the bottom of the strainer—that’s good stuff you don’t want to waste. Since raspberries tend to be a bit tart, stir in a tablespoon or so of honey to sweeten them just a tad. Now it’s time to add the gelatin. Two tablespoons is the perfect amount to set each of these purees just right (neither too hard nor too loose). Sprinkle the powder evenly over the top, then stir the gelatin in until it’s completely dissolved. Next, pour the mix into molds and chill until set, about 2 hours or so. Use whatever you like or have for a mold. Some examples of kitchen favorites that make good molds include 8×8-inch baking pans, ice cube trays, or—my personal favorite, and the type that I show in the video—silicon mini muffin molds. These flexible molds make it especially easy to pop out the individual jigglers. After the stint in the refrigerator, unmold by running a blunt knife or small spatula around the edge of the mold, then lift—or in the case of the silicon—pop out the pieces. If you’ve poured your puree into a baking dish, simply slice the jigglers into squares before lifting out the pieces with an offset spatula. Stack the jiggers in a covered container, and refrigerate for up to two weeks. These shots are wonderful to keep on hand for an instant snack or low-key dessert. I like to eat a few of these in the morning instead of a piece of fruit. Once you’ve made these a couple of times, I’m certain you’ll want to keep a regular stash. I know I do. Share on Facebook and Twitter | desserts, Fruit, Snacks, Uncategorized | No comments
Acai Bowls
Acai berries contain many beneficial compounds, such as powerful antioxidants, fiber, monounsaturated fats (oleic acid), and anthocyanins, which are all clinically proven to have health benefits. Because they’re so low not only in sugar, but also in the acid that protects most fruits, they must be picked, processed, and flash frozen before being transported out of the Amazon. Otherwise the fruit would oxidize, turn brown, and lose its beneficial nutrients. The berries are squeezed into juice or—my favorite—pureed into frozen smoothie packs. These are sold in the freezer section of natural food stores. You can take advantage of the packs by making delicious frozen treats without using an ice cream maker. The only equipment required is a food processor. In today’s video, I demonstrate two delicious bowls that are suitable for dessert, snacks, or even breakfast. Each one has healthy fat added to keep your blood sugar stable and help you feel satisfied for hours. They’re quick to make: You whirl a few ingredients together, then immediately eat what you’ve made. You can store leftovers in the freezer, but you do have to let them thaw before eating. The first bowl that I demonstrate in the video is flavored with cherries, cocoa, and almonds, all of which complement the acai. Begin by adding 2 unsweetened smoothie packages to the bowl of a food processor. It’s best to let the acai pack sit out for 5 minutes or so to thaw slightly, so it’s not rock hard when you whirl it. Add a cup of frozen cherries, half a ripe avocado, a couple tablespoons cocoa powder, a tablespoon raw honey, and 1/4 teaspoon almond extract. Now you’re ready to whirl, except you need to add about 1/2 cup of liquid to loosen up the mixture. (In the demo video I add coconut milk, but almond and cashew milk are both delicious as well.) A quick whirl in the food processor melds these ingredients into a luscious concoction. To add a bit of texture, top the two servings with a sprinkling of almonds and cocoa nibs, and a dash of cocoa powder. The second bowl features bananas and almond butter. Again, start with two packages of acai smoothie packs, the contents broken into chunky pieces. Add one chopped frozen banana, 3 pitted medjool dates, a tablespoon almond butter, and a dash cinnamon. Loosen the whole mix with 1/2 cup of coconut milk. Again, a quick whirl transforms the whole mix into frozen ambrosia. Top this banana-almond acai bowl with large flakes of dried coconut and rosy goji berries. These simple blends are so easy to make with ingredients that you can keep handy in your freezer and pantry. These bowls (which can serve as a snack, a breakfast, or a dessert) underscore that a luscious frozen treat can both satisfy a sweet tooth and be truly health-promoting.
Share on Facebook and Twitter | Breakfast, desserts, Fruit, Gluten Free, ingredients, Recipes, Snacks, techniques, Uncategorized | No comments
Chia Seed Puddings
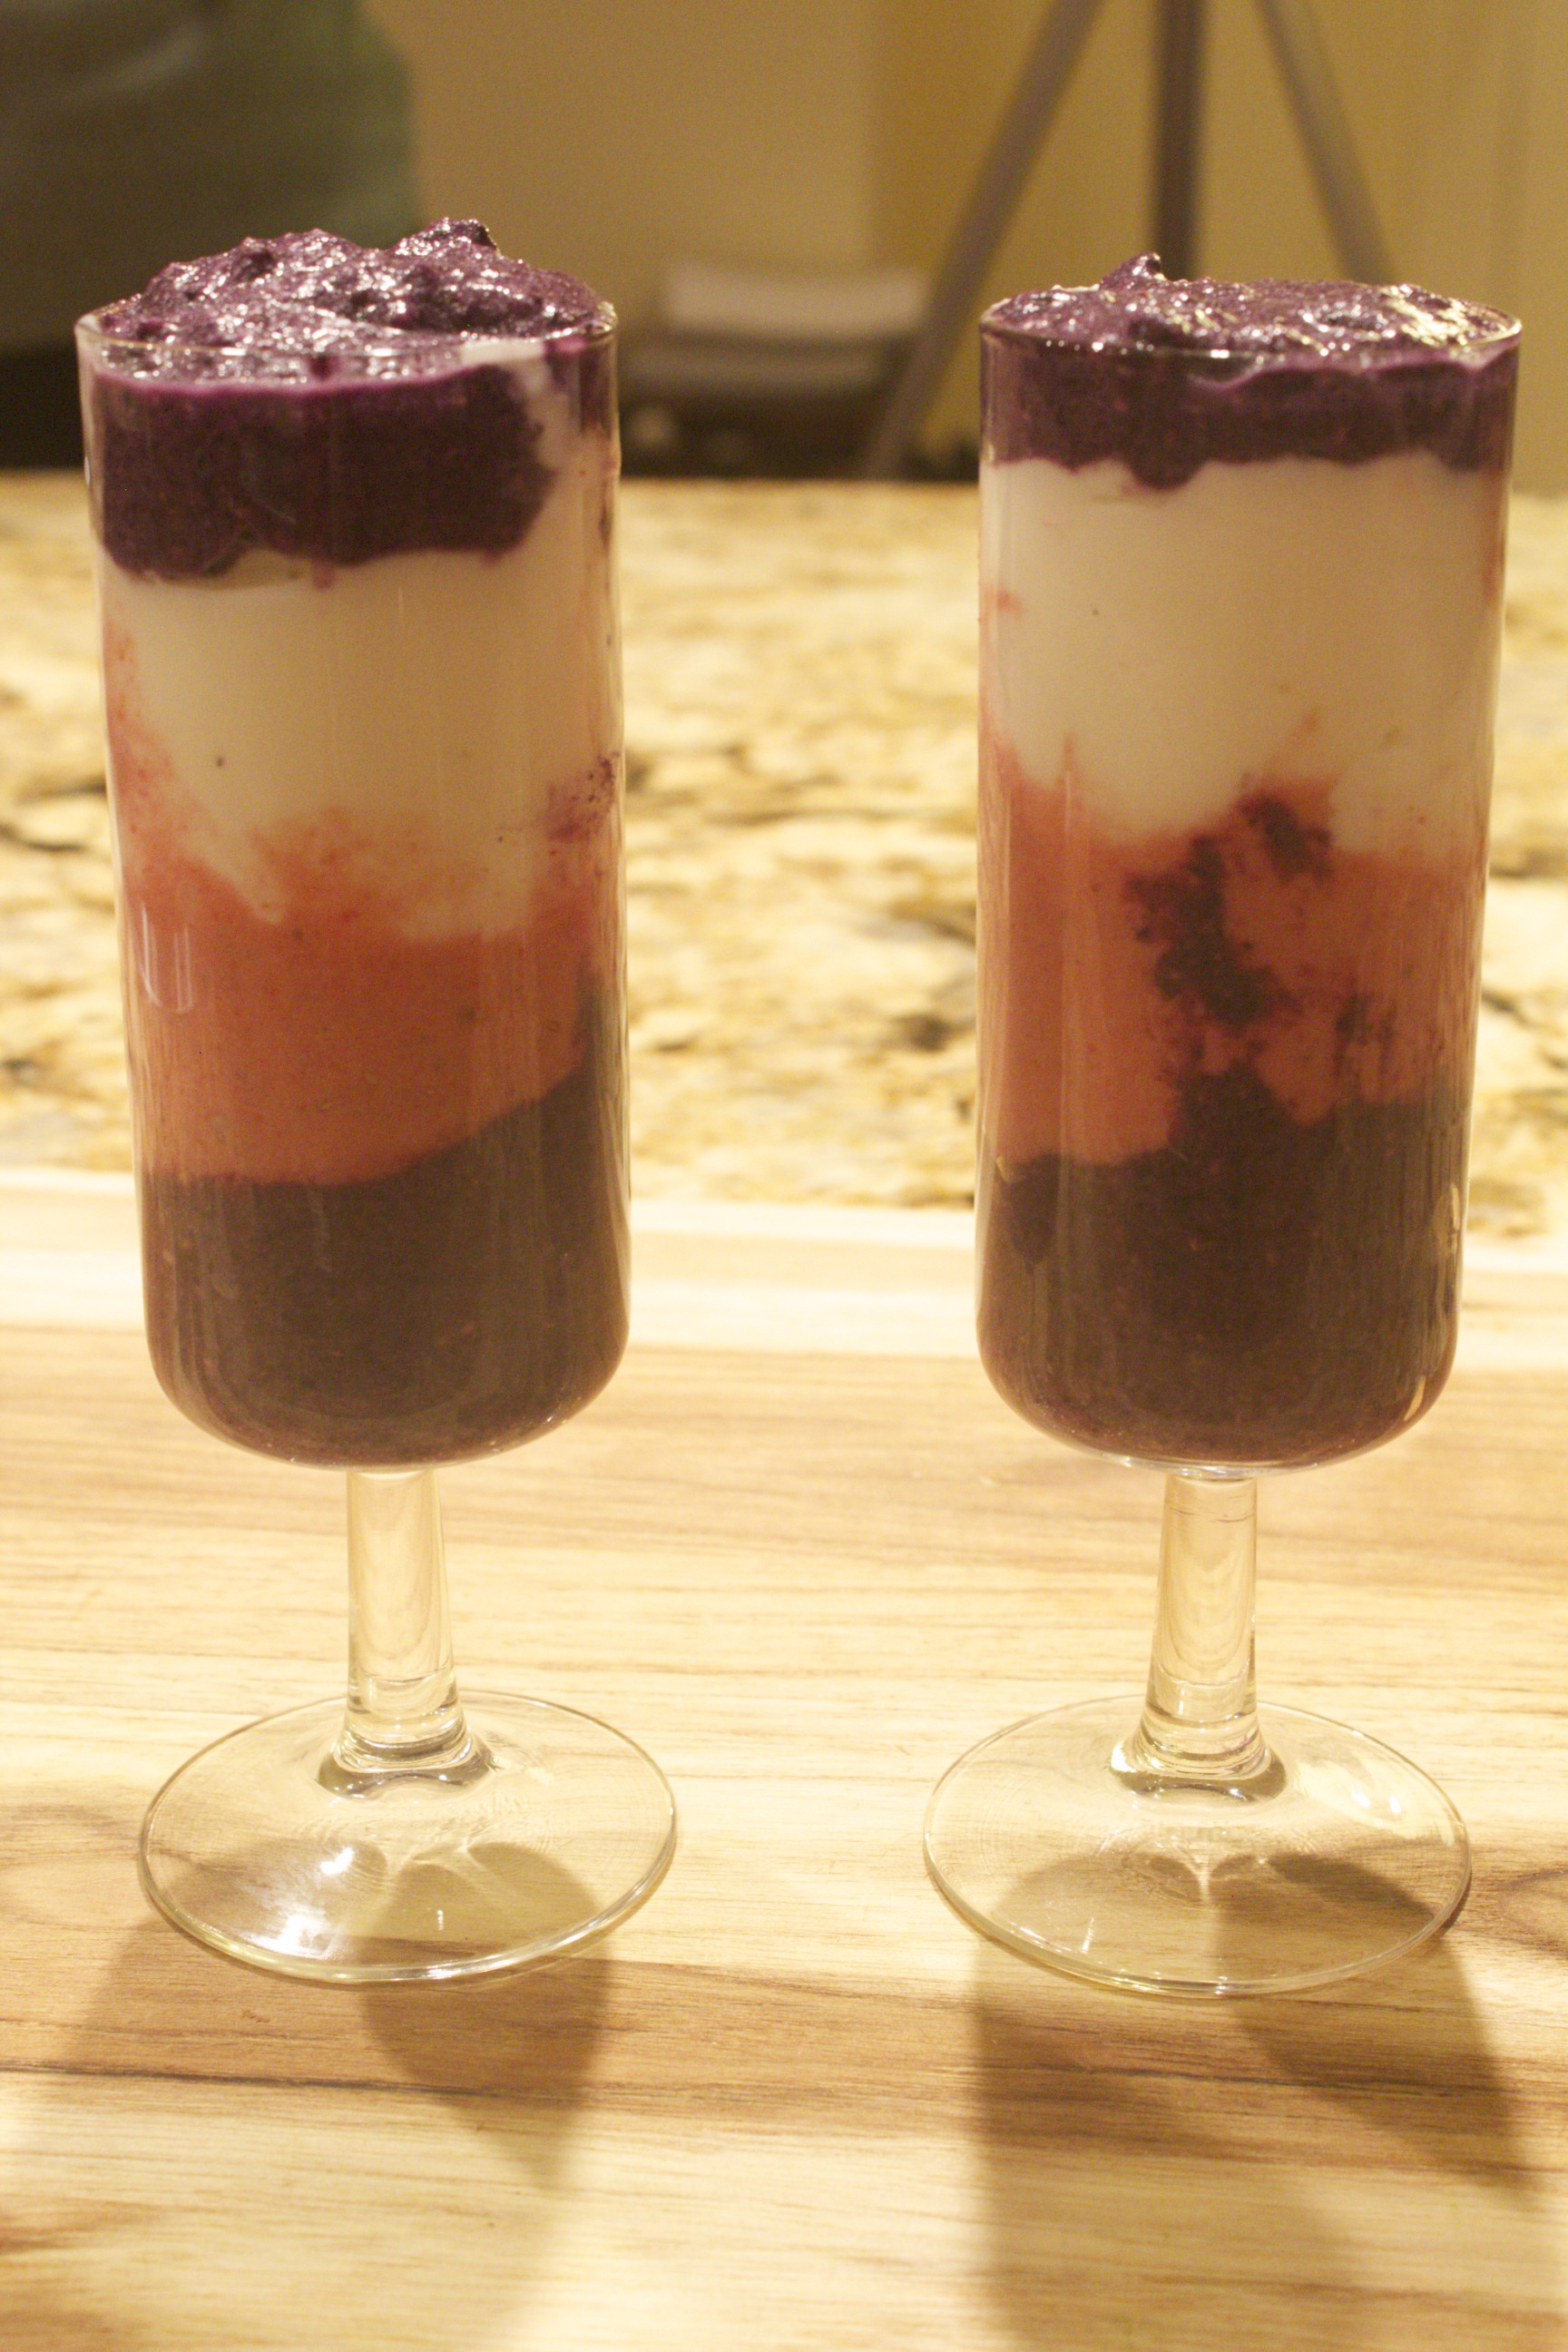
In today’s video of chia seed puddings, I show how to make two delicious chia seed puddings. Chia seeds are touted for their powerful salutary benefits: Included among their vital nutrients are protein, fiber, antioxidants, and ALA (alpha-linoleic acid), a type of omega-3 fatty acid. It seems that nowadays people are shaking these micro-seeds into everything from cereals to salads, from baked goods to beverages. I’m not a fan of the dry chia sprinkle: Chia seeds are most digestible when allowed to soak and swell. Therefore, I favor adding them to blended concoctions, then leaving enough time for the tiny powerhouses to plump. The result is thickened puddings with luscious pebbly beads, reminiscent of tapioca. The procedure for making chia seed pudding is quick, simple, and consistent. Whiz together a flavorful blend, stir in some chia, and refrigerate for at least 30 minutes to allow the seeds to thicken. The array of potential flavor permutations are vast. In the video, I demonstrate two berry-based puddings, each one ideal to savor alone or to layer into a colorful parfait. You’ll need a stand blender to pulverize the ingredients; a high-powered blender is the gold standard, but it’s not essential. The first purée that I show has a base of blueberries. Start with 2 cups of the fruit, either fresh or frozen. If you’re using frozen, let the berries rest a few minutes to defrost. Add 1/2 cup cashews, ideally after having soaked them for 2 hours before draining. Soaking the cashews allows for maximum nutrient absorption and digestibility. The sweetener in this pudding is a mere 4 dates. Any variety of date (make sure to remove the pit!) is fine, but the medjool variety is the softest and sweetest. This resulting pudding is sweet enough without being cloying. A couple tablespoons coconut oil—virgin or aroma-free—will also help keep your blood sugar stable as well as ensure that the pudding has a luxurious texture. One tablespoon vanilla and a generous sprinkling of cinnamon complete the flavorings. A cup of liquid is necessary for proper blending. In the video, I use coconut water, but plain water would be fine as well. Give the ingredients a good whiz until well combined. Transfer the purée to a bowl or container, then stir in 6 tablespoons chia. The micro seeds need a bit of time to work their magic and swell. Transfer the pudding to the refrigerator and leave for 30 minutes minimum, preferably longer. The next strawberry chia delight that I show in the video is simplicity itself. Blend well 3 cups strawberries (if frozen, defrost a bit), 1/4 cup raw honey, and 3/4 cup coconut milk, which lends the needed richness and body to the finished dish. Add a splash vanilla, and give a long enough whiz in the blender until the base is smooth. Transfer to a bowl or container, and stir in 1/4 cup chia. Refrigerate for a minimum of 30 minutes, but longer is even better to allow for the seeds to expand as much as possible. The puddings last refrigerated for at least a week, and they each yield 4 to 6 luscious servings. Either of them alone—or the two in combination—can make a great snack or low-sugar dessert. You can also leave them refrigerated for a convenient grab-and-go breakfast. One favorite breakfast of mine is the combination of puddings layered in a parfait or martini glass with sheep’s milk yogurt. The blend tastes tart and sweet, looks gorgeous, and contains just enough fat, fiber, and fruit to keep you happily sated until lunch. Share on Facebook and Twitter | Breakfast, desserts, Gluten Free, Gluten Free, Snacks | No comments
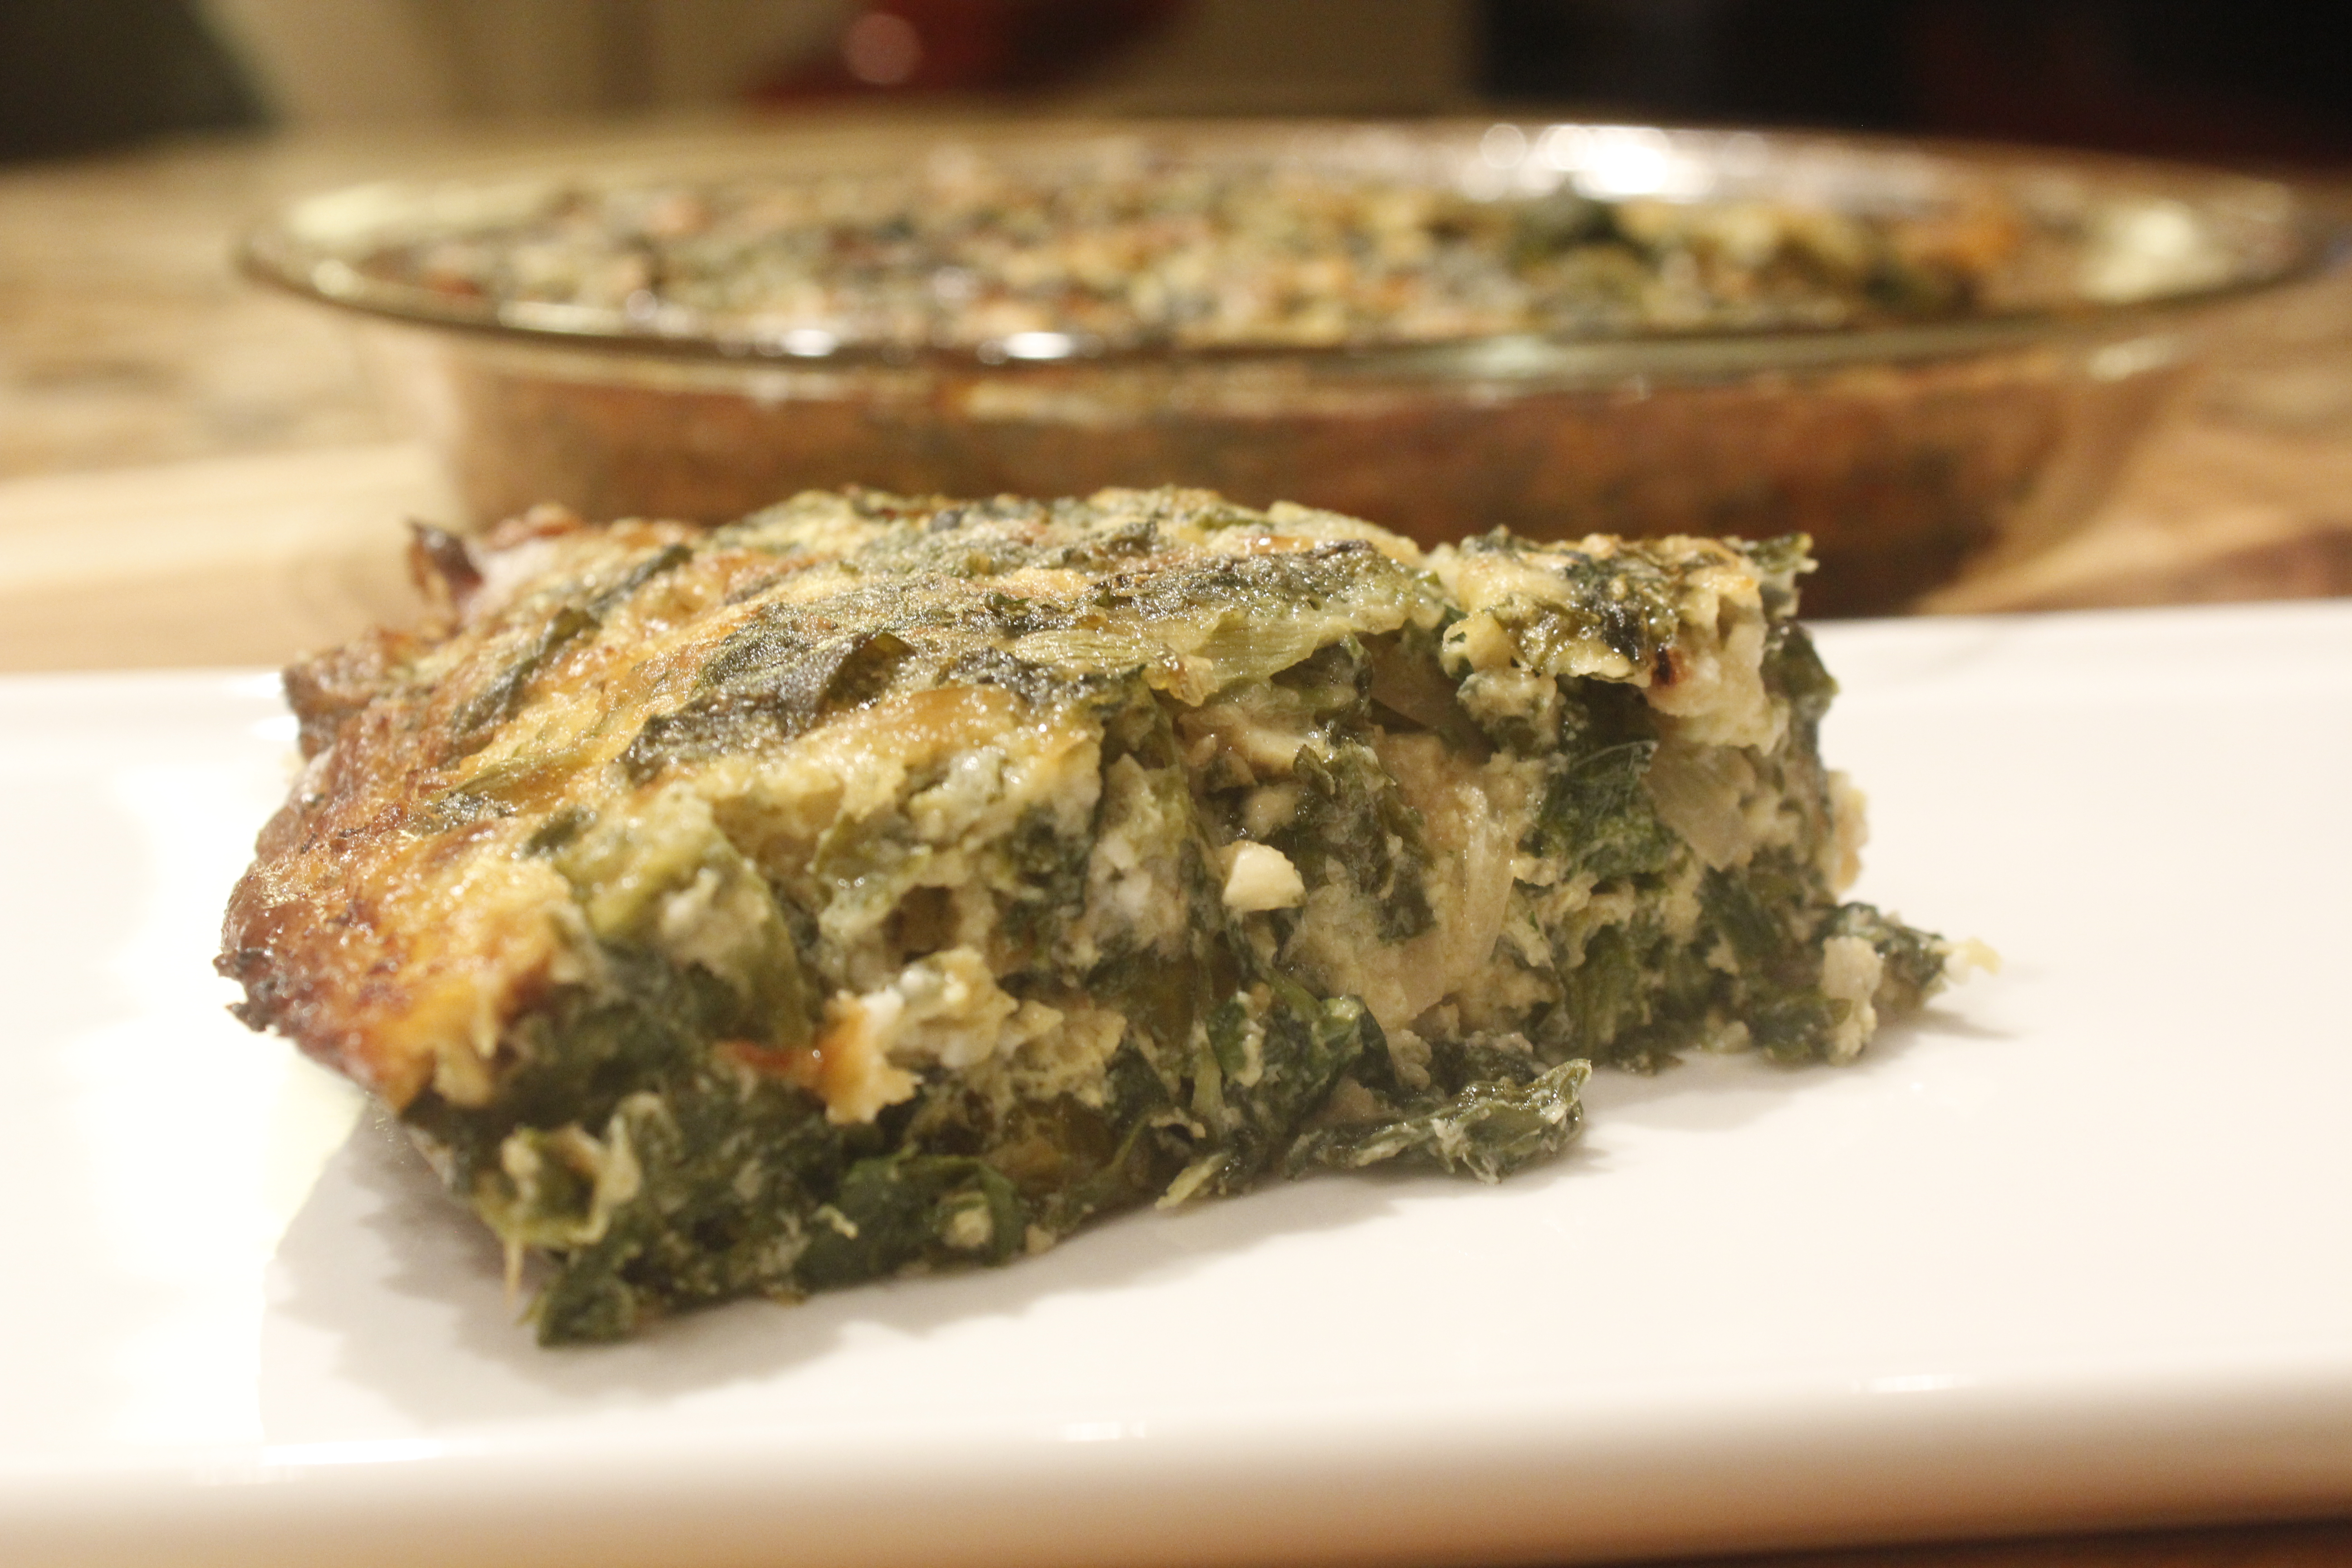
Spring Greens Pie (kuku)
One of the first signs of spring is the abundance of greens that show up in farmers’ markets and grocery stores. In today’s video on how to make a greens kukuI take advantage of the copious selections and demonstrate a kuku, a Persian frittata which resembles a crustless quiche. While it’s baking, the pie forms a bottom crust as well as a top crust. The result is a luscious spring greens pie. The selection of greens that I show in the video includes chicory, which adds a delightful bitterness, as well as arugula and watercress, which lend a bright peppery bite. The more exotic additions include two that are just starting to show up at the farmer’s market: Claytonia, a delicate mild-flavored green; and sorrel, a delightfully lemony herb with a bright tart liveliness. Since this kuku lends itself to countless variations, you can also make it with the other spring greens you find or fancy, and mix in some fresh leafy herbs: Basil, chives, cilantro, dill, and chervil are all excellent choices. Begin by wilting the greens. A drop of water in the skillet gets the leaves off to a good start. Start with the amount that will fit in the pan, and add more as the greens start to cook. Add handfuls to the skillet, and use a tongs to turn the uncooked leaves to the bottom of the skillet. The heat of the pan and the cooked greens help cook the raw ones quickly. You’ll want about 4 cups of cooked greens and mixed herbs total; to end up with this amount, begin with 2 to 3 large bunches—about 3 to 4 pounds before cooking. No need to wilt the fresh herbs; simply chop them. When the greens are sufficiently wilted, transfer to a strainer set over a bowl, and allow to cool and drain. Press the greens against the strainer to remove any excess liquid. Transfer to a cutting board, chop into bite-sized pieces, and set aside. While the greens are cooling, warm enough olive oil to coat the bottom of a medium skillet over medium heat, and add a heaping cup or so sliced onions. Sauté for a few minutes, toss in a few cloves minced garlic, and cook until the onions are caramelized. Dollop a tablespoon butter (or coconut or olive oil) onto a 9-inch pie plate, and set the plate in a 350 degree oven to warm in the pan for a few minutes as you mix the ingredients for your pie together. In a medium bowl, whisk together 4 eggs. Stir in 1/2 teaspoon salt, a tablespoon flour and 1/2 teaspoon baking powder. Since you’re using such a small amount of flour, even unbleached white flour is okay—so long as you don’t have gluten intolerance. The flour in combination with the baking powder lends an extra lift to the pie, making it especially airy. Stir in the chopped greens, the fresh herbs, the onions and the garlic. In the kuku in the video, I add also a cup of crumbled sheep’s milk feta as well as a cup of sheep’s milk gruyere. That touch of flavorful cheese imparts rich flavor, but the kuku is already certainly scrumptious when made without the dairy. Stir in a generous dusting of black pepper, and mix everything well. You’ll notice that the eggs bind the greens together inconspicuously and disappear into the batter. By this time, the butter will have melted and the pan will be hot. Remove it from the oven and swirl the butter around so that it coats the pan evenly. Pat the filling into the pie plate, and return to the oven to bake for about 20 minutes, until you see some browning around the sides. Dollop another tablespoon of fat on top—the heat of the oven will spread it—and return the kuku to the oven for another 20 minutes or so, until it develops a gorgeous deep golden top crust. This pie stays fresh for days in the refrigerator. You can just cut yourself a piece and heat up what you want to eat, or reheat the whole pan. The one-dish meal can be served any time of the day for a light meal or snack. In Judeo/Christian traditions, eggs are a symbol of rebirth and are featured on spring religious holidays. It feels appropriate to celebrate this long-awaited season with this delicious greens and eggs medley.
Share on Facebook and Twitter | Eggs, Greens, Main course, techniques | No comments
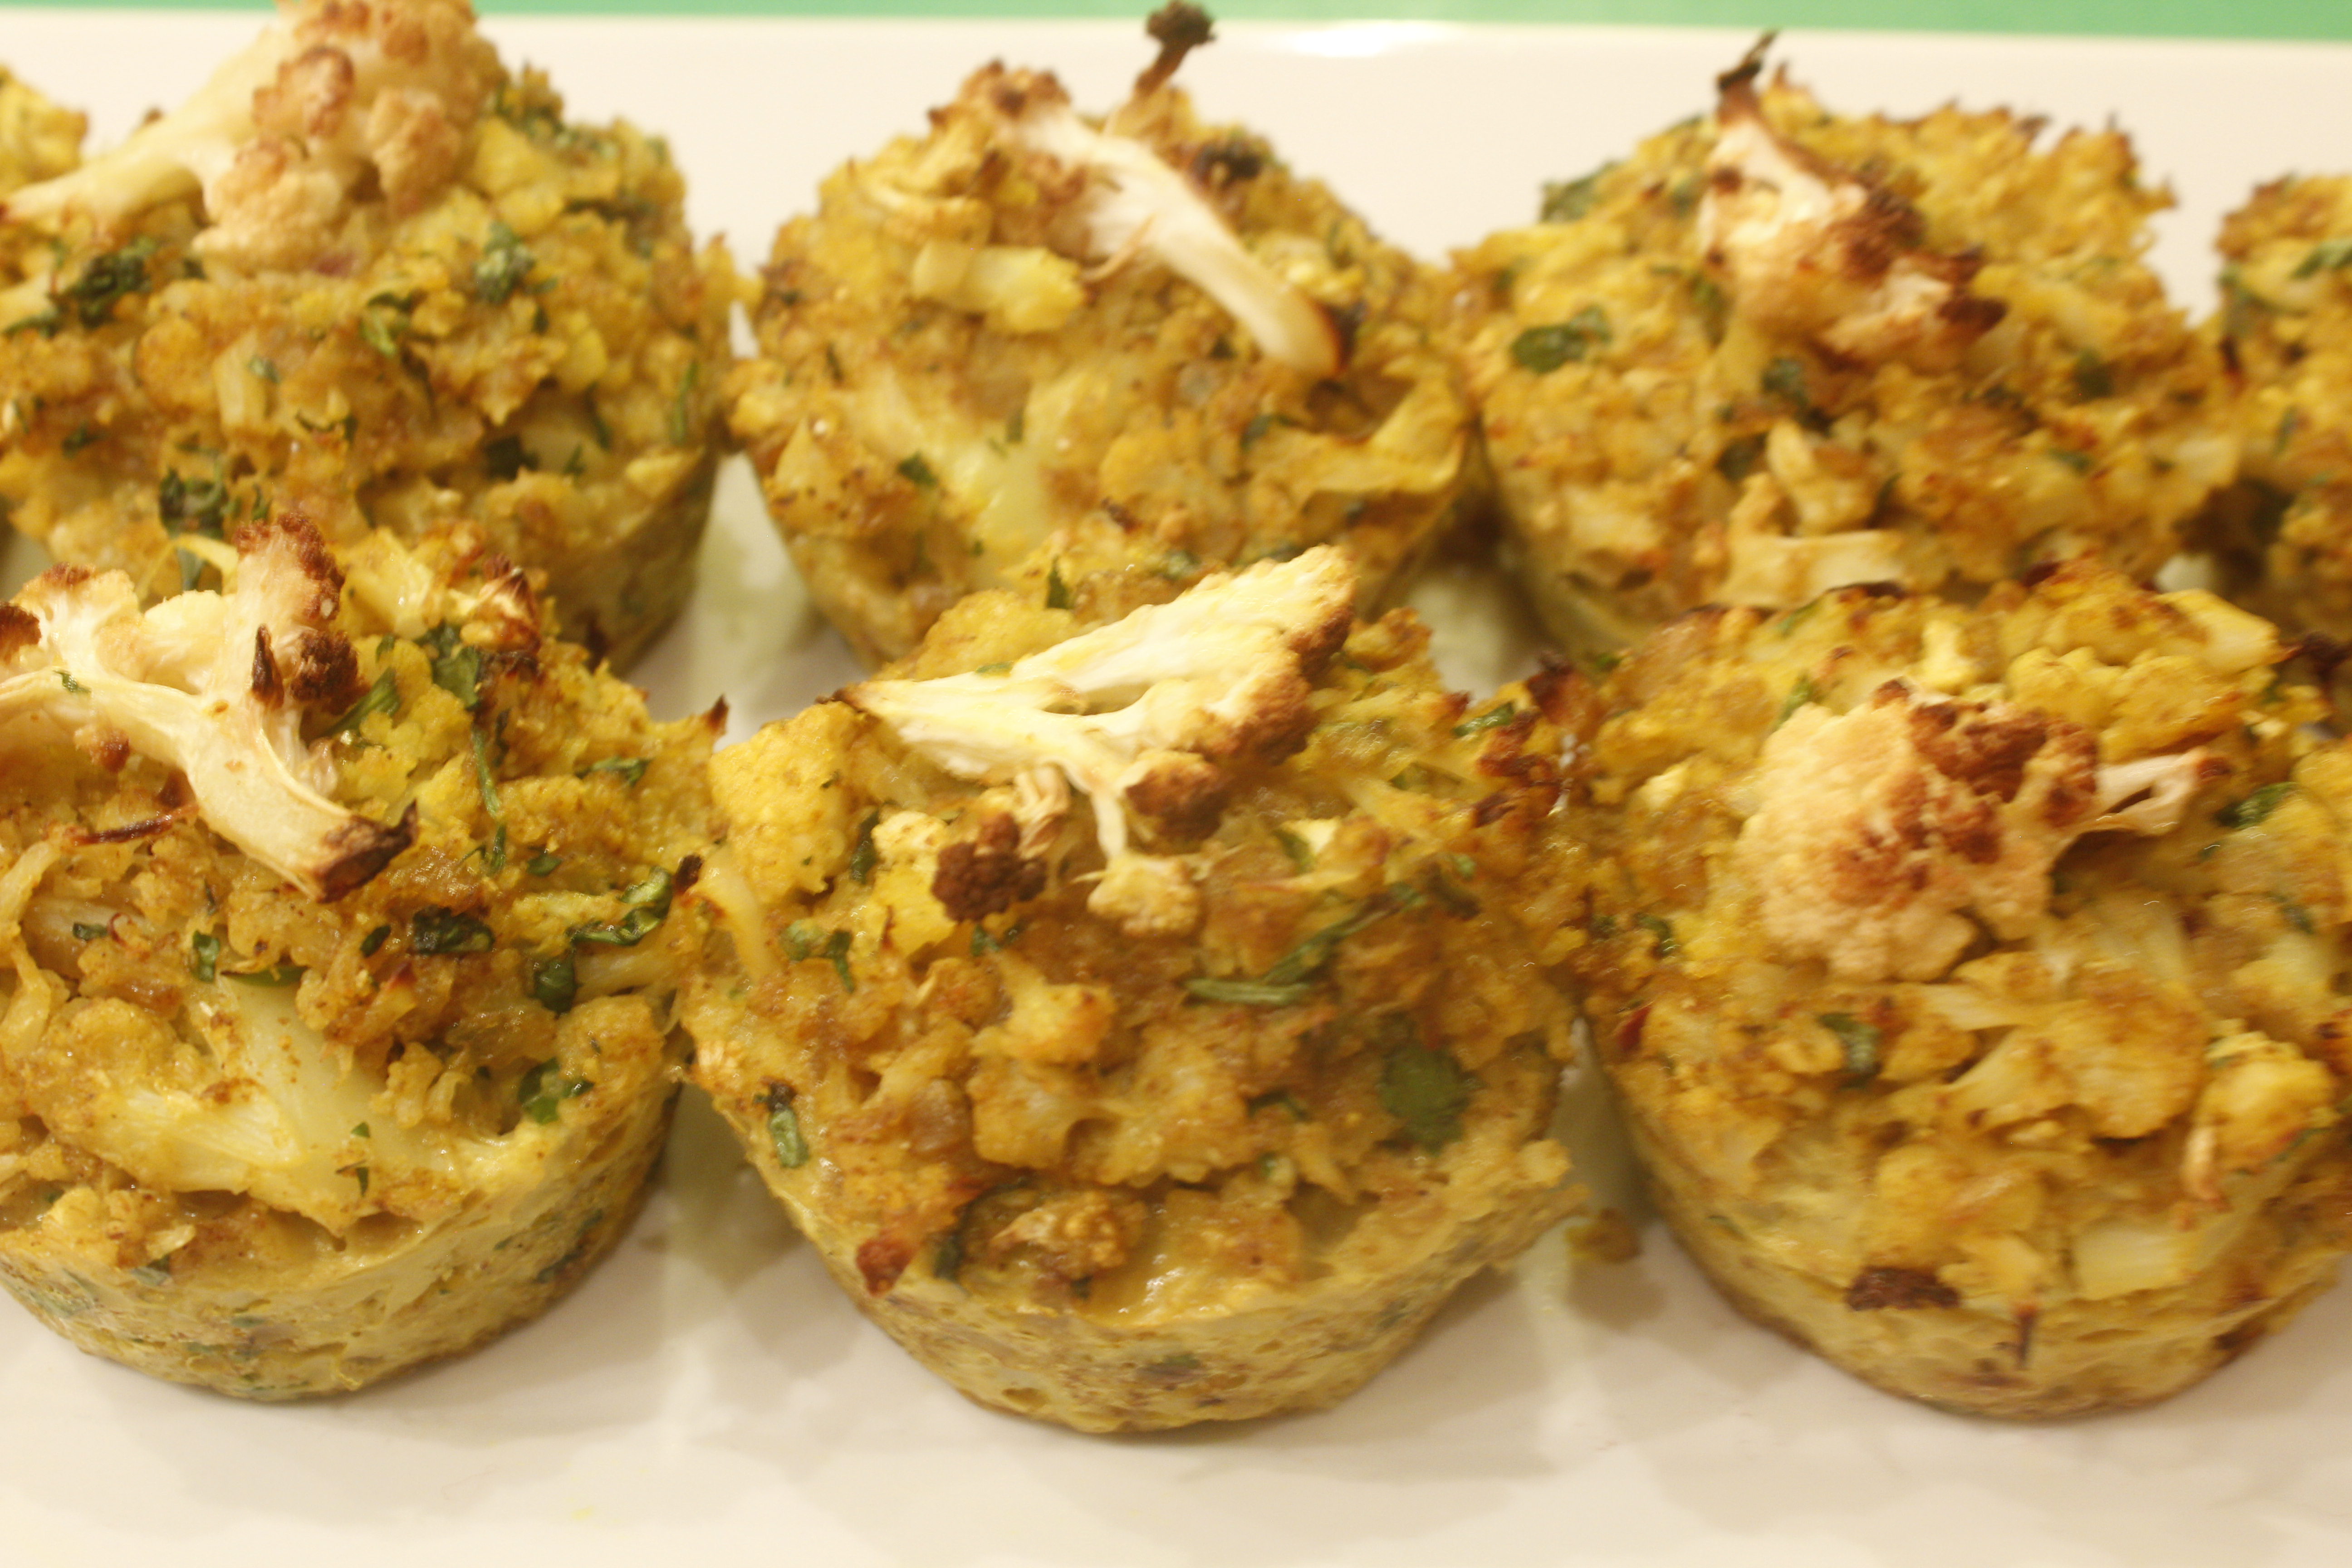
Cauliflower-crusted Pizzas
In today’s video on cauliflower-crusted pizzas, I show how to make a couple of variations on a cauliflower-crusted pizza. These delicious pizzas are light and low carb, yet as satisfying as traditional pizza. And, of course, you can vary the toppings to suit your preferences. To begin, cut a medium-sized cauliflower into florets. Pulverize the florets in a food processor until they take on a crumbly, couscous-like texture. Because you’re grinding the cauliflower raw, you’re not in danger of turning it into a puree. Next, have ready a pot with about an inch of boiling water. Add the cauliflower and blanch for 2 to 3 minutes, then pour into a fine mesh strainer to drain. Let the cauliflower cool for a few minutes. Now—and this part is very important—wrap the cauliflower granules in a tea towel and squeeze to extract as much liquid as you can. You may be surprised at just how much water comes out. Finally, turn the squeezed mass into a bowl; by this time, the cauliflower actually has the texture of a dough, and you’re ready to flavor it. The crust needs a binder; for this purpose, a couple of lightly beaten eggs are essential. To flavor the dough, stir in a teaspoon of dried thyme, and half that amount of garlic powder and salt. Next, decide whether or not you wish your crust to contain a little cheese or to be dairy free. Stir in 1/2 cup of grated Parmesan for a delectable cheese version. For an equally scrumptious dairy-free variation, replace the cheese with 1/4 cup almond flour and 1 tablespoon nutritional yeast. The nutritional yeast lends a cheese-like flavor to the combination. In the video, I demonstrate a half version of both the crust with cheese and the crust with almond flour. The next step is to press out the crust on a parchment-covered baking sheet. A medium sized head of cauliflower should press into about two 8-inch pizzas. Press the crust down to about 1/8-inch thickness, leaving a raised border around the edges. You do need to bake it until golden before topping. 30 to 40 minutes in a 400˚F oven will color the crust just right. You can assemble the crusts and bake them up to a day in advance; refrigerate them until you’re ready to add the toppings and bake the pizzas. I present two toppings in the video, but these are merely two ideas out of many. The first one is a classic combination of toppings: the requisite tomato pizza sauce and dollops of fresh mozzarella. Refrain from overdoing the mozzarella since it tends to spread a lot when it melts. This one also has crumbled cooked ground beef and wilted spinach. The surface is then dusted with grated Parmesan. The second is a goat cheese topping. Four ounces of soft cheese are mashed in a bowl with a clove of minced garlic, a dollop of Dijon mustard, a couple tablespoons fresh thyme, a tablespoon olive oil, and a sprinkle of salt. Using an offset spatula makes spreading the cheese over the crust smooth and effortless. Both pizzas return to the oven for 10 minutes, until the toppings have colored, the cheese is melted, and everything is heated through.
Transforming cauliflower into a crust is exciting, and the pizzas taste amazing. This is a deliciously fun way to have your pizza and your vegetables too! Share on Facebook and Twitter | Gluten Free, Main course, techniques, Uncategorized, Vegetables | No comments
Preserved Lemons
In today’s video on preserved lemons, I show how to make a condiment that can brighten so many of your dishes: preserved lemons. Best of all, they have real lasting power, remaining fresh in the refrigerator for an impressive six months or so. After I put up the lemons, I go on to demonstrate one way to use them in a delicious and easy dish of steamed black cod. Sure, you can purchase a jar of ready-made preserved lemons, but nothing beats the fresh taste of ones that you cure yourself. You’ll see from the video that they take only about five minutes of prep. Use organic lemons for the best results; after all, you’ll be eating the softened rinds. The only other ingredient you need is salt (I recommend a good sea salt). You also need a very clean jar. You can sterilize your jar by immersing it in boiling water for a couple of minutes. Make sure to scrub and dry the lemons as well. How many you use depends on the size of your jar. In the demo, I use a pint-sized jar, but you can certainly use a larger one. To prep the lemons, cut a sliver (a dime-sized piece) off of each end. Set the lemon on one end and, starting from the top, make a vertical cut three quarters of the way into the fruit, so that the two halves remain attached at the base: do not cut it in half. Turn the lemon upside down and make a second vertical cut at a 90-degree angle to the first, again three quarters of the way into the fruit. Fill each cut with as much salt as it will hold. Place a little salt at the bottom of the jar, then squish and push the lemons in. You’ll notice that lemon juice will rise to the top. Since the preserved lemons need to be covered in lemon juice, you may need to squeeze a couple of extra lemons to fill the jar. Screw on the lid, and turn the jar upside down a few times over the first few days to make sure that lemon juice is always covering the lemons. After four to six weeks, your lemons will be pliable and ready to use. It’s the softened rind that is the most exciting part to add to your dishes. Its flavor is tangy, slightly fermented, with that unmistakable brightness that is associated with Moroccan and Middle Eastern cooking. I also demo two servings of steamed black cod. To make the steaming liquid, add 1/2 cup chicken stock, 1/4 cup white wine, 2 cloves sliced garlic, a splash olive oil, and a couple tablespoons thinly sliced preserved lemon to a 4-quart pot. The steaming liquid will become the sauce, to which the preserved lemon in the steaming liquid will lend a bright citrus finish. Sprinkle each piece of cod with a dusting of salt, paprika, cayenne, and ground cumin. When the steaming liquid is bubbling and steam starts wafting through the steam holes, lay the fish on top of the basket and cover. It will be steamed to perfection in a mere 7 minutes. Plate the fish, pouring the steaming liquid (which now reduced, has become the sauce) over the fish. A sprinkling of chopped green olives, parsley, and cilantro complements the other flavors. Marvel at how this zesty and convenient condiment can add such lively flavor to a dish that is simple enough for weeknight dining, yet celebratory enough for entertaining company. Share on Facebook and Twitter | condiments, Fish, Main course, Pantry Items | No comments
The Myriad Uses of Cooked Squash
‘Tis the season to be savoring sweet squash. In today’s video, I demonstrate the richness and versatility of cooked squash. With a tub of the bright orange flesh on hand, you can quickly whip up any number of autumnal dishes. You can keep cooked squash refrigerated for up to a week, or you can freeze it. Although there are all kinds of wonderful varieties of squash and pumpkin available in farmers’ markets, in the video I demonstrate with butternut: the smooth, flavorful workhorse of the squash world. To prep the squash—use a 21/2 to 3-pound butternut—slice it down the middle, and place it face down on a parchment-covered baking sheet. Roast it at 325˚F to 375˚F (the temperature depends on what’s already in the oven cooking; anything within this range is good!) until very tender, about 45 minutes. Rest the squash until cool enough to handle, then scoop out and discard the seeds, which is much easier to do after the squash is cooked. Scoop the flesh into a bowl and reserve. The first recipe in the video is for a speedy soup. To begin, in a medium pot sauté 1/2 cup of chopped leeks along with a tablespoon or so of minced ginger in a couple tablespoons fat (coconut oil, ghee, or extra virgin olive oil are all good) over medium heat. When the vegetables are softened, add a quart of stock—this is a great place to use a homemade chicken or vegetable broth—a can unsweetened coconut milk, the reserved squash flesh, and 1 1/2 teaspoons salt. Let the soup cook a few minutes to marry the flavors, then finish with a flick of cayenne and a splash of lime juice. Voilà: a delicious soup! Serve up a hearty bowl dusted with chopped cilantro. The second recipe is for a light yet substantial pumpkin pie-spiced breakfast pancake. The recipe makes 2 servings, but you can easily scale it up. Start with a couple tablespoons coconut flour in a bowl. Add a mix of spices: 1/2 teaspoon cinnamon powder; and a pinch of nutmeg, ginger, and allspice. Add a large pinch baking soda and salt, and whisk together the dry ingredients. Then add 1/2 cup squash flesh, a couple of lightly beaten eggs, a tablespoon maple syrup, 1/2 teaspoon vanilla extract, and 1 tablespoons melted fat (butter or coconut oil). Mix vigorously, and you’re ready to make pancakes. To cook, film a griddle or nonstick skillet with oil until your hand held 1 inch above the pan is uncomfortable. This batter is a little more delicate than a typical flour-based batter; for best results, opt for medium-size pancakes, and above all, resist crowding the pan. Drop the batter—a tablespoon at a time—into the sizzling skillet until you have four swelling hotcakes. Leave the pancakes alone until browned and toasty on the bottom, then flip and cook a few more minutes on the second side. Transfer to a plate, and repeat with the remaining batter. Serve these airy cakes with butter, fruit, or a drizzle more sweet syrup. These are just two of the many wonderful dishes that you can make with squash flesh. Yes, it takes 45 minutes or so to cook the squash, but the oven does the work, so it’s not your time. With cooked squash on hand, you can whip any number of delectables together in minutes. Share on Facebook and Twitter | Breakfast, Kitchen Tips, Soups, Uncategorized, Vegetables | No comments
Savory Breakfast Muffins
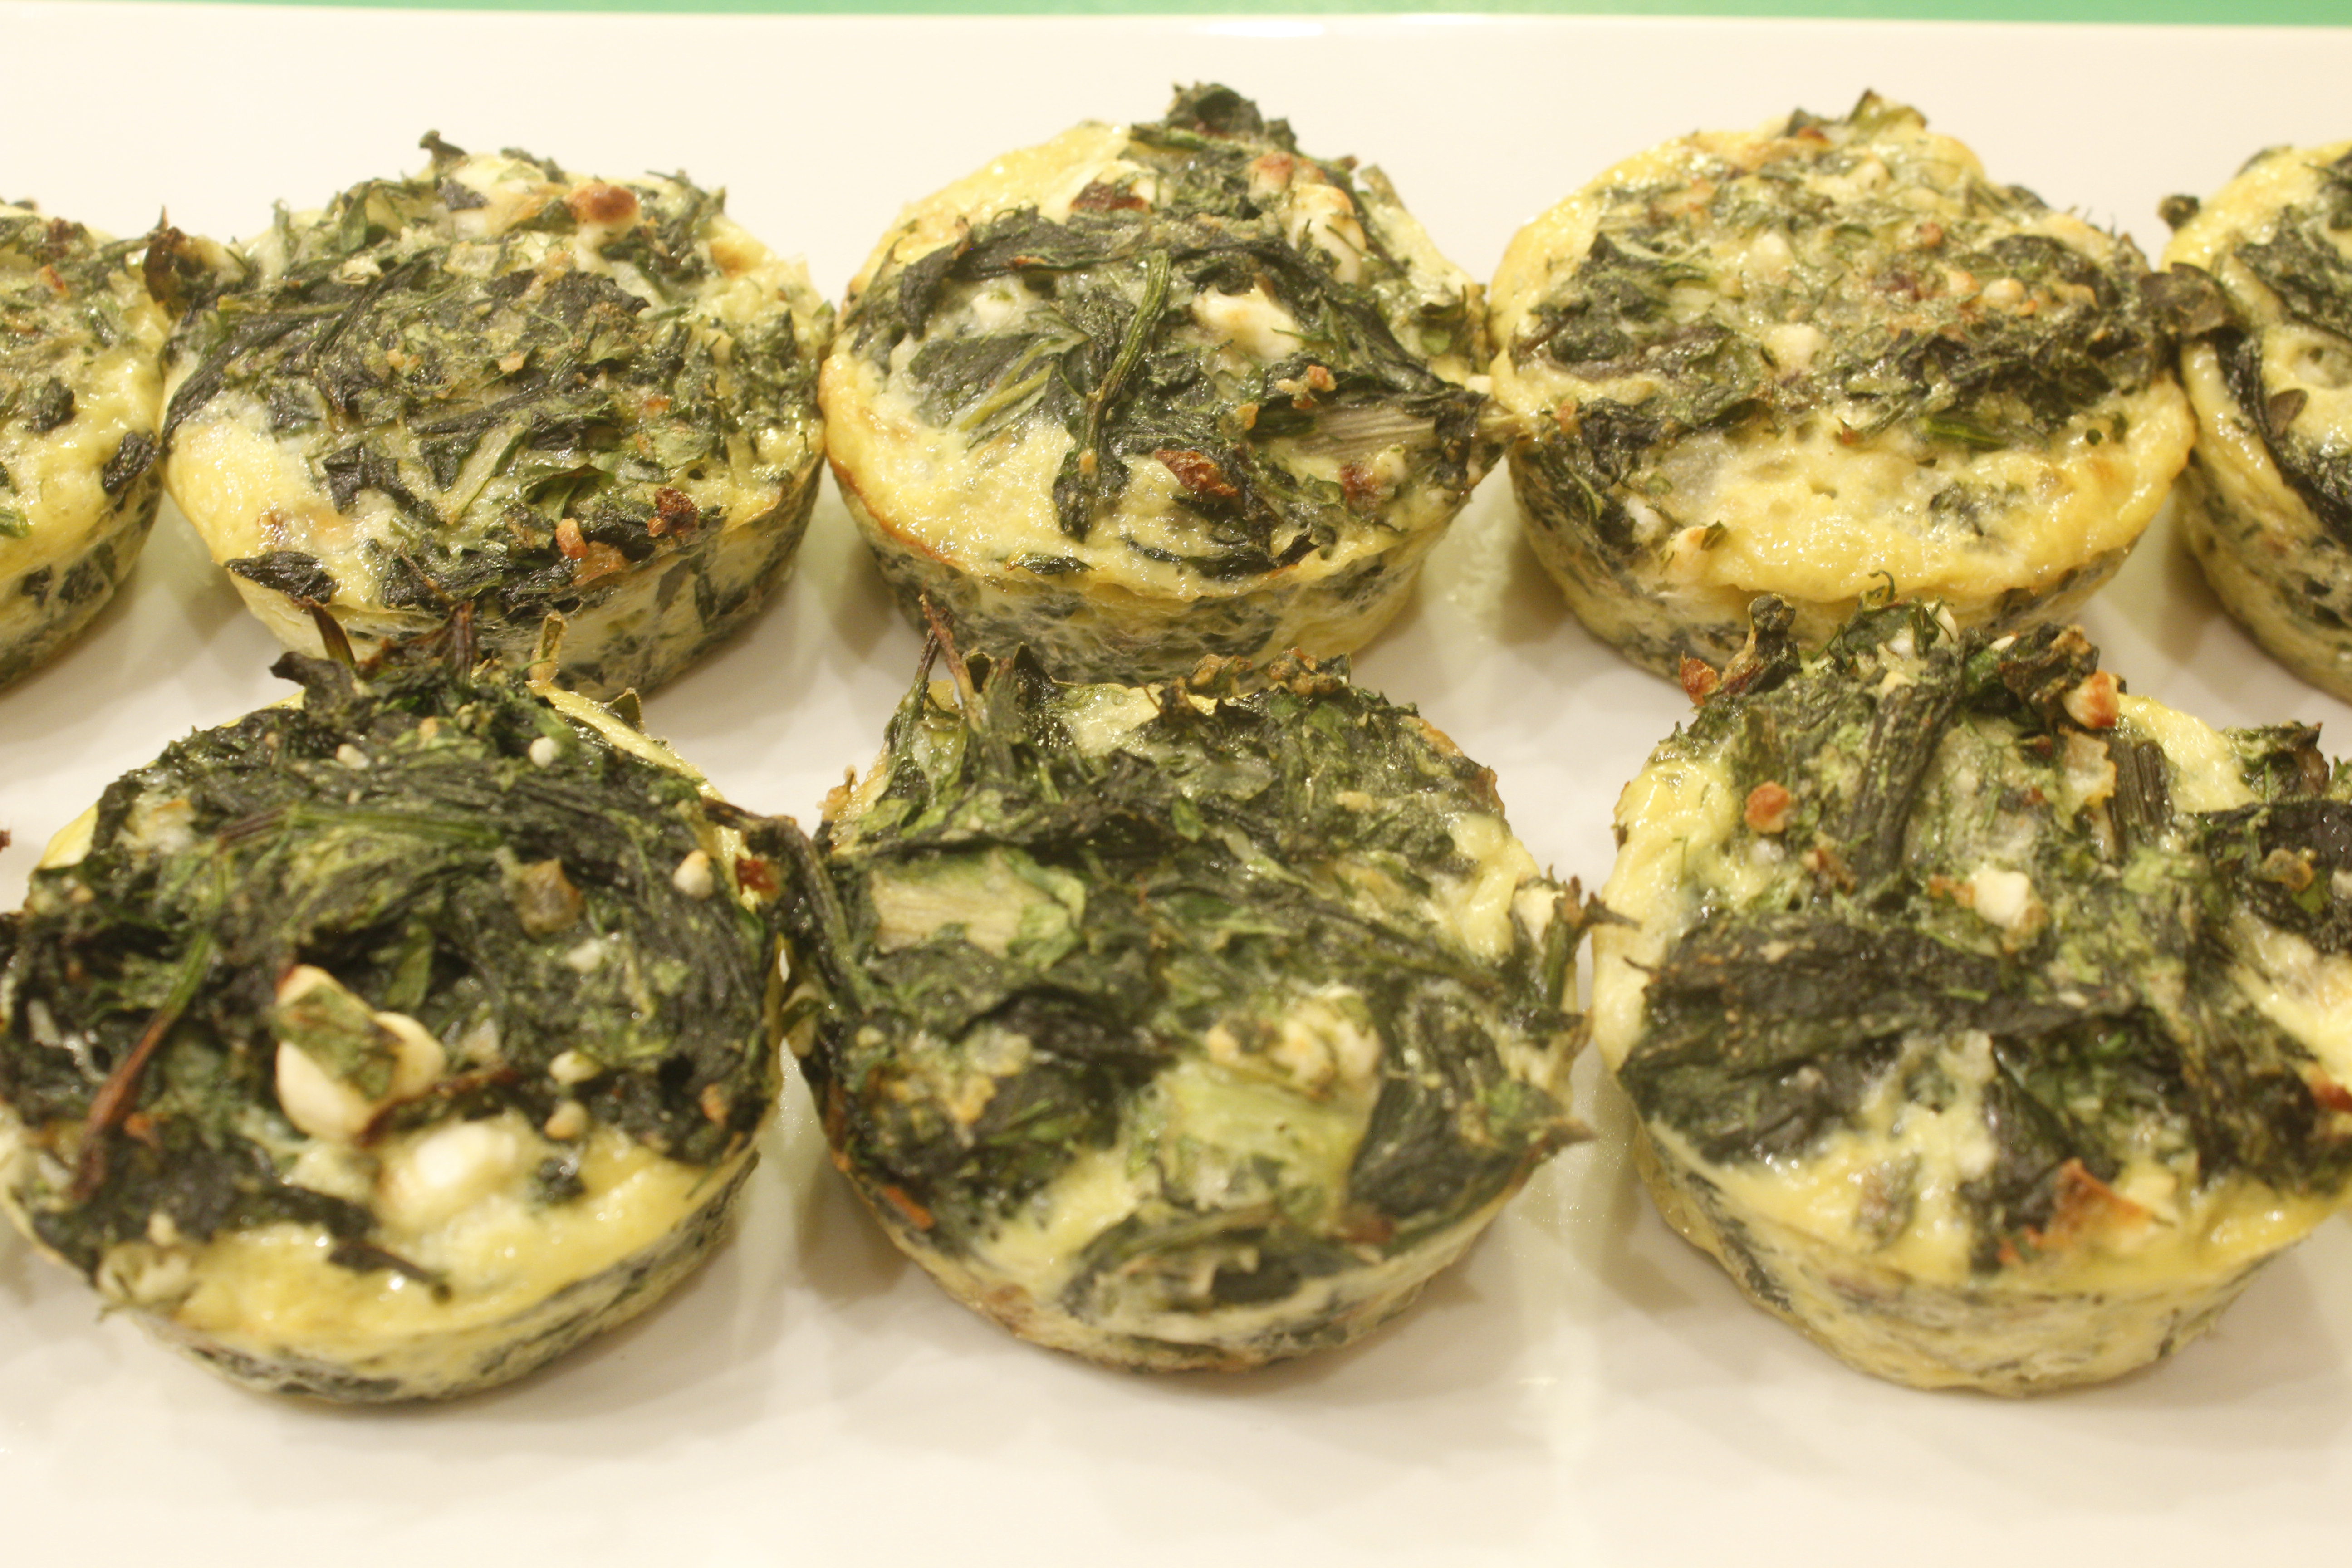
In today’s Breakfast Muffins Video I demonstrate how to make two different kinds of vegetable muffins. These light, yet substantial morsels make a quick breakfast-on-the-go, or a convenient elegant vegetarian side dish. They last for four or five days in the refrigerator, ready to be reheated and enjoyed at a moment’s notice. The first muffin shown in the video is the curried cauliflower version. Here’s how to make it: Start with a large head of cauliflower, which yields 10 to 12 cups when cut into florets. Take 1/3 of those florets, slice them, toss them in a light coating of olive oil with a bit of salt, and spread them on a parchment-lined baking sheet. Roast in a preheated 400˚ oven for about 20 minutes. Meanwhile, steam the remainder of the cauliflower until very tender, then transfer to a large bowl and mash until crumbly. While the cauliflower is roasting and steaming, sauté 2 cups red onions in 2 tablespoons ghee until softened. Stir in 1 teaspoon cumin, 1/2 teaspoon turmeric, and 2 cloves minced garlic. At this point, you’ll notice that the kitchen smells so enticing! Transfer this aromatic melange to the bowl of steamed, mashed cauliflower. Stir in 3/4 teaspoon salt, a dash of cayenne and black pepper, 1/2 teaspoon baking powder, and a couple tablespoons cornmeal. Bind the vegetables with 3 lightly beaten eggs. By this time, the roasted cauliflower is ready to remove from the oven. Set aside 12 slices to crown the top of the muffins. Chop the remainder of the roasted cauliflower into small pieces, and stir into the bowl with a few tablespoons chopped cilantro. The verdant-flecked yellow cauliflower mix positively glows! Spoon evenly into muffin tins—the silicon kind is my favorite for ease—and bake about 20 minutes until golden and firm. The second muffin presented in the video is a take-off on a spanakopita. To begin, sauté a cup of chopped onions in 2 tablespoons olive oil over medium heat until nice and softened, about 7 minutes. Let the onions cook while you wilt the greens. In the video version, I use a combination of Swiss chard and spinach—a pound and a half all together, but use whatever greens looks freshest and most appealing. Wilt the washed greens in a skillet, using tongs to push the wilted leaves to the bottom. There’s no need to add extra liquid, and there’s no need to use a large skillet; the big pile of greens you started with shrinks down to an astonishingly small amount! You do need to drain the cooking liquid from the wet greens well, however. To do this, let them cool in a strainer and grab handfuls from which to wring out the excess liquid. Alternatively, transfer the greens to a ricer— I show this technique in the video—and squeeze out the liquid while the greens are piping hot. What a great use for a tool designed for potatoes! Next, dump the greens out on a cutting board, chop them into small pieces, and transfer them to a bowl. Now stir in the rest of the ingredients. Fresh herbs enliven the mixture; the combination of 1/4 cup dill and 1/2 cup parsley lends delightful freshness. Sprinkle in some nutmeg and mix in a 1 1/2 cups feta cheese. Goat’s or sheep’s milk are especially delicious and digestible. Add 2 tablespoons of your favorite flour—I use rice in the video—and 1/2 teaspoon baking powder and salt. 4 eggs bind the mixture together; now the batter is ready to be divided into muffin holders and baked to perfection, about 20 minutes at 375˚. Improvise with other vegetables as well, and enjoy these savory treats! Share on Facebook and Twitter | Breakfast | No comments
Fermented Tomato Salsa
In today’s Video, I show how to ferment a tomato salsa; making this lactoferment is a great way to celebrate and enjoy the luscious tomatoes available right now. You may not be familiar fermented salsa: but it is truly delicious and you get to reap the benefits of your labor quickly. Just 24 to 48 hours of fermentation results in a salsa with a delightfully tangy flavor and a long-lasting life. Salt (or a mixture of salt and whey) initiates the fermentation process; it inhibits the growth of undesirable bacteria long enough for the lactobacilli, the delightful microorganisms already present on plants, to be converted to lactic acid. The nutrient content of the salsa is increased; the versatile condiment turns into a healthy probiotic. I demonstrate the two versions in the video: one made with salt, and one made with a combination of salt and whey. Fresh whey is simple to make. You place a cheesecloth-lined strainer over a bowl and add a couple cups of yogurt to the strainer. Within an hour or so, you’ll have a decent amount of liquid in the bowl: that’s the whey. You can transfer it to a covered jar and keep it stored in the refrigerator for up to six months. The longer you strain the yogurt, the more whey you’ll have and the thicker your yogurt will be. You can strain it for a few hours to produce thick, rich Greek-style yogurt, or you can strain it overnight to produce even thicker yogurt cheese. Whey gives the ferment a jumpstart, and the version with whey is usually ready within one day. Alternatively, you can leave out the whey and just add salt; you’ll still get wonderful results within two days. For either version, start with 1 ½ pounds tomatoes, diced small. The salsa is especially vibrant with a mélange of colorful tomatoes; a quart’s worth of quartered cherry tomatoes is also suitable. Next add a couple cloves minced garlic and 1 or 2 minced jalapeños to the tomatoes. It’s also good to add something oniony: I favor a mix of red onion and scallions, about ½ cup of each. No salsa is complete without a mound of chopped cilantro, so add at least ½ cup. To this, add ¼ cup lime juice. Now it’s up to you either to add 2 teaspoons salt or 1 teaspoon salt plus ¼ cup whey. Either way, make sure to push the salsa down into your 1-quart jar so that the liquid covers the top. Cover tightly; then leave the jar out on the counter for 1 to 2 days. Within a day or two, you’ll notice bubbles in the liquid. At that point, transfer your ferment to the refrigerator, where it will stay fresh for a few months. Use it to add zest to your meals and snacks.
Share on Facebook and Twitter | Fruit, Gluten Free, Kitchen Tips, Side Dishes | No comments
|