|
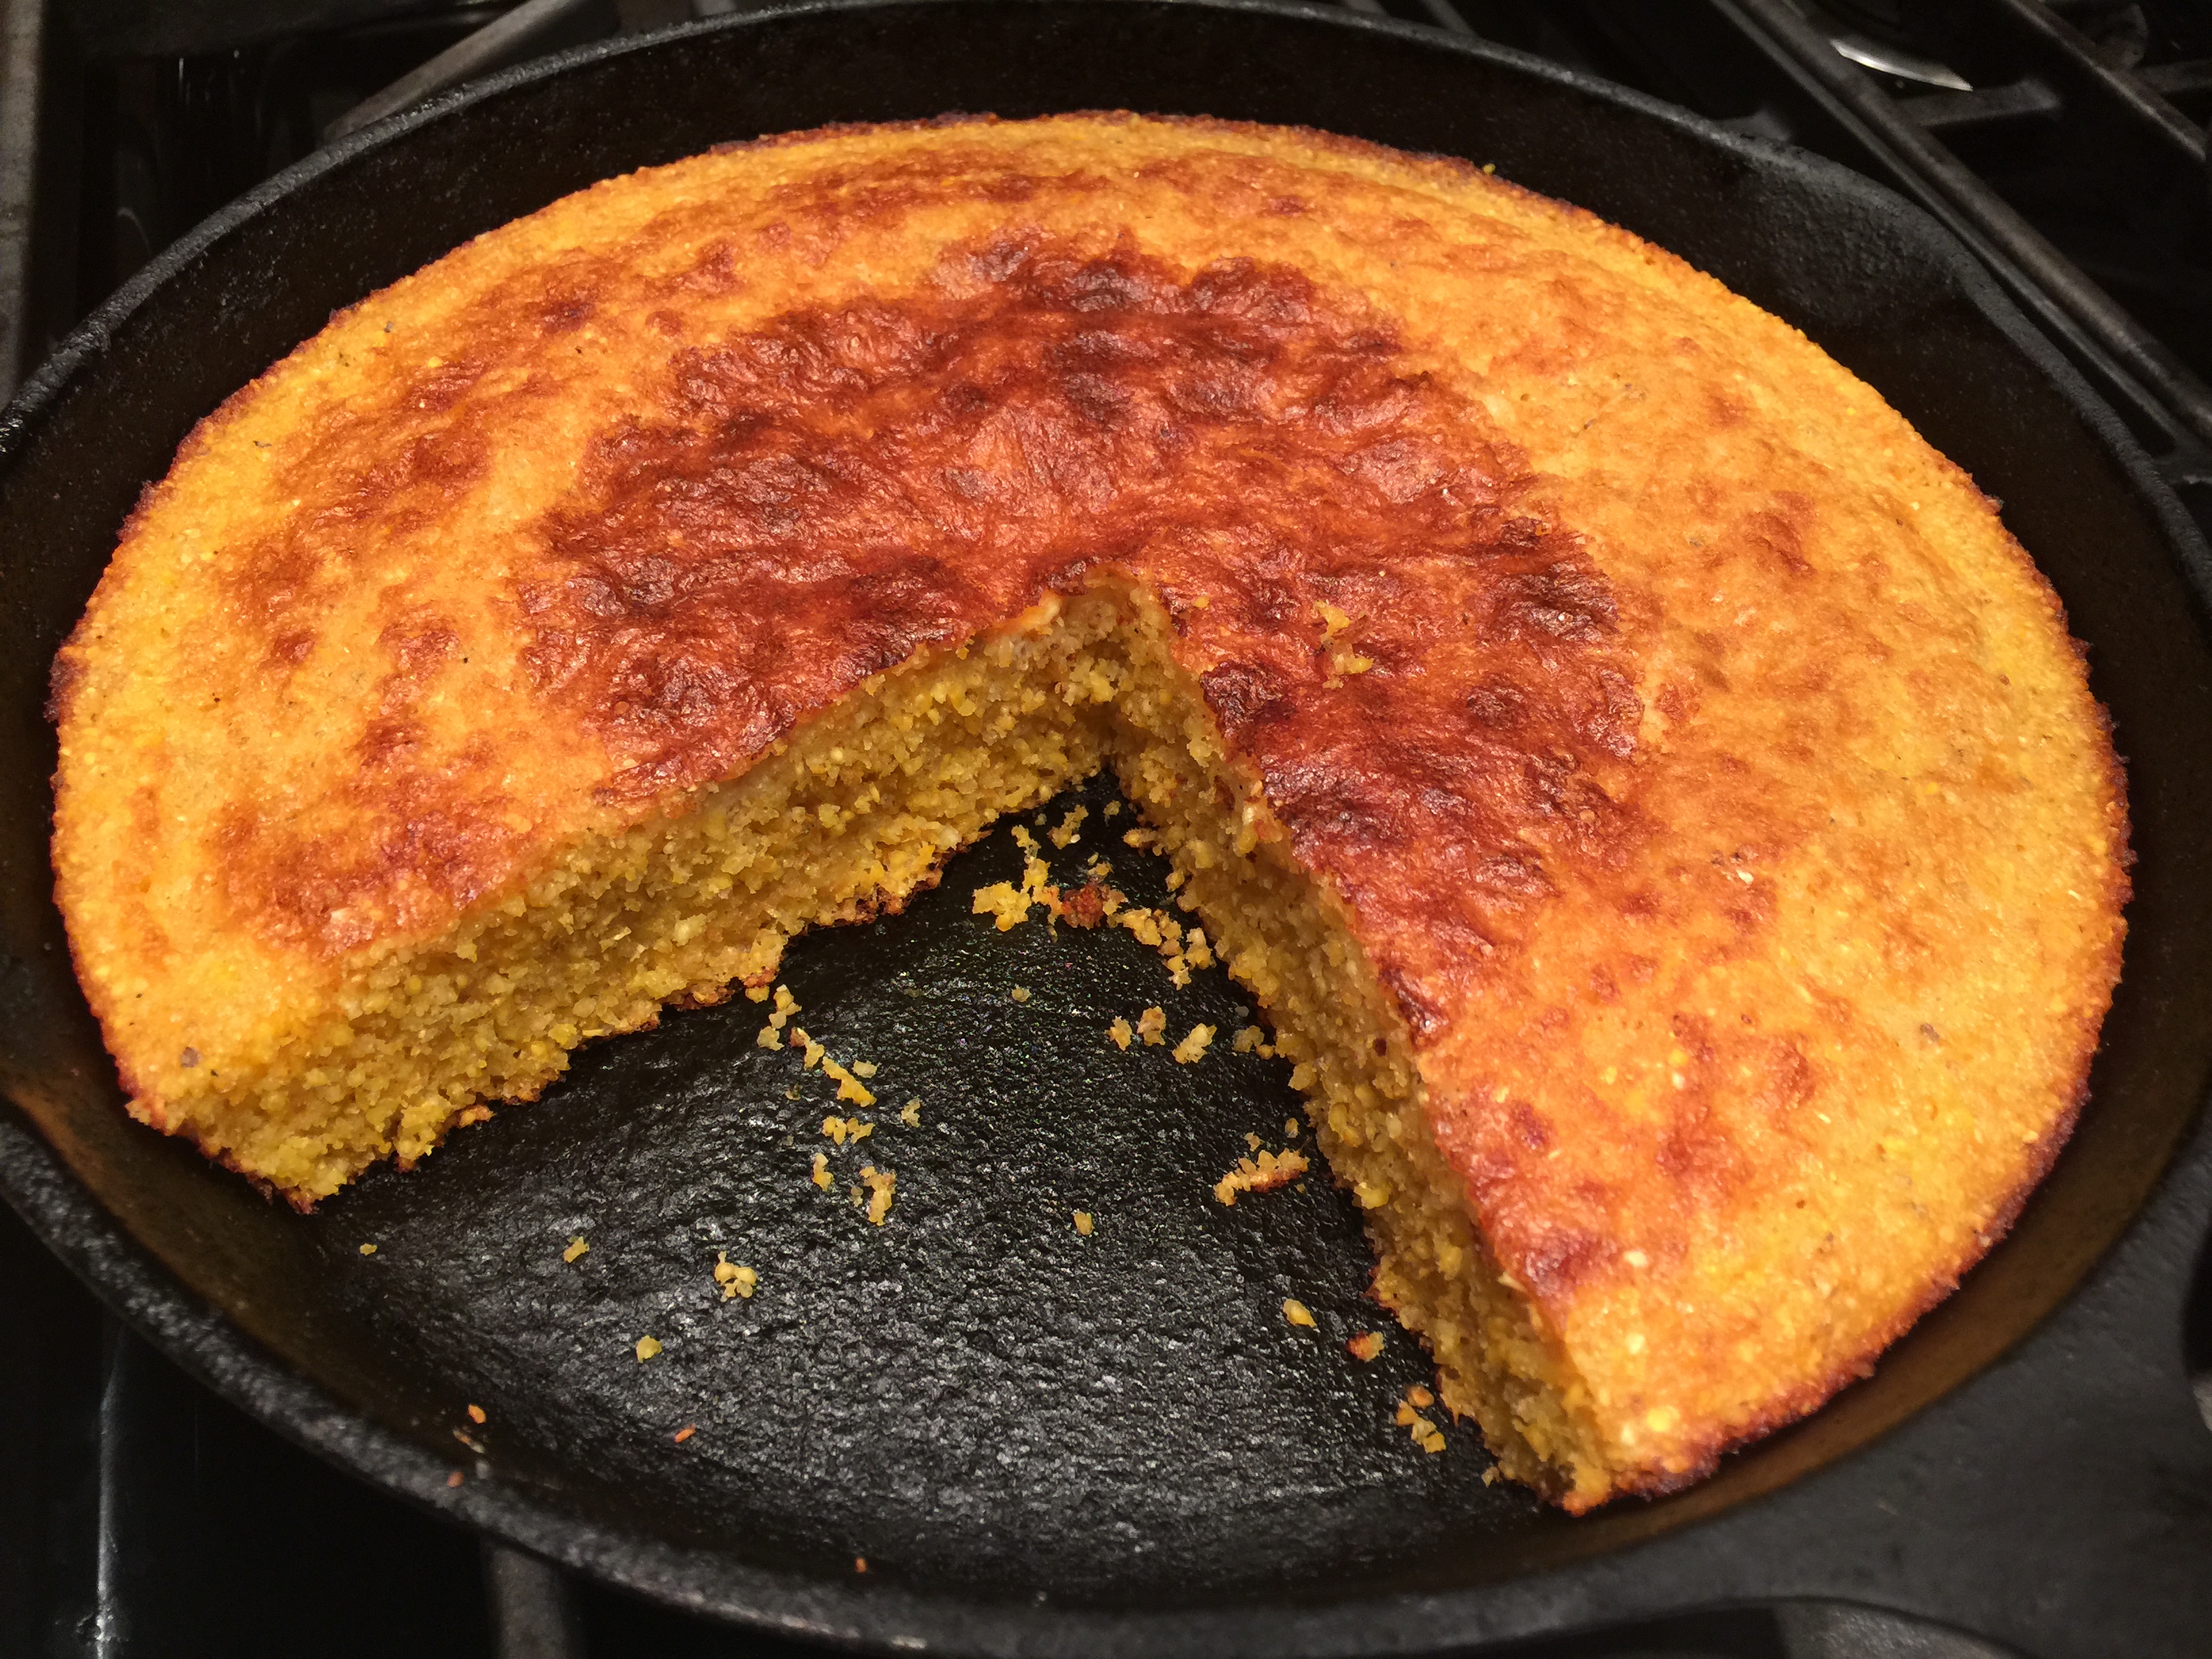
Southern Skillet Cornbread My new favorite cornbread is adapted from a recipe in Cook’s Country magazine. It’s made from pure cornmeal, so it’s got super corny flavor. It’s easy to make, baked at high temperature in a cast iron skillet.
In today’s video, I show how to make a delicious Southern-style skillet cornbread. This cornbread is made completely from cornmeal, without any other flours, making it gluten free. Besides the cornmeal, there are just a few other ingredients besides good quality fat (a mix of coconut oil and butter). The dish is baked in a 10-inch cast iron skillet, and it’s quick to make. The technique for making this dish is also a little unusual. You can make this cornbread using either course cornmeal or fine-grind cornmeal, which yields very different results; or you can mix the two. In the video, I demo a mix; I use 1 1/4 cups of a course-grade polenta and 1 1/4 cups of a fine grind masa harina, cornmeal that’s been treated with edible lime (calcium carbonate) to make it digestible and impart that distinctive tortilla flavor. The two together give the cornbread a delightful texture. To begin, spread both types of cornmeal on a parchment-covered sheet tray and toast in a very hot (450 degree) oven for 10 minutes. Once the cornmeal has been in the oven for 5 minutes, add 1/4 cup aroma-free coconut oil to a 10-inch cast iron skillet, and place that in the oven on a higher shelf to melt and heat. Remove the sheet tray and the cast iron skillet at the same time after 5 more minutes. The cornmeal will have started to brown around the edges. To the melted coconut oil, add 1/4 cup butter and return that to the oven to melt. Transfer the cornmeal to a bowl (it’s still warm) and whisk in 2 cups buttermilk. Add the remaining ingredients: 2 beaten eggs, 1 teaspoon each baking powder and baking soda, and 3/4 teaspoon salt. Notice how the mix starts to bubble as soon as the leaveners are stirred in. By this time, the butter will have melted. Remove the cast iron skillet from the oven, and pour off all of the fat into the bowl with the other ingredients, leaving just enough fat in the skillet to coat the bottom. Thoroughly mix the coconut oil-butter mixture into the other ingredients; then pour the entire contents of the bowl into the prepared skillet. Give the skillet a shake to even and smooth out the batter. Return it to the oven and bake it from 12 -16 minutes, rotating the pan after about 7 minutes. Remove the pan when the top is crusty and golden. Let the cornbread cool for a few minutes before slicing. Make sure to wrap a towel or kitchen mitt around the handle so that you don’t inadvertently touch the skillet. Even though you know you just took it out of the oven, you’re liable to forget out of sheer habit. Cut the cornbread into wedges. Marvel at the lightness of the texture, the corniness of the flavor, and the ease of assembly. Enjoy this luscious treat with your favorite cold weather dish or holiday meal.
Share on Facebook and Twitter | Gluten Free, Grains, Kitchen Tips, Recipes, Side Dishes | No comments
Fermented Tomato Salsa
In today’s Video, I show how to ferment a tomato salsa; making this lactoferment is a great way to celebrate and enjoy the luscious tomatoes available right now. You may not be familiar fermented salsa: but it is truly delicious and you get to reap the benefits of your labor quickly. Just 24 to 48 hours of fermentation results in a salsa with a delightfully tangy flavor and a long-lasting life. Salt (or a mixture of salt and whey) initiates the fermentation process; it inhibits the growth of undesirable bacteria long enough for the lactobacilli, the delightful microorganisms already present on plants, to be converted to lactic acid. The nutrient content of the salsa is increased; the versatile condiment turns into a healthy probiotic. I demonstrate the two versions in the video: one made with salt, and one made with a combination of salt and whey. Fresh whey is simple to make. You place a cheesecloth-lined strainer over a bowl and add a couple cups of yogurt to the strainer. Within an hour or so, you’ll have a decent amount of liquid in the bowl: that’s the whey. You can transfer it to a covered jar and keep it stored in the refrigerator for up to six months. The longer you strain the yogurt, the more whey you’ll have and the thicker your yogurt will be. You can strain it for a few hours to produce thick, rich Greek-style yogurt, or you can strain it overnight to produce even thicker yogurt cheese. Whey gives the ferment a jumpstart, and the version with whey is usually ready within one day. Alternatively, you can leave out the whey and just add salt; you’ll still get wonderful results within two days. For either version, start with 1 ½ pounds tomatoes, diced small. The salsa is especially vibrant with a mélange of colorful tomatoes; a quart’s worth of quartered cherry tomatoes is also suitable. Next add a couple cloves minced garlic and 1 or 2 minced jalapeños to the tomatoes. It’s also good to add something oniony: I favor a mix of red onion and scallions, about ½ cup of each. No salsa is complete without a mound of chopped cilantro, so add at least ½ cup. To this, add ¼ cup lime juice. Now it’s up to you either to add 2 teaspoons salt or 1 teaspoon salt plus ¼ cup whey. Either way, make sure to push the salsa down into your 1-quart jar so that the liquid covers the top. Cover tightly; then leave the jar out on the counter for 1 to 2 days. Within a day or two, you’ll notice bubbles in the liquid. At that point, transfer your ferment to the refrigerator, where it will stay fresh for a few months. Use it to add zest to your meals and snacks.
Share on Facebook and Twitter | Fruit, Gluten Free, Kitchen Tips, Side Dishes | No comments
Lacto-fermented Sauerkraut In today’s video, I show how to make traditional sauerkraut, one of the popular dishes that Eastern Europeans of yore would put up in storage in November so that they could have vegetables that would last the entire winter. Cabbage is especially amenable to culturing. While giving it a delightfully tangy flavor, the time-honored fermentation process turns pedestrian cabbage into an uber-raw natural probiotic. Lactobacilli are delightful microorganisms already present on the leaves and roots of plants. With a little encouragement, they convert the starches and sugars in the leaves to lactic acid—thus the term “lacto-fermentation.” Salt initiates the process; it inhibits the growth of undesirable bacteria long enough for the lactic acid to start forming. Enzymes break down the cabbage into more digestible molecules, and the lactic acid preserves it by eliminating unwanted organisms and increases the level of Vitamin C. In the end, “predigested” fermented cabbage also promotes the growth of healthy flora throughout the intestines, making harder-to-digest foods much more digestible. Here’s how you make the ferment: In the video I demonstrate the process with a medium head of green cabbage, shredded finely; you should have 10 cups or so. Stir in a couple of grated carrots and four teaspoons salt, a good amount for a quart-worth of packed kraut. Use a good quality unadulterated salt that has trace minerals, such as celtic sea salt. To help get the juices of the cabbage flowing, massage the cabbage with your hands; get in there and squeeze hard. You can also pound the cabbage with a mallet to help it start to sweat. Once you have a lot of shiny, juicy cabbage in the bowl, stir in the other ingredients. In today’s ferment, I’m adding a tablespoon each of minced ginger and garlic, about ½ cup of sliced scallions, and a minced red Fresno chile, a mild and colorful chile which I found at my local grocer. 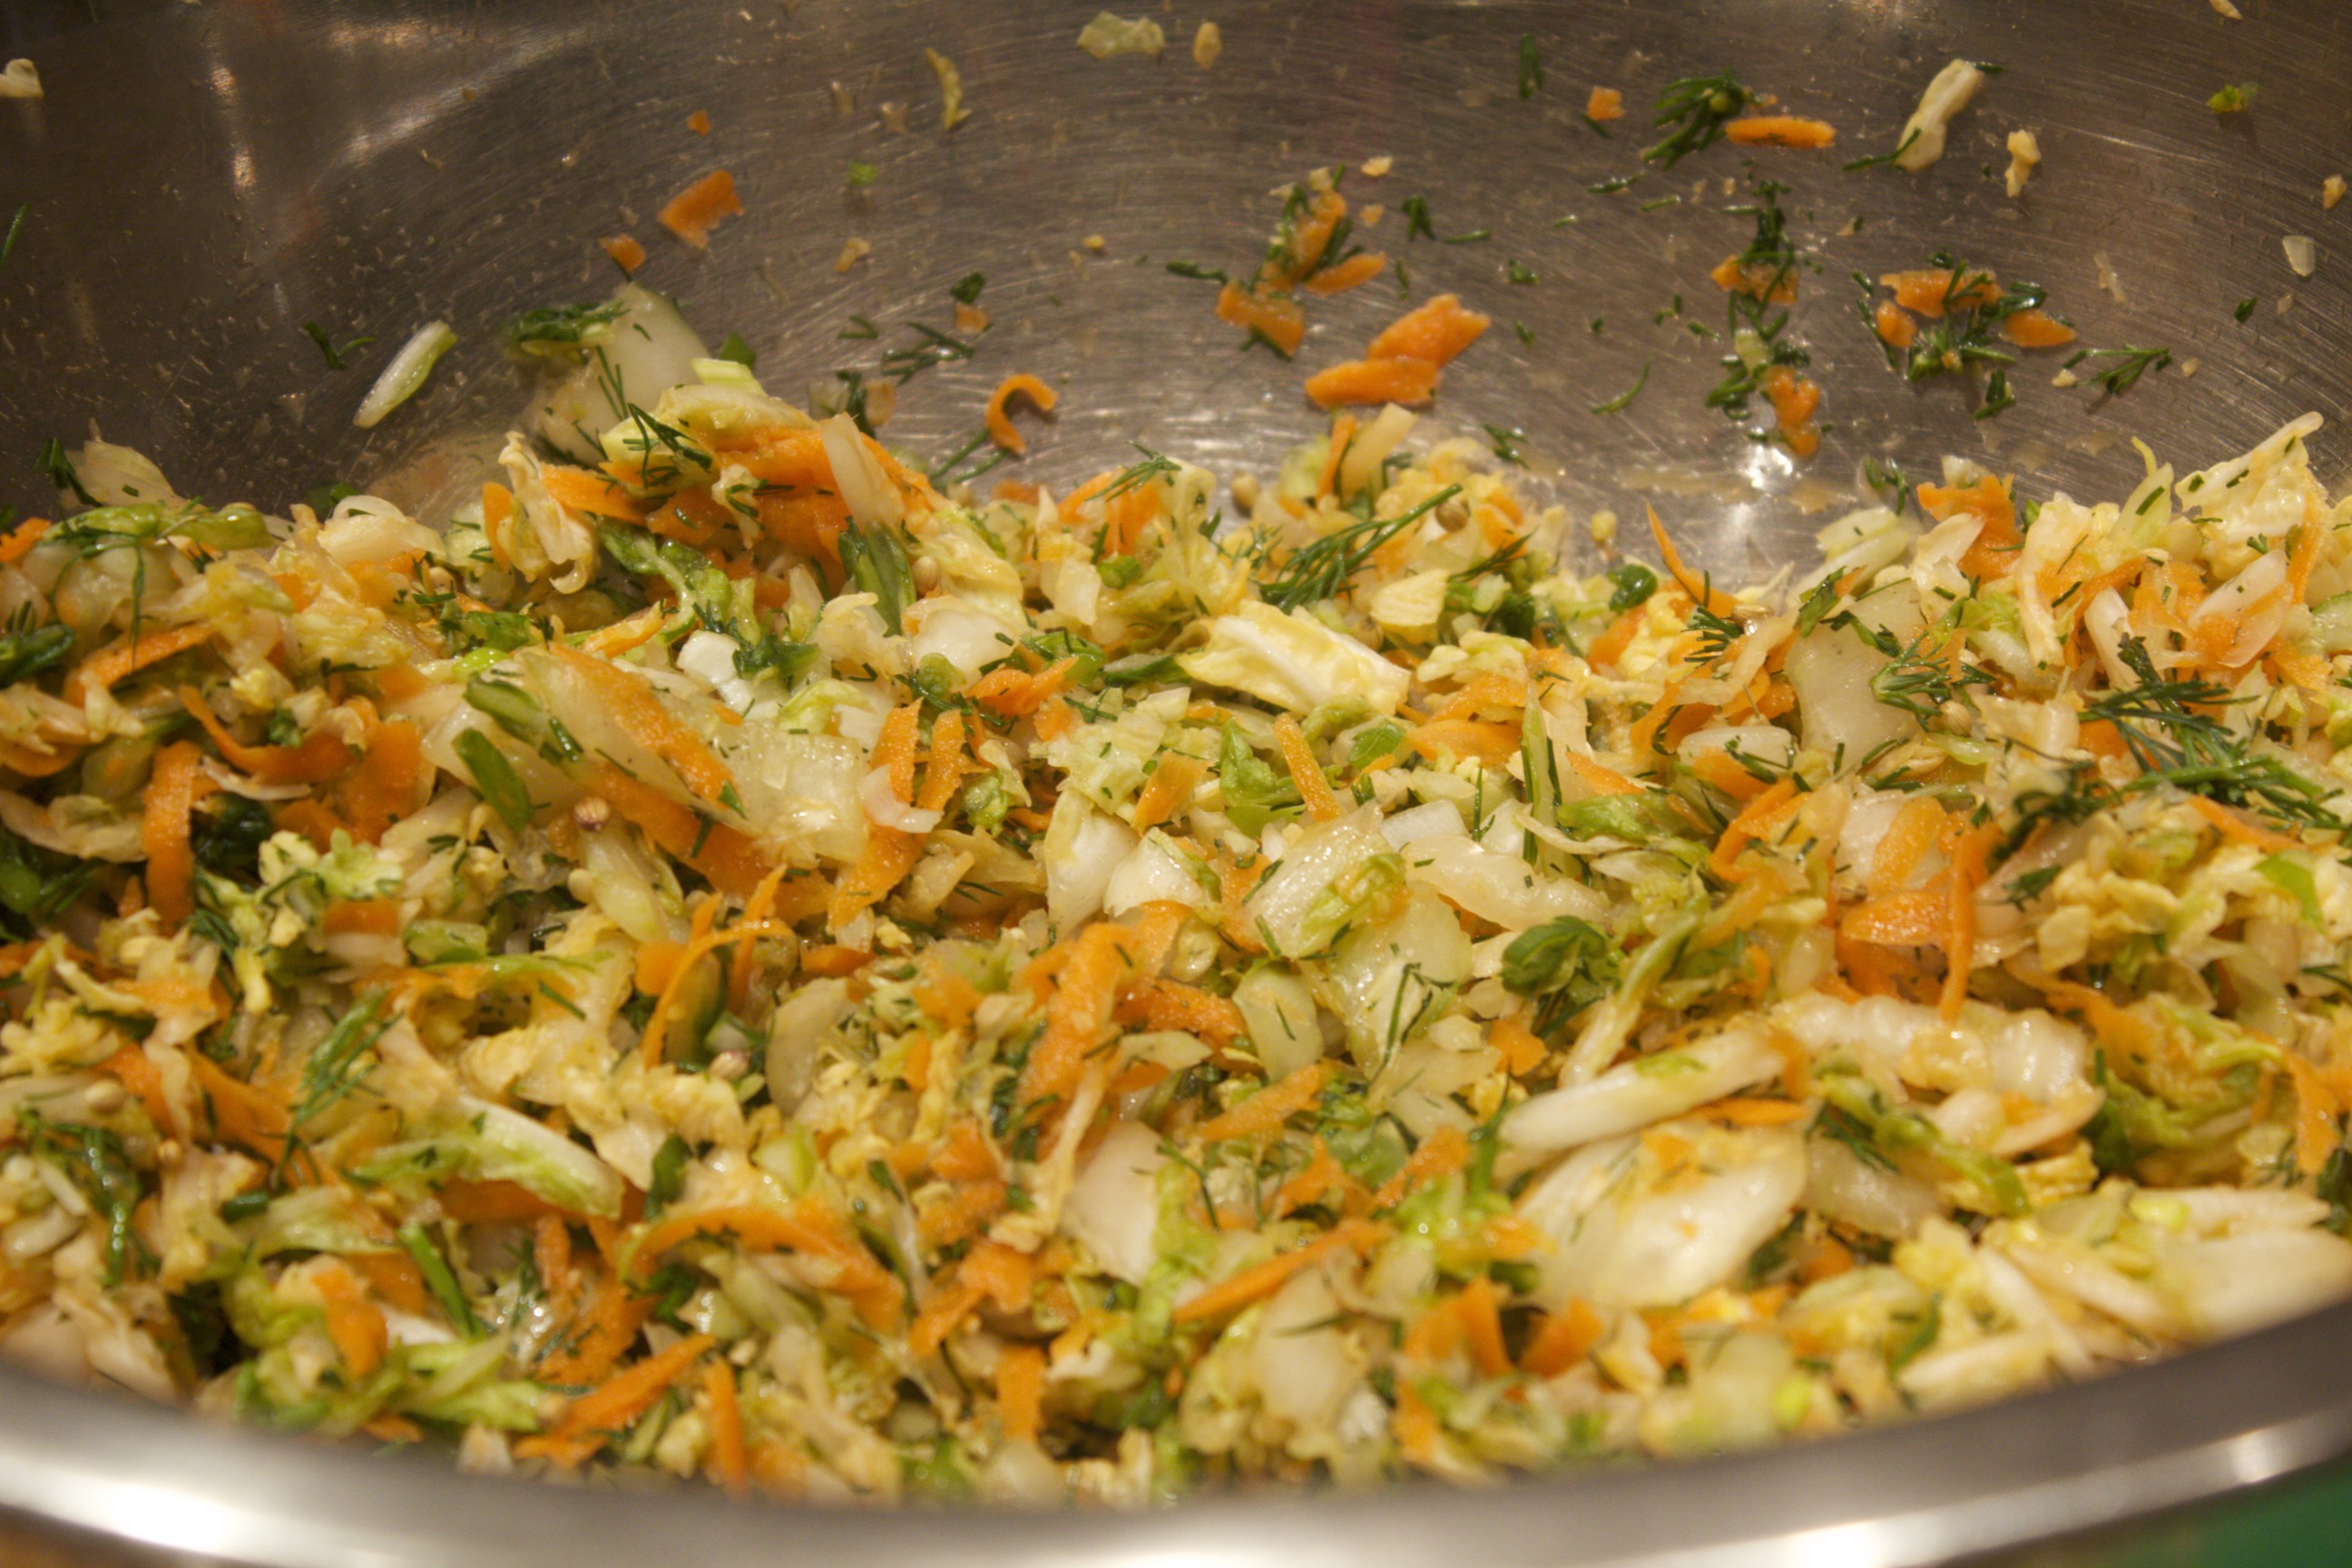 Cabbage ready to be packed Stuff the juicy cabbage mixture into a 1-quart bell jar, pressing down hard to make sure that there is liquid floating on the top. (A blunt, wooden, club-like instrument called a “kraut-pounder” is quite helpful for pressing down the vegetables, but you can improvise with the end of a tapered rolling pin as well.) Leave a generous inch of space at the top of the jar in order to prevent liquid from seeping out the top.  Make sure liquid covers the top. Let your imagination reign when it comes to the variations. Start with a base of cabbage: red, savoy, or nappa. I’ve enjoyed all kinds of additions to my slaws, including onions, fennel, daikon, fennel seed, juniper berries, chiles, and curry powder (but not all in the same slaw, of course). Leave the ferment on the counter from 5 days to 2 weeks. The insert in the middle of the bell jar will be hard to press down once the ferment really gets going. Start tasting the kraut at that point. It will be fermented after a few days; but, if you can leave the kraut for the full two weeks, you’ll have a tangier, richer flavor. (After tasting, make sure that the cabbage is still tightly packed and submerged in liquid.) Transfer the jar to the refrigerator; it’s ready to eat, but it tastes even better if you can leave it for a couple of additional weeks before opening. Once opened, the ferment stays fresh at least a good three months refrigerated. Start off slow; a few tablespoons added to your meals is sufficient. You can increase the amount as your belly becomes acclimated to all the additional probiotic flora. It’s deeply satisfying to make your own krauts; you might just find yourself with a refrigerator full of delicious varieties.
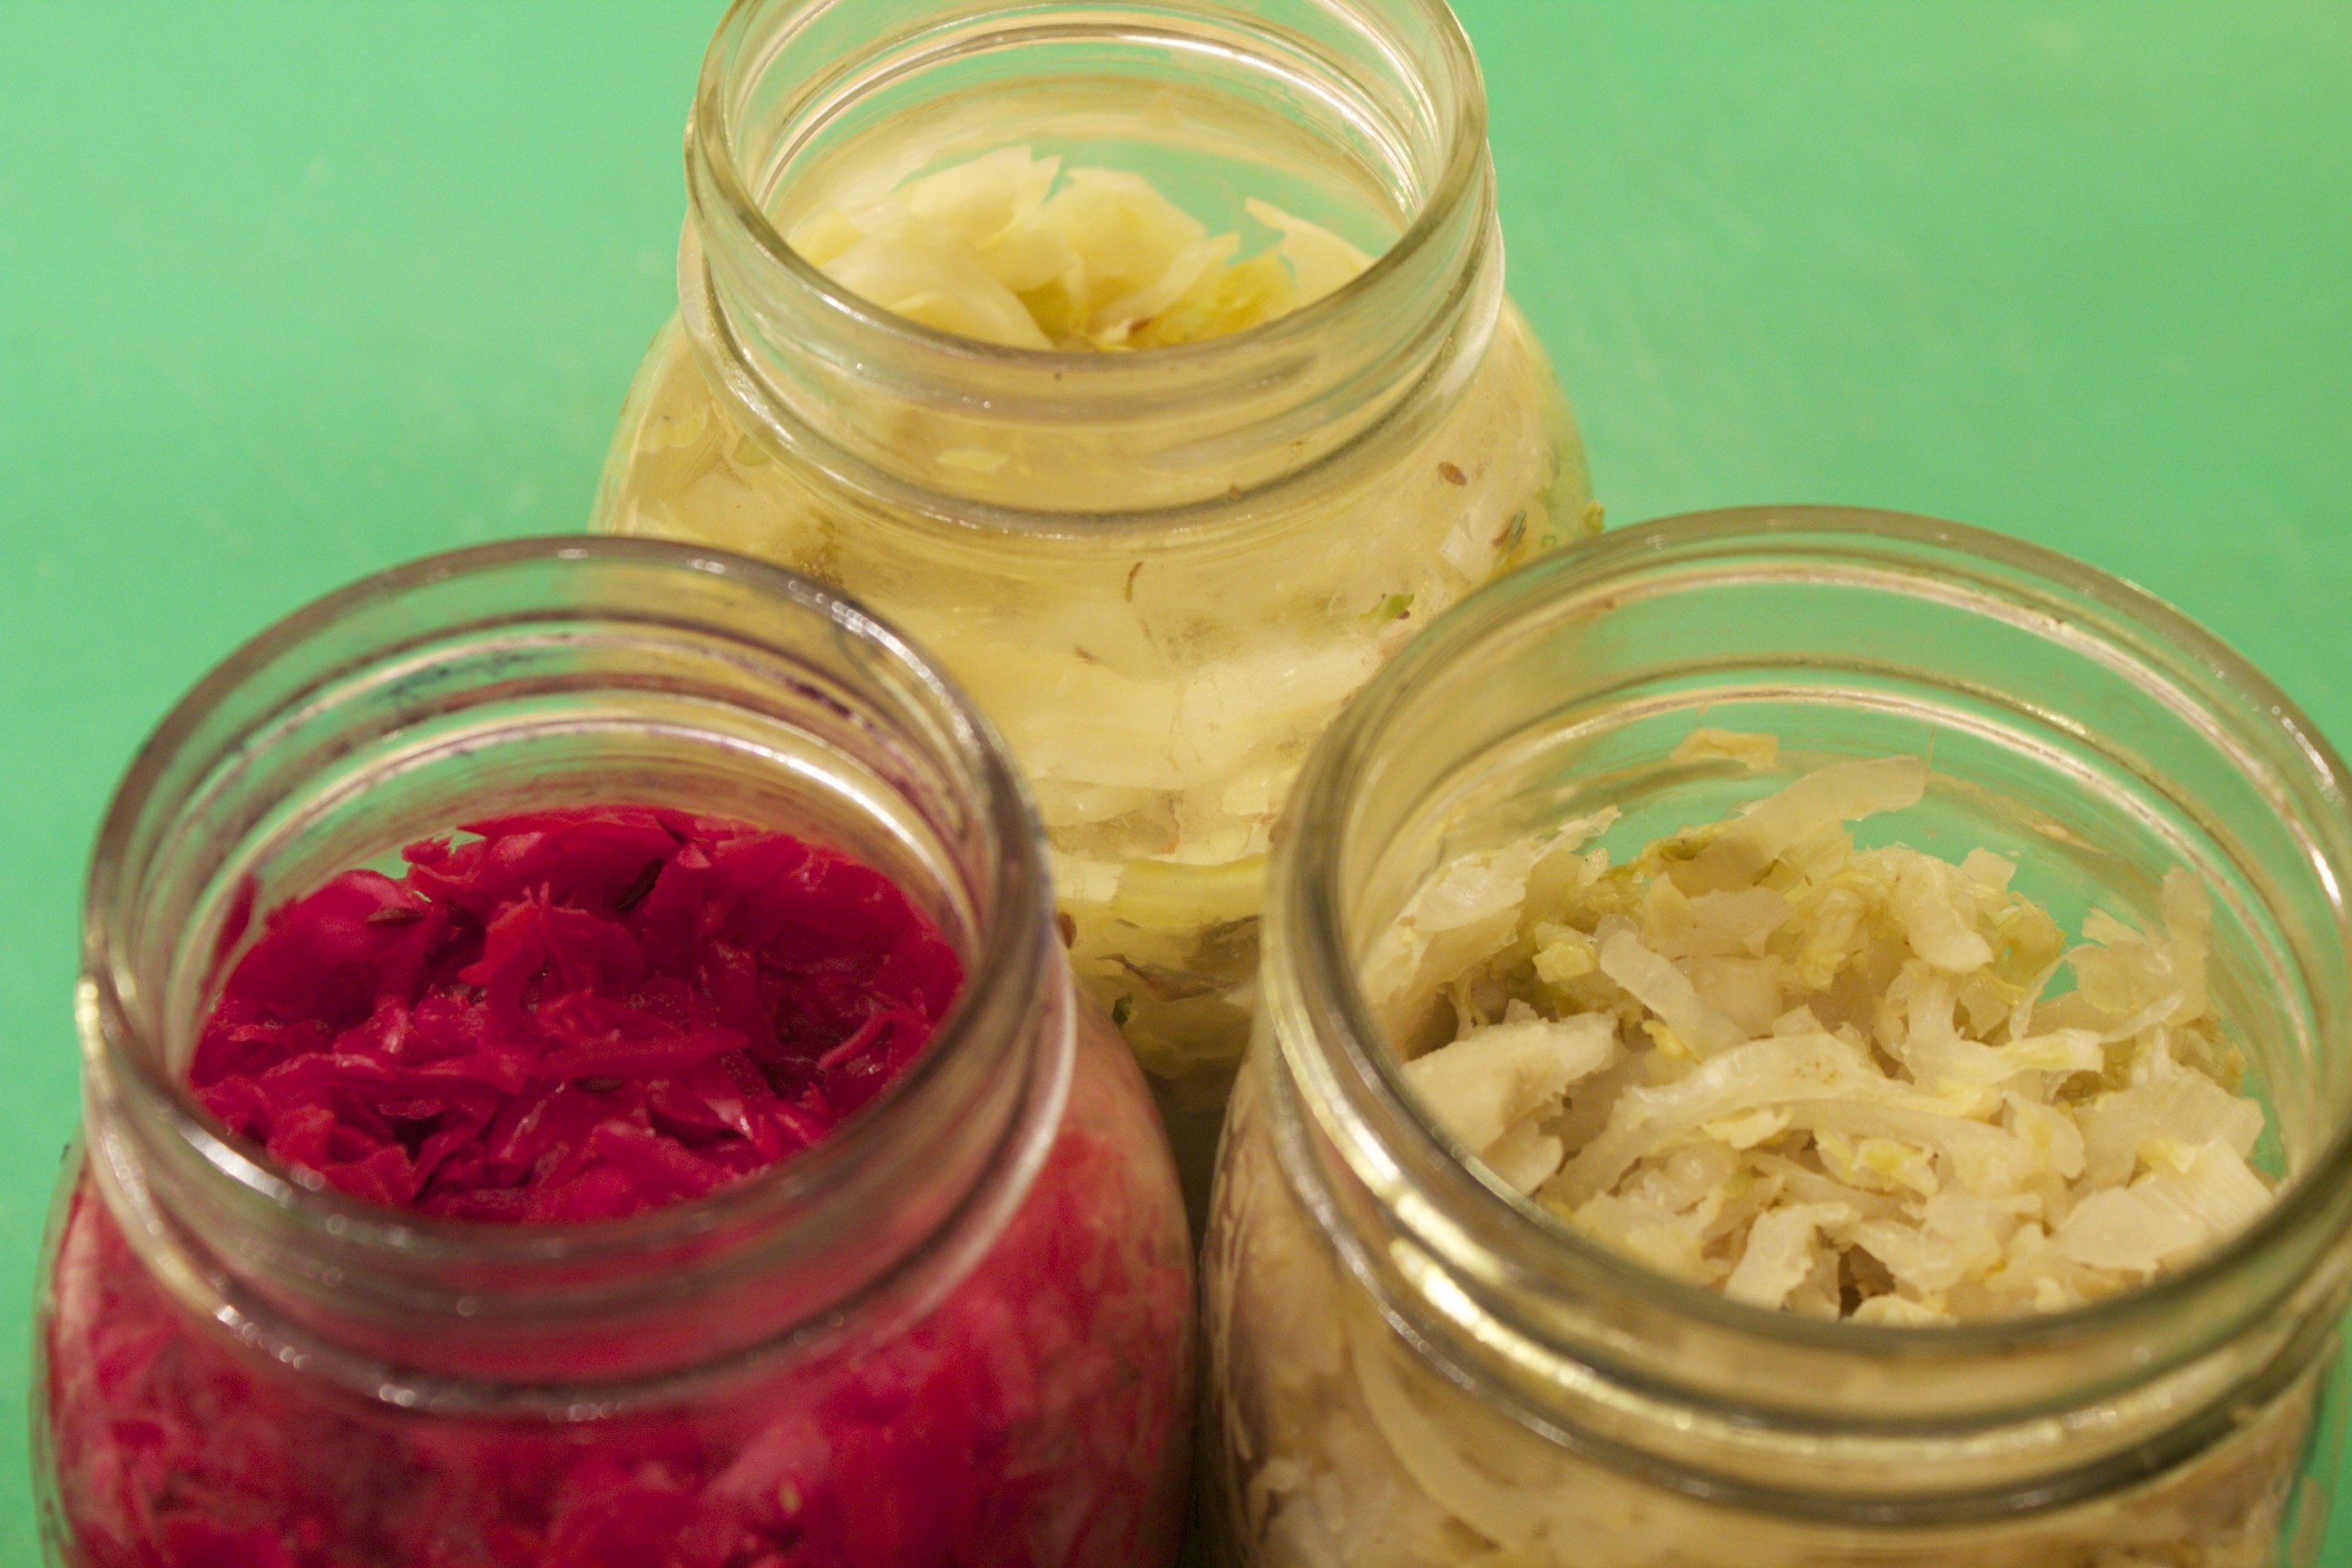 Finished lacto-ferments
Share on Facebook and Twitter | condiments, Health Tips, Kitchen Tips, Side Dishes, Vegetables | No comments
Lemon-Garlic Roasted Cauliflower with Fennel and Gremolata The January issue of Organic Gardening made it to the newsstands on January 1st. The theme for the food central section was garlic; my recipe for this issue is a lemon-garlic roasted cauliflower with fennel and gremolata. Garlic plays two exciting roles in this vibrant winter dish. One whole head is separated into cloves and mellowed as it roasts with the cauliflower and fennel, and a clove of raw garlic in the gremolata adds an enlivening finishing touch. The lemon slices meld into the dish as they roast, contributing a burst of citrus. Make sure to zest the lemon for the gremolata before slicing it. 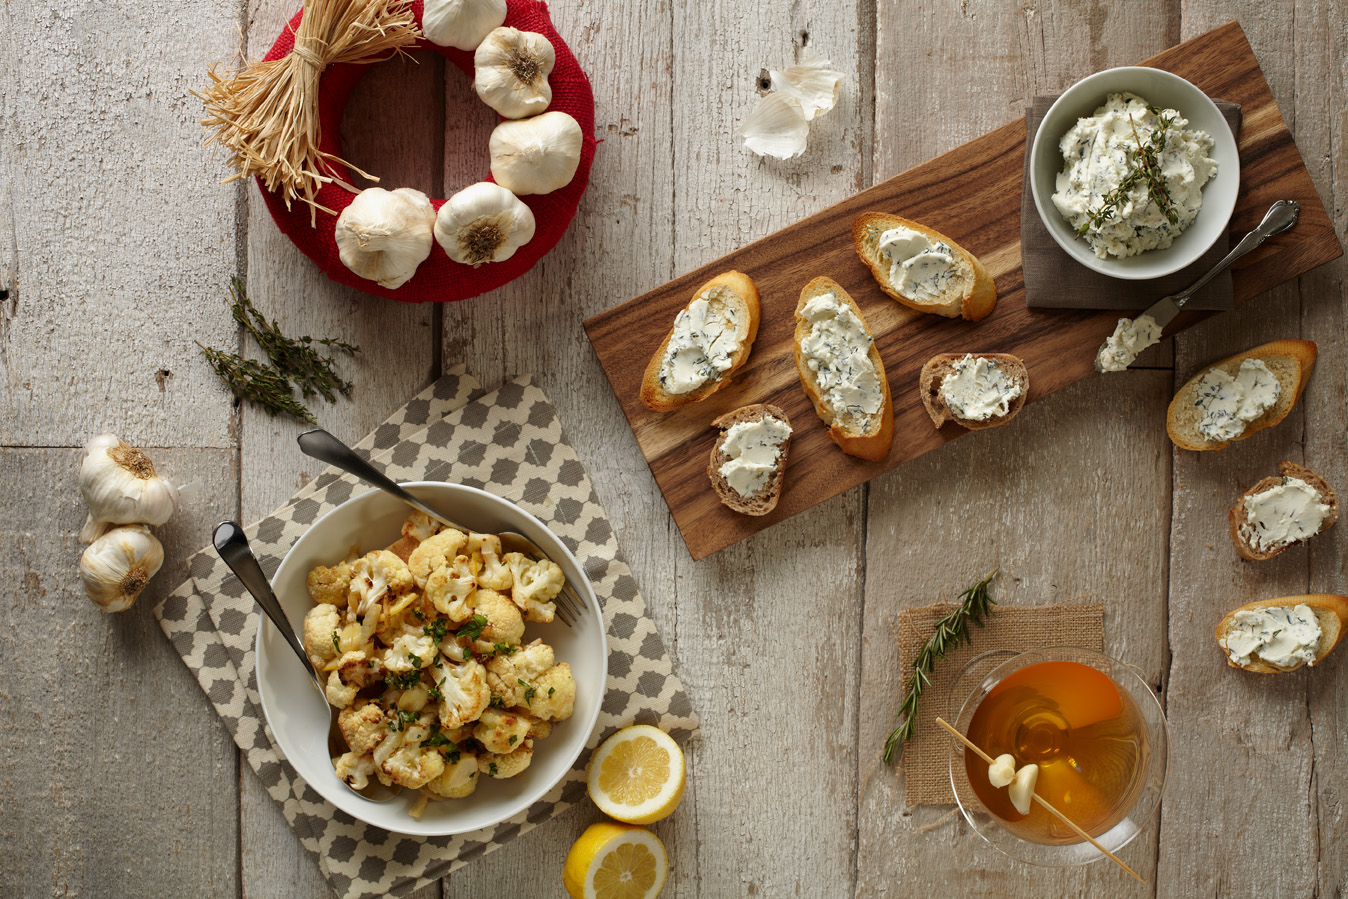 Foodcentral: garlic Lemon-Garlic Roasted Cauliflower with Fennel and Gremolata Serves 4 Gremolata: 1 teaspoon grated lemon zest 1 garlic clove, minced 2 tablespoons chopped flat leaf parsley Cauliflower: 1 lemon 1 medium head cauliflower, cut into medium florets 1 head garlic, cloves peeled and left whole 1 fennel bulb, cored and thinly sliced (2 cups sliced) ¼ cup extra virgin olive oil 1 ¼ teaspoons salt Freshly ground black pepper
Share on Facebook and Twitter | Side Dishes, Vegetables | No comments
Glorious Autumn Squash Glorious autumn squashes and pumpkins in a variety of shapes and sizes abound in greenmarkets and grocery stores at this time of year. In the video today, I go over a few ins and outs of cooking with these vegetables as well as demonstrate a delicious and easy recipe that work with many of the varieties available. Here are six of my favorite types of squash among those that you’re likely to see. Two that have sweet dry rich orange flesh include the forest-green kabocha squash and the flaming red kuri pumpkin. These are wonderful for soups, stews, roasting, or mashing. Of course, cutting into one of these tough guys can seem like a dangerous undertaking. Here’s my favorite tip for handling an intimidating squash: turn the oven to between 325˚F and 375˚F (whatever is appropriate for the recipe), and simply toss the whole pumpkin into the oven for 10 to 15 minutes. That little bit of precooking is enough to enable you to be able to cut down the middle of a hard squash with even a thin-bladed knife. You can even peel the skin easily and cube the squash as well. Here’s an alternative method: simply bake the entire pumpkin without cutting into it first at all. If this is what you plan to do, make sure to place your squash on a baking tray, however, or you’re in for a messy oven-cleaning job when the juices start to drip. Another one of my favorite varieties includes the oblong delicata squash, characterized by its pale yellow skin with green stripes. The thin skin is eatable, so no need to peel these. To prep the squash, cut it lengthwise down the center, scoop out the seeds, and cut it into wedges. Toss the wedges in a little olive oil and salt, and roast for 20 minutes or so at 400˚F on a parchment-covered baking sheet. The small sweet dumpling squash is a variety that is perfect for stuffing. Give it a preliminary 10-to 20-minute bake before cutting the top off and scoop out the seeds, then stuff the inside and bake until tender. The football-shaped spaghetti squash is a fun variety with a stringy spaghetti-like texture. Initially, just toss the whole squash in the oven for about an hour. After it sits out of the oven for a few minutes and is soft and cool enough to handle, slice it down the middle, scoop out the seeds, and then scrape out the stringy flesh with a fork. Treat the strands like pasta and toss them with your favorite spaghetti sauce. The workhorse of the squash world is the butternut. This variety is softer than some of the other types, so it doesn’t need a head start in the oven before being cut or peeled. Treat it like two separate vegetables when dicing. The oblong part in the middle is dense, and it can be sliced like a potato: the bulbous bottom part contains all of the seeds, so it’s best to cut that part into wedges first. Use a t-shaped peeler, the kind that takes thick skins off, to make peeling the squash efficient. For the oblong part, first cut a thin piece off the bottom to anchor the squash on your cutting board, then cut downward slabs. Cut the slabs into long “batons,”, then cut the batons into dice. When you roast the butternut squash, do so by slicing it down the center first and placing it face down on a parchment-covered baking sheet. It’s so much easier to take out the seeds after the squash is cooked. The recipe that I demo in the video is sautéed butternut squash with pears and ginger. The pears harmonize beautifully with the squash—they’re both in season at the same time—and the ginger and cayenne add warmth to the dish. I start with some extra virgin olive oil. I warm a couple of tablespoons over medium heat in a large skillet. I then add the cubed squash with one diced pear—comice, Anjou and Barlett are all good—and cook uncovered over medium heat until the pieces are just tender and starting to brown, (about 6 to 8 minutes). I then push the squash to one side of the pan and add a tablespoon or so of butter (you can also use extra virgin olive oil). When the butter melts, I add the ginger and cook it a minute or so until fragrant. I then stir the ginger—along with ½ teaspoon of salt and a pinch of cayenne—into the mix. I finish the dish by stirring in a splash of balsamic vinegar. This dish is fragrant, fast, and flavorful. What a good time to get creative with all of the delicious varieties of squash that are out right now. They’re not difficult at all to use, so have a wonderful time!
Share on Facebook and Twitter | Kitchen Tips, Recipes, Side Dishes, techniques, Uncategorized | No comments
Culinary Roulette Peppers The first time I tried a shishito pepper, I thought that they were unbearably hot. I didn’t know at the time that only about one in ten is hot, while the rest are mild and flavorful. This experience kept me away from these delicious peppers for a good couple of years, until I was seduced by the gorgeous overflowing bins at the Union Square greenmarket. Fortunately, I finally gave them another try, and have been happily eating them ever since. Not only do shishito peppers abound right now, there are another two varieties similar enough that they can be treated the same way. Here’s the rundown on the different types: There’s the shishito pepper, which are very aromatic. They have little ridges. 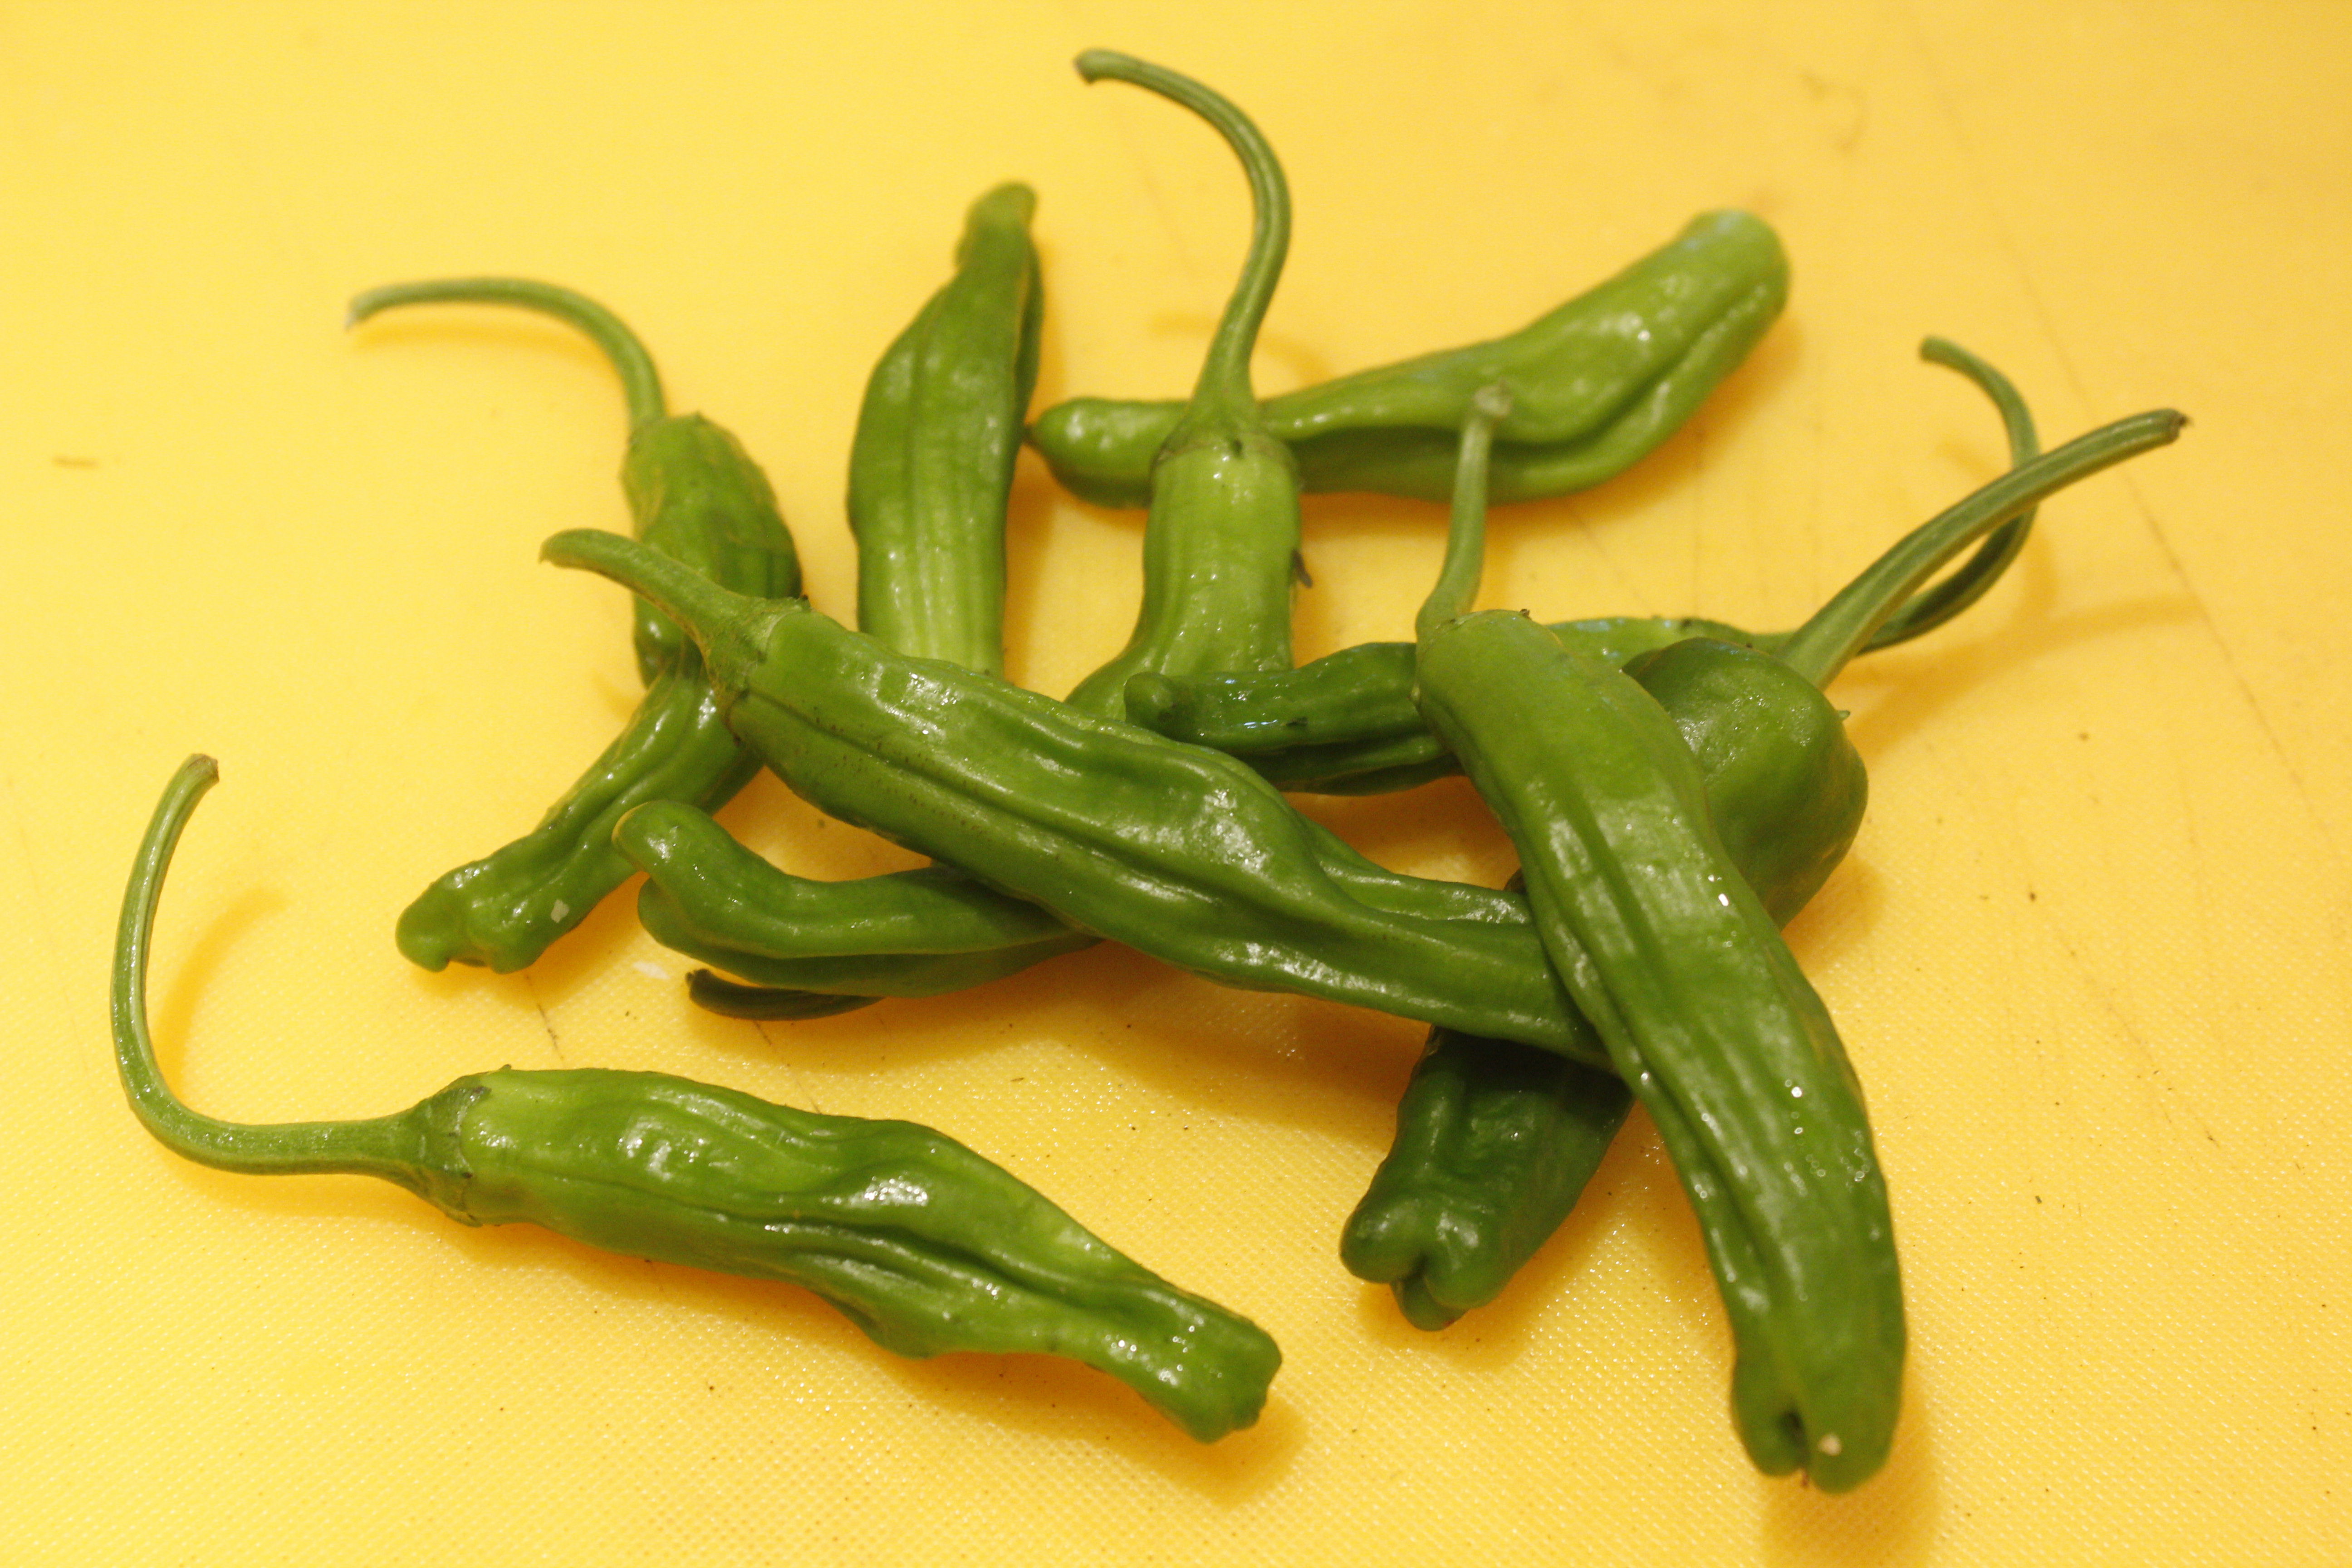 Shishito Peppers A pepper that competes with the shishitos is the Fushimi pepper. They have an even crispier skin and texture. You can eat these raw as well as cooked.  Fushimi Pepper Another squatter horn-shaped pepper with similar characteristics is the Pimento de Padrón, the heirloom variety from Spain. 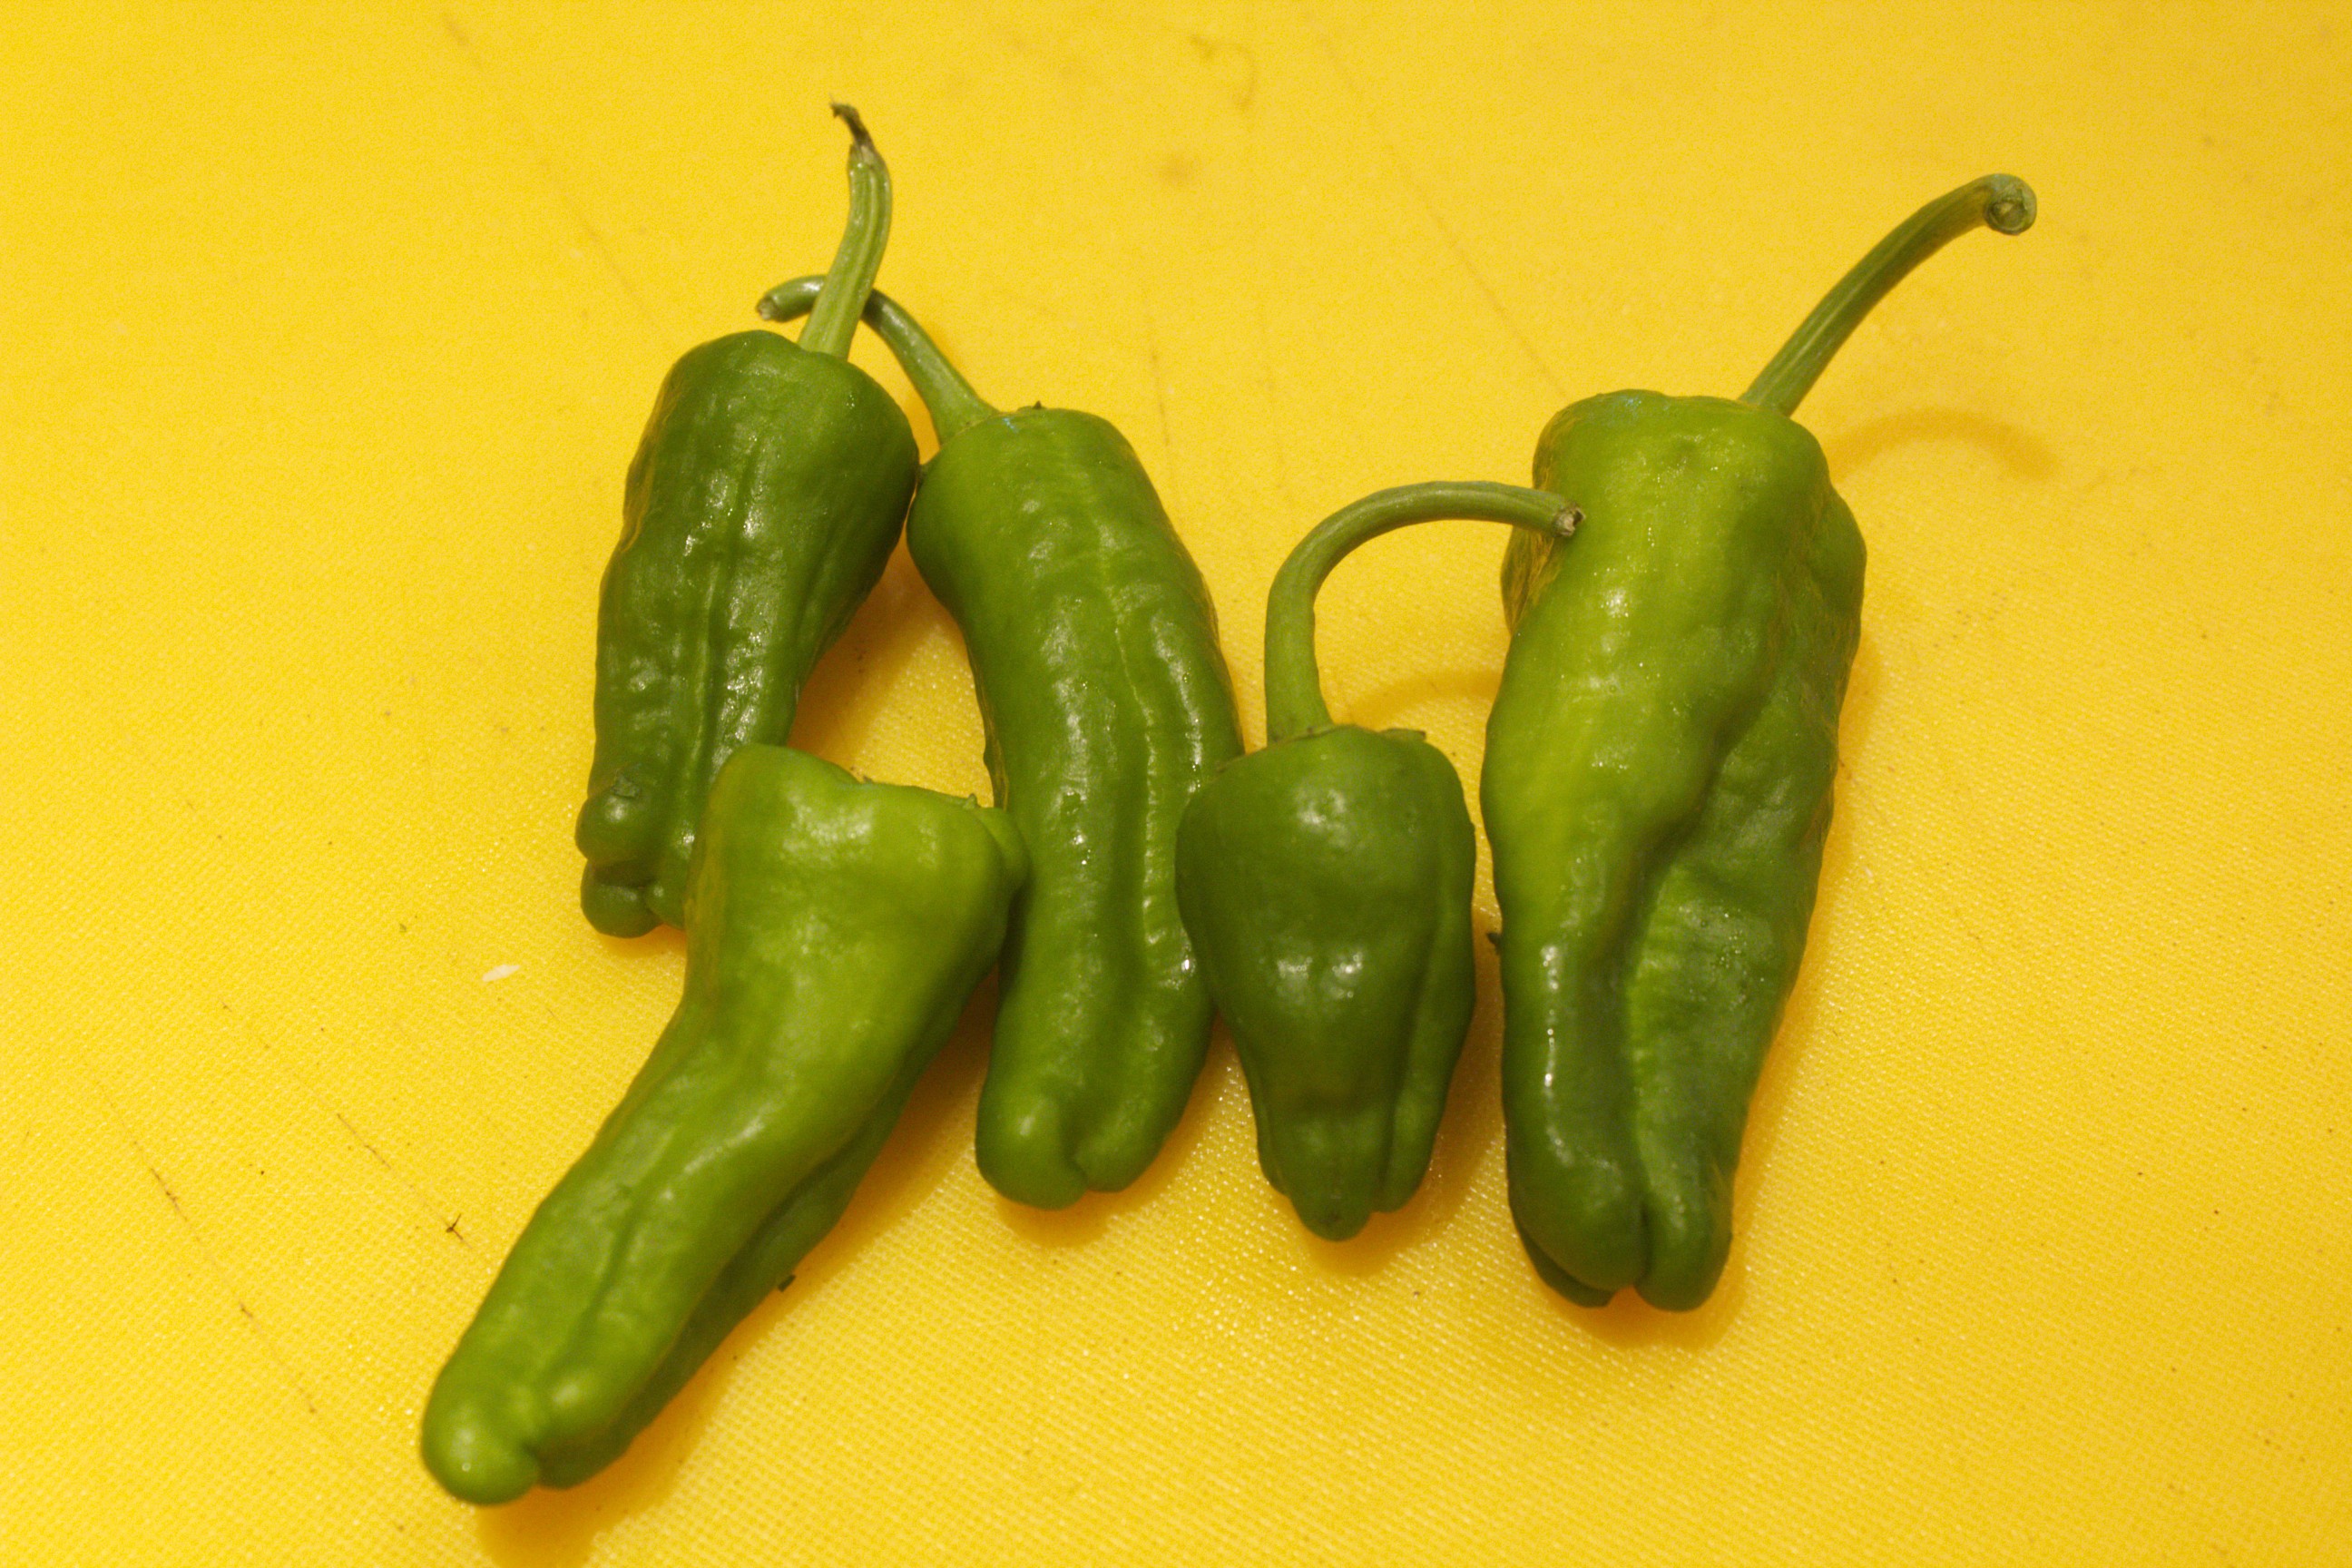 Pimento de Padrón All of the peppers have a lot of health benefits: high levels of vitamin A and C and carotenoids like lutein, which is helpful for maintaing healthy hair and skin, as well as providing resistance to colds. These retain their vitamins when they are pickled as well. My favorite way to cook all of these peppers is to toss them into a hot skillet that is filmed with oil and simply blister them. I then toss them with a course salt. Lately, I’ve been tossing them with lapsong souchong salt, so they have a delicious smokey tea flavor. 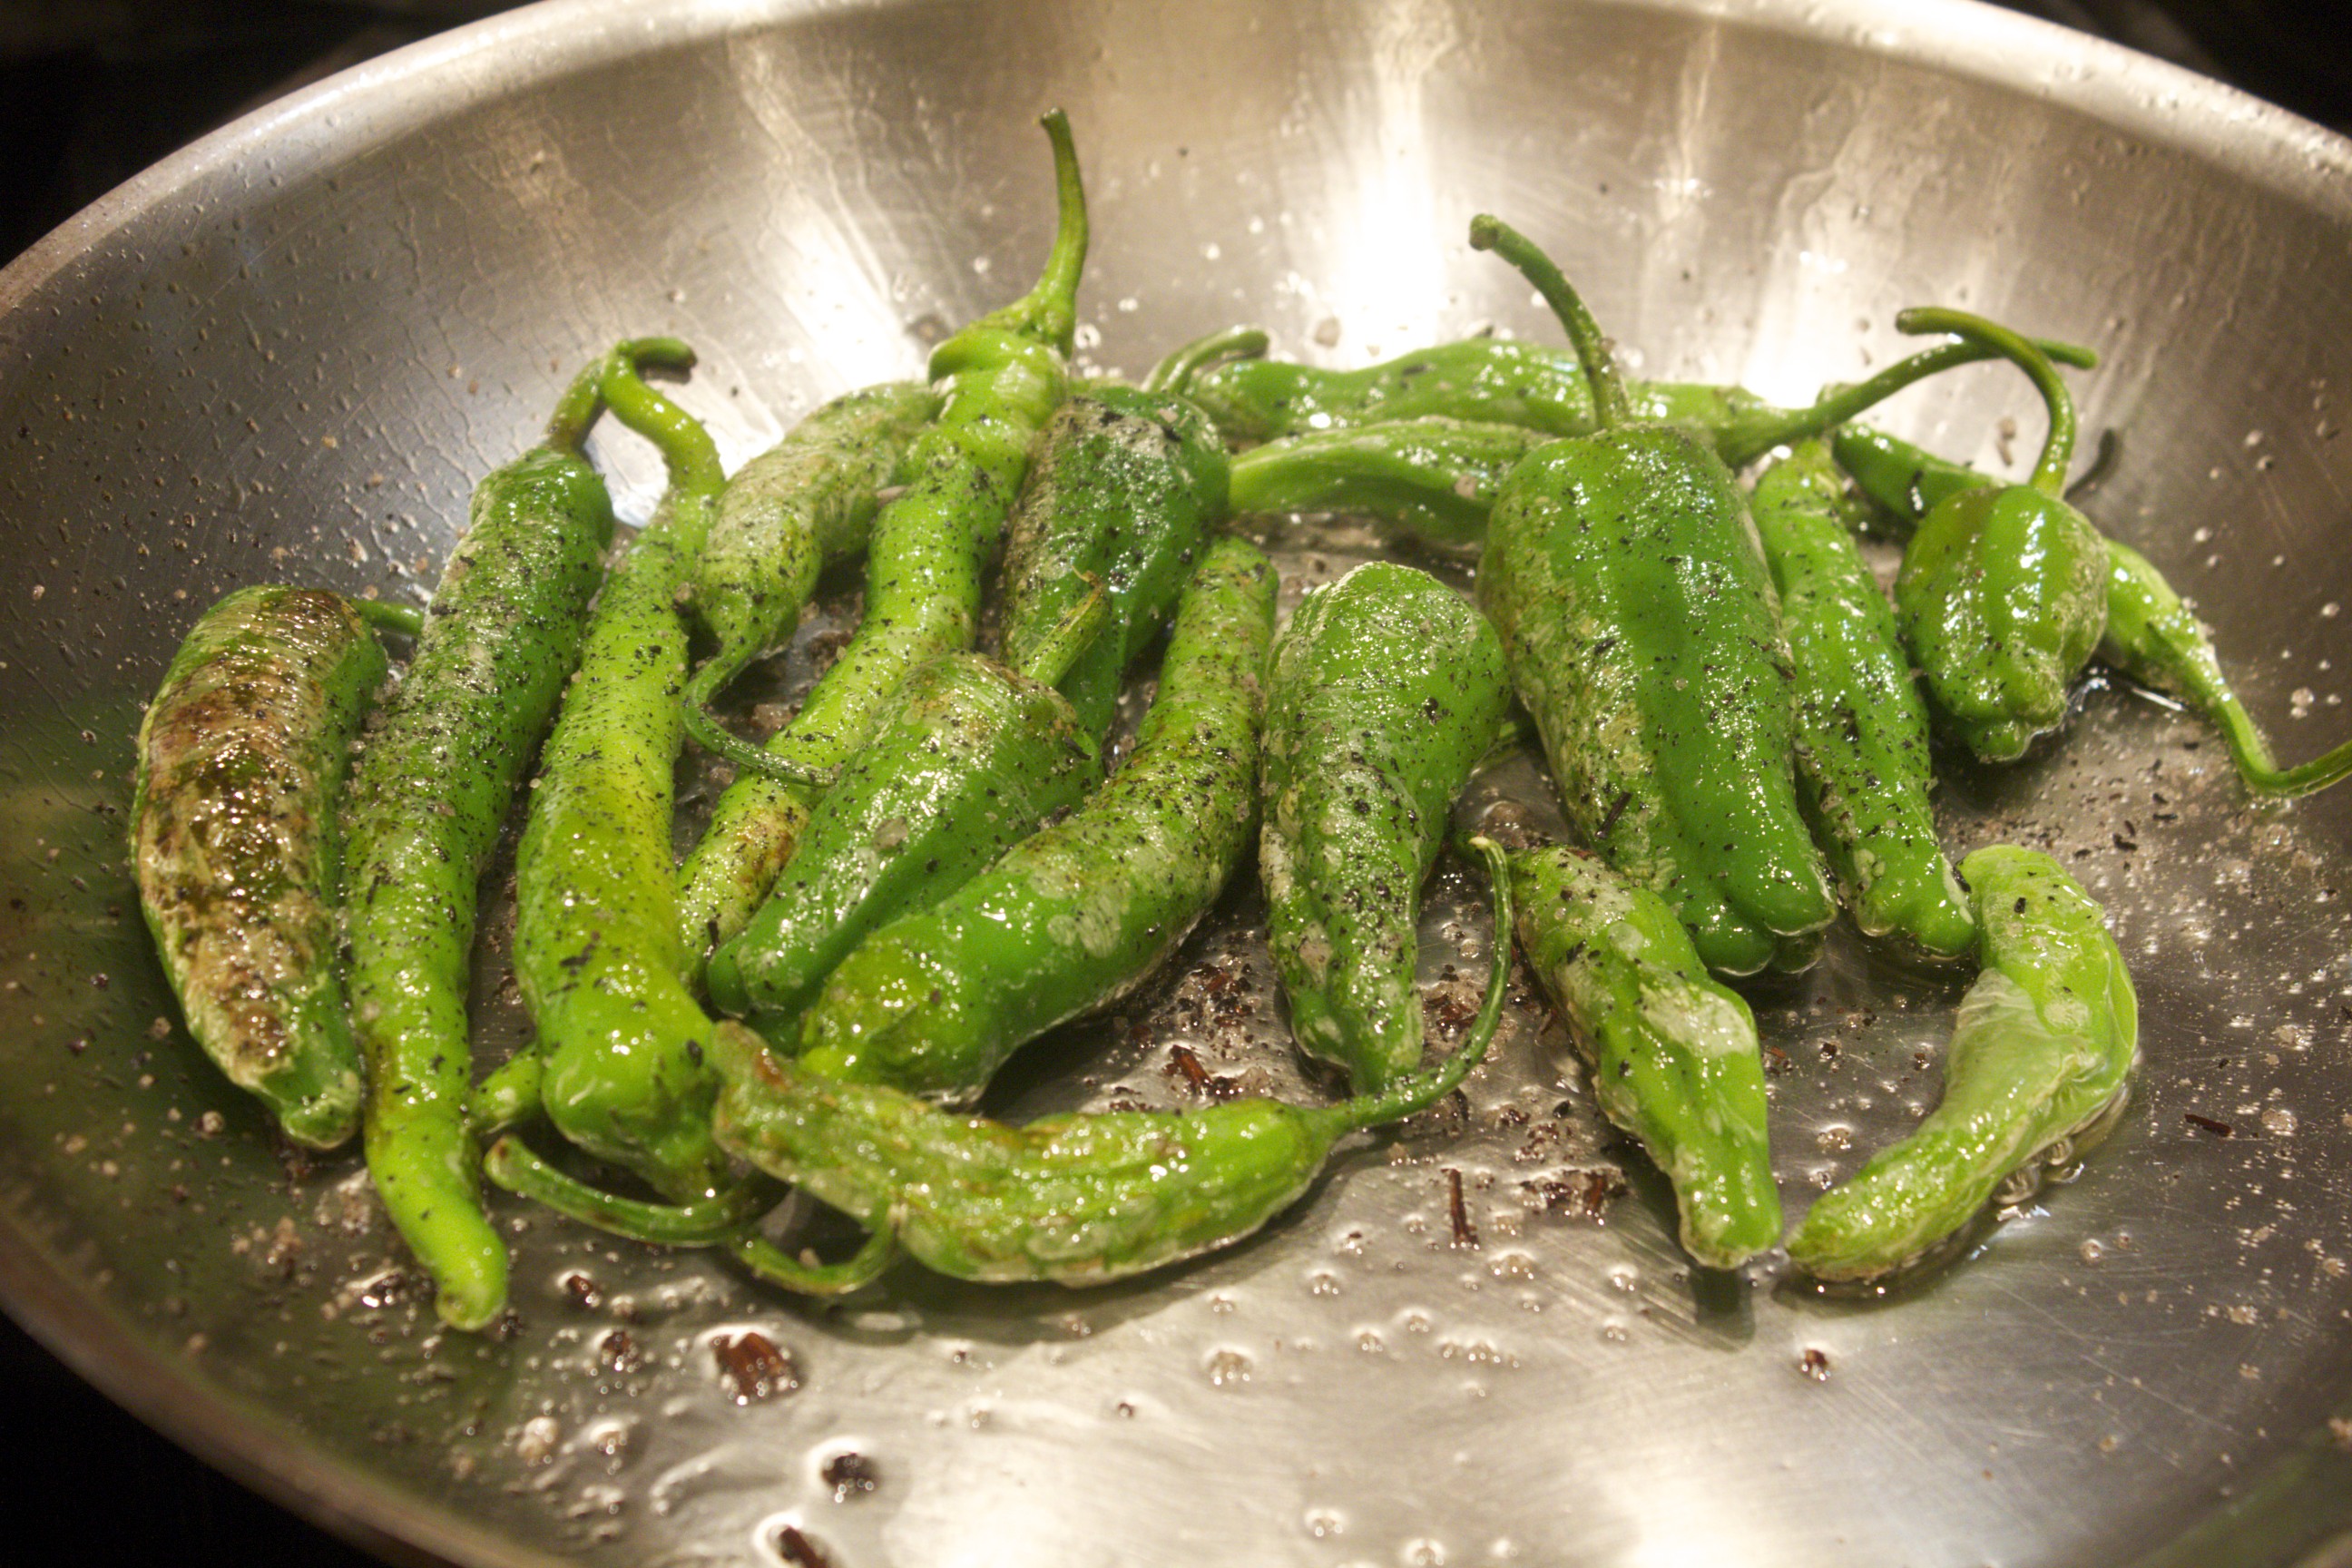 Blistered Peppers For more ideas on exciting salts, visit The Filling Station in Chelsea Market, where you can choose from a variety of flavored coarse salts. All of these peppers make for an exciting game of culinary roulette. I like to serve these to guests sitting around the table and watch their faces as they eat them. Since most of the peppers are sweet and mild, it’s a bit of a surprise when you get that one zinger in ten that is picante. Proceed with caution, and take a small first bite! Share on Facebook and Twitter | Health Tips, Side Dishes, Vegetables | No comments
Day Before Thanksgiving Feast This time of year I get a hankering to cook a Thanksgiving meal, even if I’m not the one having the guests over. My local traditional foods club has farmers that bring in stunning pasture-raised Turkeys, so I couldn’t resist buying a couple. I invited a friend over to cook a no-stress pre-Thanksgiving meal with me and split the bounty. (We cooked the 13-pound Turkey. I still have a wee 7-pound turkey in the freezer.) This is what we made, based on what looked good at the greenmarket when I went shopping that morning: Cranberry glazed turkey: I planned this one. I made a glaze by simmering cranberries, maple syrup, thyme, orange zest, garlic, and brown rice vinegar in a small pot. When the cranberries had burst, I pushed everything through a strainer. I served this same glaze for a recent lunch party on duck breasts.  Cranberry Glaze in the Pot I received the turkey Tuesday night and did a little prep. I dry-brined it with salt (basically just rubbed it all over) and slipped some thyme-rosemary-sage butter under the skin to keep the breast moist. I laid the turkey on a rack in the roasting pan and refrigerated it overnight. Wednesday I baked it breast-side down at 325˚F. for an hour, then flipped it, and cooked the turkey about another 2 hours. I glazed the bird the last 40 minutes. Next time I won’t be lazy, and I’ll tie the turkey legs together.  Cranberry-Glazed Turkey Gravy was the pan drippings with a roux made from chickpea flour and butter (the whole meal was gluten free), with some gelatinous chicken stock. (I had simmered a whole chicken with a bunch of extra feet overnight to make a gelatinous chicken stock.) Stuffing: I made a gluten-free cornmeal with cornmeal and sorghum flour (soaked the flours in buttermilk overnight, then proceeded with the recipe), then sautéed onions with cranberries, dates, and prunes. I added some wine, apple cider, and a smidge of maple sugar to deglaze, and cooked this until the cranberries burst. I added the mix to a bowl with some sage, chopped pecans, toasted cornbread cubes, a pound of turkey sausage (I cooked it first), and a splash of sherry vinegar (and salt and pepper of course) and a couple eggs. I baked this separately in an 8×11 roasting pan at 350 for about 20 minutes. Next time I’ll have the stuffing ready in advance and I’ll fill the bird with it.
 Stuffing in Progress Celery root-apple-sage pancakes: recipe from The Healthy Hedonist Holidays. I used chickpea flour instead of unbleached white flour to make these gluten-free. Chard with cipolline onions: We cooked cipolline onions in olive oil and balsamic vinegar and added a couple bunches of wilted chard. Buttered Green Beans with anchovies, garlic, and sage: We crushed the anchovies with salt so that they disappeared, and finished the green beans off with a splash of lemon juice. Brussels Sprouts with leeks and shiitake mushrooms: We sweated the leeks and mushrooms with olive oil and a splash of tamari, until shrunken and tender. We removed them from the pan. We then added the Brussels Sprouts with butter, water, thyme, and salt, and cooked them until tender. We uncovered the lid and added balsamic vinegar and mustard, stirred the mushroom mix back in, and finished with a sprinkle of fresh tarragon. Squash-Chestnut soup: We cooked hubbard squash soup with chestnuts, and added a splash of scotch. Served it with a swirl of yogurt, although crème fraiche would have been even more luscious.  Hubbard Squash and Chestnut Soup Russet apples: Roasted in ginger-cinnamon mulled cider. Then we feasted, and divided the spoils. No room for dessert, but it wasn’t necessary. Had leftovers of this one (espresso pudding with pumpkin whipped cream).
 Chocolate-Espresso Pudding with Pumpkin Cream and Whipped Cream I’ll admit that on Thanksgiving I had salmon, since I didn’t want to exhaust my enthusiasm for Turkey. The next night I was into Turkey again. This is my second night of leftovers, and it’s so good.  The whole plate: Turkey, Stuffing, Chard with Cipollines, Brussels Sprouts, Russet Apples, and Celery Root Pancakes Share on Facebook and Twitter | Dinner, Gluten Free, Main course, Side Dishes, Uncategorized | No comments
Red Cabbage Lacto-Fermented Sauerkraut Lately, I’ve been on a lacto-fermenting frenzy, fermenting everything from red cabbage to dill pickles to beet and fruit kvass. The lactobacilli, which are good bacteria, proliferate in fermented vegetables and fruit. The vegetables and fruit are easier to digest and the vitamin levels are increased as well. The main by-product of lacto-fermentation is lactic acid, which promote the growth of healthy flora throughout the intestine. What I like about these fruits and vegetables is that once they’re fermented, they last for a long time in the refrigerator. They’re an instant quick hit of super nutrition. Moreover, they are easy to produce. Here’s one of my favorites, a red cabbage ferment, that needs only salt to get the whole process of fermentation going. The salt inhibits any bacteria that could putrify the ferment until the lactic acid forms. I start with a head of finely shredded red cabbage. I add some shredded carrots, a piece of minced ginger, a tablespoon caraway seeds, and two tablespoons Celtic sea salt.
After stirring everything together, I massage the mix with my hands to help the cabbage release its juices. There’s no need to add water to the brine when you make a cabbage ferment.. You can pound that cabbage with a mallet or just put a weight on the cabbage ( a bowl with a weight in it works well). and it will start sweating away in no time.  Ready to Jar I then stuff the mix into a jar (a one quart bell jar is perfect) pressing down to make sure that there’s liquid floating on top. I make sure to have an inch of space at the top. (This is quite important to avoid leaks.) I leave this on my kitchen counter for 3 to 5 days. With a bell jar, the piece in the middle is hard to press down when the ferment is complete.  Make Sure There's Liquid on Top The red cabbage doesn’t look so bright in the beginning, but as it ferments it turns a beautiful magenta color. It’s best to transfer this to the refrigerator, where it can last a long time (up to a year) without opening. Once opened, it’s good for about three months.  Ready to Refrigerate  Hot Pink and Delicious Share on Facebook and Twitter | condiments, Health Tips, Kitchen Tips, Side Dishes, techniques, Vegetables | No comments
Catering Gig This past Friday and Sunday, I catered a couple of on-site parties. I had Wednesday and Sunday morning to prepare for the Sunday brunch, and Thursday and Friday to prepare for the Friday evening party. Since I had to prepare a good amount in advance of Sunday, I had to plan on a certain number of dishes that would freeze or hold well for up to five days. These individual cheesecakes fit the criteria.  Individual Cheesecakes with Raspberry Sauce As they rest in the refrigerate, they just keep on getting tastier, so making them five days ahead was not a stumbling block. I bought the molds at J.B. Prince, an amazing store on 31st street in NYC. I froze a batch of crepes (which were to be filled with strawberry-rhubarb compote), zucchini pancakes, lasagna, and this caramelized onion tart.
I made the Friday desserts Friday afternoon. This is the blueberry buckle from the Healthy Hedonist Holidays.  Blueberry Buckle This is a chocolate cake made in individual aluminum ramekins.  Chocolate Cake with Chocolate Sauce Powdered sugar covers a multitude of craters. The Friday night meal had as a starter the Turkish chopped romaine salad and the miso-marinated black cod from The Healthy Hedonist.  Miso marinated cod with Turkish chopped salad I marinated the cod early in the day (marinade made the day before) and just tossed it in the broiler to brown. Before serving I blasted the fish in a hot oven to reheat; the oily fish is so forgiving it was not in the least bit dried out . The stock for the broccoli soup was made Wednesday and the soup and pistou topping were finished Thursday.  Broccoli Soup The main course included braised short ribs and stuffed chicken (a great way to keep the chicken moist) as well as braised-roasted purple potatoes, sweet potatoes and carrots, and lemony sautéed artichokes.  Friday Dinner Main Course I planned the main course to have items on it that would reheat well without drying out. For the Sunday buffet I did cook a couple of items that required precise timing, but not too many. One of the most important things about cooking for a crowd–beside being organized–is to have a menu that is a bit forgiving. Share on Facebook and Twitter | Dinner, Main course, Musings, Side Dishes, Where To Buy (Sources) | No comments
Mediterranean Catering I’ve been cooking a lot of Mediterranean food lately, for all kinds of events. This one featured dukkah-crusted stuffed medallions of chicken. I filled boneless breasts with caramelized onions and garlic-sautéed spinach, then coated the breasts with flour, egg, and dukkah. Dukkah is a combination of toasted pistachios, sesame seeds, cumin, coriander, smoked paprika, thyme, salt and pepper. (It’s a great mix to have on hand to jazz up a meal.) The breasts were sautéed, then finished in the oven for about 15 minutes.  Stuffed Chicken Breasts Coated with Dukkah I then sliced them with an electric saw to get these beautiful even cuts. Best thing about these breasts is that they stay tender, even when reheated the next day.  Sliced Stuffed Chicken
I also made Moroccan-braised short ribs. I had previously been making these with lamb shanks, but the short ribs worked as well. I salted, peppered, and browned the short ribs first, then sautéed sliced red onions until tender. I added some harissa, garlic, ginger, cinnamon sticks, bay leaves, cumin, coriander, and cooked the spices for a couple of minutes. I then added a jar of roasted red peppers and some stock, brought the liquid to a boil, and then transferred the baking pan to the oven. The dish braised at 325˚F. for 2 ½ hours. I pulled the dish out of the oven, added some dried apricots and figs, and returned it to the oven to cook uncovered at 500˚F. for another 30 minutes to brown. The ribs by this time were falling off the bone.  Moroccan-Braised Short Ribs I tossed carrots, parsnips, and butternut squash with garlic, extra virgin olive oil, chicken stock (vegetable stock is good as well), cinnamon, nutmeg, salt, and cayenne and place them in the oven to braise at 375˚F. for about 45 minutes. Then I let the vegetables cook another 20 minutes uncovered so that they could color.  Braise-Roasted Vegetables For dessert, I made the coconut chocolate mousse from The Healthy Hedonist, layered with berry sauce and cashew cream made from cashews blended with coconut milk, maple sugar, and vanilla.  Coconut Chocolate Mousse Parfaits I also made the cakes-in-a-jar for gifts, only this time they were topped off with whipped cream. Thank goodness I had done a test run. (See previous post for how to make these.) They were a hit.  Topped off with Whipped Cream The salad was an herbed watercress and orange blossom vinaigrette salad with roasted beets and was sprinkled with pistachios. This is how a single serving looked.  Watercress, Herb, and Beet Salad All of these dishes stored well and could be made in advance, which was, after all, the whole idea. Share on Facebook and Twitter | desserts, Dinner, Main course, Side Dishes | No comments
|