|
Not Your Ordinary Jello Shot
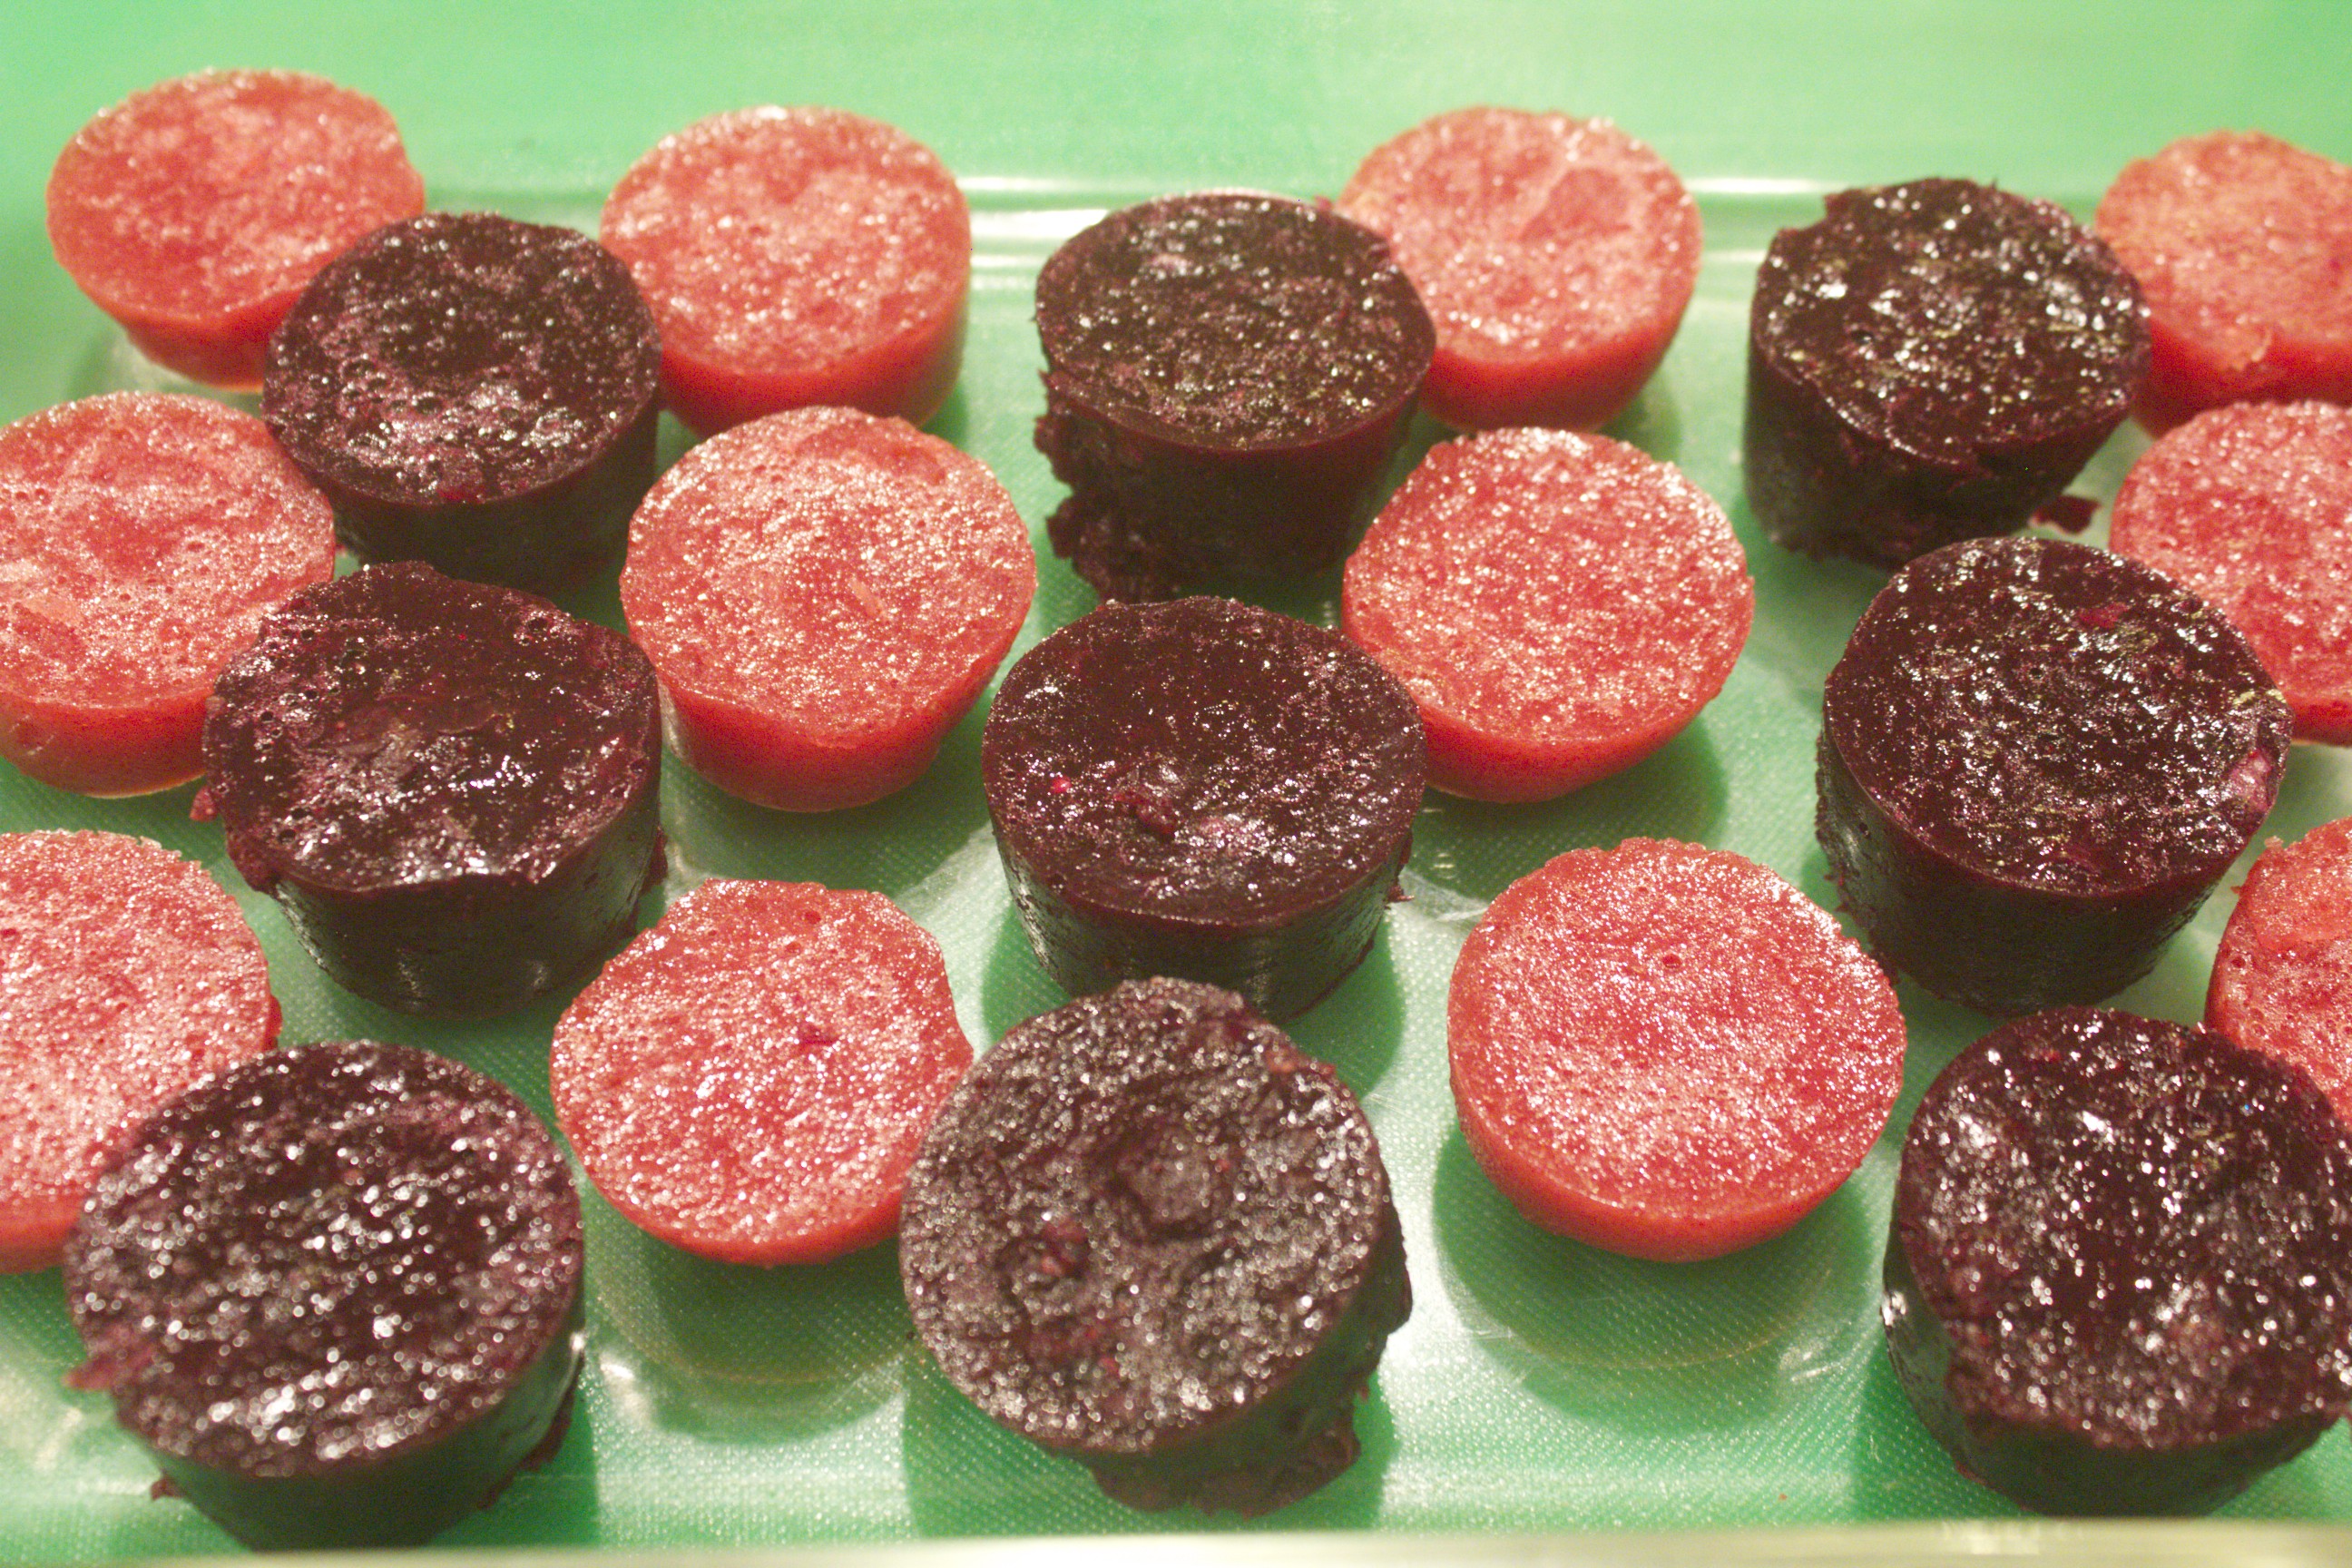
In today’s gelatin shot video, I demonstrate how to make berry jigglers, also known as gelatin shots. In case just hearing the word “gelatin” makes you think of images of wobbly neon molds popular in bygone eras, think again. These delightful bites are made purely from berries, so they’re more like gelled fruit bites. They have only the minimal number of ingredients; and good quality gelatin makes these refreshing nibbles extra nutritious. Gelatin has many healing properties: it soothes the gut lining; it strengthens bones, ligaments, skin and hair; and it regulates blood sugar. And that’s just the short list. To get the most healing benefits from these jiggers, make the effort to obtain powdered gelatin from grassfed cows, which is readily available nowadays. In the video, I demonstrate two flavors of jigglers, beginning with the blueberry version. It hardly matters whether you use fresh or frozen fruit. Add 2 1/2 cups berries to a medium pot or saucepan along with 1/2 cup of liquid. In the demonstration, I use coconut water, but apple or other fruit juice works as well. Let the berries heat to a gentle bubble to soften. Then, blend the berries until smooth. This is a good occasion to use an immersion blender if you have one. Tilt the pot to make sure to blend the berries evenly without splattering. Transfer them to a bowl to cool for about 10 minutes. Gelatin dissolves best in warm liquid, not super hot. I also demonstrate a version made with strawberries and raspberries. Working with berries with seeds requires an extra step; the seeds need to be strained. After the berries are heated and puréed, press them through a fine-meshed wire strainer. Use the bottom of a ladle, rotating it in a circular motion to push the puree through quickly and efficiently. You’ll be left with just a handful of seeds in the strainer basket, which you can discard or give to the compost worms. Make sure to use a spatula to collect any of the puree that is stuck to the bottom of the strainer—that’s good stuff you don’t want to waste. Since raspberries tend to be a bit tart, stir in a tablespoon or so of honey to sweeten them just a tad. Now it’s time to add the gelatin. Two tablespoons is the perfect amount to set each of these purees just right (neither too hard nor too loose). Sprinkle the powder evenly over the top, then stir the gelatin in until it’s completely dissolved. Next, pour the mix into molds and chill until set, about 2 hours or so. Use whatever you like or have for a mold. Some examples of kitchen favorites that make good molds include 8×8-inch baking pans, ice cube trays, or—my personal favorite, and the type that I show in the video—silicon mini muffin molds. These flexible molds make it especially easy to pop out the individual jigglers. After the stint in the refrigerator, unmold by running a blunt knife or small spatula around the edge of the mold, then lift—or in the case of the silicon—pop out the pieces. If you’ve poured your puree into a baking dish, simply slice the jigglers into squares before lifting out the pieces with an offset spatula. Stack the jiggers in a covered container, and refrigerate for up to two weeks. These shots are wonderful to keep on hand for an instant snack or low-key dessert. I like to eat a few of these in the morning instead of a piece of fruit. Once you’ve made these a couple of times, I’m certain you’ll want to keep a regular stash. I know I do. Share on Facebook and Twitter | desserts, Fruit, Snacks, Uncategorized | No comments
Acai Bowls
Acai berries contain many beneficial compounds, such as powerful antioxidants, fiber, monounsaturated fats (oleic acid), and anthocyanins, which are all clinically proven to have health benefits. Because they’re so low not only in sugar, but also in the acid that protects most fruits, they must be picked, processed, and flash frozen before being transported out of the Amazon. Otherwise the fruit would oxidize, turn brown, and lose its beneficial nutrients. The berries are squeezed into juice or—my favorite—pureed into frozen smoothie packs. These are sold in the freezer section of natural food stores. You can take advantage of the packs by making delicious frozen treats without using an ice cream maker. The only equipment required is a food processor. In today’s video, I demonstrate two delicious bowls that are suitable for dessert, snacks, or even breakfast. Each one has healthy fat added to keep your blood sugar stable and help you feel satisfied for hours. They’re quick to make: You whirl a few ingredients together, then immediately eat what you’ve made. You can store leftovers in the freezer, but you do have to let them thaw before eating. The first bowl that I demonstrate in the video is flavored with cherries, cocoa, and almonds, all of which complement the acai. Begin by adding 2 unsweetened smoothie packages to the bowl of a food processor. It’s best to let the acai pack sit out for 5 minutes or so to thaw slightly, so it’s not rock hard when you whirl it. Add a cup of frozen cherries, half a ripe avocado, a couple tablespoons cocoa powder, a tablespoon raw honey, and 1/4 teaspoon almond extract. Now you’re ready to whirl, except you need to add about 1/2 cup of liquid to loosen up the mixture. (In the demo video I add coconut milk, but almond and cashew milk are both delicious as well.) A quick whirl in the food processor melds these ingredients into a luscious concoction. To add a bit of texture, top the two servings with a sprinkling of almonds and cocoa nibs, and a dash of cocoa powder. The second bowl features bananas and almond butter. Again, start with two packages of acai smoothie packs, the contents broken into chunky pieces. Add one chopped frozen banana, 3 pitted medjool dates, a tablespoon almond butter, and a dash cinnamon. Loosen the whole mix with 1/2 cup of coconut milk. Again, a quick whirl transforms the whole mix into frozen ambrosia. Top this banana-almond acai bowl with large flakes of dried coconut and rosy goji berries. These simple blends are so easy to make with ingredients that you can keep handy in your freezer and pantry. These bowls (which can serve as a snack, a breakfast, or a dessert) underscore that a luscious frozen treat can both satisfy a sweet tooth and be truly health-promoting.
Share on Facebook and Twitter | Breakfast, desserts, Fruit, Gluten Free, ingredients, Recipes, Snacks, techniques, Uncategorized | No comments
Chia Seed Puddings
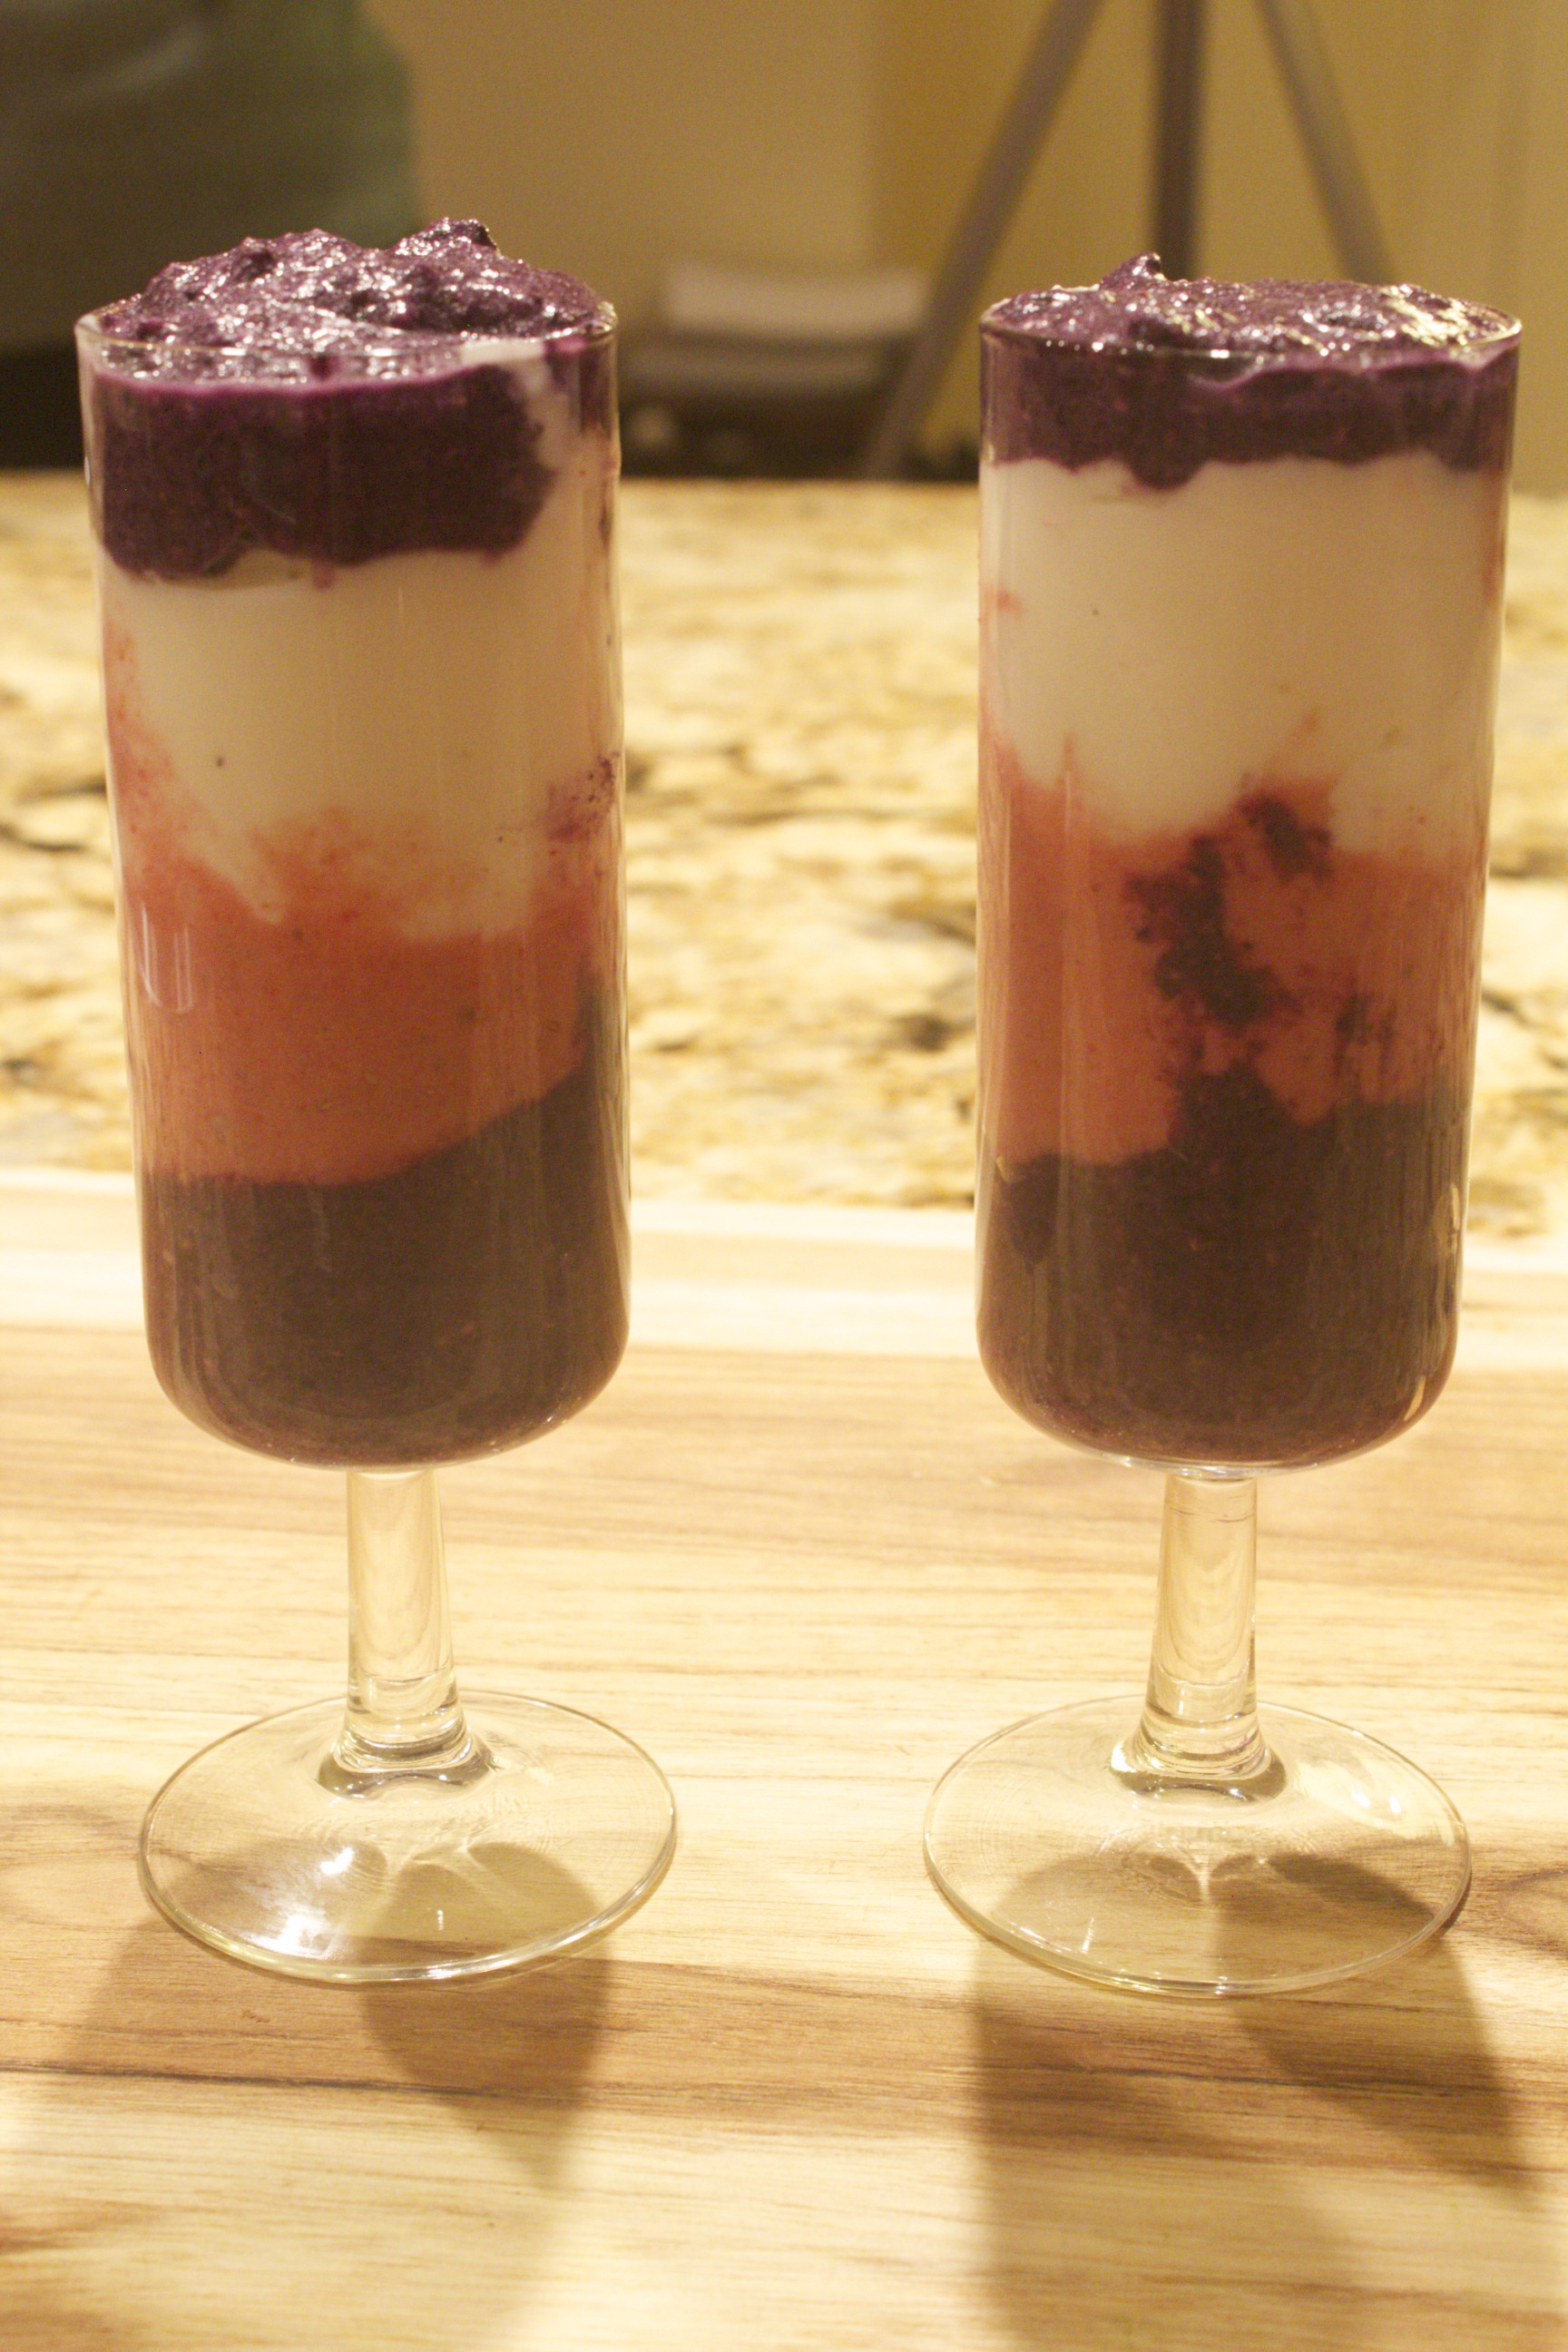
In today’s video of chia seed puddings, I show how to make two delicious chia seed puddings. Chia seeds are touted for their powerful salutary benefits: Included among their vital nutrients are protein, fiber, antioxidants, and ALA (alpha-linoleic acid), a type of omega-3 fatty acid. It seems that nowadays people are shaking these micro-seeds into everything from cereals to salads, from baked goods to beverages. I’m not a fan of the dry chia sprinkle: Chia seeds are most digestible when allowed to soak and swell. Therefore, I favor adding them to blended concoctions, then leaving enough time for the tiny powerhouses to plump. The result is thickened puddings with luscious pebbly beads, reminiscent of tapioca. The procedure for making chia seed pudding is quick, simple, and consistent. Whiz together a flavorful blend, stir in some chia, and refrigerate for at least 30 minutes to allow the seeds to thicken. The array of potential flavor permutations are vast. In the video, I demonstrate two berry-based puddings, each one ideal to savor alone or to layer into a colorful parfait. You’ll need a stand blender to pulverize the ingredients; a high-powered blender is the gold standard, but it’s not essential. The first purée that I show has a base of blueberries. Start with 2 cups of the fruit, either fresh or frozen. If you’re using frozen, let the berries rest a few minutes to defrost. Add 1/2 cup cashews, ideally after having soaked them for 2 hours before draining. Soaking the cashews allows for maximum nutrient absorption and digestibility. The sweetener in this pudding is a mere 4 dates. Any variety of date (make sure to remove the pit!) is fine, but the medjool variety is the softest and sweetest. This resulting pudding is sweet enough without being cloying. A couple tablespoons coconut oil—virgin or aroma-free—will also help keep your blood sugar stable as well as ensure that the pudding has a luxurious texture. One tablespoon vanilla and a generous sprinkling of cinnamon complete the flavorings. A cup of liquid is necessary for proper blending. In the video, I use coconut water, but plain water would be fine as well. Give the ingredients a good whiz until well combined. Transfer the purée to a bowl or container, then stir in 6 tablespoons chia. The micro seeds need a bit of time to work their magic and swell. Transfer the pudding to the refrigerator and leave for 30 minutes minimum, preferably longer. The next strawberry chia delight that I show in the video is simplicity itself. Blend well 3 cups strawberries (if frozen, defrost a bit), 1/4 cup raw honey, and 3/4 cup coconut milk, which lends the needed richness and body to the finished dish. Add a splash vanilla, and give a long enough whiz in the blender until the base is smooth. Transfer to a bowl or container, and stir in 1/4 cup chia. Refrigerate for a minimum of 30 minutes, but longer is even better to allow for the seeds to expand as much as possible. The puddings last refrigerated for at least a week, and they each yield 4 to 6 luscious servings. Either of them alone—or the two in combination—can make a great snack or low-sugar dessert. You can also leave them refrigerated for a convenient grab-and-go breakfast. One favorite breakfast of mine is the combination of puddings layered in a parfait or martini glass with sheep’s milk yogurt. The blend tastes tart and sweet, looks gorgeous, and contains just enough fat, fiber, and fruit to keep you happily sated until lunch. Share on Facebook and Twitter | Breakfast, desserts, Gluten Free, Gluten Free, Snacks | No comments
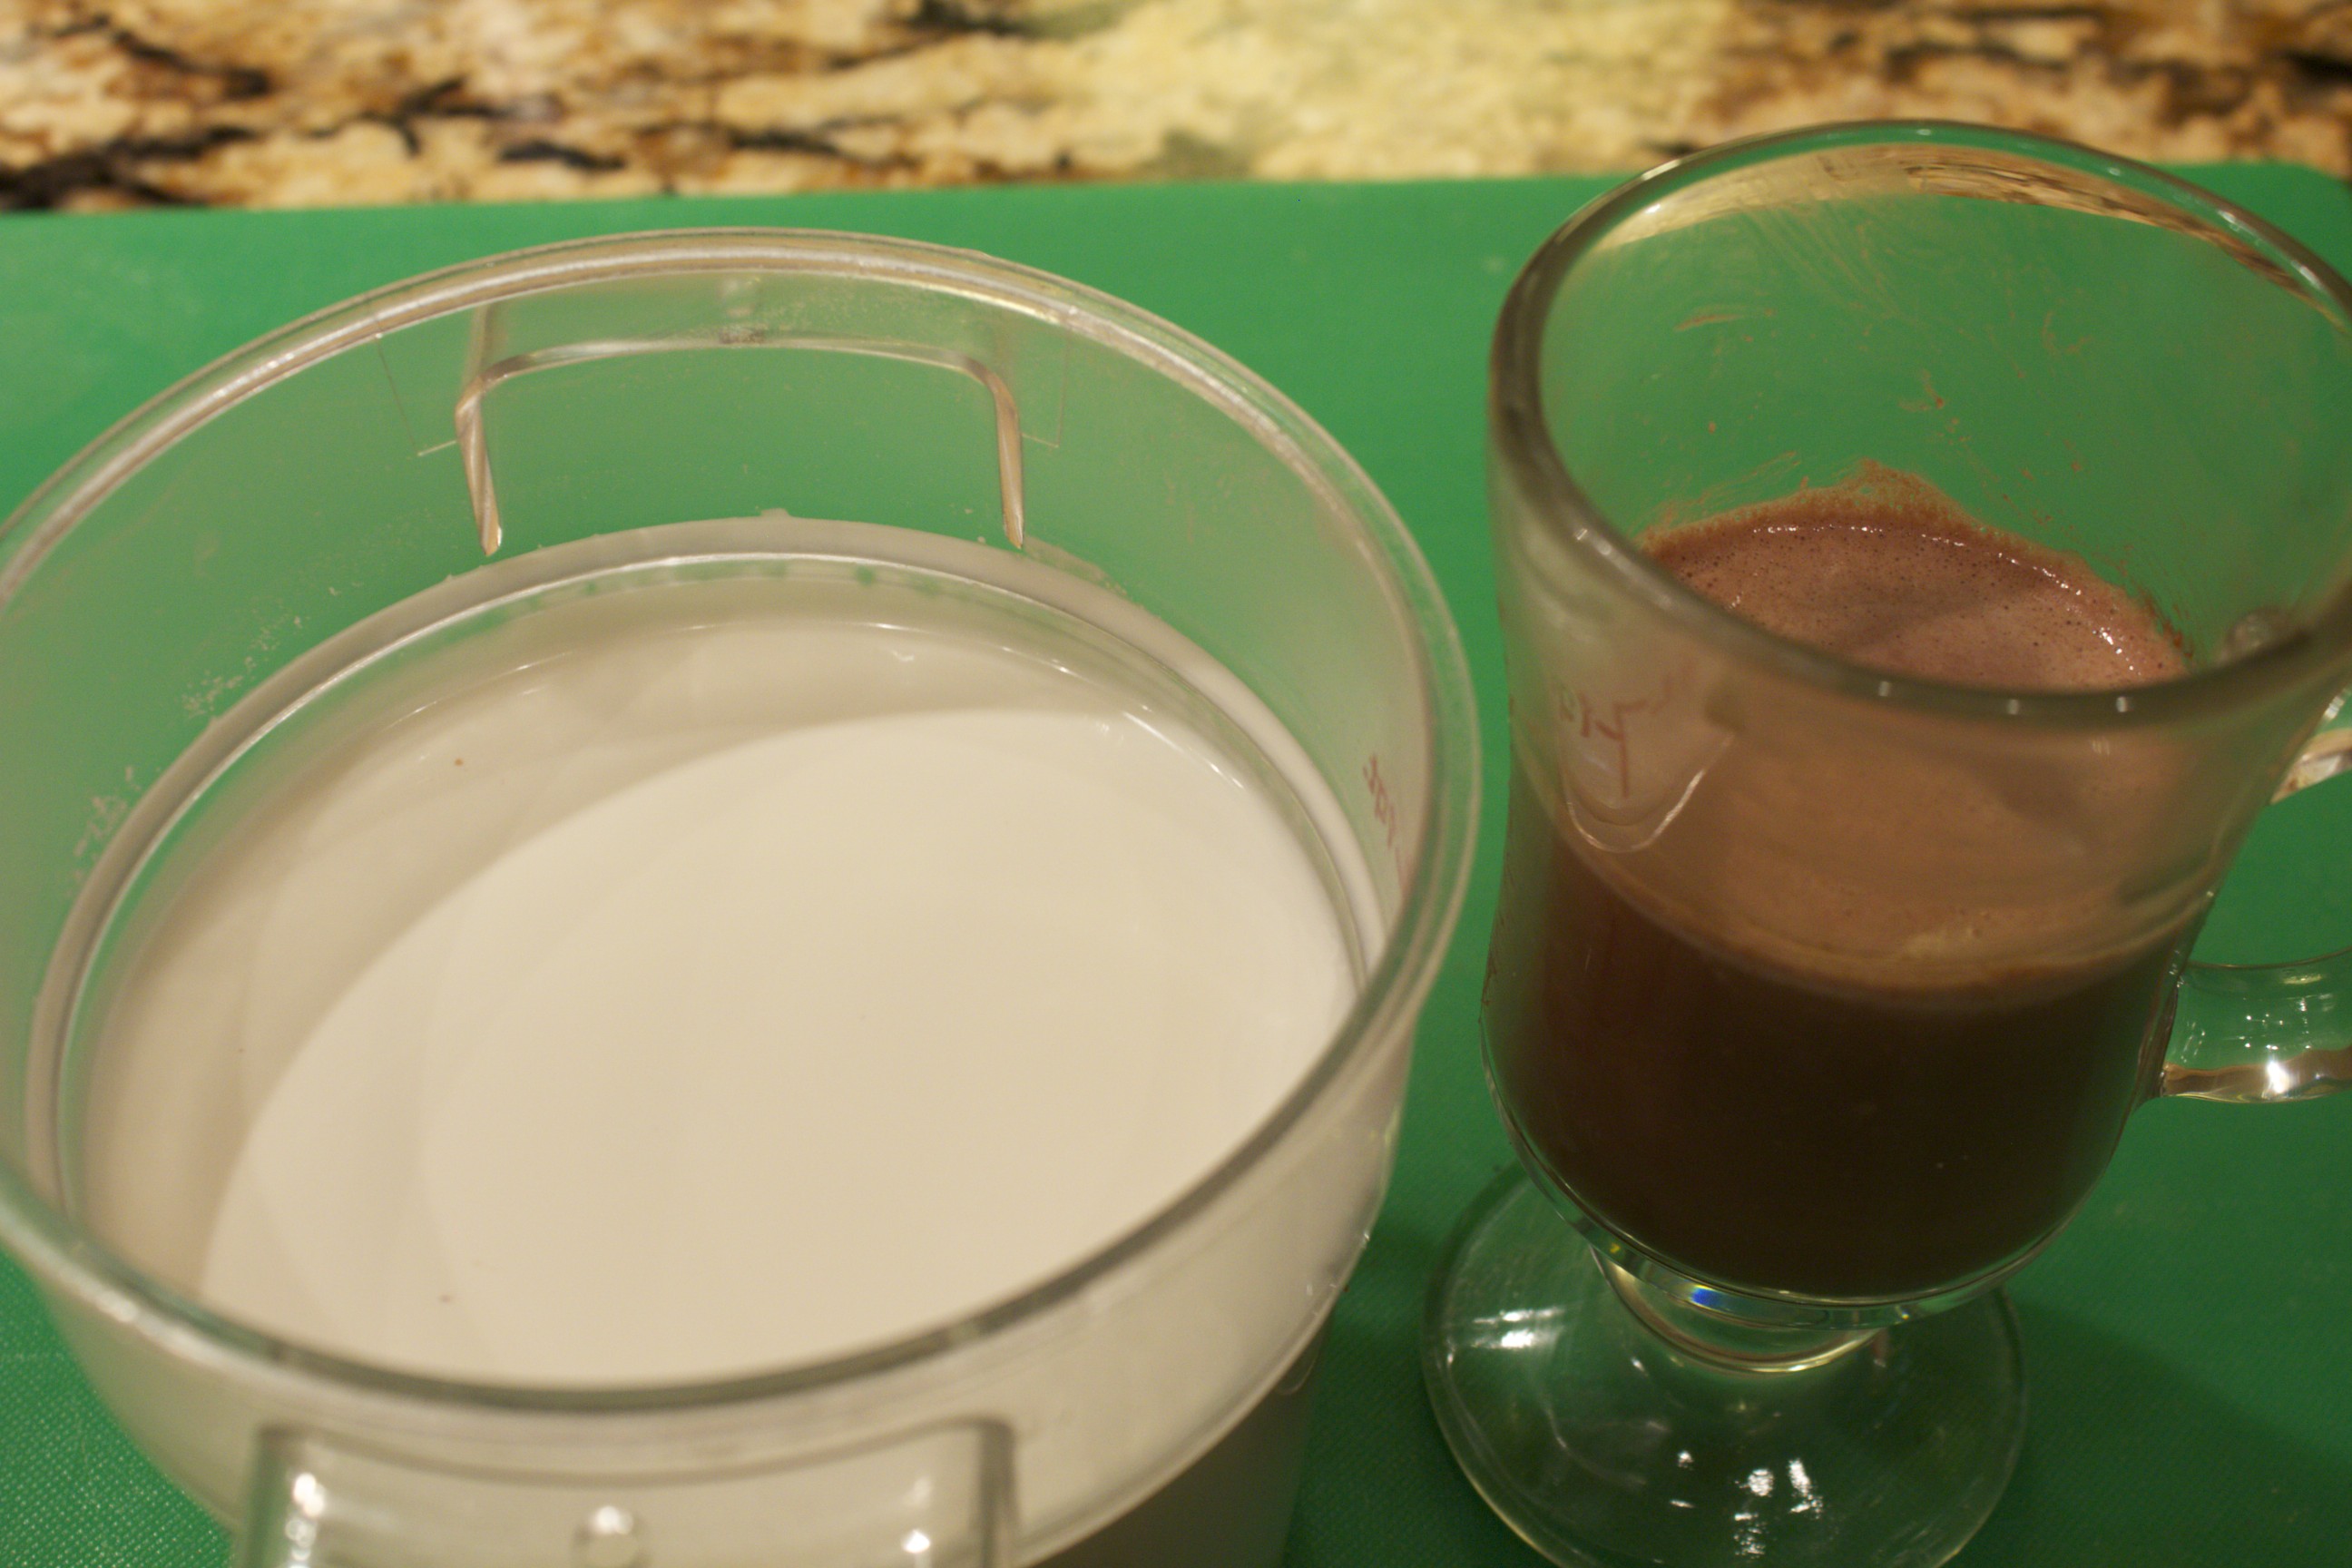
Homemade Nut Milk In today’s video, I show just how easy it is to make your own nut milks. Homemade versions are not only fresher than the store-bought (which contain synthetic vitamins, thickeners, and sweeteners): they are also healthier and more flavorful. You can use these versatile beverages as a base for smoothies, hot chocolate, or cereal, or as an alternative to dairy in your baked goods. Or, add a touch of natural sweetener and a dash of spice to make a simple nut-milk drink. The basic prep technique is the same for most nuts. Step one is to soak the nuts. Almonds require a good overnight soak; it’s even okay to let them go for as long as 12 hours. The reason for the soak is as follows: nuts and seeds are naturally adapted to lie dormant in nature until proper sprouting conditions are present. When it rains, nuts and seeds get wet; then they germinate, and the plants grow. When we soak the almonds, we are mimicking nature’s incubating process. When there is moisture, enzyme inhibitors and toxic substances called phytic acid are washed away naturally. In other words, phytic acid is nature’s padlock, and water is the key. Once the nuts are soaked, all of the enzymes & minerals available in them—almonds have phosphorous, magnesium, manganese, & copper—become available to the body. These soaked nuts become swollen and soft so that they blend easily into a rich nut milk, and they are noticeably easy to digest. Next you rinse and drain the nuts. If you’re not ready to make nut milk right away, leave the drained nuts refrigerated for up to 3 days. When ready, blend them with fresh water at a ratio of 3 parts water to 1 part nuts. A high-speed blender, such as a Vitamix, is convenient for whizzing the nuts into a foamy beverage in a blink; other blenders take a couple of minutes. The last step is to squeeze the frothy liquid through a nylon mesh nut bag, which you can conveniently use over and over again, or a double layer of cheesecloth draped over a strainer. The leftover pulp has all the flavor squeezed out of it; you can simply compost or discard it. Cashew milk is different from the typical nut milk. Cashews blend up so pulverized that the particles squeeze through the fine mesh of the bag, so don’t bother to strain them! Do add an extra cup water for a 4 to 1 ratio of water to cashews; this way your milk won’t be too heavy or too thick. In the last part of the video, I demo a speedy hot chocolate made with only two other ingredients besides the cashew milk. I stir a tablespoon of cocoa powder and 2 tablespoons maple syrup in the bottom of a small pot until bubbling; then I add a couple cups of nut milk and let the liquid come to a boil. That’s it: soothing and delectable, and just one of the many luscious comestibles that you can concoct with homemade nut milk.
 Cashew Milk and Hot Chocolate Share on Facebook and Twitter | Beverages, Chocolate, Gluten Free, Kitchen Tips, Natural Sweeteners, nuts and seeds, Snacks, techniques | No comments
Toffee-Ginger Nut Squares Delicious treats are part of the joy of any celebration. In this video, I show you how to make one of my absolute favorite delectables: toffee-ginger nut squares. These melt-in-your-mouth bars are nutty, buttery, gingery, and salty—a taste combination that lingers tinglingly on your palette. Even a small square is satisfying. You can make up a batch and freeze them. You can even make these gluten-free, by replacing the pastry flour with sorghum flour. Best of all, these bite-sized morsels make special edible holiday gifts your loved ones will really appreciate. Start by buttering an 8×8 baking dish, then line it with parchment that overhangs the edges on two sides; these handles are convenient for when you transfer the finished bars to the cutting board. Begin with the crust. Sift together one cup of whole wheat pastry flour with ¼ teaspoon each baking powder and salt, and set it aside. Use an electric or hand mixer to beat 6 tablespoons butter with 1/3 cup of maple sugar (or any other unprocessed granulated sugar) for a couple of minutes, until well-combined. Then beat in the sifted flour mixture, followed by ¼ cup finely chopped nuts. In the video, I make the squares with pecans, but cashews and macadamia nuts are delicious as well. Press the crust (which looks crumbly at first) into the prepared baking dish, and bake it for 10 minutes in a 350˚F preheated oven, just until lightly colored. While the crust is baking, make the topping. Melt 6 tablespoons butter and ¾ cup chopped pecans (use the same variety of nuts that you added to the crust) in a small pot. Cook for a couple of minutes over medium-high heat, stirring constantly, until the butter is foamy and the nuts are fragrant. Then stir in the rest of the ingredients: ¼ cup maple sugar (or the same sugar that you used for the crust), 2 tablespoons brown rice syrup, and ½ cup finely chopped crystallized ginger. Let the mixture simmer for a couple of minutes. Whisk two eggs in a medium bowl. Add the hot liquid slowly at first to temper the eggs, then faster as the eggs warm. Stir in 2 tablespoons pastry flour (or sorghum flour). Pour this mix, spreading evenly with a spatula, over the crust; bake for 20 to 25 minutes, until the top sets and develops a luscious caramel color. Let the squares cool to room temperature in the pan, then sprinkle the top with coarse sea salt; lightly press the salt granules into the top. Using the flaps of the parchment as handles, lift the bars out of the pan and transfer them to a cutting board. Cut into squares: sixteen if they are for a full dessert, and twenty-five if they are tea treats or holiday gifts. Keep the squares covered, at room temperature, for up to five days, refrigerate them for up to two weeks, or freeze to have on hand any time. This way, you’ll have an exciting delight ready for when you have guests over, or for when you want a little extra pleasure. Happy holidays!  Toffee-Ginger Nut Squares
Share on Facebook and Twitter | desserts, Gluten Free, Natural Sweeteners, nuts and seeds, Snacks | No comments
Strawberry Guacamole 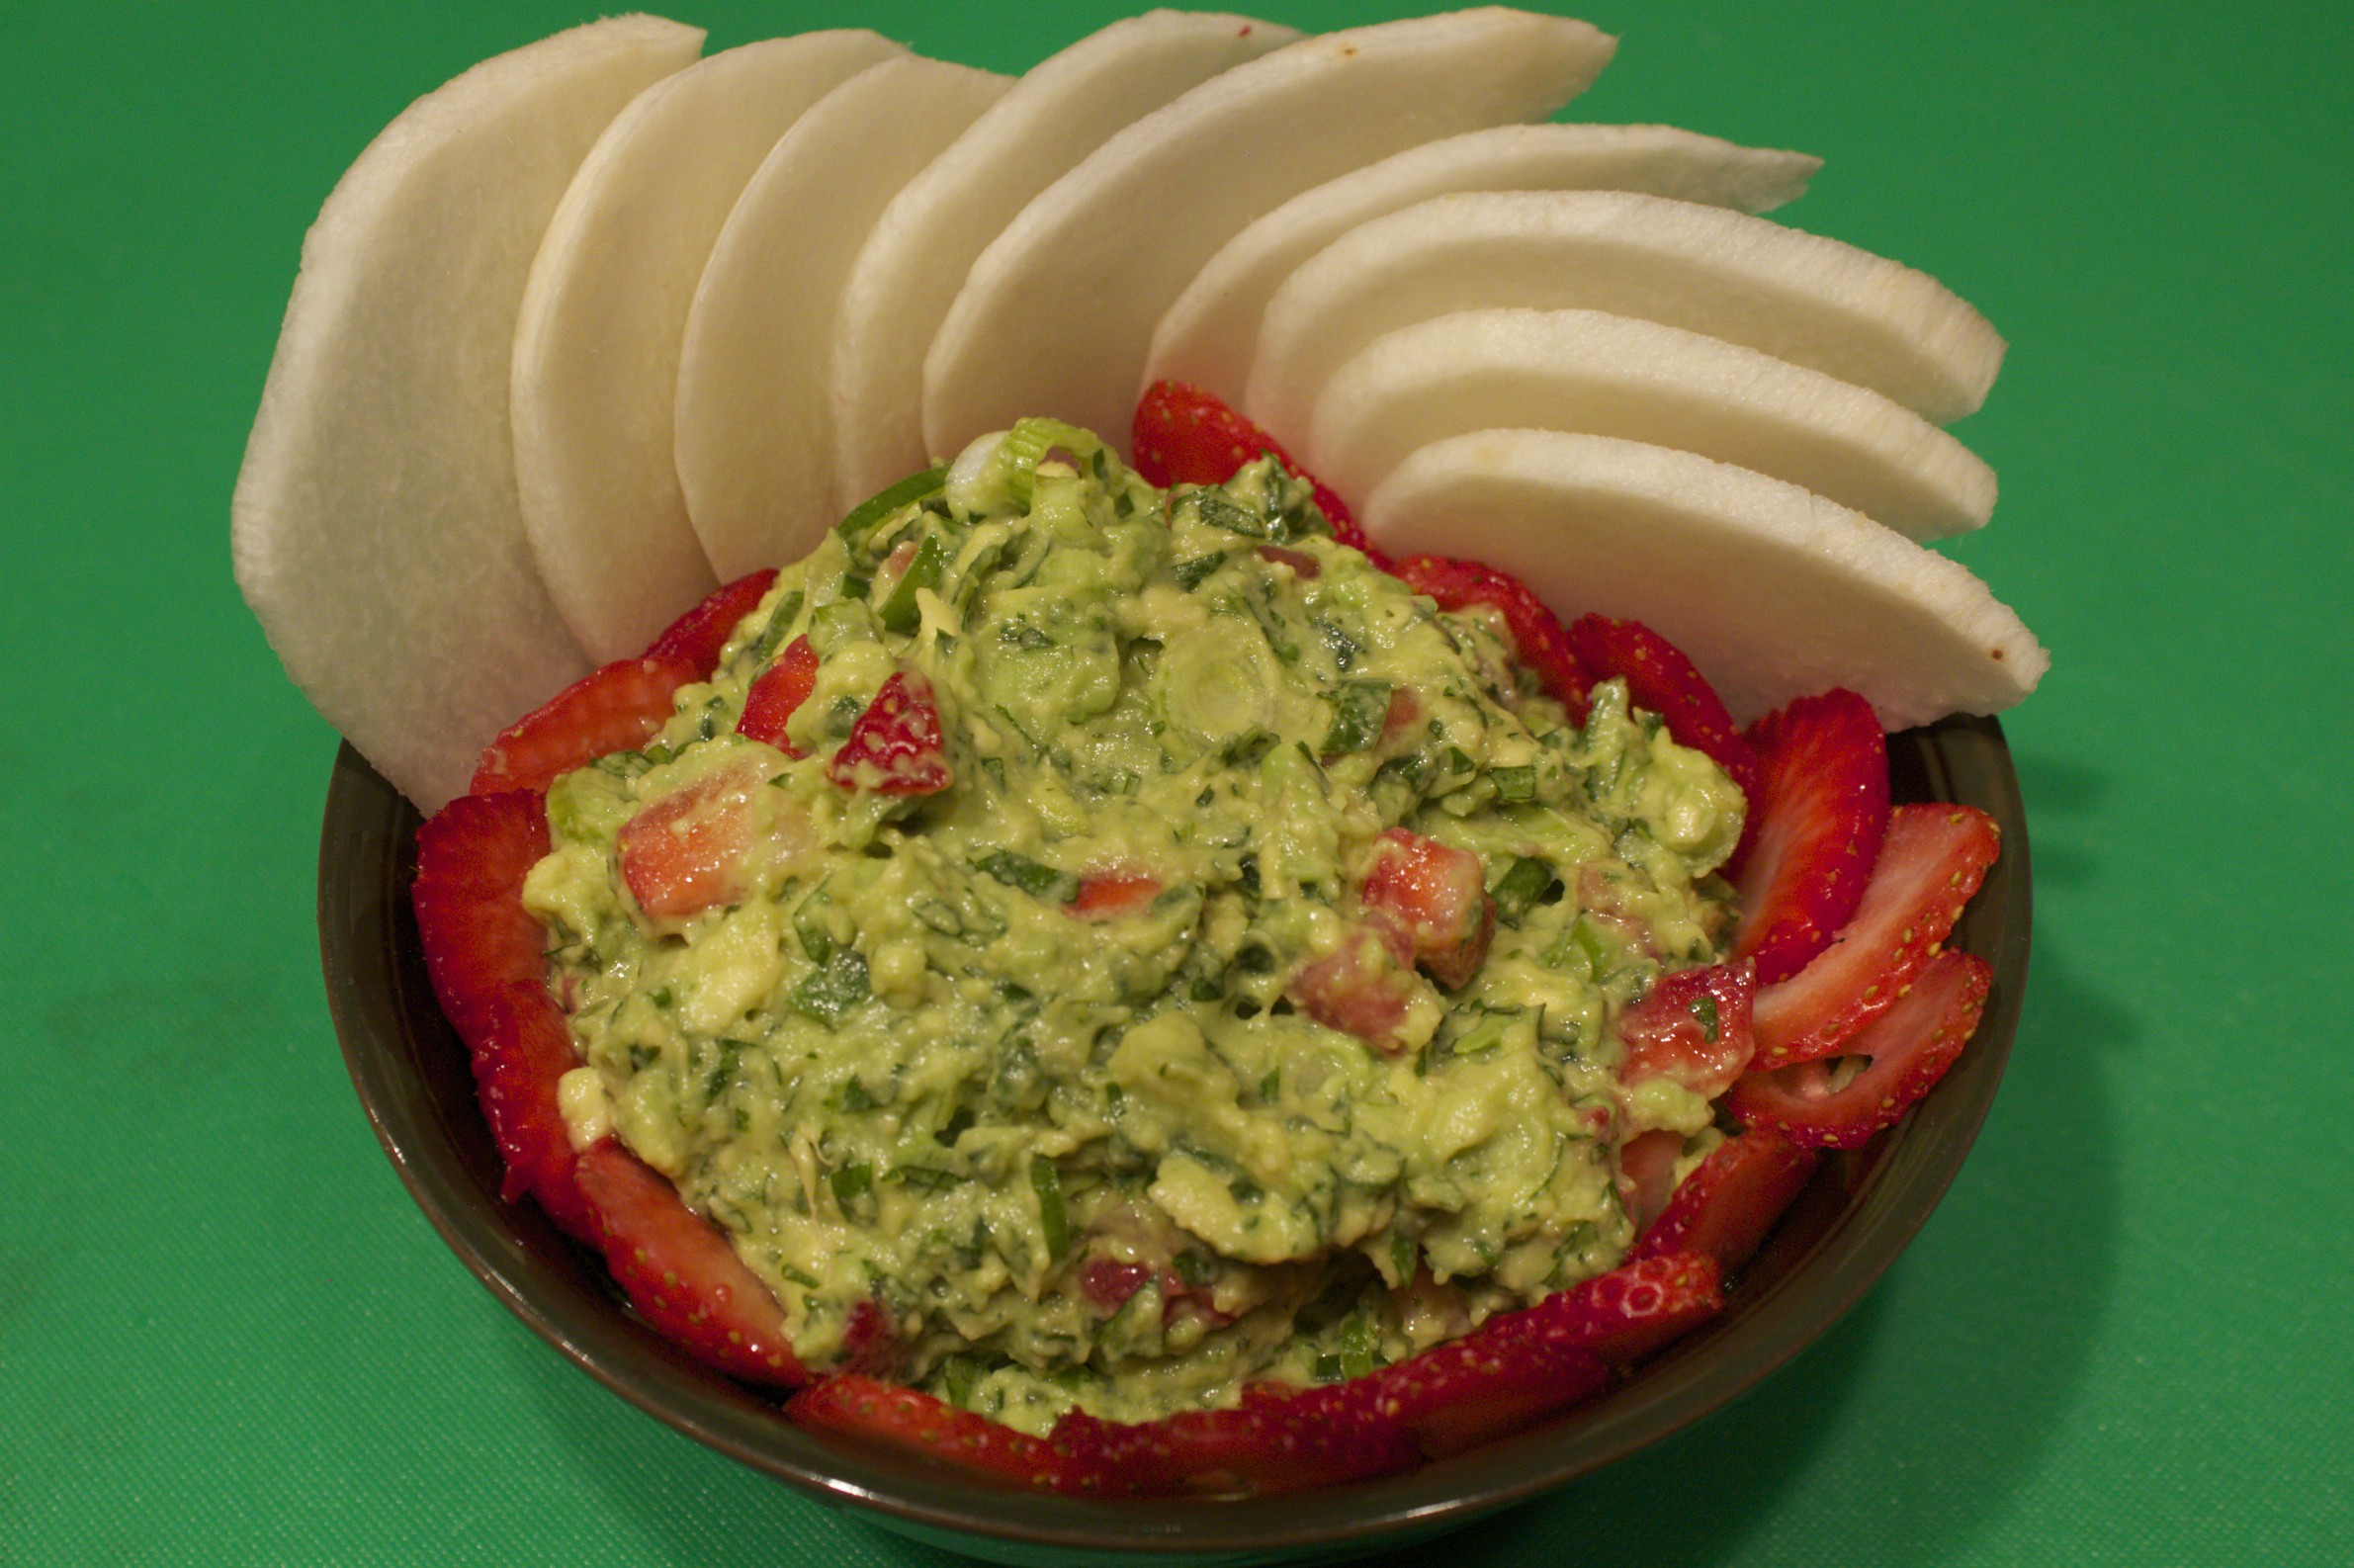 Strawberry Guacamole with Jicama Chips Fruit and avocado (which is technically a fruit itself) go well together, and it is traditional in Mexico to enjoy fruit-studded guacamole. Strawberries and guacamole are an especially refreshing and nutritious combination, containing lots of vitamin C from the strawberries and vitamin E from the avocados, as well as numerous phytochemicals and minerals from both. In the video, I show how to put this dish together in minutes. To make this attractive, summery version of a classic, start with a couple of ripe avocados. Cut them down the middle, and pop out the flesh into a bowl. Fork- mash them to break them up a bit, and then add a couple of tablespoons fresh lime juice as well as a teaspoon of salt. Mix in some essential guacamole ingredients: a couple of thinly sliced scallions, a quarter cup chopped fresh cilantro, and a couple of minced Serrano chiles. Mix all the green ingredients well before gently folding in a cup of chopped strawberries. Keep a few extra sliced strawberries as a garnish around the side of the bowl. I like to serve this colorful dip with jicama, the root vegetable that looks like a tuber but has a refreshing taste resembling that of a water chestnut. Make sure to choose a firm one free of too many blemishes. Peel the skin with a Y-shaped peeler, and cut it in half to safely position the vegetable cut-side down on the board. Then you can slice it into “chips.” Jicama makes a great alternative to the more typical corn chips. It is low-calorie and contains lots of fiber, as well as Vitamin C, making this a nutritious, light-but-filling snack or appetizer, as well a refreshing way to celebrate late spring and summer. Share on Facebook and Twitter | Fruit, Snacks, Vegetables | No comments
Maple Sugar and Candied Nuts When I want to use a granulated sugar, I invariably reach for maple sugar as my first choice. This natural sweetener has a subtle maple taste, and works well in many recipes that call for granulated sugar. Maple sugar is simply maple syrup that has been cooked until the water in the syrup has evaporated off. The clumps that are left are ground into smaller pieces, then sifted according to size – powder, granules, or a combination of the two. Nothing is added during the processing.
Maple sugar is relatively expensive. However, when purchased from the source, shipping and all, it is considerably less expensive than purchasing it in a store. I get mine directly from Coombs family farms, a wonderful sugar plant based in Vermont. Their phone number is 888 266-6271 and their website is Coombsfamilyfarms.com. They ship quickly, and you can purchase a choice of maple granules, powdered maple sugar, or a combination or the two. I use the maple powder for all of my maple sugar recipes, since this grind is the most like granulated sugar.
This morning I made a couple batches candied nuts to give away. I love candied nuts. When you make them yourself, you can use just the right amount of high quality sweetener to enhance great nutty flavor. A sprinkling of these crunchy nuts add so much pizzazz to hot breakfast cereals, desserts, salads and soups. They stay fresh in the pantry for two to three months, making them wonderful hostess gifts and edible presents. Bundle them in festive party bags for a treat that everyone will enjoy.
Here are a couple of my favorite combinations. These recipes both take a minimum of prep time and the oven does most of the work. Watch the video on how to make candied nuts. This first recipe is for candied pecans. I toss one cup roughly chopped pecans with 2 tablespoons maple syrup and 2 tablespoons maple sugar. I spread them on a parchment-covered baking dish and place them in the oven for 20 minutes. I stir the pecans one time during the baking, so that they caramelize evenly. The pecans are ready when they are dry all the way through. This technique works well with chopped walnuts, almonds, and blanched hazelnuts as well. When I remove the pecans from the oven, I let them cool before packing them. These pecans keep covered, at room temperature, for two to three months.
 Candied Pecans The second recipe is for coconut cashews, one of my favorites. The mix is an exciting combination of sweet, spicy, and crunchy, which makes, among other uses, an excellent garnish for a zesty carrot soup. I toss together in a medium bowl one cup of roughly chopped cashews, ½ cup unsweetened coconut, 1/3 cup maple sugar, ¼ teaspoon salt, and ¼ teaspoon cayenne. I then add one egg white to bind the whole mix together. Again, I’m spreading it on a parchment-covered baking sheet and baking it for 15 to 20 minutes at 325˚. I have to stir this mix twice during the baking session to ensure that the more delicate coconut colors evenly. (By the way, I pull out my tray to stir the mix, so I don’t lower the temperature of the oven. Then I return the tray to the oven to finish baking.) When the mix is evenly browned, I remove the tray from the oven and let it cool to room temperature. I break up the clumps into small clusters that are now ready to be stored or packed. Sweet holidays!  Candied Coconut-Cashews
 Edible Gift Packages
Share on Facebook and Twitter | Kitchen Tips, Natural Sweeteners, Recipes, Snacks, Where To Buy (Sources) | No comments
|