|
Home Made Nut Butters 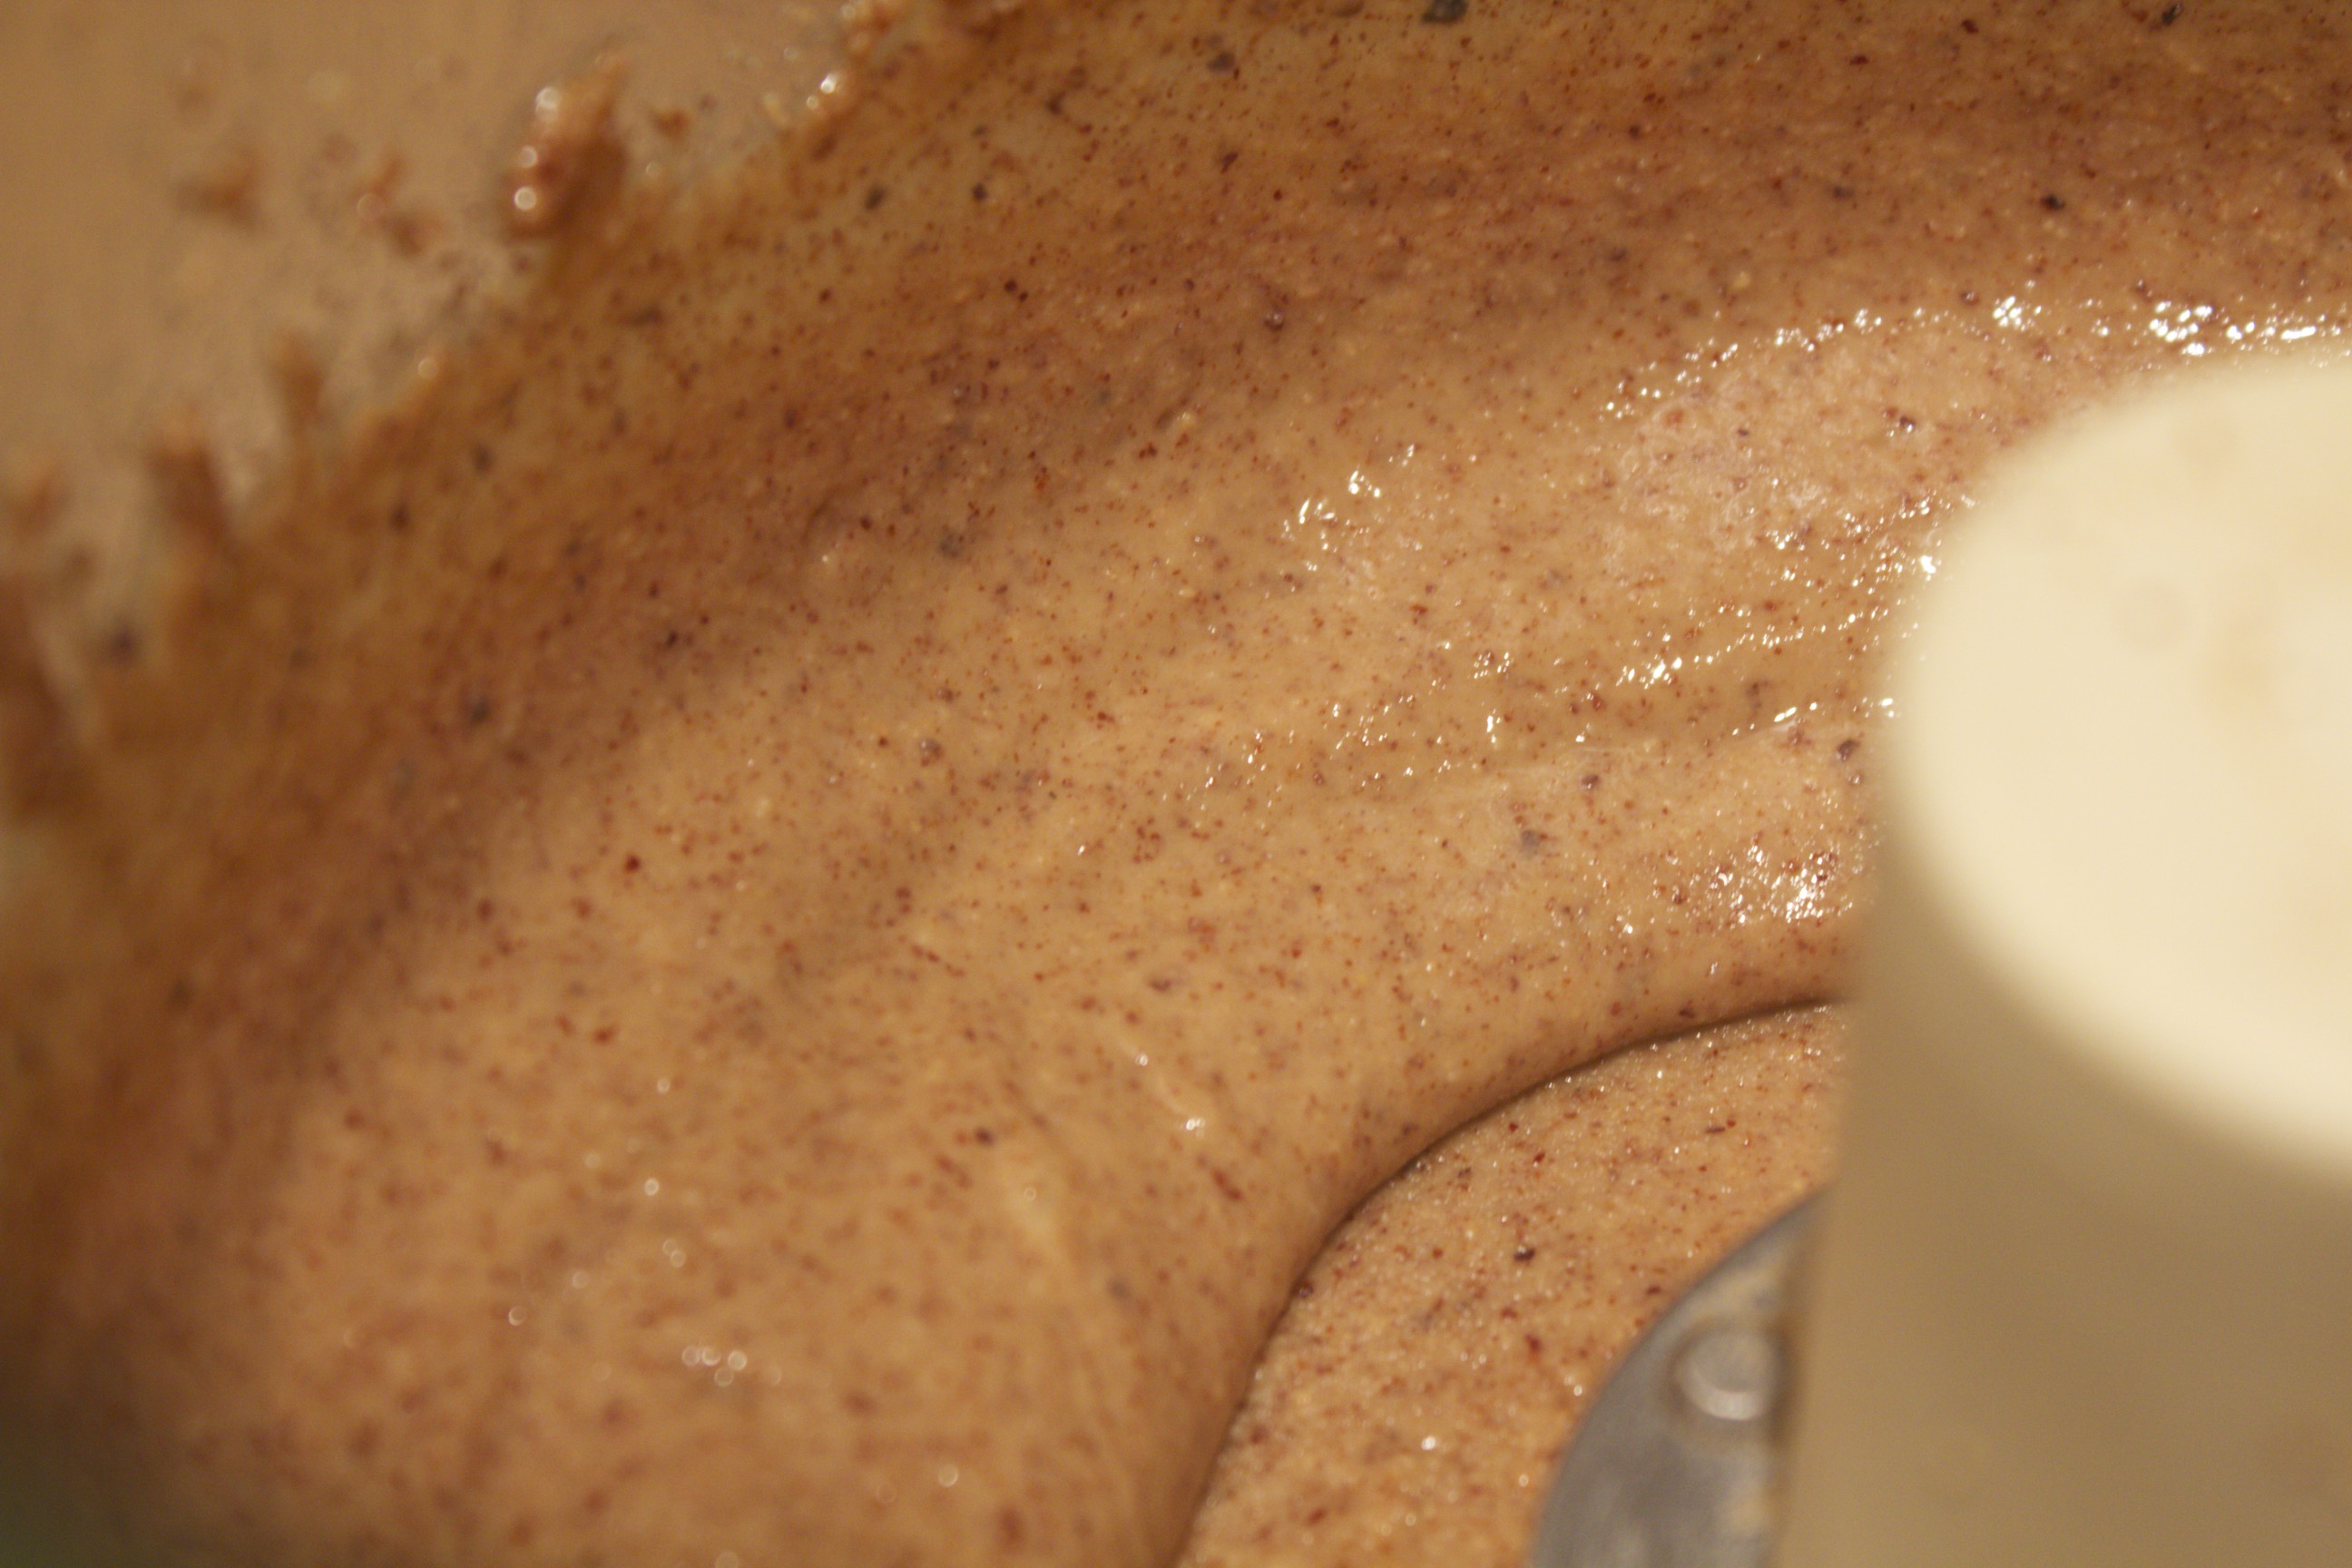 Finished Almond Butter In today’s video, I show how to make nut butters from scratch. Not only is homemade nut butter more delicious and economical than the store-bought variety, it’s a lot more digestible. After you do a small amount of preparation, it’s also quite simple to make. Nuts contain an enzyme inhibitor called phytic acid, which keeps them protected from rancidity and growth. They won’t germinate until the right conditions—moisture and time— are present. You can mimic nature’s process by soaking the nuts overnight in water with a little salt (a tablespoon per pound) for flavor. The next step is to drain and rinse the nuts before spreading them on a parchment-covered baking tray. Bake them in an oven set to 300 degrees for about an hour or so— until dry and toasted —to make nut butter that tastes roasted. You can also dry the nuts slowly at low heat, ranging from 115˚ in a dehydrator to 200˚ in an oven. Just make sure that whatever the heat that you use (the lower the temperature, the longer the nuts take to crisp), you don’t remove the nuts until they are really dry. At this point, you can store the prepared nuts at room temperature for up to a month. In today’s video, I’m starting with 3 cups of almonds, about a pound, which turns into 2 cups of butter. The one piece of equipment needed to make nut butter is a food processor fitted with the metal blade. There’s also one essential little trick: rub the inside of the food processor with oil—coconut oil is especially good—which keeps the butter from sticking to the sides. Add the nuts and whirl, and keep processing until you have what you want. That’s all there is to it. In the first stage, the nuts turn to powder. After a couple of minutes of whirling, the nuts start to stick together and clump. At this point, you’ll be able to appreciate how that preliminary greasing keeps the nuts from sticking to the sides. Don’t stop at this first stage; you’ll have better results if you let the processor go longer. After 6 to 12 minutes, the natural oils in the almonds are released and rise to the top; and you have a creamy, smooth, finished butter. Transfer the finished product to jars, and store in the refrigerator. In the video, the almond butter took only 6 minutes, but sometimes it does take longer: be patient, and keep on whirling. The cashew butter I demo in the video took 9 minutes of processing. Cashews, by the way, should be soaked only 4 to 6 hours or else their texture can be compromised. Almonds, hazelnuts, pecans, and walnuts benefit from an overnight soak. I’ve kept the nut butters here simple, but if you like you can stir or pulse in all kinds of flavorings once the butter is finished: salt, raisins, honey, or preserves are just a few ideas. Embellished or simple, the glistening spreads are truly irresistible, and they really do feel lighter on the belly than any store-bought varieties. Once you make your own, you’re likely to be as excited about these as I am, and you’re not likely to want to return to commercial selections. Share on Facebook and Twitter | nuts and seeds, techniques | No comments
Homemade Nut Milk In today’s video, I show just how easy it is to make your own nut milks. Homemade versions are not only fresher than the store-bought (which contain synthetic vitamins, thickeners, and sweeteners): they are also healthier and more flavorful. You can use these versatile beverages as a base for smoothies, hot chocolate, or cereal, or as an alternative to dairy in your baked goods. Or, add a touch of natural sweetener and a dash of spice to make a simple nut-milk drink. The basic prep technique is the same for most nuts. Step one is to soak the nuts. Almonds require a good overnight soak; it’s even okay to let them go for as long as 12 hours. The reason for the soak is as follows: nuts and seeds are naturally adapted to lie dormant in nature until proper sprouting conditions are present. When it rains, nuts and seeds get wet; then they germinate, and the plants grow. When we soak the almonds, we are mimicking nature’s incubating process. When there is moisture, enzyme inhibitors and toxic substances called phytic acid are washed away naturally. In other words, phytic acid is nature’s padlock, and water is the key. Once the nuts are soaked, all of the enzymes & minerals available in them—almonds have phosphorous, magnesium, manganese, & copper—become available to the body. These soaked nuts become swollen and soft so that they blend easily into a rich nut milk, and they are noticeably easy to digest. Next you rinse and drain the nuts. If you’re not ready to make nut milk right away, leave the drained nuts refrigerated for up to 3 days. When ready, blend them with fresh water at a ratio of 3 parts water to 1 part nuts. A high-speed blender, such as a Vitamix, is convenient for whizzing the nuts into a foamy beverage in a blink; other blenders take a couple of minutes. The last step is to squeeze the frothy liquid through a nylon mesh nut bag, which you can conveniently use over and over again, or a double layer of cheesecloth draped over a strainer. The leftover pulp has all the flavor squeezed out of it; you can simply compost or discard it. Cashew milk is different from the typical nut milk. Cashews blend up so pulverized that the particles squeeze through the fine mesh of the bag, so don’t bother to strain them! Do add an extra cup water for a 4 to 1 ratio of water to cashews; this way your milk won’t be too heavy or too thick. In the last part of the video, I demo a speedy hot chocolate made with only two other ingredients besides the cashew milk. I stir a tablespoon of cocoa powder and 2 tablespoons maple syrup in the bottom of a small pot until bubbling; then I add a couple cups of nut milk and let the liquid come to a boil. That’s it: soothing and delectable, and just one of the many luscious comestibles that you can concoct with homemade nut milk.
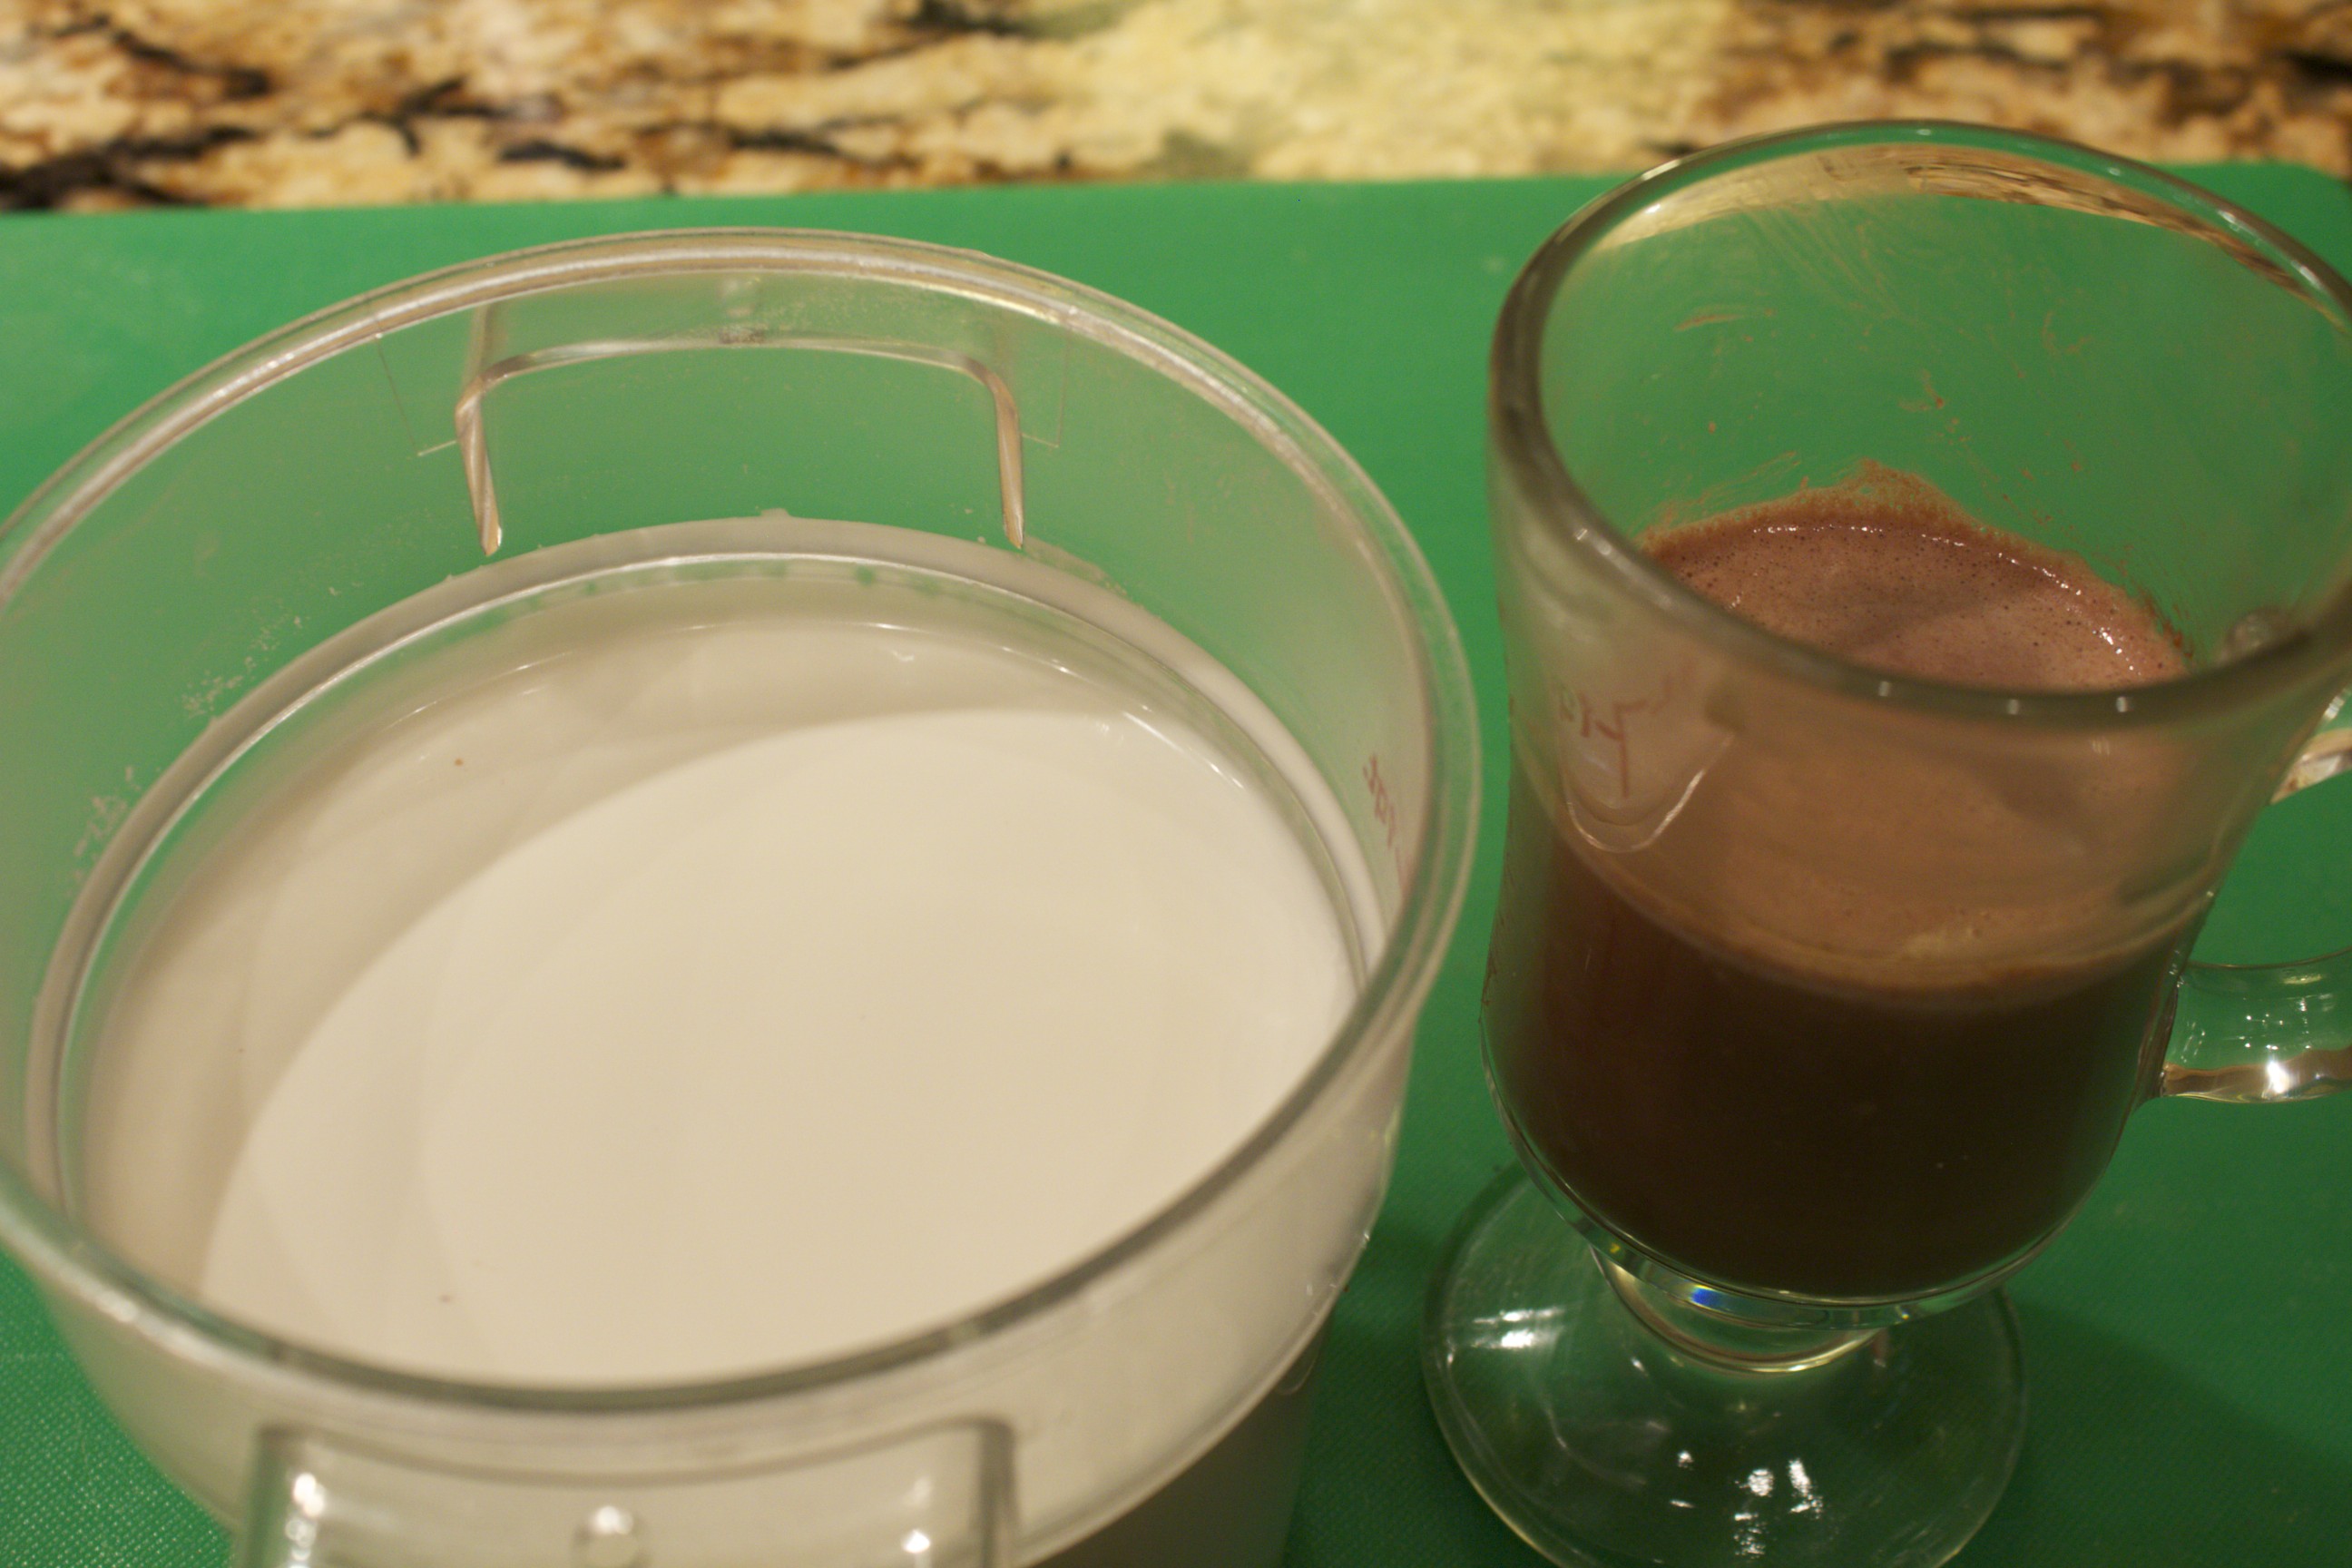 Cashew Milk and Hot Chocolate Share on Facebook and Twitter | Beverages, Chocolate, Gluten Free, Kitchen Tips, Natural Sweeteners, nuts and seeds, Snacks, techniques | No comments
Toffee-Ginger Nut Squares Delicious treats are part of the joy of any celebration. In this video, I show you how to make one of my absolute favorite delectables: toffee-ginger nut squares. These melt-in-your-mouth bars are nutty, buttery, gingery, and salty—a taste combination that lingers tinglingly on your palette. Even a small square is satisfying. You can make up a batch and freeze them. You can even make these gluten-free, by replacing the pastry flour with sorghum flour. Best of all, these bite-sized morsels make special edible holiday gifts your loved ones will really appreciate. Start by buttering an 8×8 baking dish, then line it with parchment that overhangs the edges on two sides; these handles are convenient for when you transfer the finished bars to the cutting board. Begin with the crust. Sift together one cup of whole wheat pastry flour with ¼ teaspoon each baking powder and salt, and set it aside. Use an electric or hand mixer to beat 6 tablespoons butter with 1/3 cup of maple sugar (or any other unprocessed granulated sugar) for a couple of minutes, until well-combined. Then beat in the sifted flour mixture, followed by ¼ cup finely chopped nuts. In the video, I make the squares with pecans, but cashews and macadamia nuts are delicious as well. Press the crust (which looks crumbly at first) into the prepared baking dish, and bake it for 10 minutes in a 350˚F preheated oven, just until lightly colored. While the crust is baking, make the topping. Melt 6 tablespoons butter and ¾ cup chopped pecans (use the same variety of nuts that you added to the crust) in a small pot. Cook for a couple of minutes over medium-high heat, stirring constantly, until the butter is foamy and the nuts are fragrant. Then stir in the rest of the ingredients: ¼ cup maple sugar (or the same sugar that you used for the crust), 2 tablespoons brown rice syrup, and ½ cup finely chopped crystallized ginger. Let the mixture simmer for a couple of minutes. Whisk two eggs in a medium bowl. Add the hot liquid slowly at first to temper the eggs, then faster as the eggs warm. Stir in 2 tablespoons pastry flour (or sorghum flour). Pour this mix, spreading evenly with a spatula, over the crust; bake for 20 to 25 minutes, until the top sets and develops a luscious caramel color. Let the squares cool to room temperature in the pan, then sprinkle the top with coarse sea salt; lightly press the salt granules into the top. Using the flaps of the parchment as handles, lift the bars out of the pan and transfer them to a cutting board. Cut into squares: sixteen if they are for a full dessert, and twenty-five if they are tea treats or holiday gifts. Keep the squares covered, at room temperature, for up to five days, refrigerate them for up to two weeks, or freeze to have on hand any time. This way, you’ll have an exciting delight ready for when you have guests over, or for when you want a little extra pleasure. Happy holidays!  Toffee-Ginger Nut Squares
Share on Facebook and Twitter | desserts, Gluten Free, Natural Sweeteners, nuts and seeds, Snacks | No comments
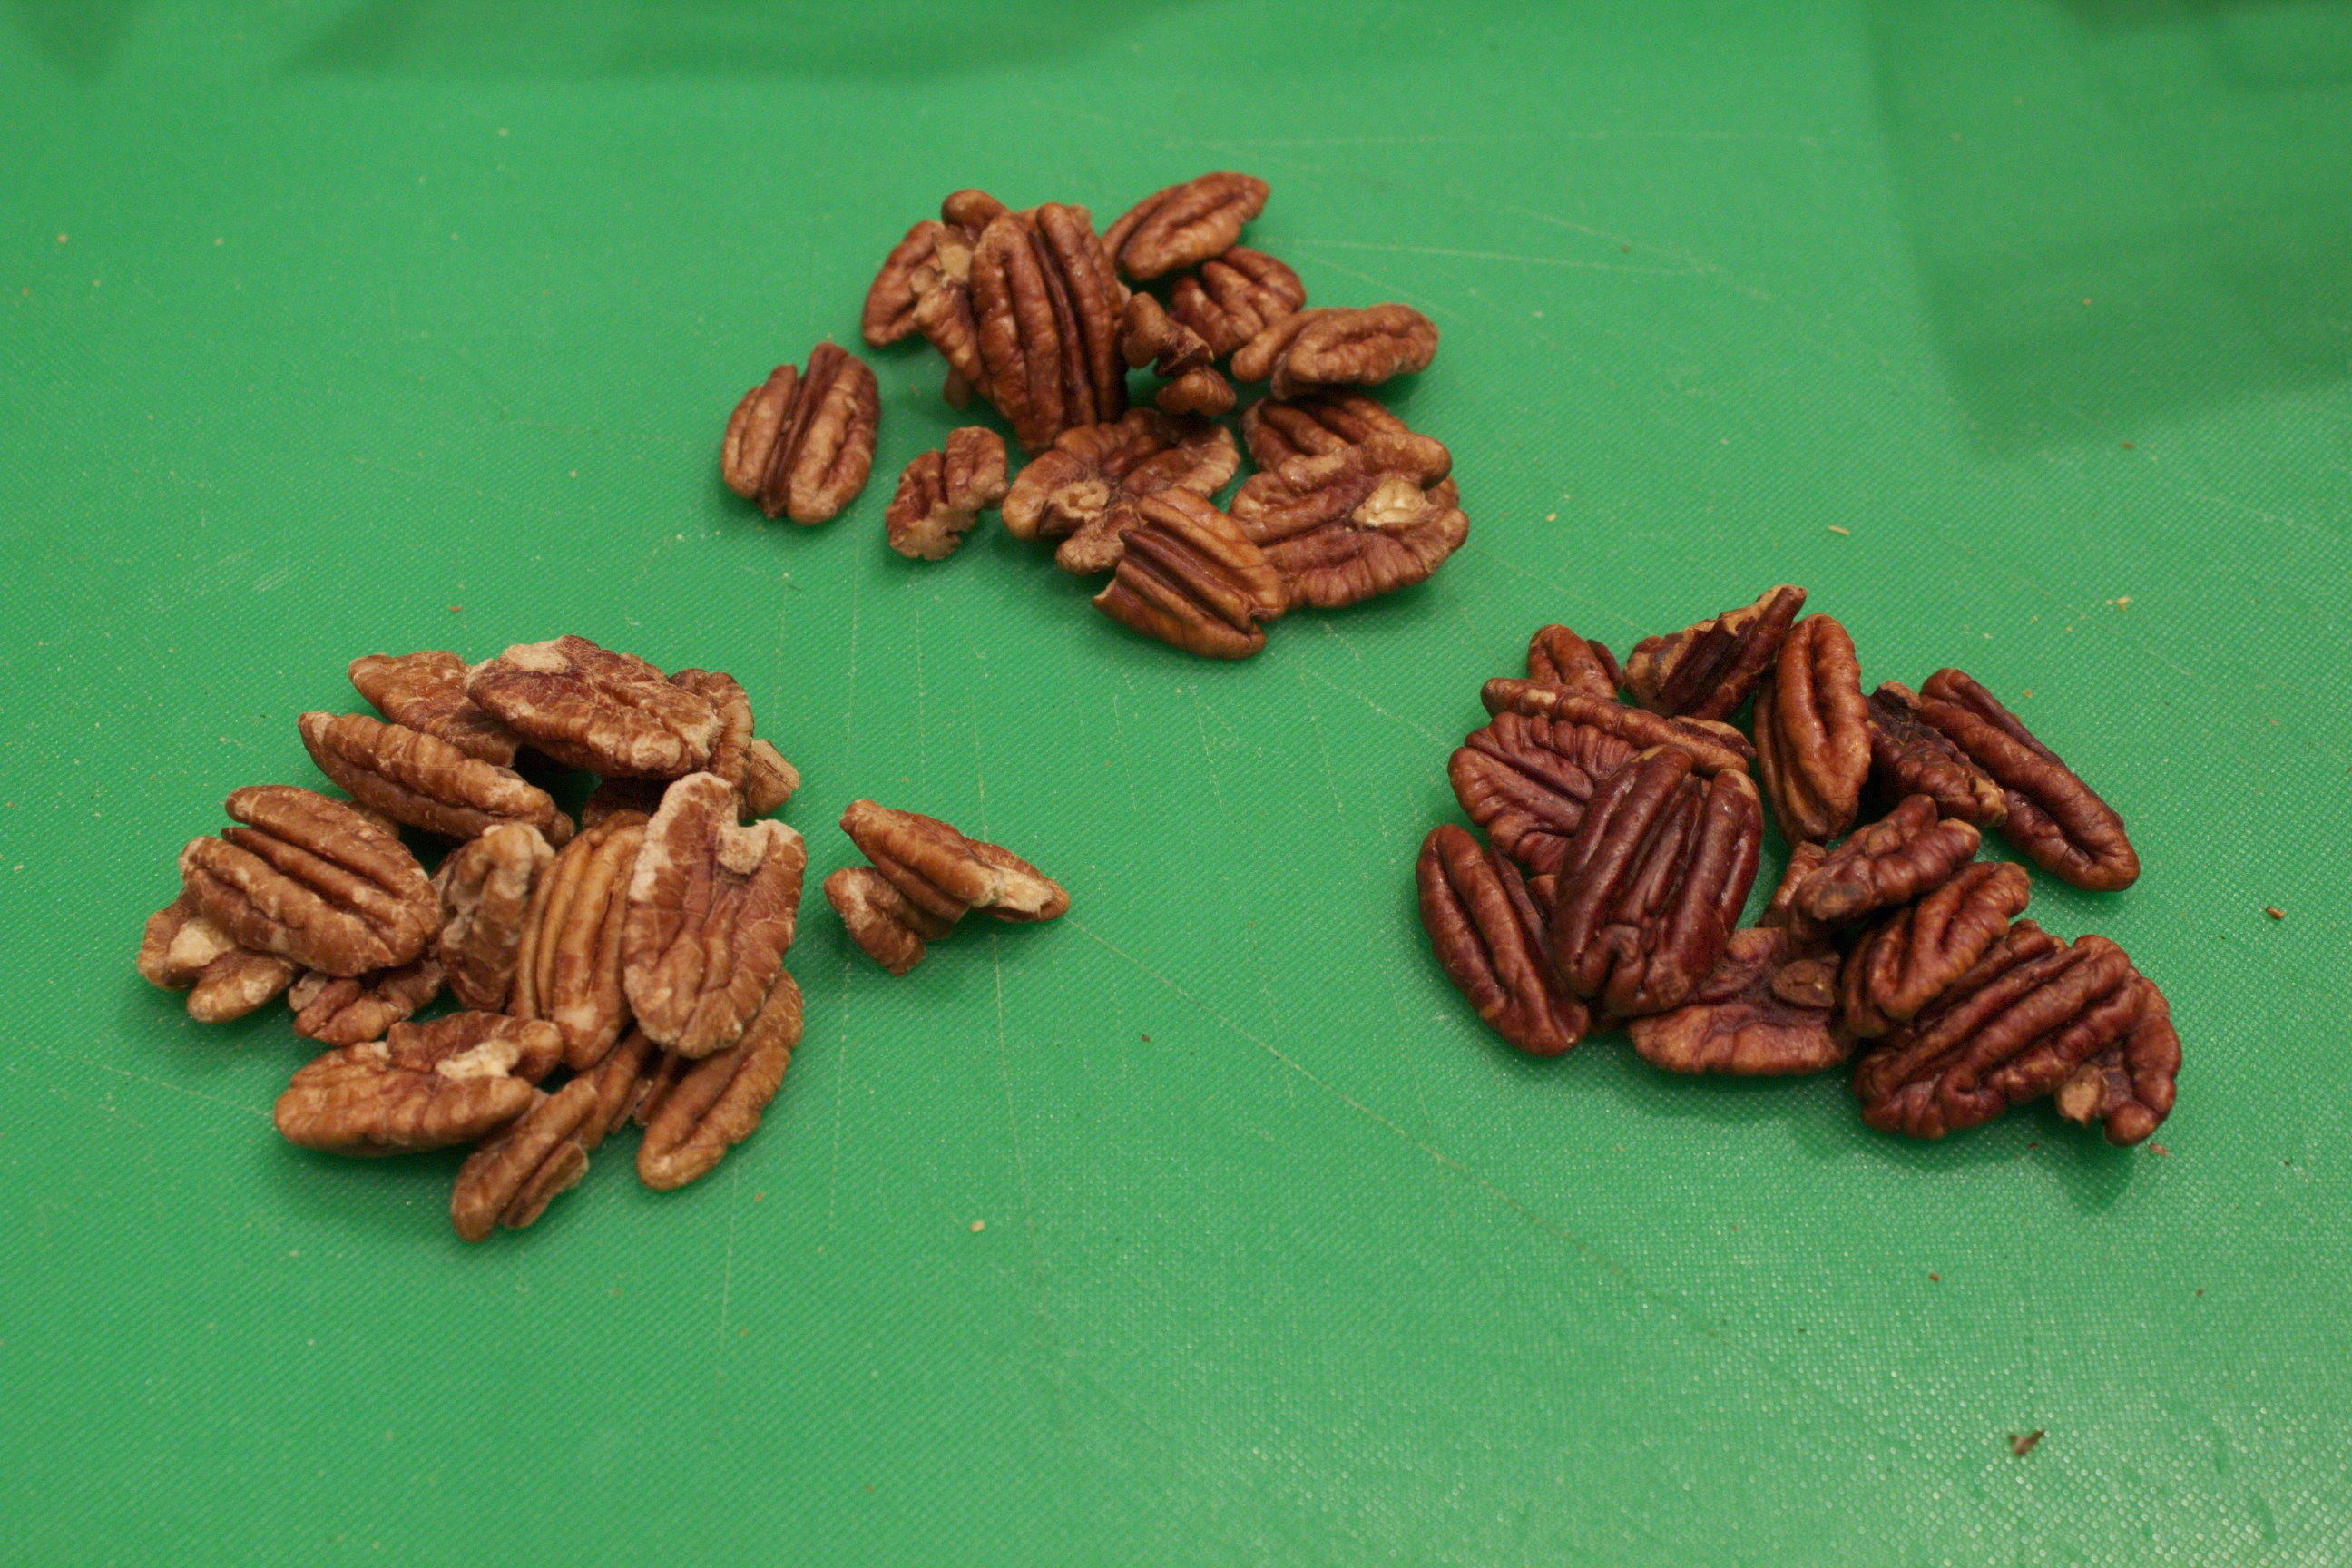
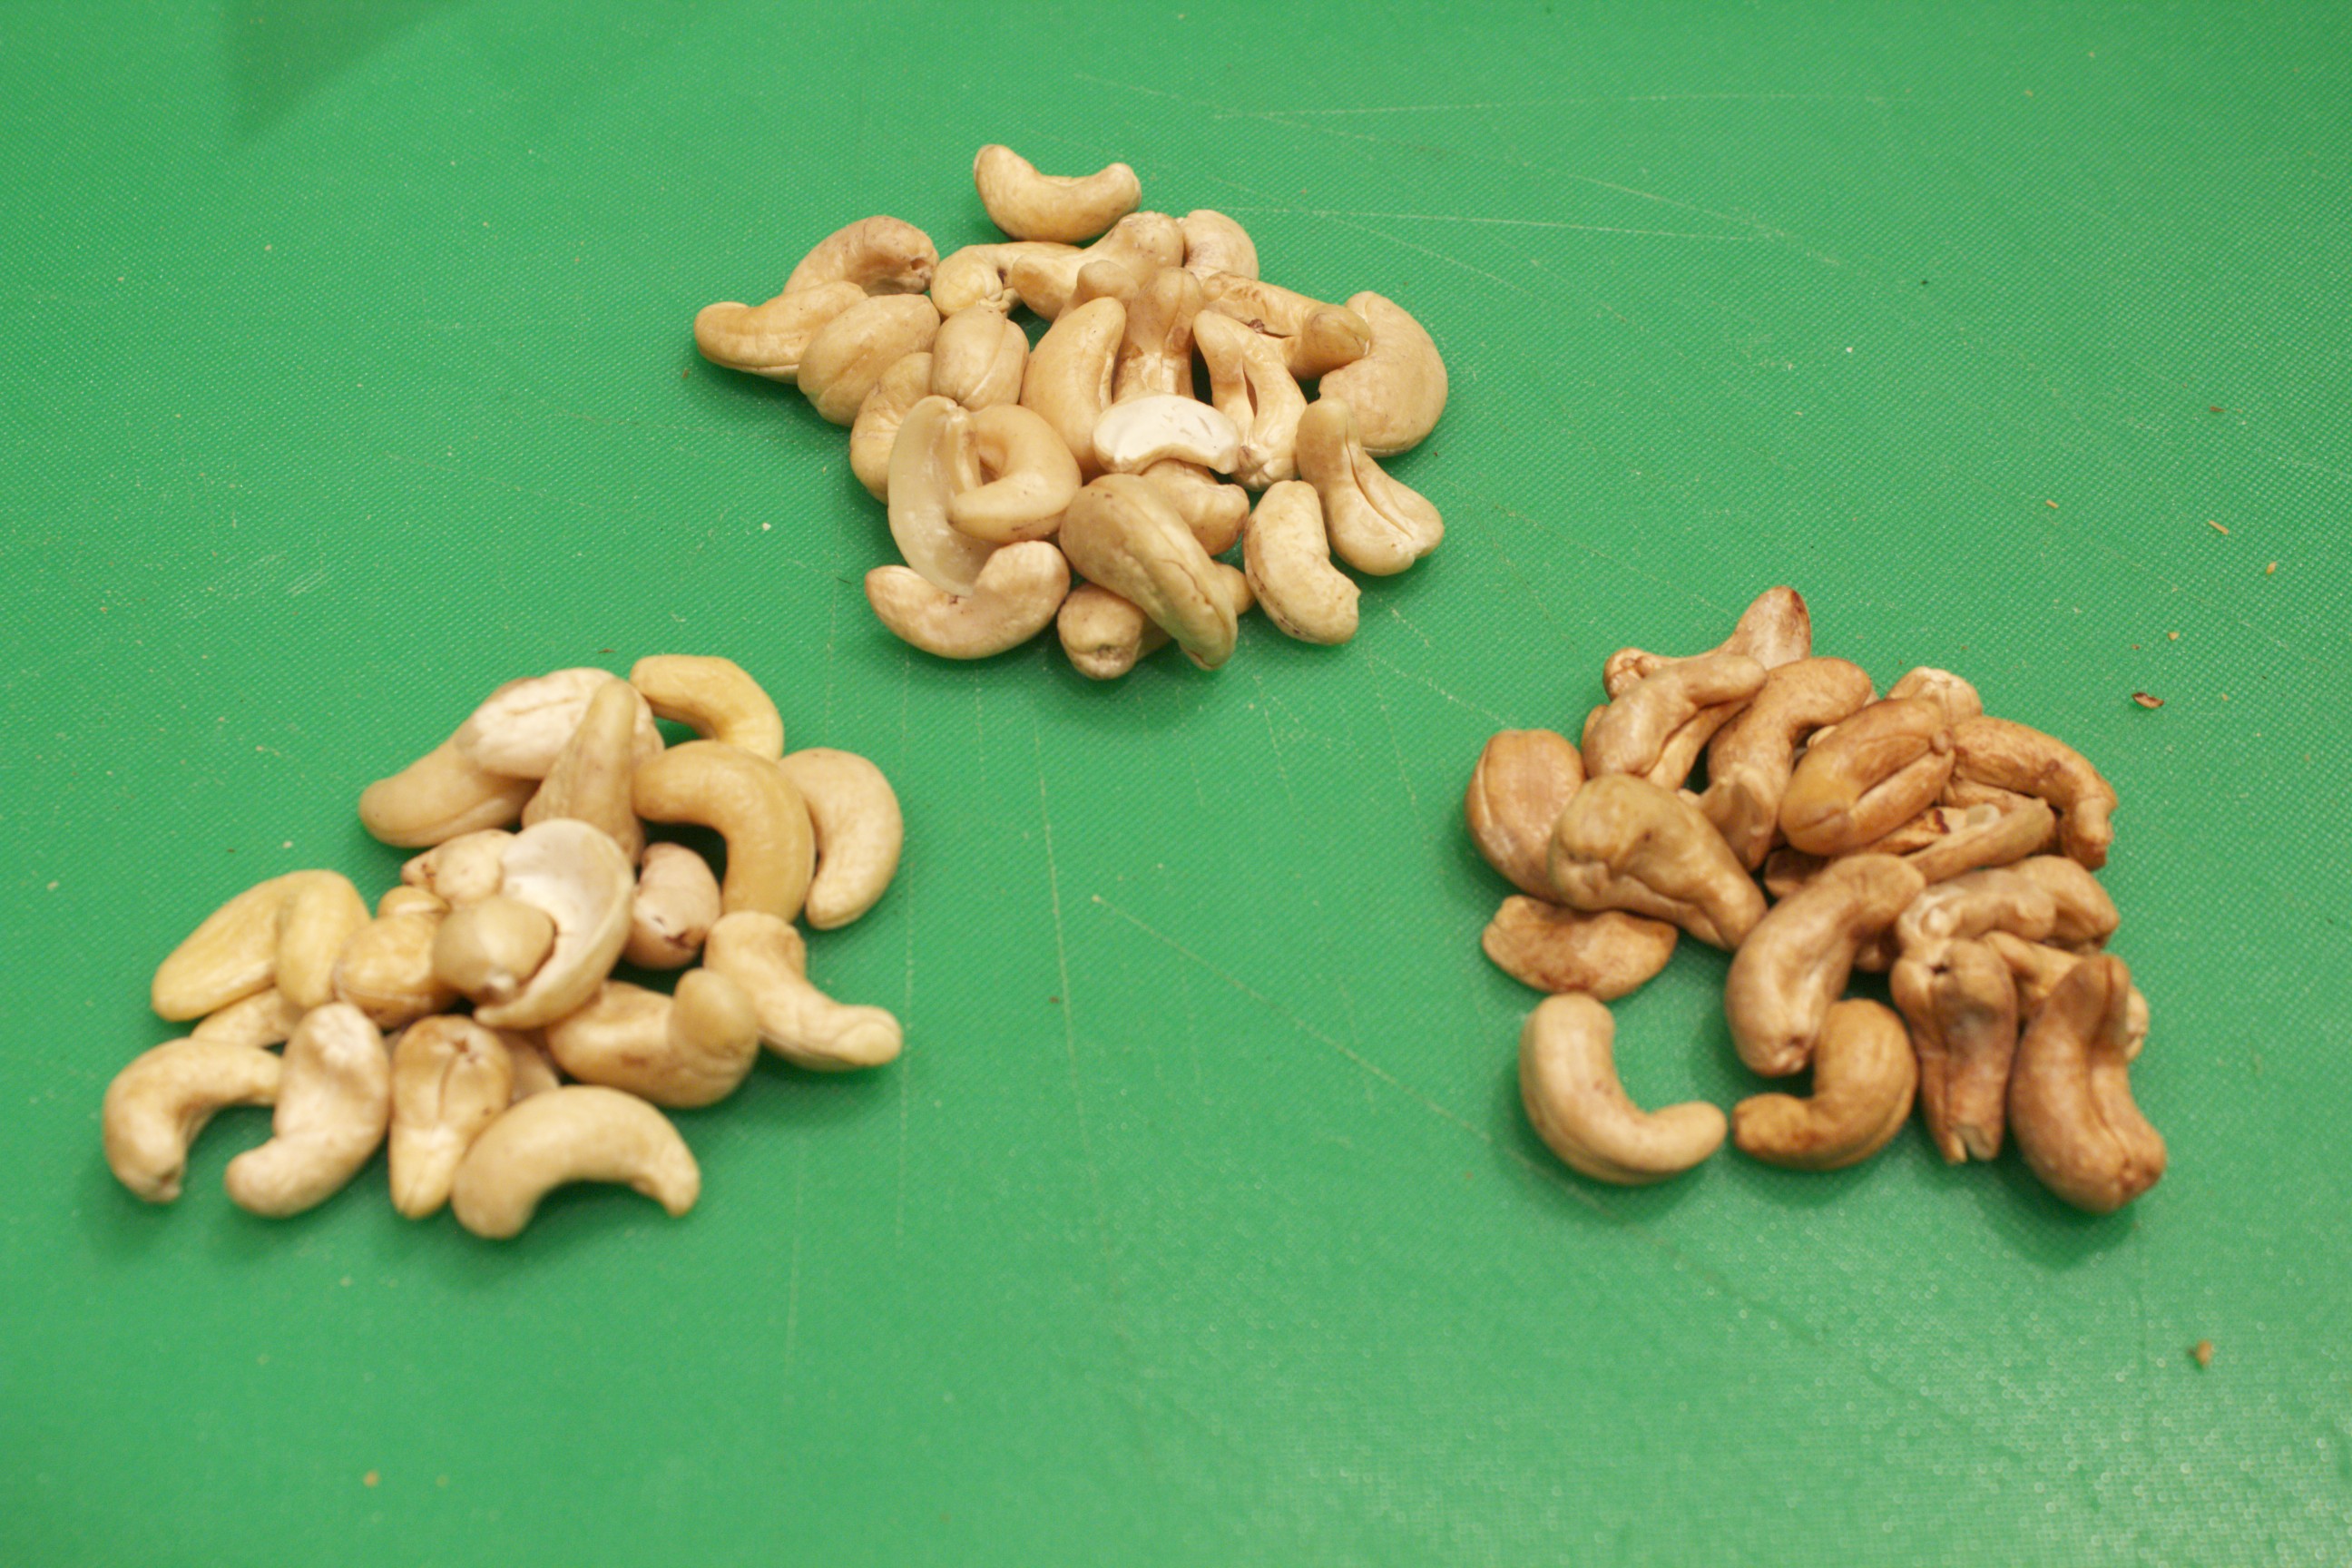
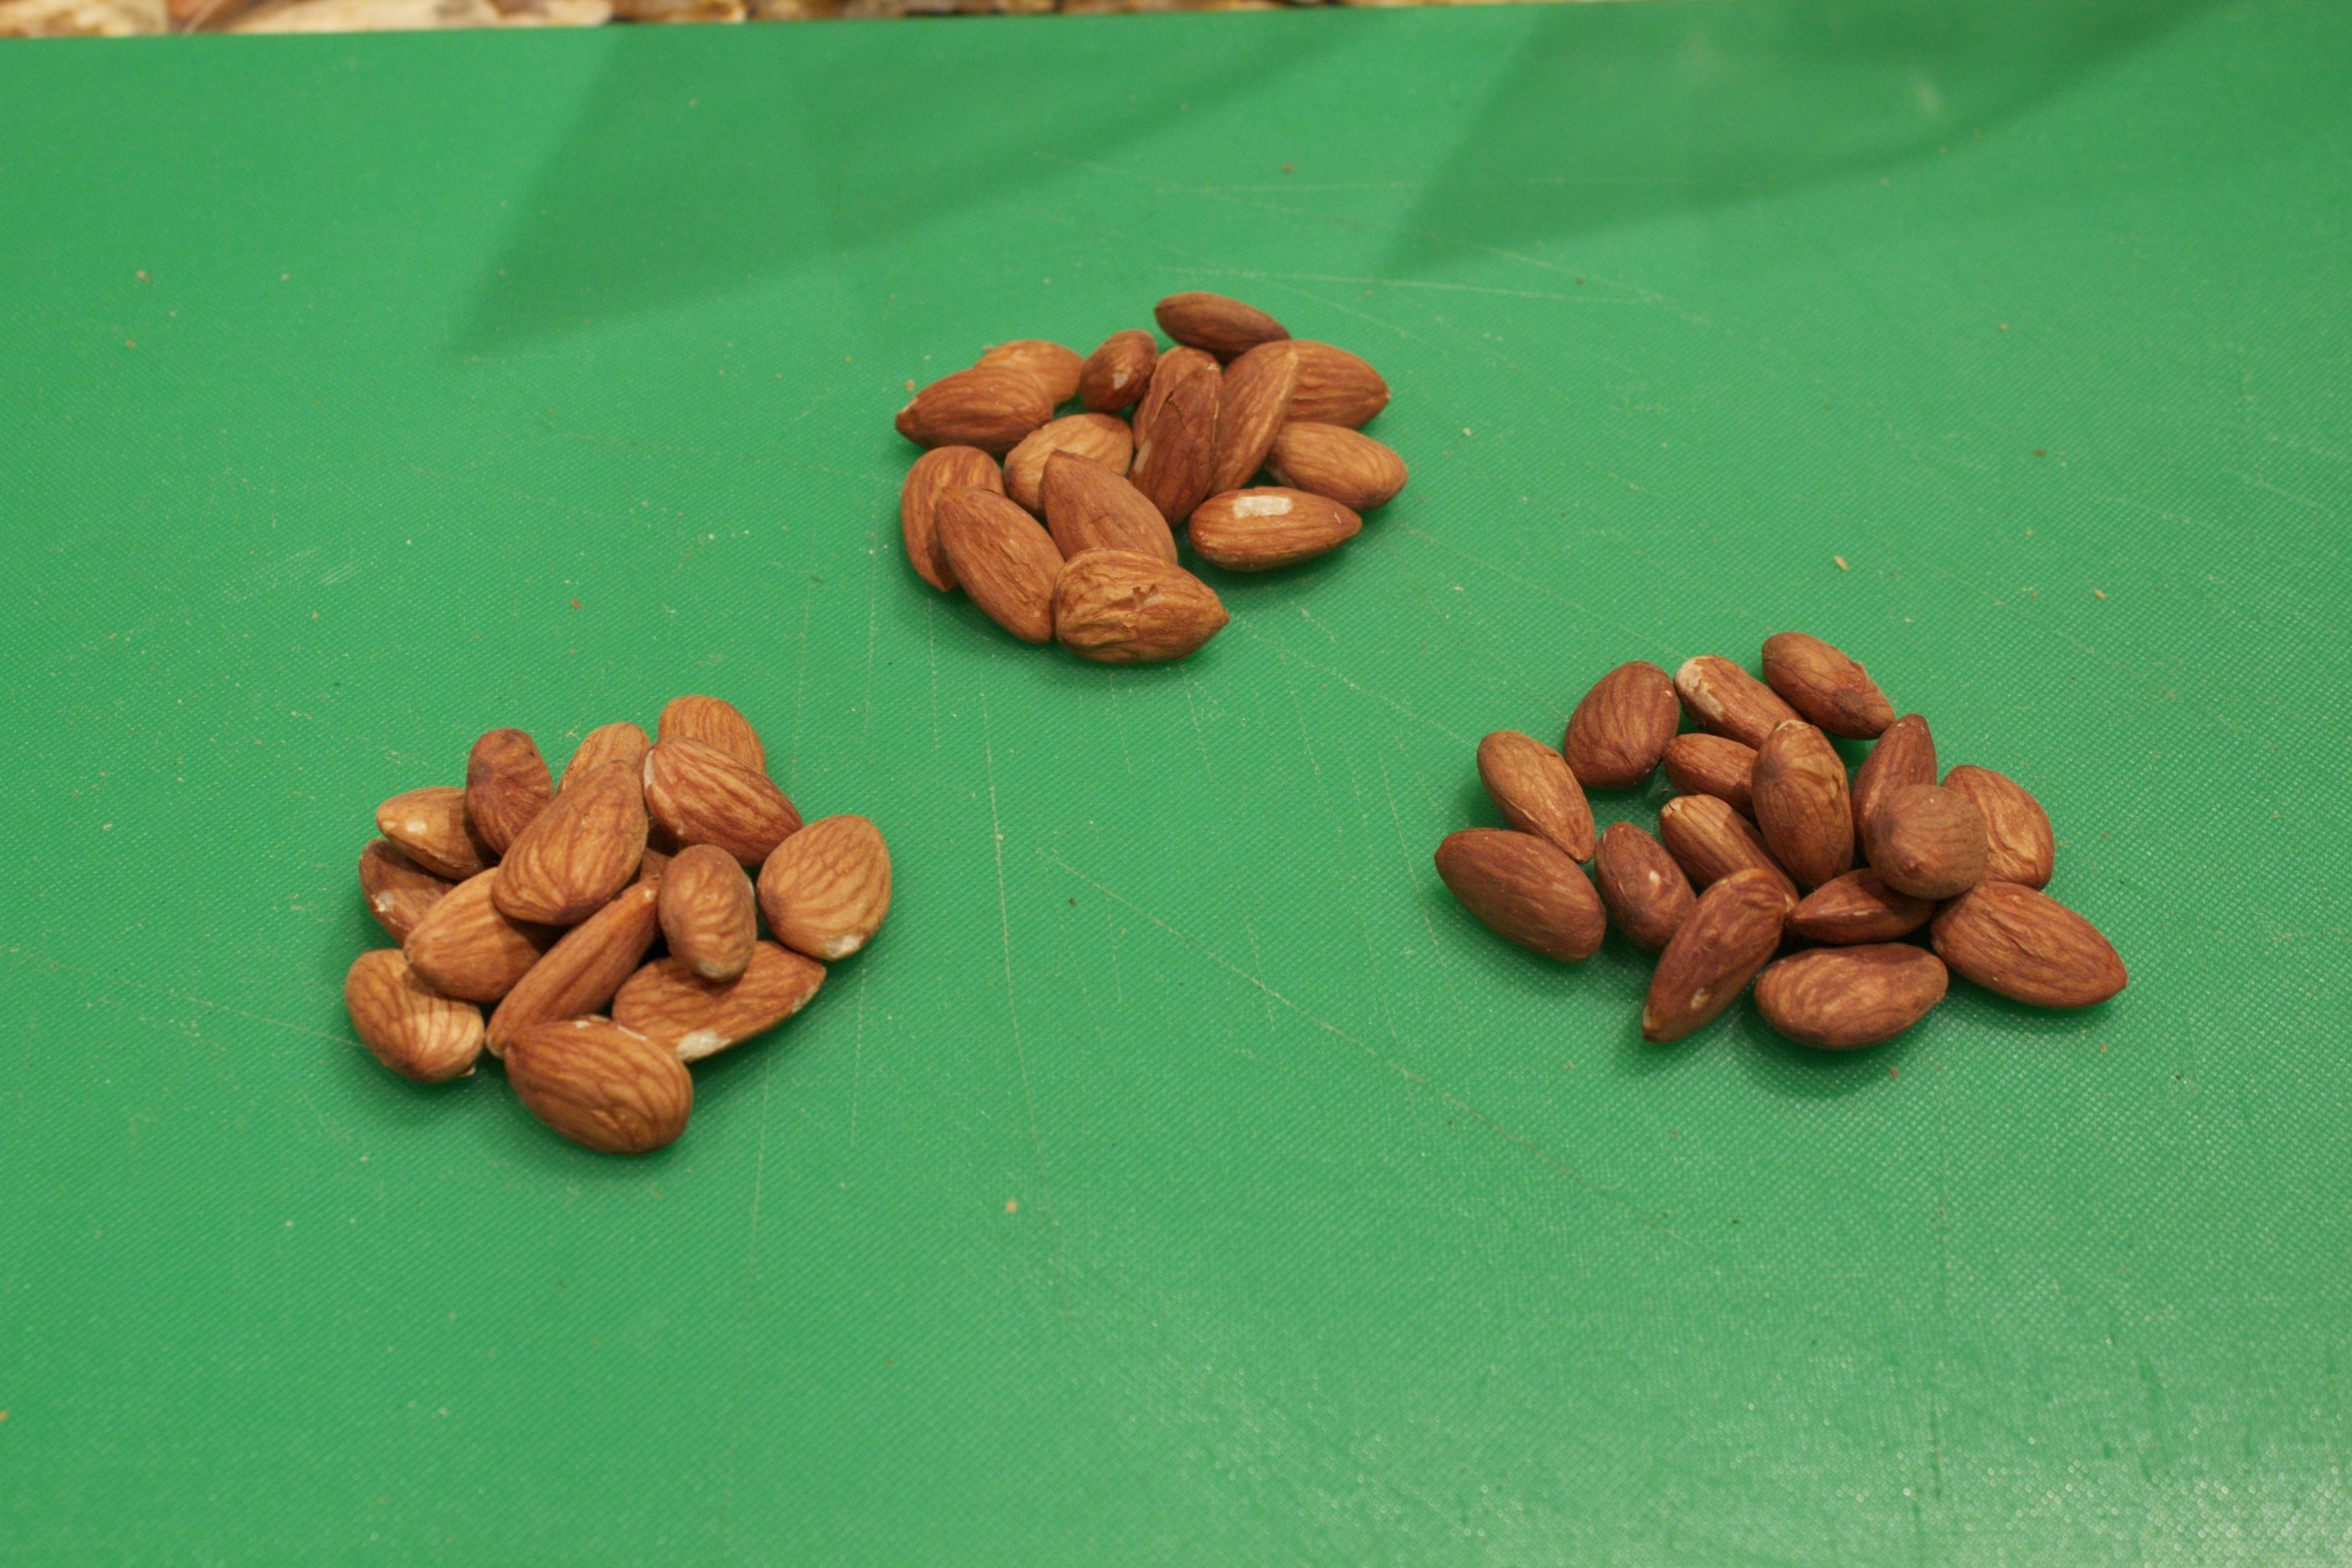
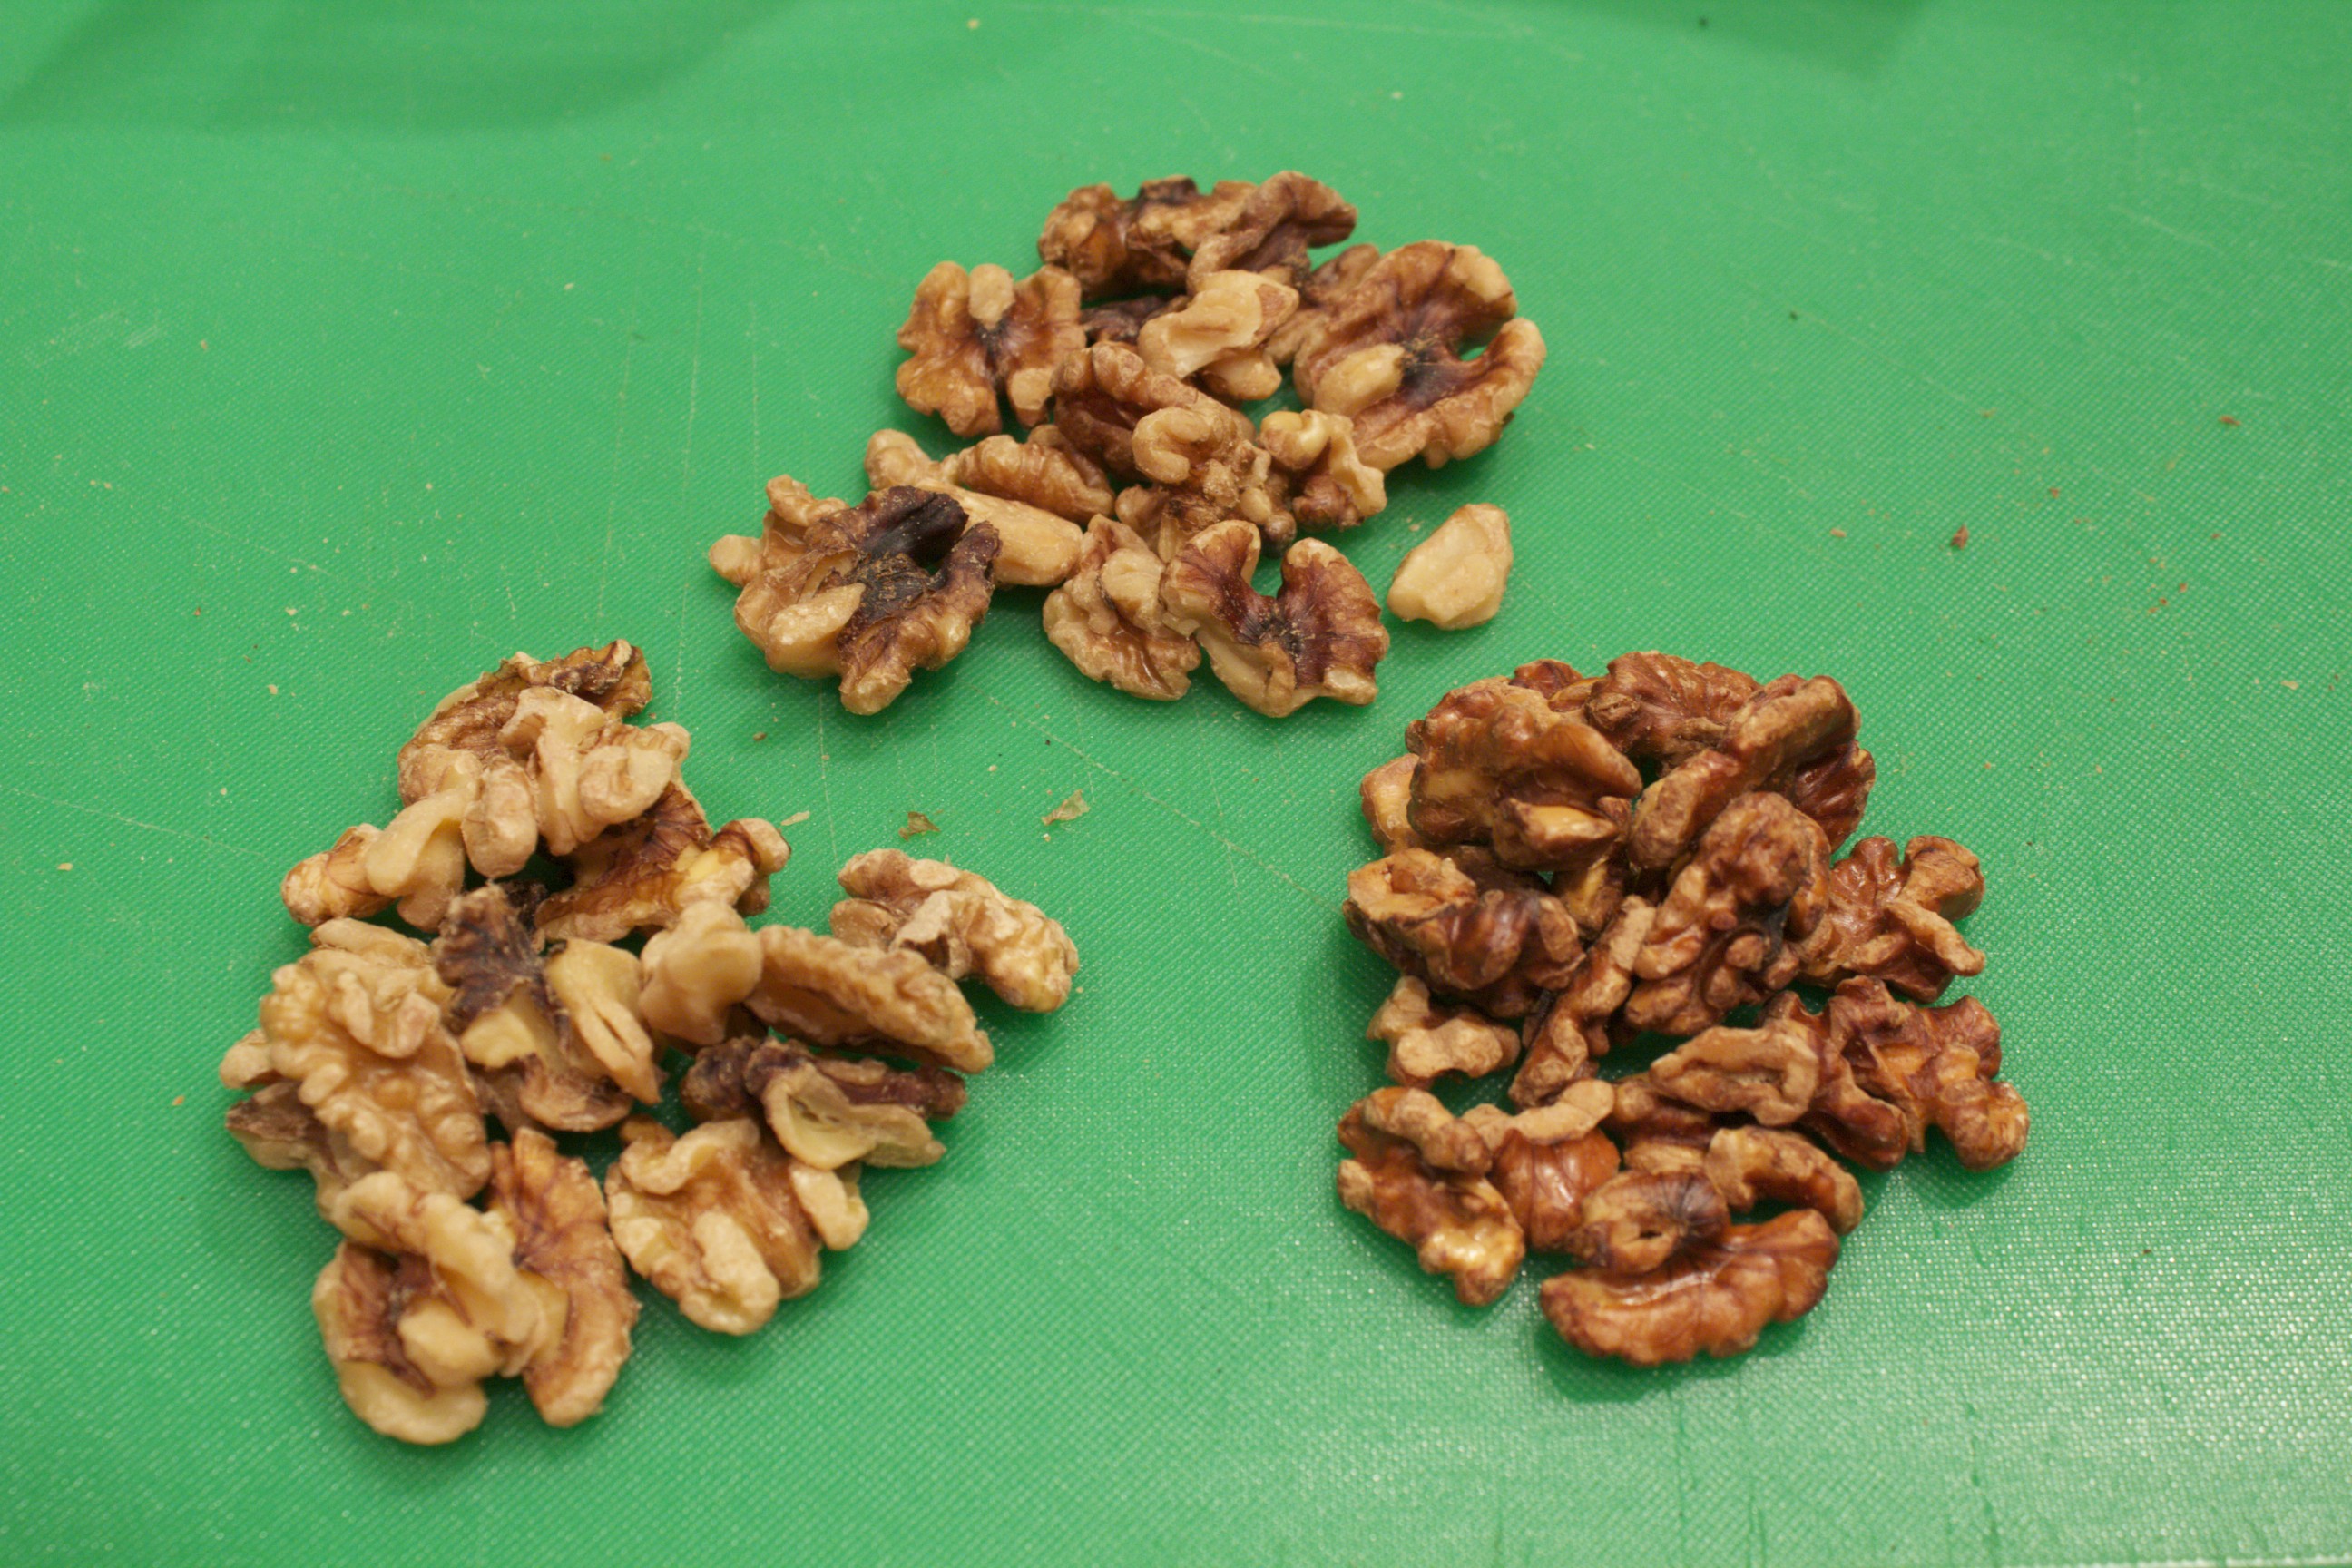
A Comparison of Soaked and Dehydrated and Toasted Nuts Soaking nuts serves to inactivate the phytates and enzyme inhibitors that make the minerals in them (zinc, magnesium, iron, and calcium) difficult to absorb. You can drain the nuts and leave them in the refrigerator for a couple of days. This is good if you wish to make nut milks, or if you don’t have time to dry them out immediately. If you want to have delicious nuts to munch on or add to your recipes, however, you need to dehydrate or toast them. There are a number of ways to do this, and it’s a matter of preference as to which ones suit your taste best. Yesterday, I compared the times and tastes of nuts that had been soaked then dried at 3 different temperatures. I did this for almonds, cashews, pecans, walnuts, and pumpkin seeds. I soaked them all over night–with the exception of the cashews, which got a four hour soak. It’s not good to soak cashews over seven hours: the texture changes for the worse. I drained the cashews, refrigerated them, and dried them with the other nuts. I included 1 tablespoon celtic salt in the the soaking water for each pound of nuts. The three comparisons included: a dehydrator at 115˚, an oven at 200˚, and an oven at 300˚. The nuts at 200 degrees took 3 hours for a beautiful light toast with delicious flavor. The nuts at 300 degrees should have come out at about 45 minutes. I left them in an hour; and while tasty, they were slightly over-toasted. The dehydrated nuts took about six hours. In a previous post I had listed the minimum times for soaking nuts. Nonetheless, I find it’s easiest to simply soak most of the nuts for about the same amount of time, about six hours. To repeat, cashews should not go longer than seven. Almonds need a minimum of six hours, but they are even better soaked longer. Here are the different nuts at different degrees of toasted. They range from light (dehydrator) to darkest (300 degree oven). My conclusion is that for eating nuts out-of-hand I prefer those toasted at the higher temperature. For a neutral nut that will later be used in cooking or baking, I would go with the lower temperature oven or the dehydrator. These delicious nuts stay fresh at room temperature for minimum of a month. Once exception is walnuts, which should be refrigerated. For super oily nuts like pine nuts, store them in the refrigerator or freezer. No need to toast them first. If this is too much for you, there is always Wilderness Family Naturals, which promptly delivers to your door already soaked and dehydrated nuts.
Share on Facebook and Twitter | Health Tips, ingredients, nuts and seeds, techniques, Uncategorized | No comments
Herbed Pesto So many gorgeous herbs are available this time of year that I often get carried away and find myself with a refrigerator drawer full of beautiful choices. One of the ways that I like to have fun with these herbs as well as use up the extra is to make an out-of-the-ordinary pesto. In the demonstration video, I’m starting with a base of toasted pumpkin seeds, about ¾ of a cup. I toast them in a dry heavy-bottomed skillet just until they are plumped, about a minute or so. While I use pumpkin seeds in the video, you can use any nut or seed that you have in your pantry. Some favorites include walnuts, almonds, sunflower seeds, pine nuts, pecans and pistachios. I transfer the lightly toasted seeds to a food processor. I then add 2 cups packed mixed herbs. In this demo I work with a combination of cilantro, basil, chives, and mint. Some other herbs that are delicious for this technique include parsley, dill, watercress, arugula, and sorrel. I add extra virgin olive oil—about 1/3 cup—as well as a couple of tablespoons of fresh lemon juice, a garlic clove, and 1/2 teaspoon of a good mineral-rich salt. I also mix in a teaspoon of light miso—such as mellow white— which gives depth and complexity to the overall flavor. This dairy-free version allows for the greatest flexibility, and is delicious with fish, chicken, pasta, grains, and vegetables. You can always add cheese later if you like. I whirl all of the ingredients in the food processor for a couple of minutes, and that’s it. The pesto is ready to use immediately and it freezes well too. One delicious all-time favorite option, which I show on the video is to dollop some pesto between slices of fresh tomato, top with shaved parmesan, and drizzle with some good extra virgin olive oil and a sprinkling of black pepper and chives. Every mouthful is exciting.  Tomatoes with Herbed Pesto and Parmesan
Share on Facebook and Twitter | condiments, Kitchen Tips, nuts and seeds, Recipes, techniques | No comments
Nuts and Seeds It is undeniable that when nuts and seeds are soaked – and dehydrated if you want them crunchy – they are more readily digestible, and the nutrients within are easier to absorb. Besides, they taste simply delicious. Nuts and seeds contain enzyme inhibitors, which are there as protection until they have what they need to grow, such as sunlight, water, or soil. The soaking water will have the enzyme inhibitors in it, so after you drain the nuts or seeds, make sure to give them a rinse. You can use the plumped nuts as is (perfect for smoothies and nut milks), since soaking makes them softer.  Plumped, Soaked Cashews You can store the soaked nuts for a few days in the refrigerator to use as needed. Alternatively, dehydrate them in a low oven (or dehydrator) to make crispy nuts. Either way, you can really feel the difference in your body between those nuts that have been properly treated and those that have not. For best results, start with organic and raw. The worst nuts to purchase are packaged varieties that have already been roasted and salted. Poor quality fat and salt are added and the roasting has damaged the fat inherent in the nuts and seeds. Here are appropriate soaking times for each variety: 0 to 2 hours: Brazil, macadamia, and pine nuts 2 to 4 hours: Cashews, pecans, and walnuts (pecans and walnuts can go up to 6 hours) 4 to 6 hours: Sunflower seeds 6 to 8 hours: Pumpkin seeds, sesame seeds, hazelnuts 8 to 12 hours: Almonds If the idea of soaking and dehydrated nuts is going to send you over the edge, consider purchasing from Wilderness family naturals. Wildernessfamilynaturals.com  Mixed bag from Wilderness Family Naturals These folk already do all the soaking and dehydrating work for you. I first tasted their exceptional products at the Wise Traditions conference a couple of years ago. The folks from Wilderness Family Naturals had a large booth, and I was able to sample before buying. I was hooked, and returned home from the conference with quite a few bags. I’ve been ordering ever since; the box arrives on my doorstep fast, within just a few days. If you just want to get your feet wet before committing to a big order, try the mixed nuts. I guarantee you’ll be pleased. It’s good to know that there’s high quality choices available. Share on Facebook and Twitter | ingredients, Kitchen Tips, nuts and seeds, Where To Buy (Sources) | No comments
|