|
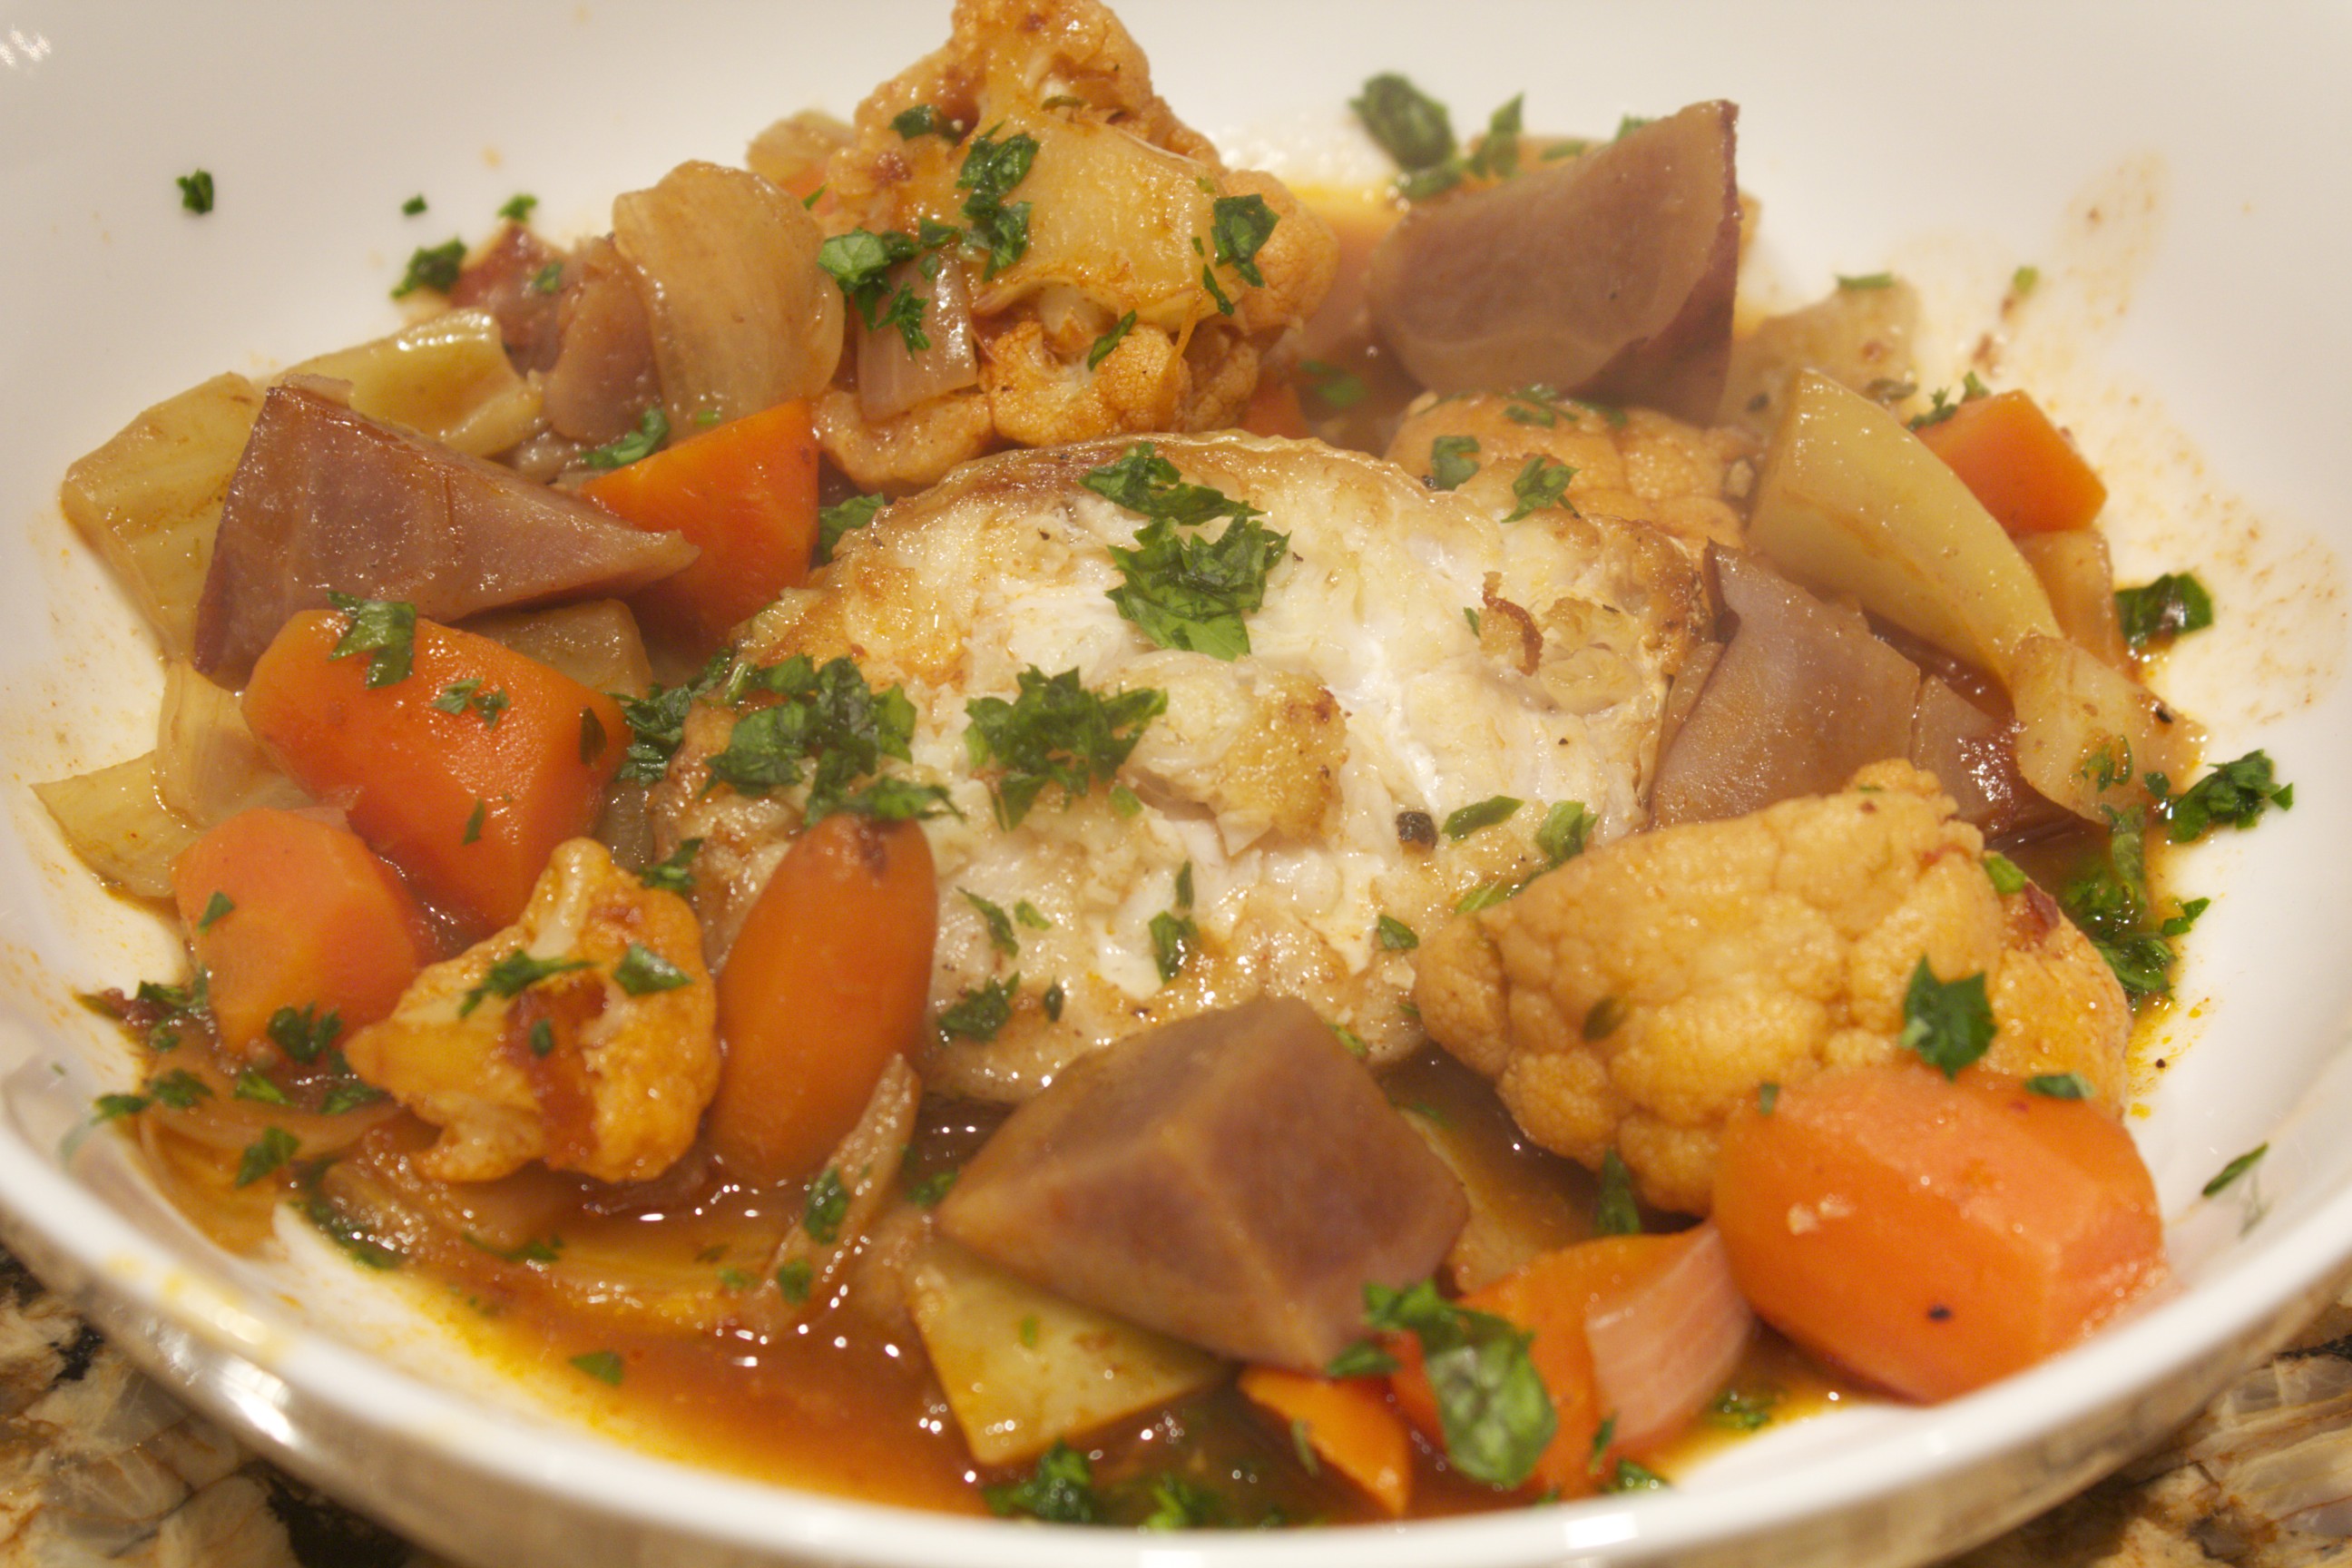
Dinner: Braised Tile Fish Steaks I went to the greenmarket the other day in search of a thick piece of fish which I wished fervently to braise in chicken or beef stock. I couldn’t get the braising bug out of my head since recently reading the Mark Bittman NY times article on that very subject. I was even prepared to purchase a whole fish, fillet it, and keep the carcass frozen until I had two or three, and I could make a broth. What I came home with was a whole tile fish because it just looked too fresh and delectable to pass up. The fishmonger insisted that I cut the flesh into steaks, which sideswiped my plans for a tidy carcass, but I still had the head, tail, and some flesh leftover.  tile fish steaks
I ended up cutting four thick steaks. I first salted and peppered the pieces and seared them for five minutes per side in a large skillet using aroma-free coconut oil as the fat. I then set aside the steaks while sweating in the same skillet –for 10 minutes or so–a bunch of vegetables: onions, fennel, purple potatoes, carrots, and cauliflower. I stirred in some saffron, smoked paprika, and a tad tomato paste before adding a few cups of rich chicken bone broth. The liquid reduced for 10 minutes; then I returned the fish to the pan and covered it. The fish braised until cooked through, about 15 minutes–the vegetables were perfectly tender by that time as well. I served the dish in a shallow bowl so that each bite could be draped in the silky sauce. The side was garlicky sautéed spinach. It turned out to be a quick, delicious meal.
Share on Facebook and Twitter | Dinner, Fish, Main course | No comments
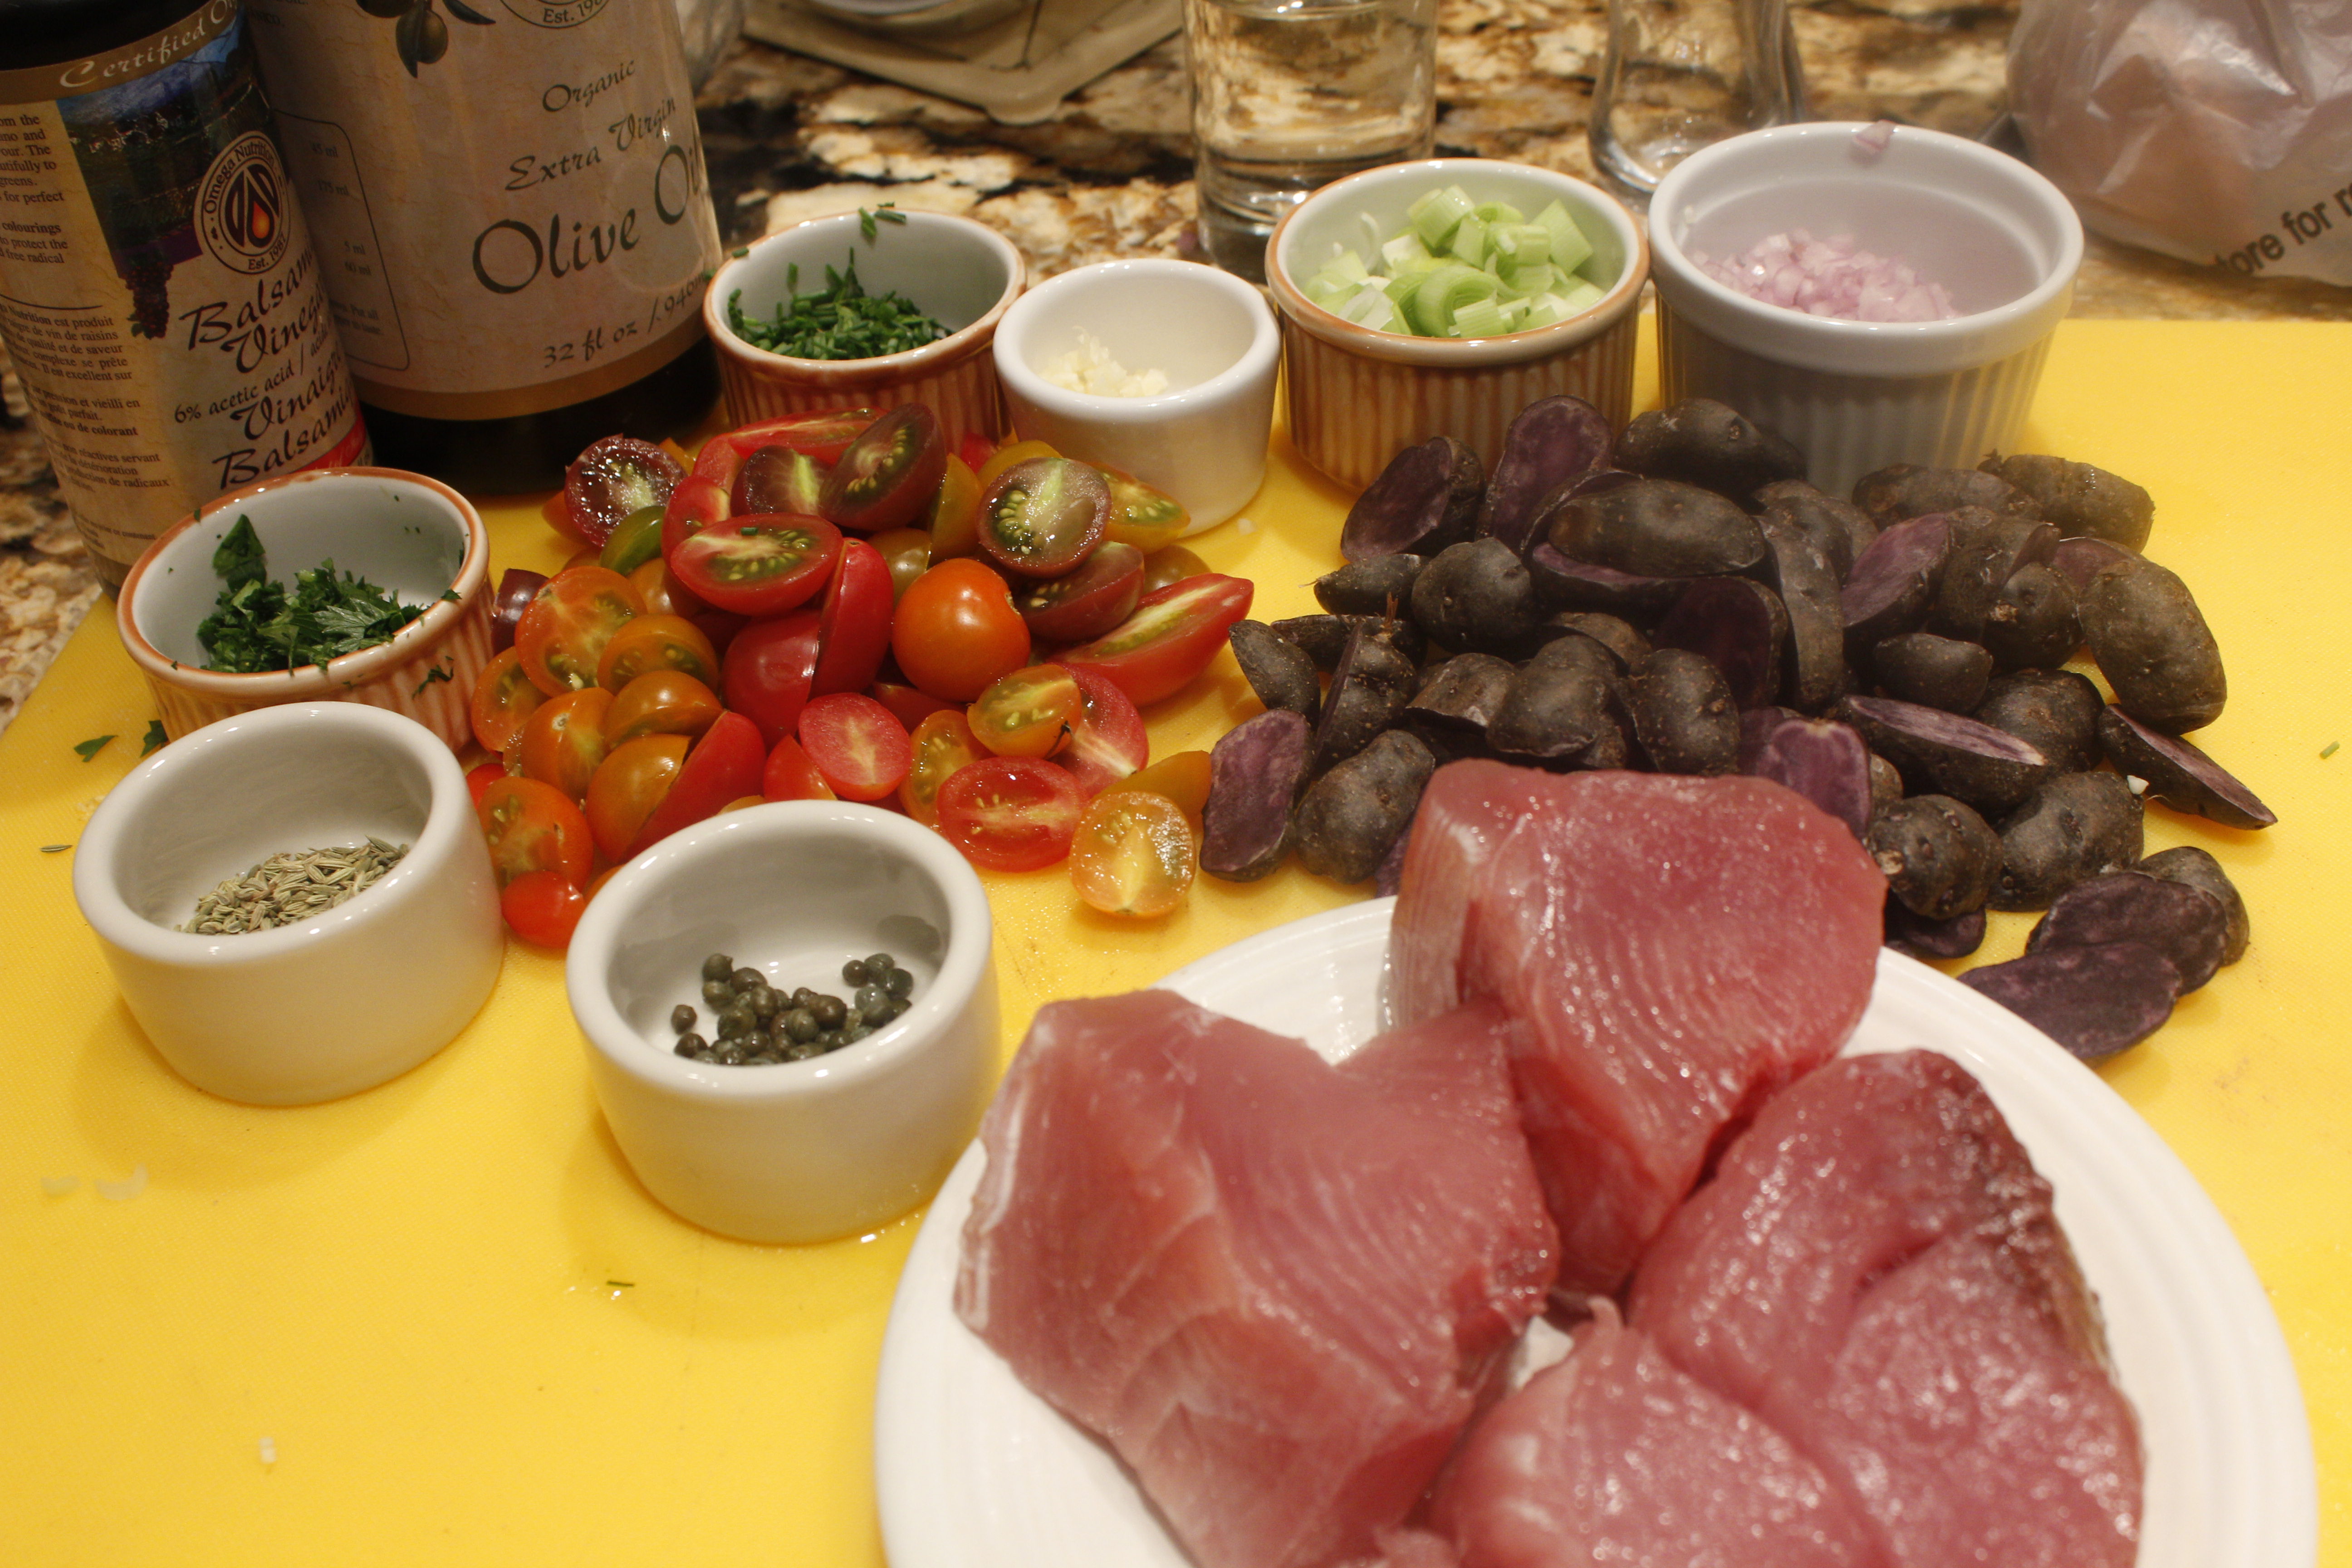
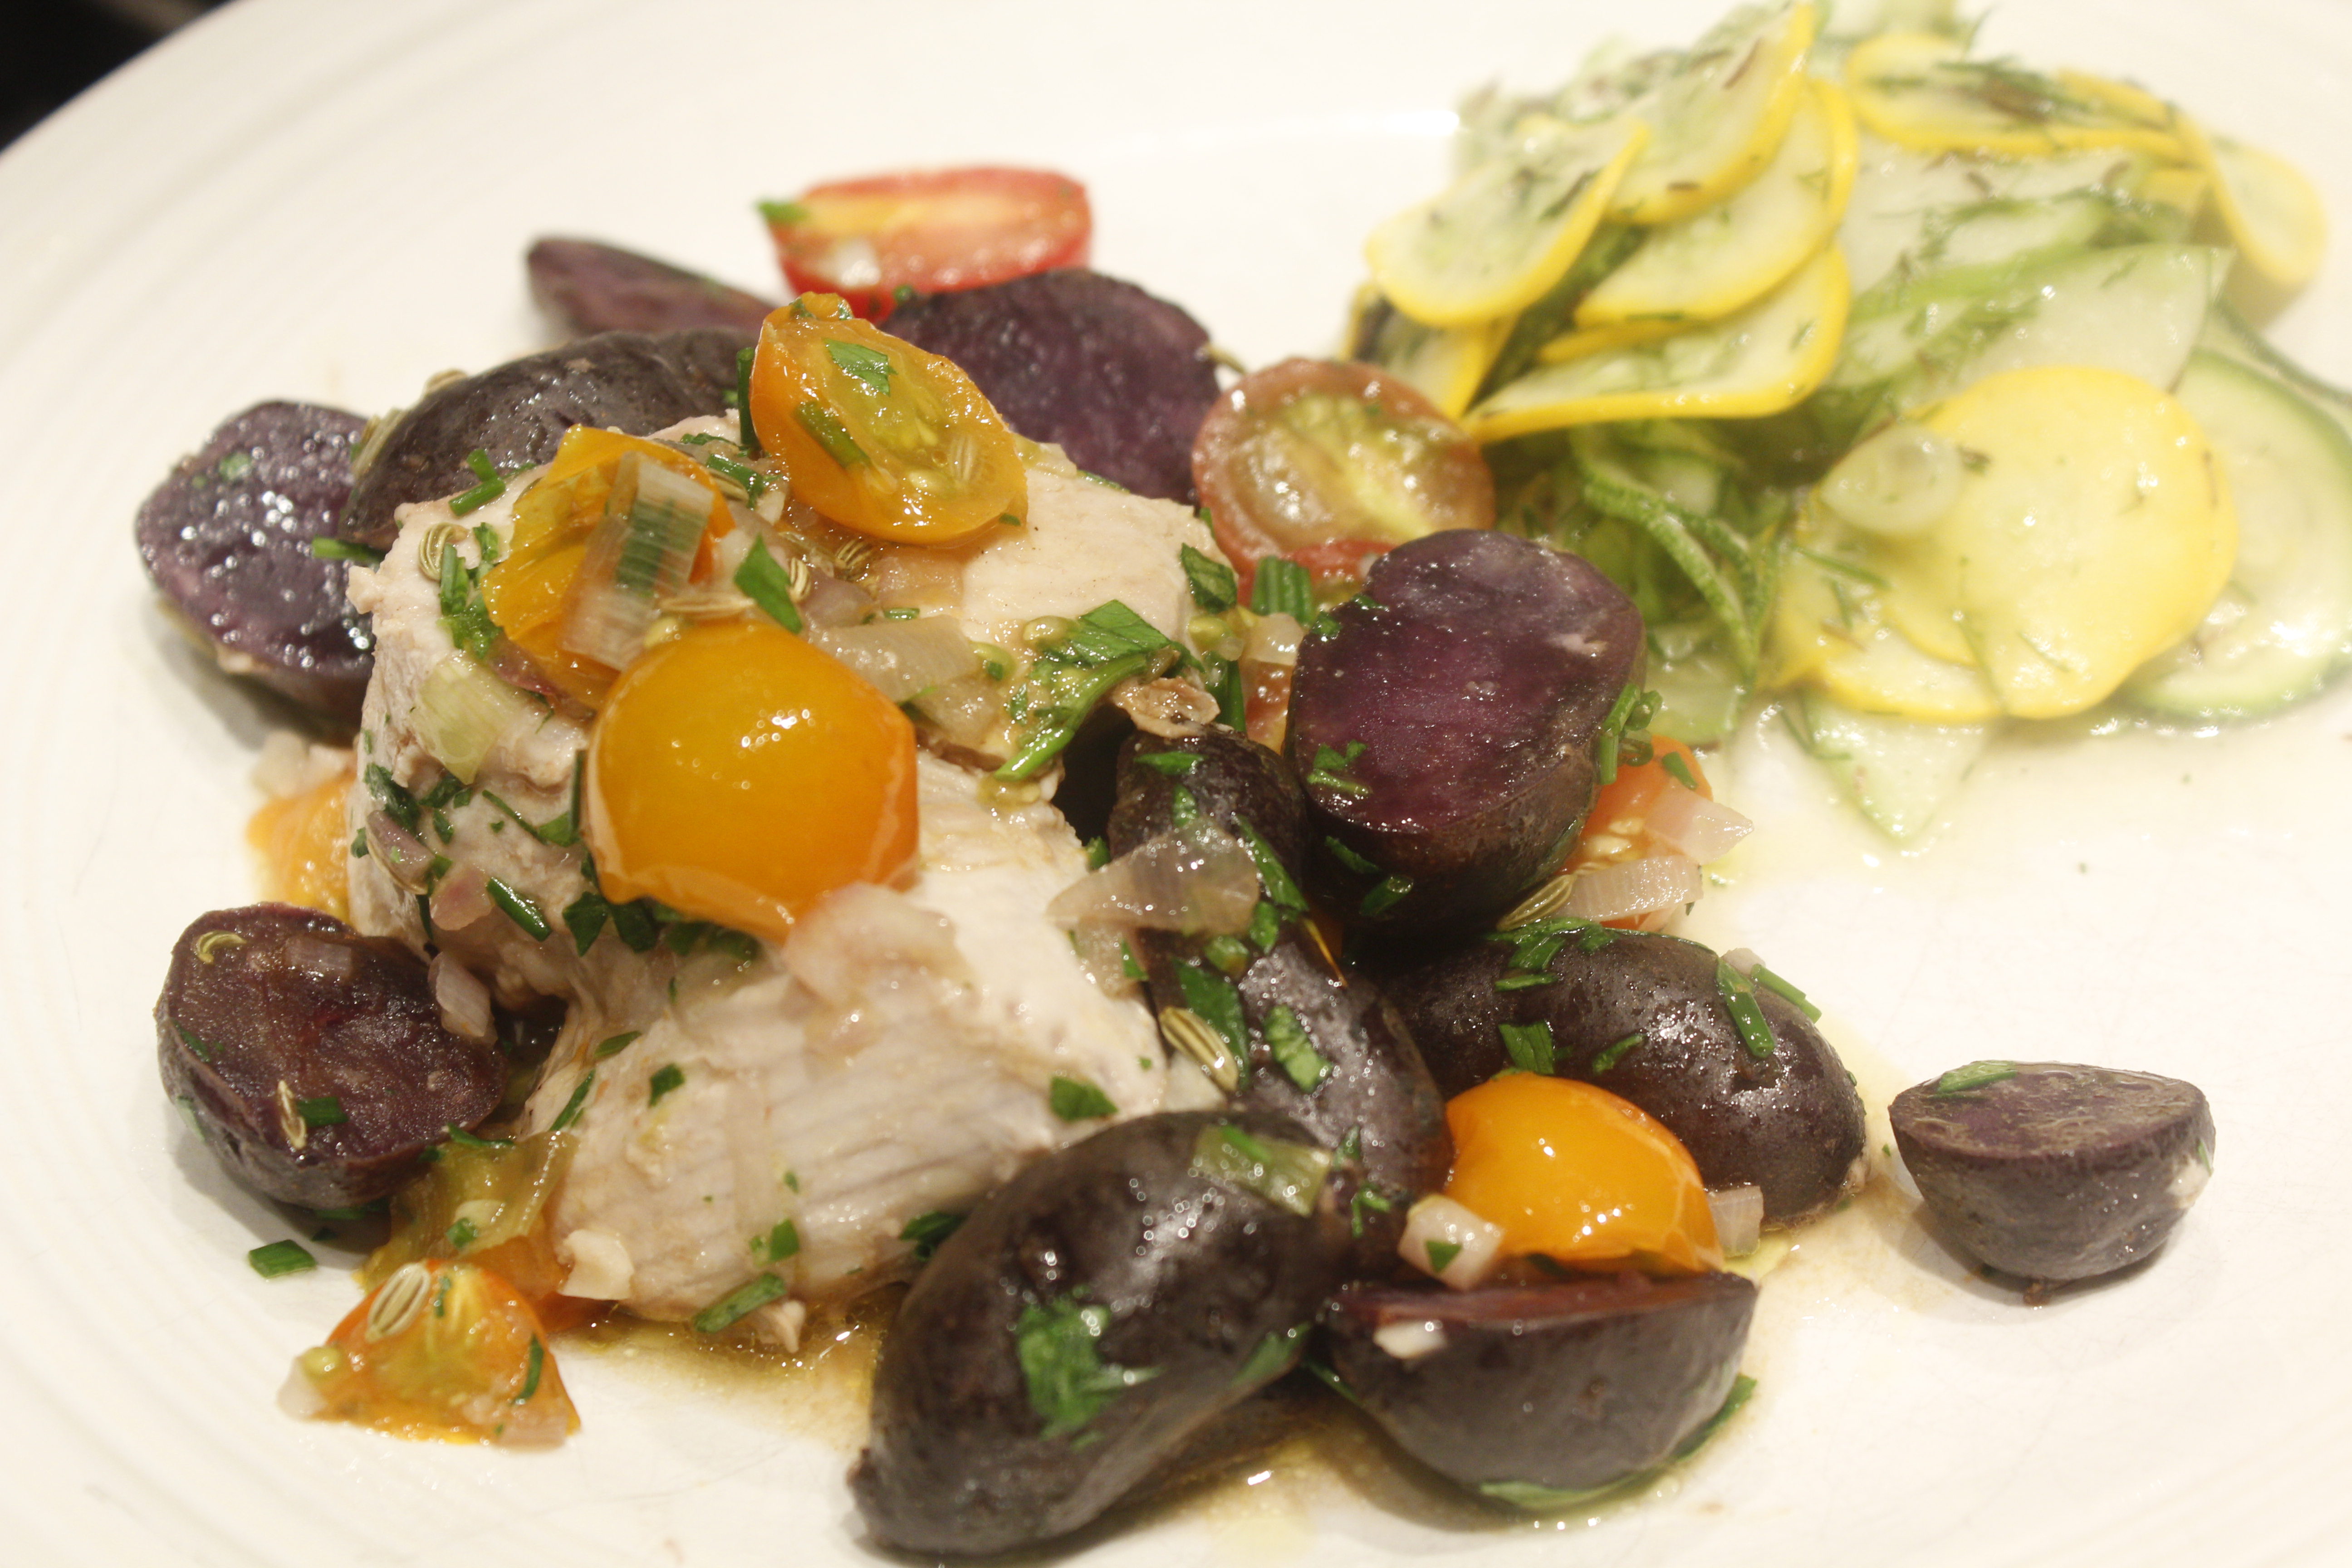
Sun-gold Tomatoes with Purple Peruvian Potatoes Recently, the greenmarket has had beautiful thick slabs of fresh tuna caught off the coast of Long Island. Bins of purple Peruvian potatoes have beckoned me as well. I love their appealing purple flesh and the fact that they are something like 40 times more nutritious than white potatoes. The summer sun gold tomatoes taste like candy, so I haven’t been able to resist buying scores of those. I started the dish in a large pan with a few leeks, then added the potatoes, and cooked the whole lot for about five minutes in a dollop of extra virgin olive oil. I then added the halved tomatoes, shallots, garlic, capers, balsamic vinegar, a bit more olive oil and the tuna. It took only four minutes to cook the dish. I then sprinkled the dish with chives and parsley before serving.
I served the tuna with a thinly shaved zucchini and apple salad with dill and black cumin. It was a delicious lunch!
Stress-Free Entertaining Last week I taught a class in stress-free entertaining. The night before I made food for a party of six with this concept in mind. While hassle-free entertaining might seem difficult to achieve, it is more than possible during the summer. The key is designing a room temperature menu. Nothing has to be juggled on the burners or in the oven at the last minute. Each dish is laid out on a serving dish, making the meal look like an extravagant antipasto bar. You can go over the top and make a huge variety of dishes, like I did for the party the night before my class. This kind of menu lends itself to easy transport as well. Happily, all the dishes packed up well. When they were all laid out on serving dishes, the guests were astounded and delighted at the variety (and of course the flavors!). Here’s some of what was included in the two nights: Poached salmon: Salmon is in season from May through October and well-priced wild Alaskan salmon is readily available. On Wednesday night I poached steaks in a cort bouillion of onions, leeks, carrots, celery, white wine, sliced lemon, thyme, parsley, peppercorns, and bay leaf. I cooked the stock for 25 minutes, then poached the steaks for 10. I served them with the mustard-dill-cucumber sauce from The Healthy Hedonist. We made this in class as well, only we sliced thick fillets into 1-inch pieces, and rolled them into even rounds that we tied with strings.  Poached Salmon Steaks Roasted Cauliflower with Fennel and Garlic Cloves. I used a variety of white and bright yellow cauliflower.  Roasted Cauliflower with Fennel and Garlic One basic crowd-pleaser was heirloom tomatoes with sliced fresh mozzarella with basil chiffonade, balsamic and olive oil. 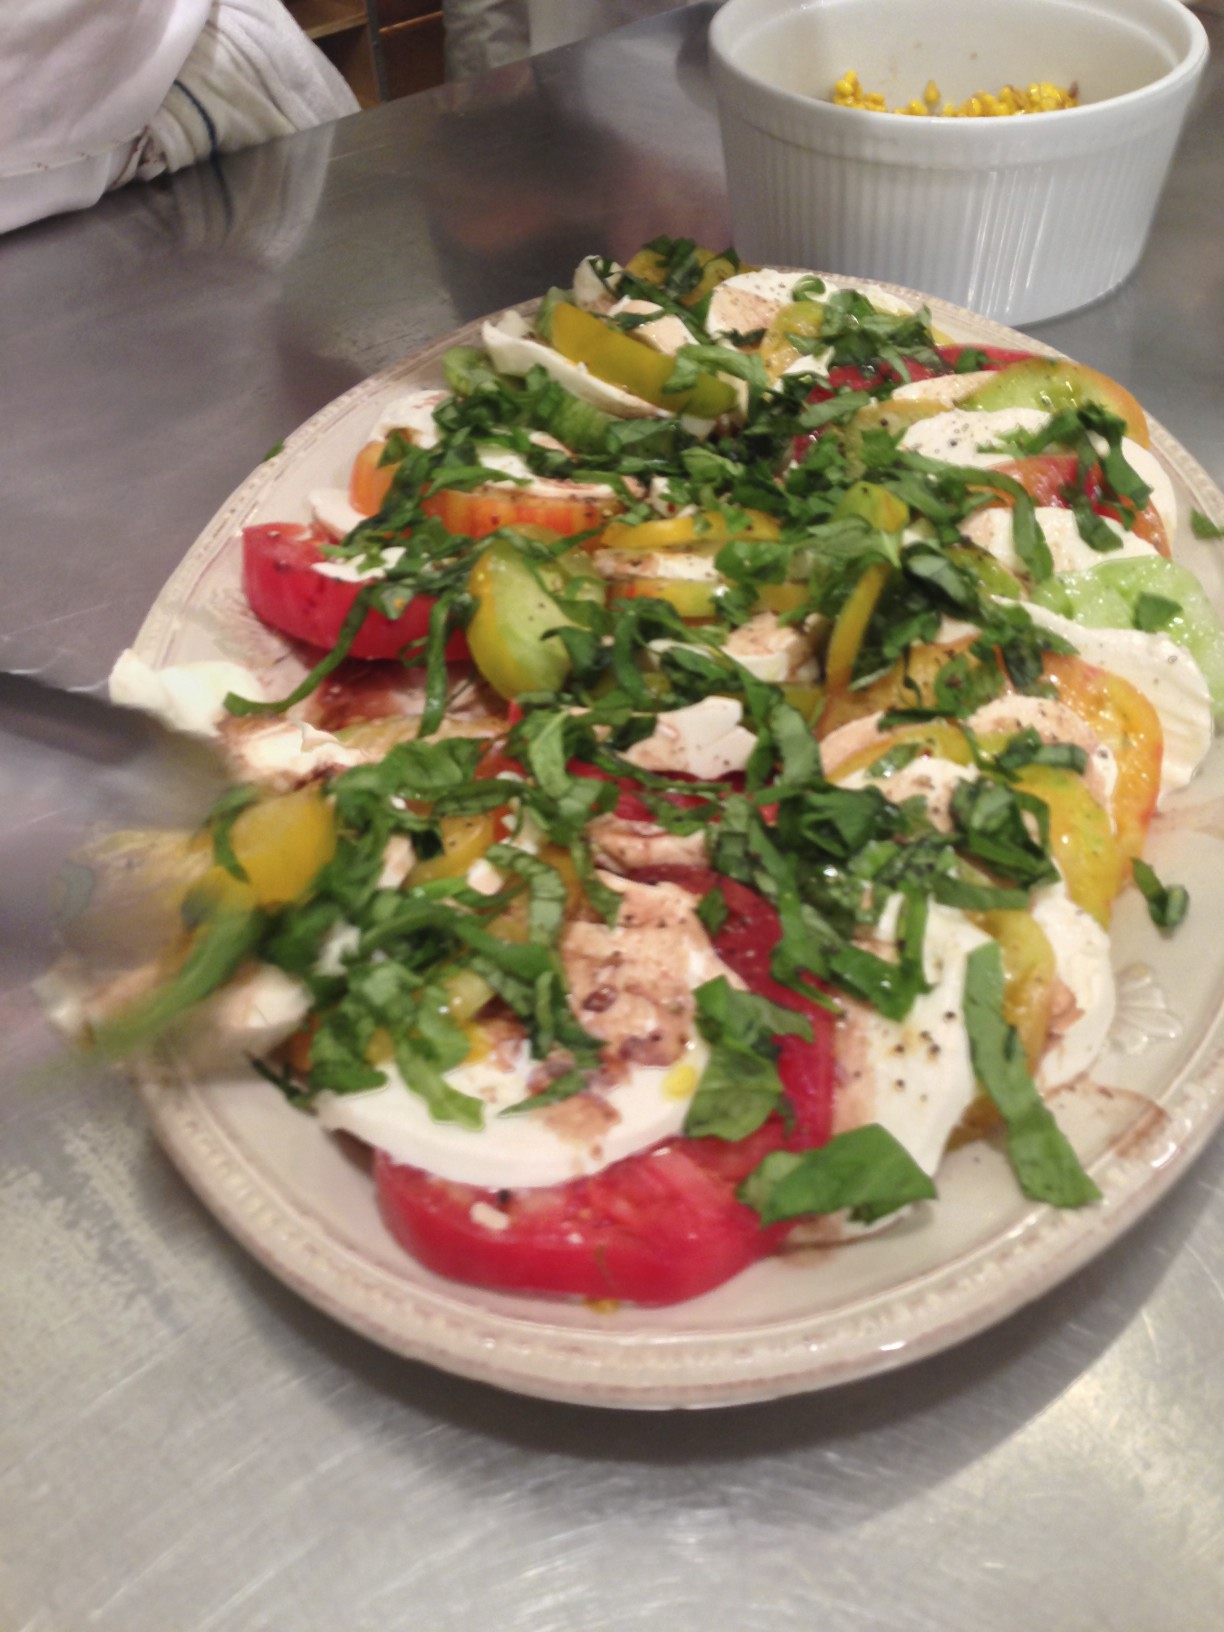 Mozarella and Tomatoes with Basil Beets with fig-balsamic vinegar, walnuts, and purslane.  Beets with Fig Balsamic, Walnuts, and Purslane Sautéed shallots and corn, pan deglazed with balsamic vinegar.  Sautéed Corn and Shallots with Balsamic Vinegar Marinated roasted red peppers with anchovy breadcrumbs.
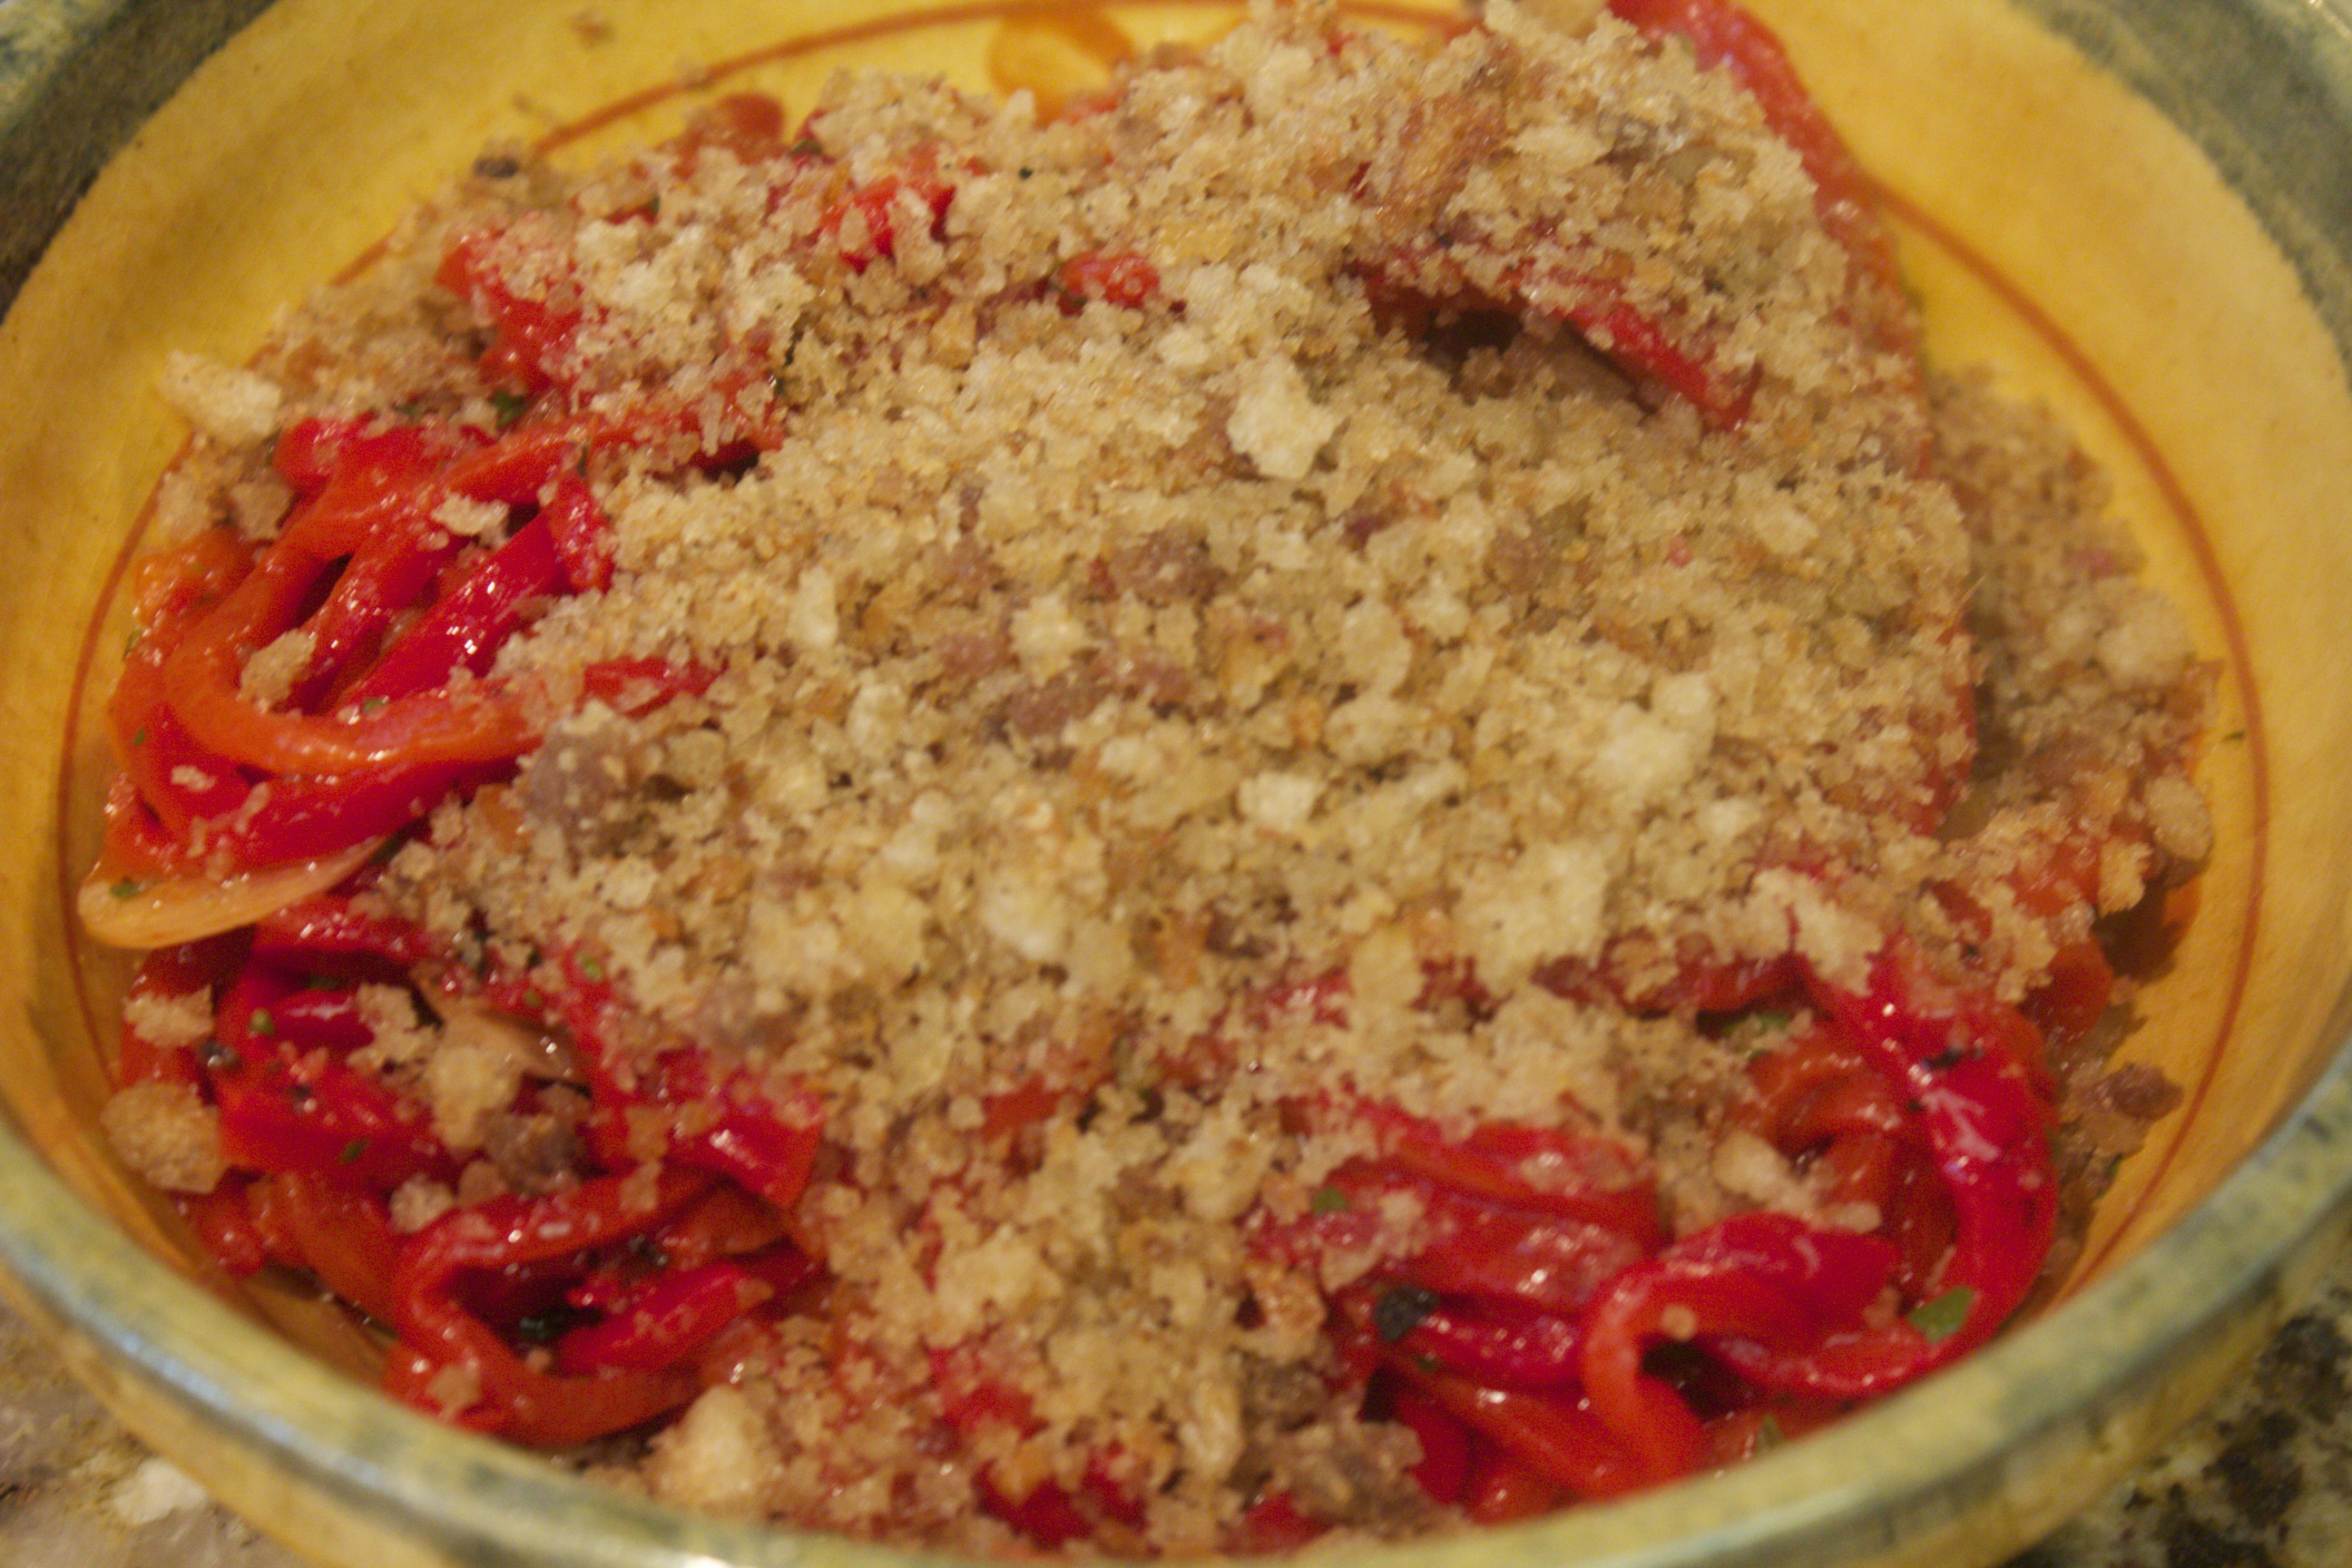 Roasted Red Peppers with Anchovy Breadcrumbs Crab salad featuring Tanner crab from Vital Choice with buttered brioche. It’s kind of like a lobster roll, only with crab. The salad had homemade mayonnaise, tarragon, celery and a touch hot sauce. 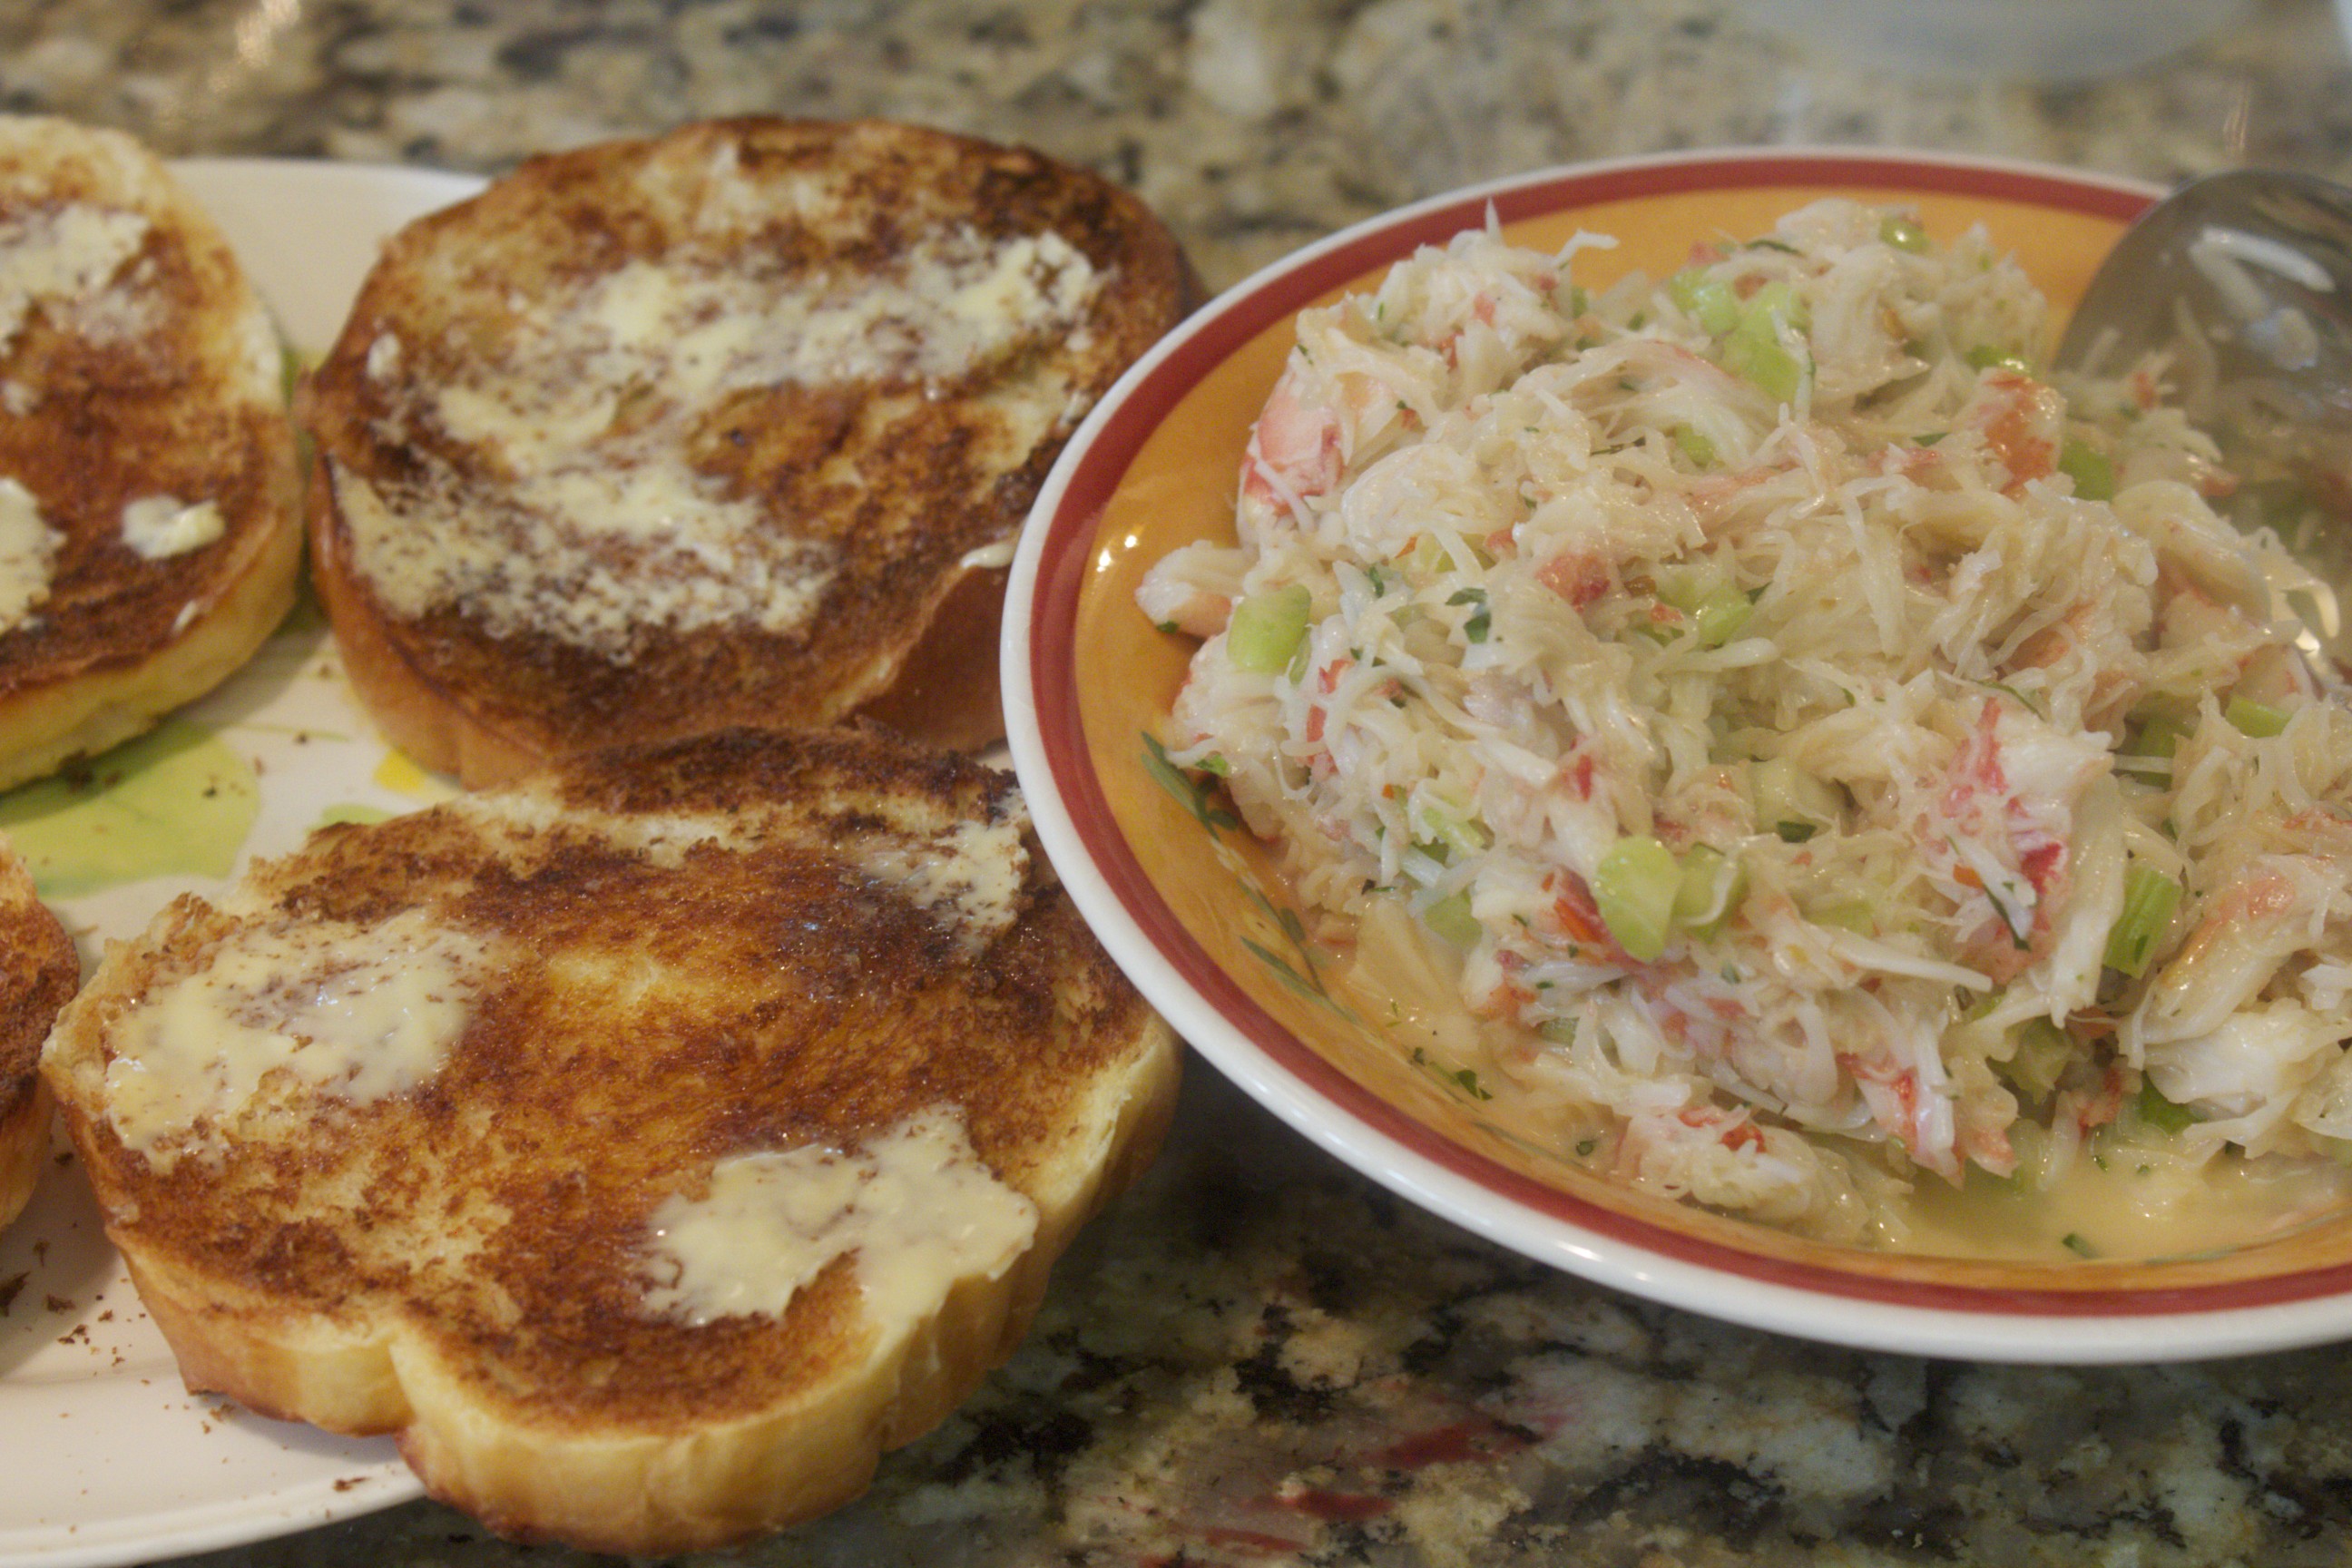 Crab Salad with Buttered Brioche From class: Shaved zucchini salad with arugula and parmesan. 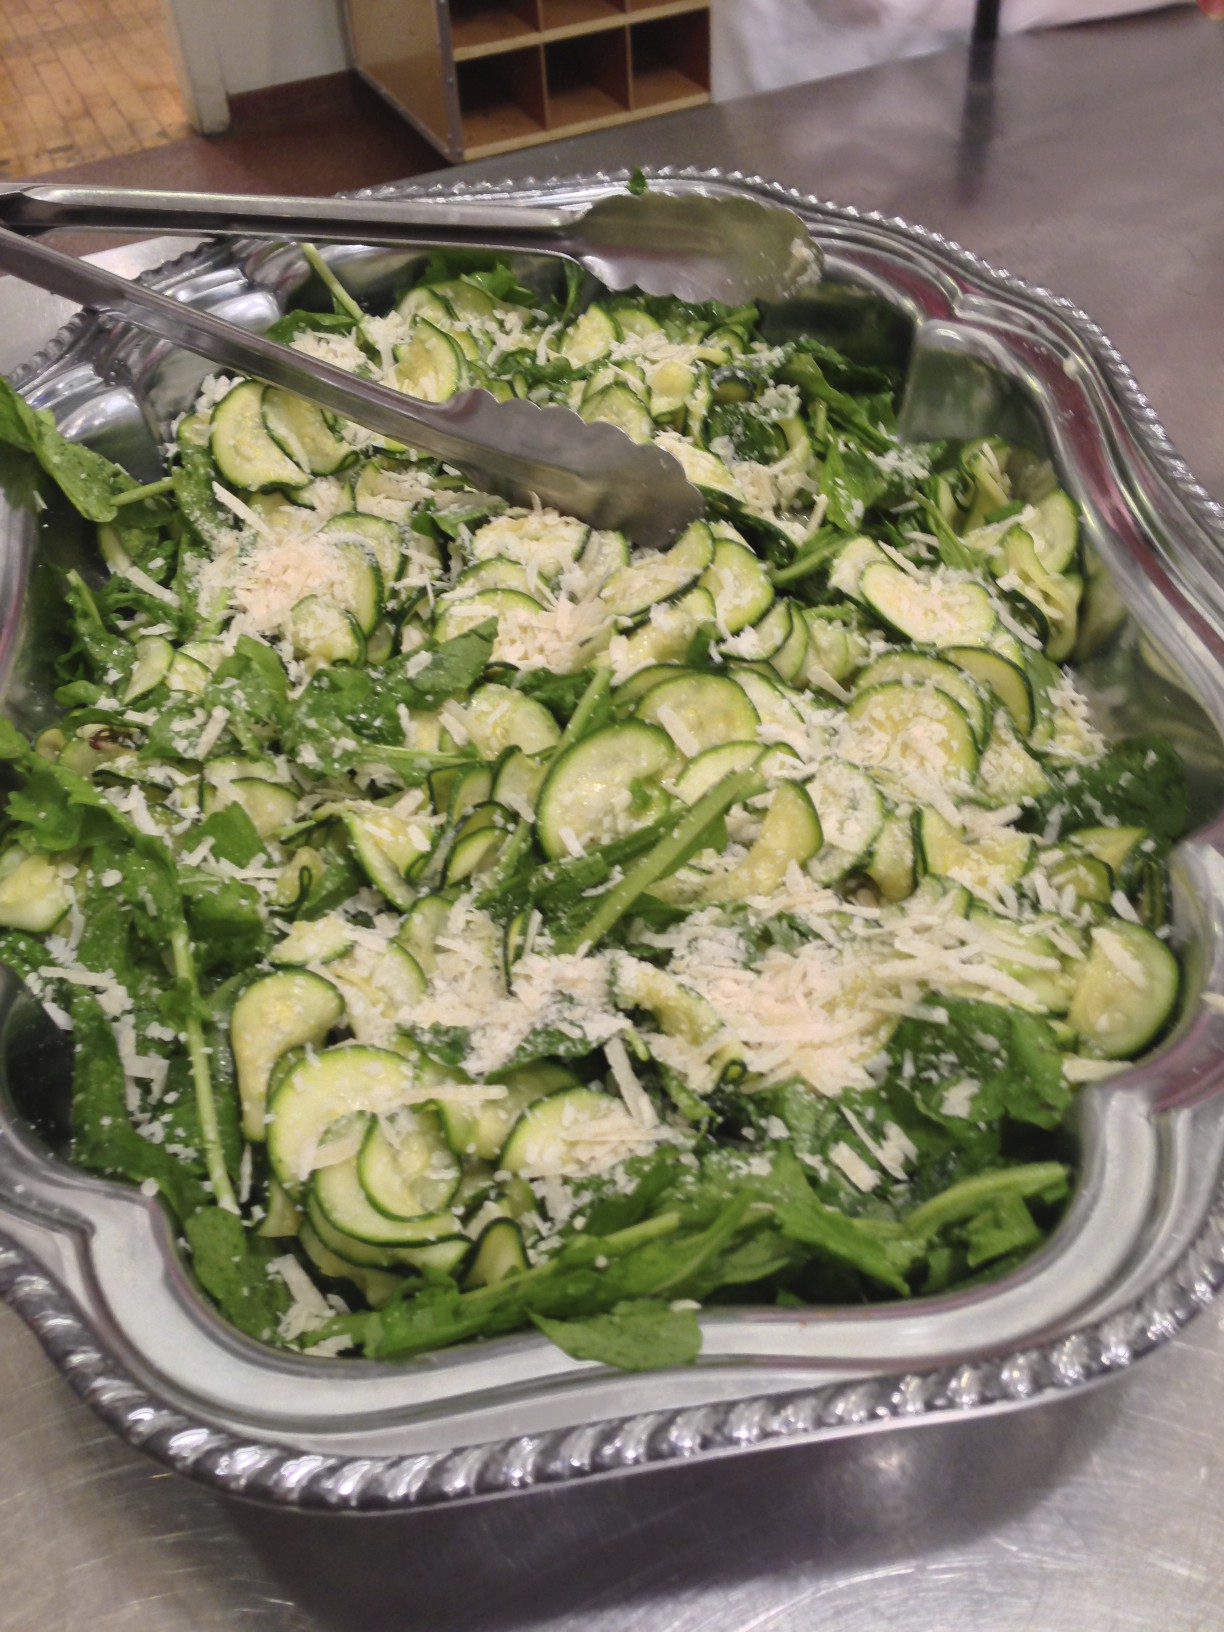 Shaved Zucchini Salad with Arugula and Parmesan Yellow tomato and golden beet Gazpacho.  Yellow Tomato and Golden Beet Gazpacho The one dish I did serve hot was an onion tart made with caramelized spring onions, spring garlic, egg yolks, and a tad parmesan, cream, and milk. 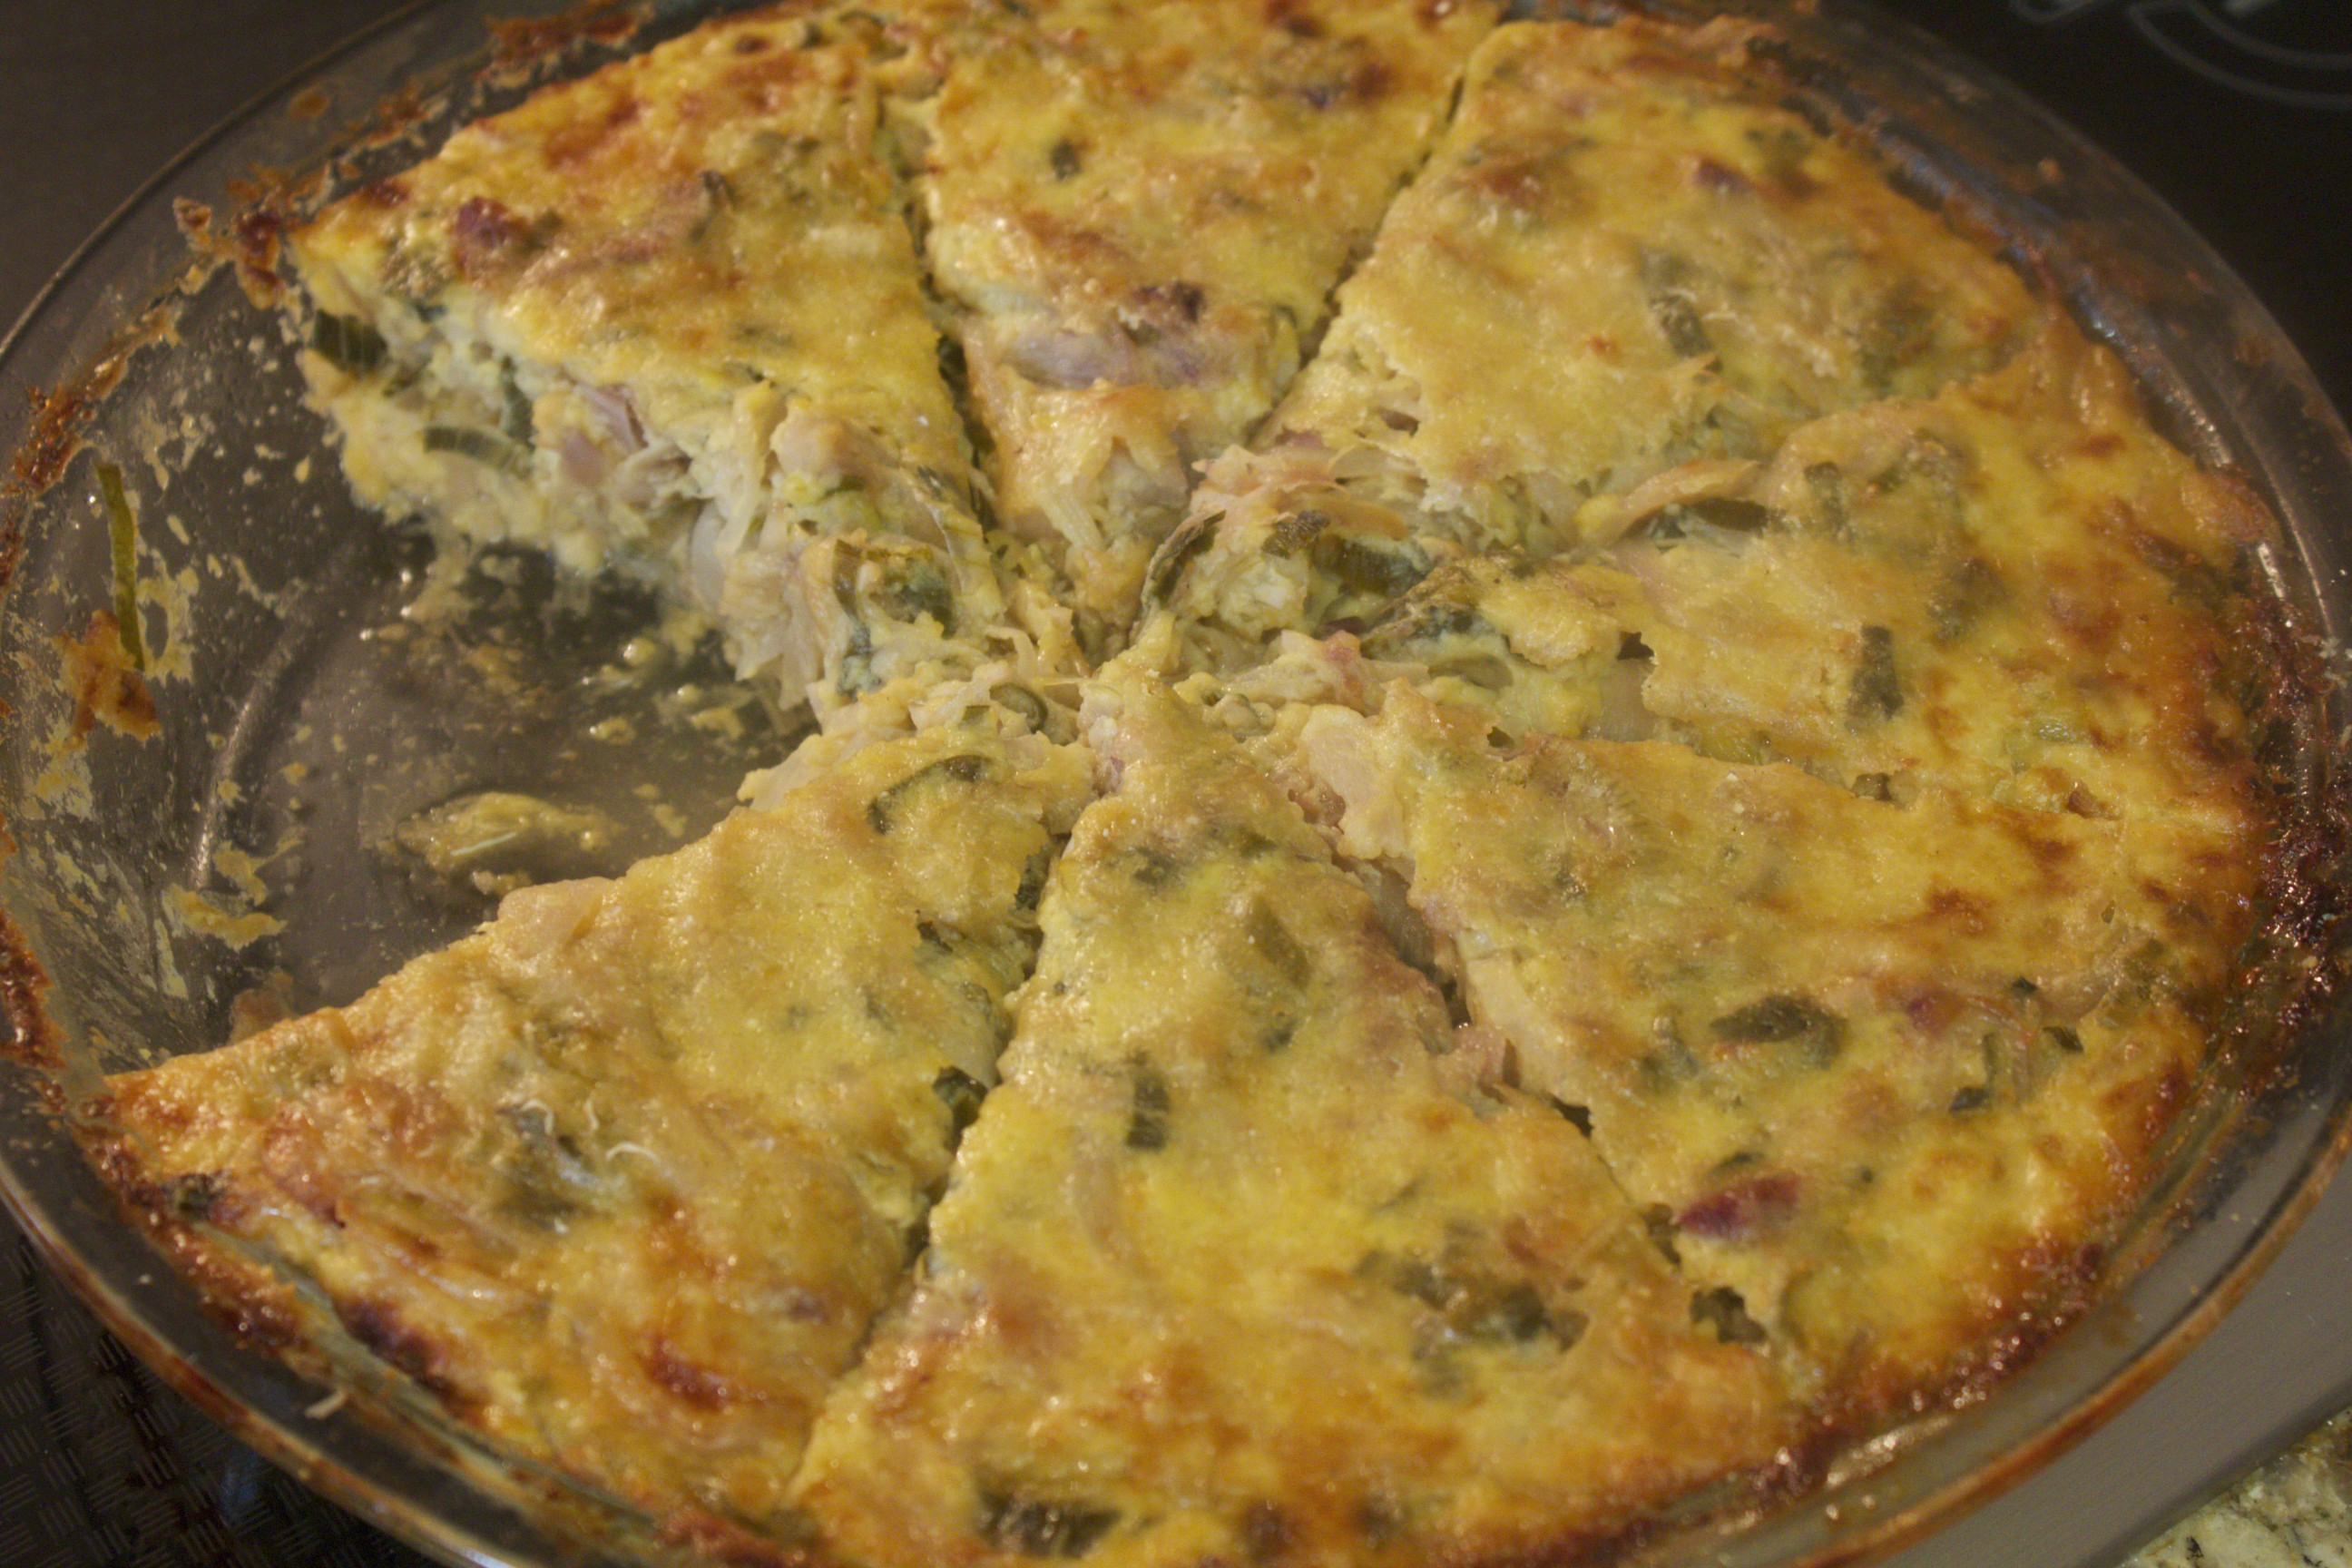 Caramelized Onion Tart Also included on this plate were marinated olives, Tuscan white beans, marinated grilled portobellos, and parmesan biscotti.  On the Plate I also included romano beans with a tahini and pomegranate dressing as well as parfaits with blackberries and cream! A good time was had by all!  Time to Eat! Share on Facebook and Twitter | Dinner, Happenings/Events | No comments
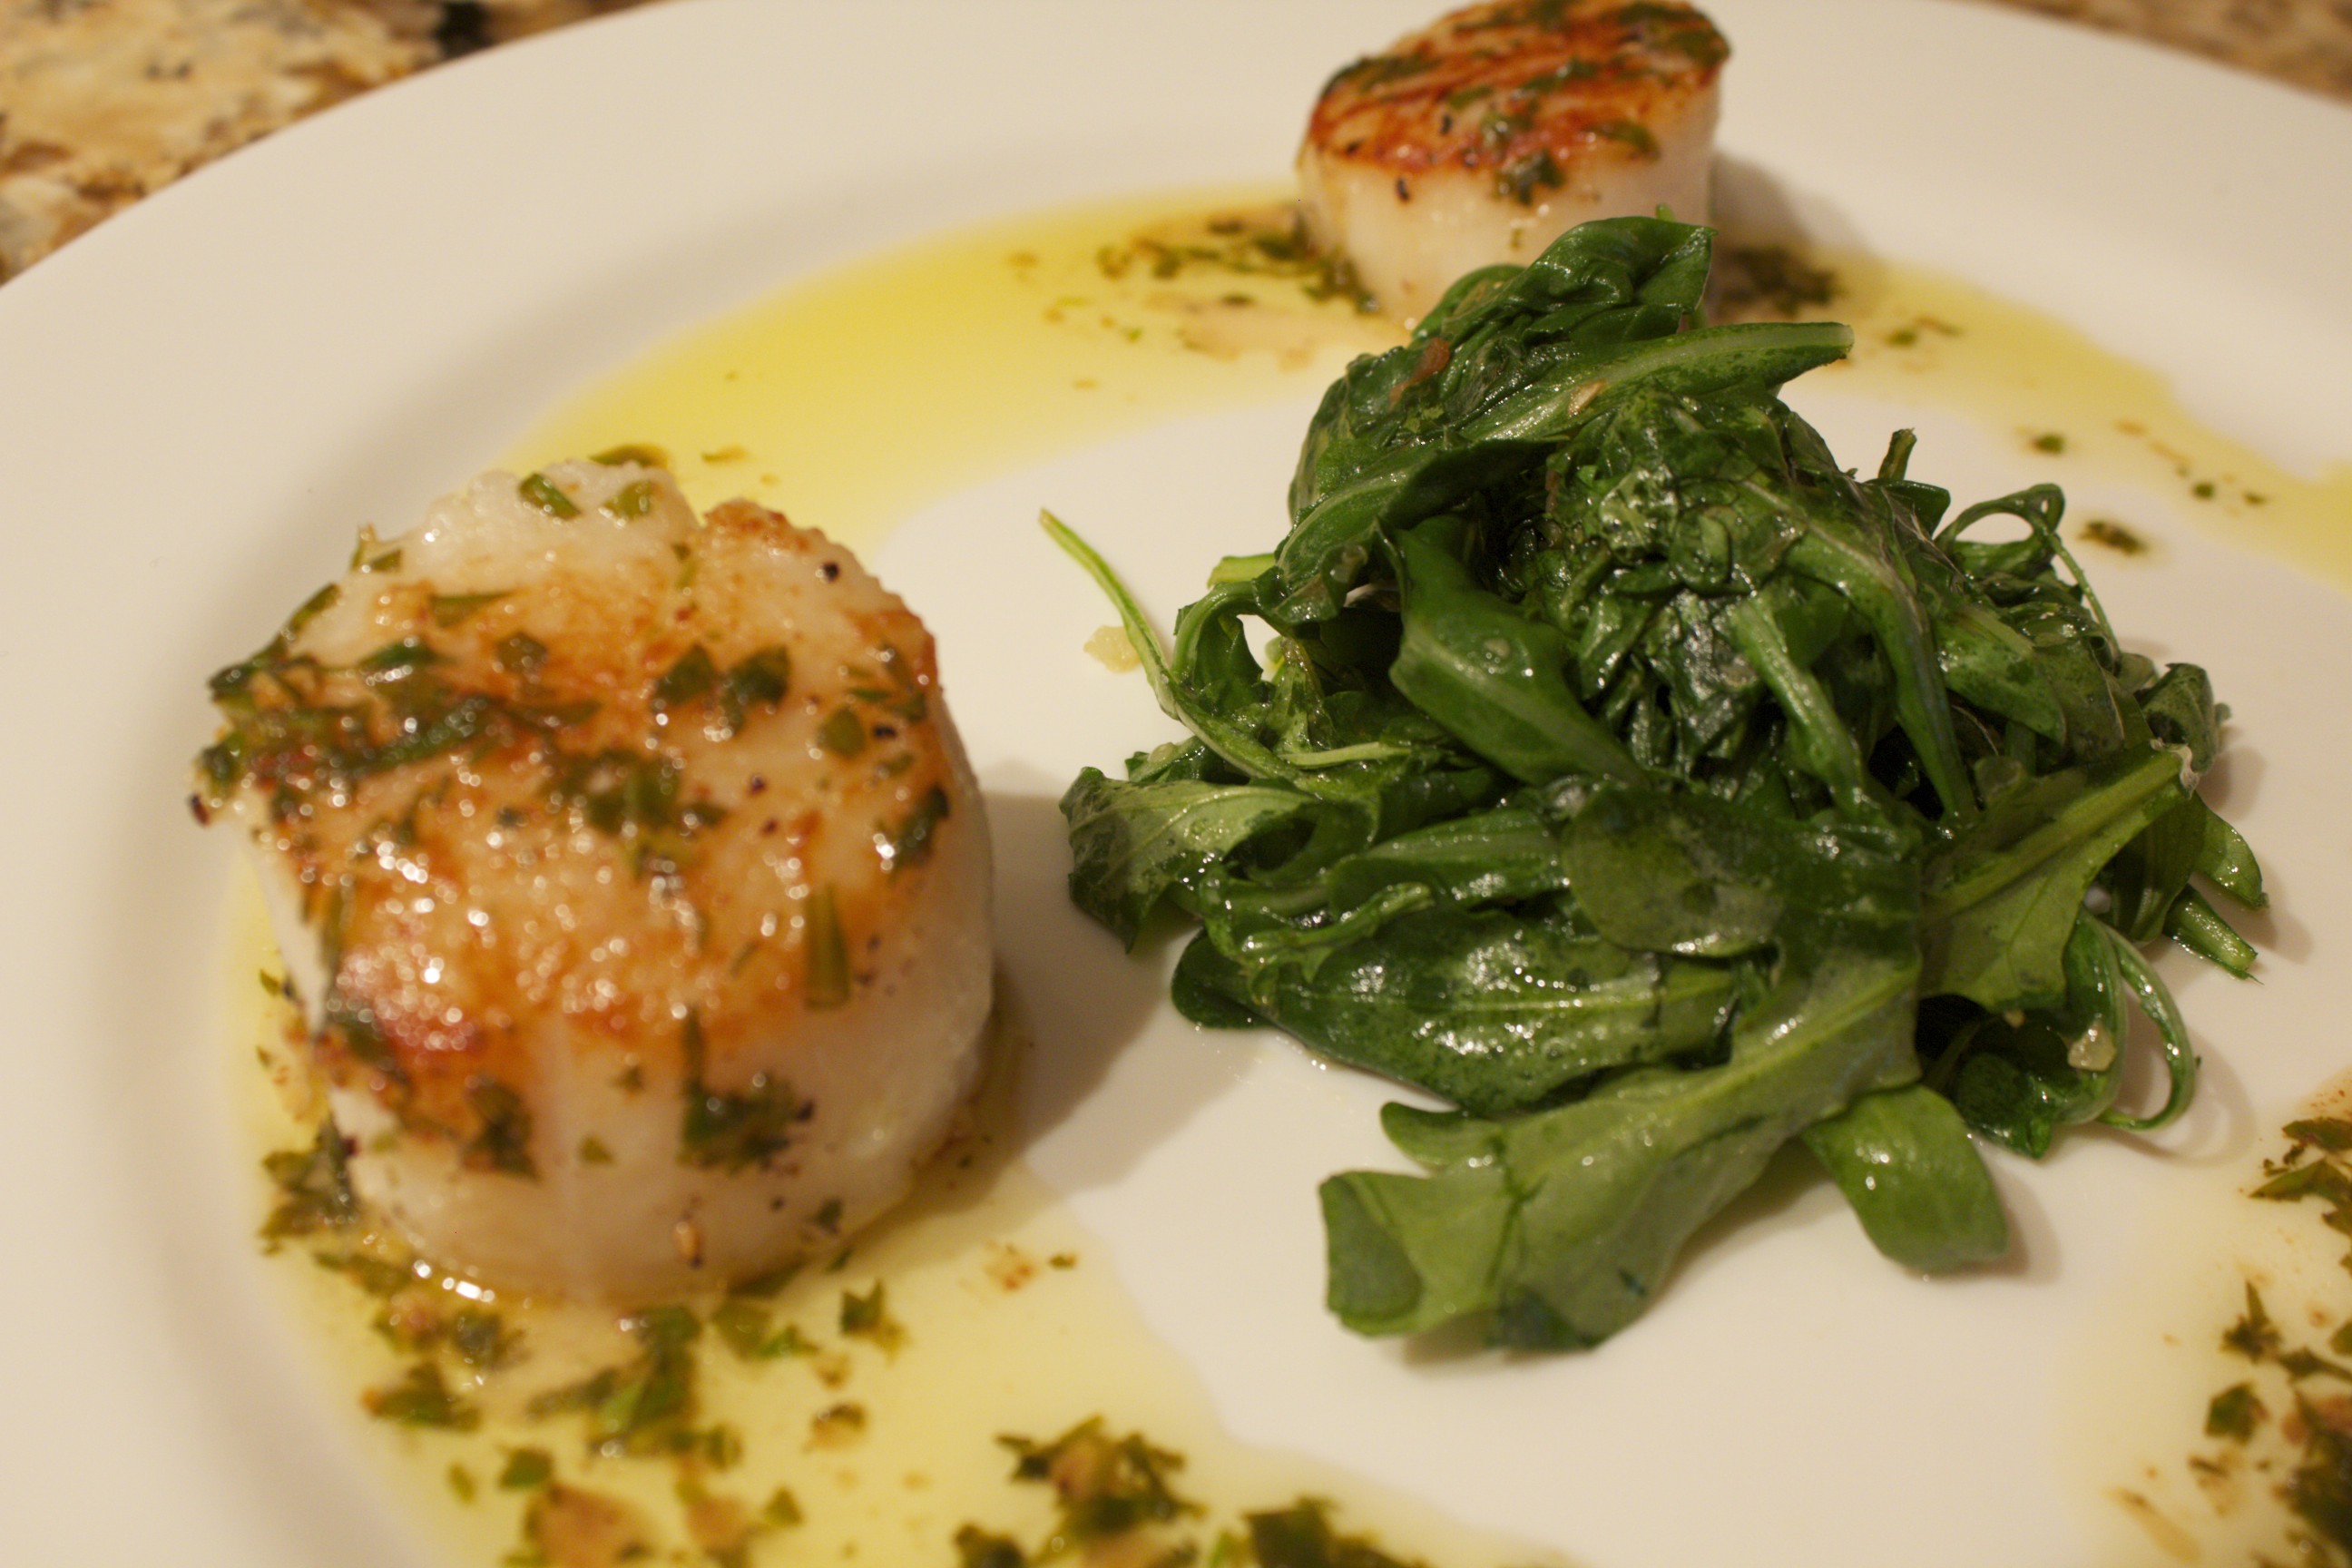
Scallops with Lemon-Tarragon Browned-Butter Sauce and Garlicky Arugula After the heavier foods of winter, spicy and bitter spring greens are cleansing to the body and taste delicious. Peppery lettuces such as arugula and watercress are typically served raw in salads, but they are very tasty when cooked as well. In this video, I show how to make a quick spring meal that you can put together in just 10 minutes. It features seared scallops in a lemony tarragon browned-butter sauce as well as garlicky sautéed arugula. Scallops in Lemon-Tarragon Browned-Butter Sauce Start with the scallops, since they take longer to cook than the greens. Make sure to purchase dry scallops that have not been soaked in any solution. Dry them well with a paper towel, and pull the tough little muscle off. (It is often attached at the side.) Toss the scallops with a little salt and freshly ground black pepper. Heat a thin film of fat in a non-stick or cast iron skillet over medium flame. Fats that are good for this dish include ghee, aroma-free coconut oil, or extra virgin olive oil. Heat the oil over a medium-high flame until your hand, when it’s held one inch above the pan, feels hot. Add the scallops—they should sizzle—and cook for about three minutes, until seared on the first side. Using a tongs, flip the scallops and cook them on the second side for another three minutes or so until they feel firm, with just a little give. Meanwhile, melt 4 tablespoons butter in a small pot on another burner over medium-high heat. You’ll notice that the butter starts gurgling right away, which means that the water content of the butter is evaporating. After about three minutes, the butter will foam and smell nutty. Use a spoon to push the foam aside and see the color of the butter, which should have turned a burnished chestnut color. Immediately remove the pan from the heat and pour in a couple of teaspoons or so of lemon juice to stop the cooking process. Add a tablespoon chopped tarragon to infuse the lemony buttery sauce with a fresh herby flair. Now you have a delicious sauce that is versatile as well. In a medium skillet, add a splash of olive oil with a couple cloves minced garlic. Start heating the oil and the garlic at the same time, which will keep the garlic from burning. When the oil starts to sizzle, and the garlic just starts to take on some light color, add a pile of greens and toss to cook. In the video, I use arugula, but watercress is delicious as well. The greens wilt and are ready in under a minute. Sprinkle with a dash salt and a splash lemon. Greens cook down a lot, so make sure you plan for two cups of loosely packed greens per person. Serve the scallops drizzled with the browned butter sauce accompanied by a mound of the garlicky greens. You’ll marvel at how something so tasty was so easy to make.
Share on Facebook and Twitter | Dinner, Lunch, Main course, Recipes, techniques | No comments
Quick Vietnamese Pho with Fresh Herbs This quick Vietnamese pho, pronounced fuh, as in fun, is a soothing one-pot meal that’s flavorful and light, especially after the heavier foods of winter. Watch the Video Quick Vietnamese Pho with Fresh Herbs The first step is to toast some spices—a couple of tablespoons of coriander, a few cloves, a pieces of star anise, a spoonful of black peppercorns— in a dry heavy-bottomed skillet over medium heat until the spices smell fragrant, which takes only a couple of minutes. I then wrap the spices in a cheesecloth along with some chunks of ginger and onions. l add this bouquet to two quarts of chicken broth (this is where a homemade one really shines) along with a pound of boneless chicken (breasts or legs are fine), a tablespoon of natural brown sugar, a couple of tablespoons of Vietnamese fish sauce, and a few pinches of salt. The fish sauce consists simply of fermented anchovies, which gives the broth authentic Southeast Asian pizazz. After bringing the liquid to a boil, I lower the heat and simmer the broth very gently (so as not to toughen the chicken) for 20 minutes or so, until the chicken is cooked through. I love that I can flavor the broth and cook the chicken all at the same time. While the chicken is cooking, I pour hot water over fettuccine rice noodles, and I assemble the garnishes. I chop some fresh mint, cilantro and basil, cut some limes, slice some red onions, and finely chop a couple of hot chile peppers. When the chicken is cooked, I remove it from the broth and discard the spice bag. As soon as the chicken is cool enough to touch, I tear it into chunky pieces. To assemble the final dish, I ladle the broth over the noodles and chicken, then add the garnishes. I start with the onions and bean sprouts and then add a big handful of the fresh herbs. A sprinkle of the hot chiles and a squeeze of fresh lime at the last minute makes the dish sing! Assembling the dish to order allows me to adjust the spice level for all who are eating. The flavorful herbed broth is nourishing and cleansing, not to mention delicious! 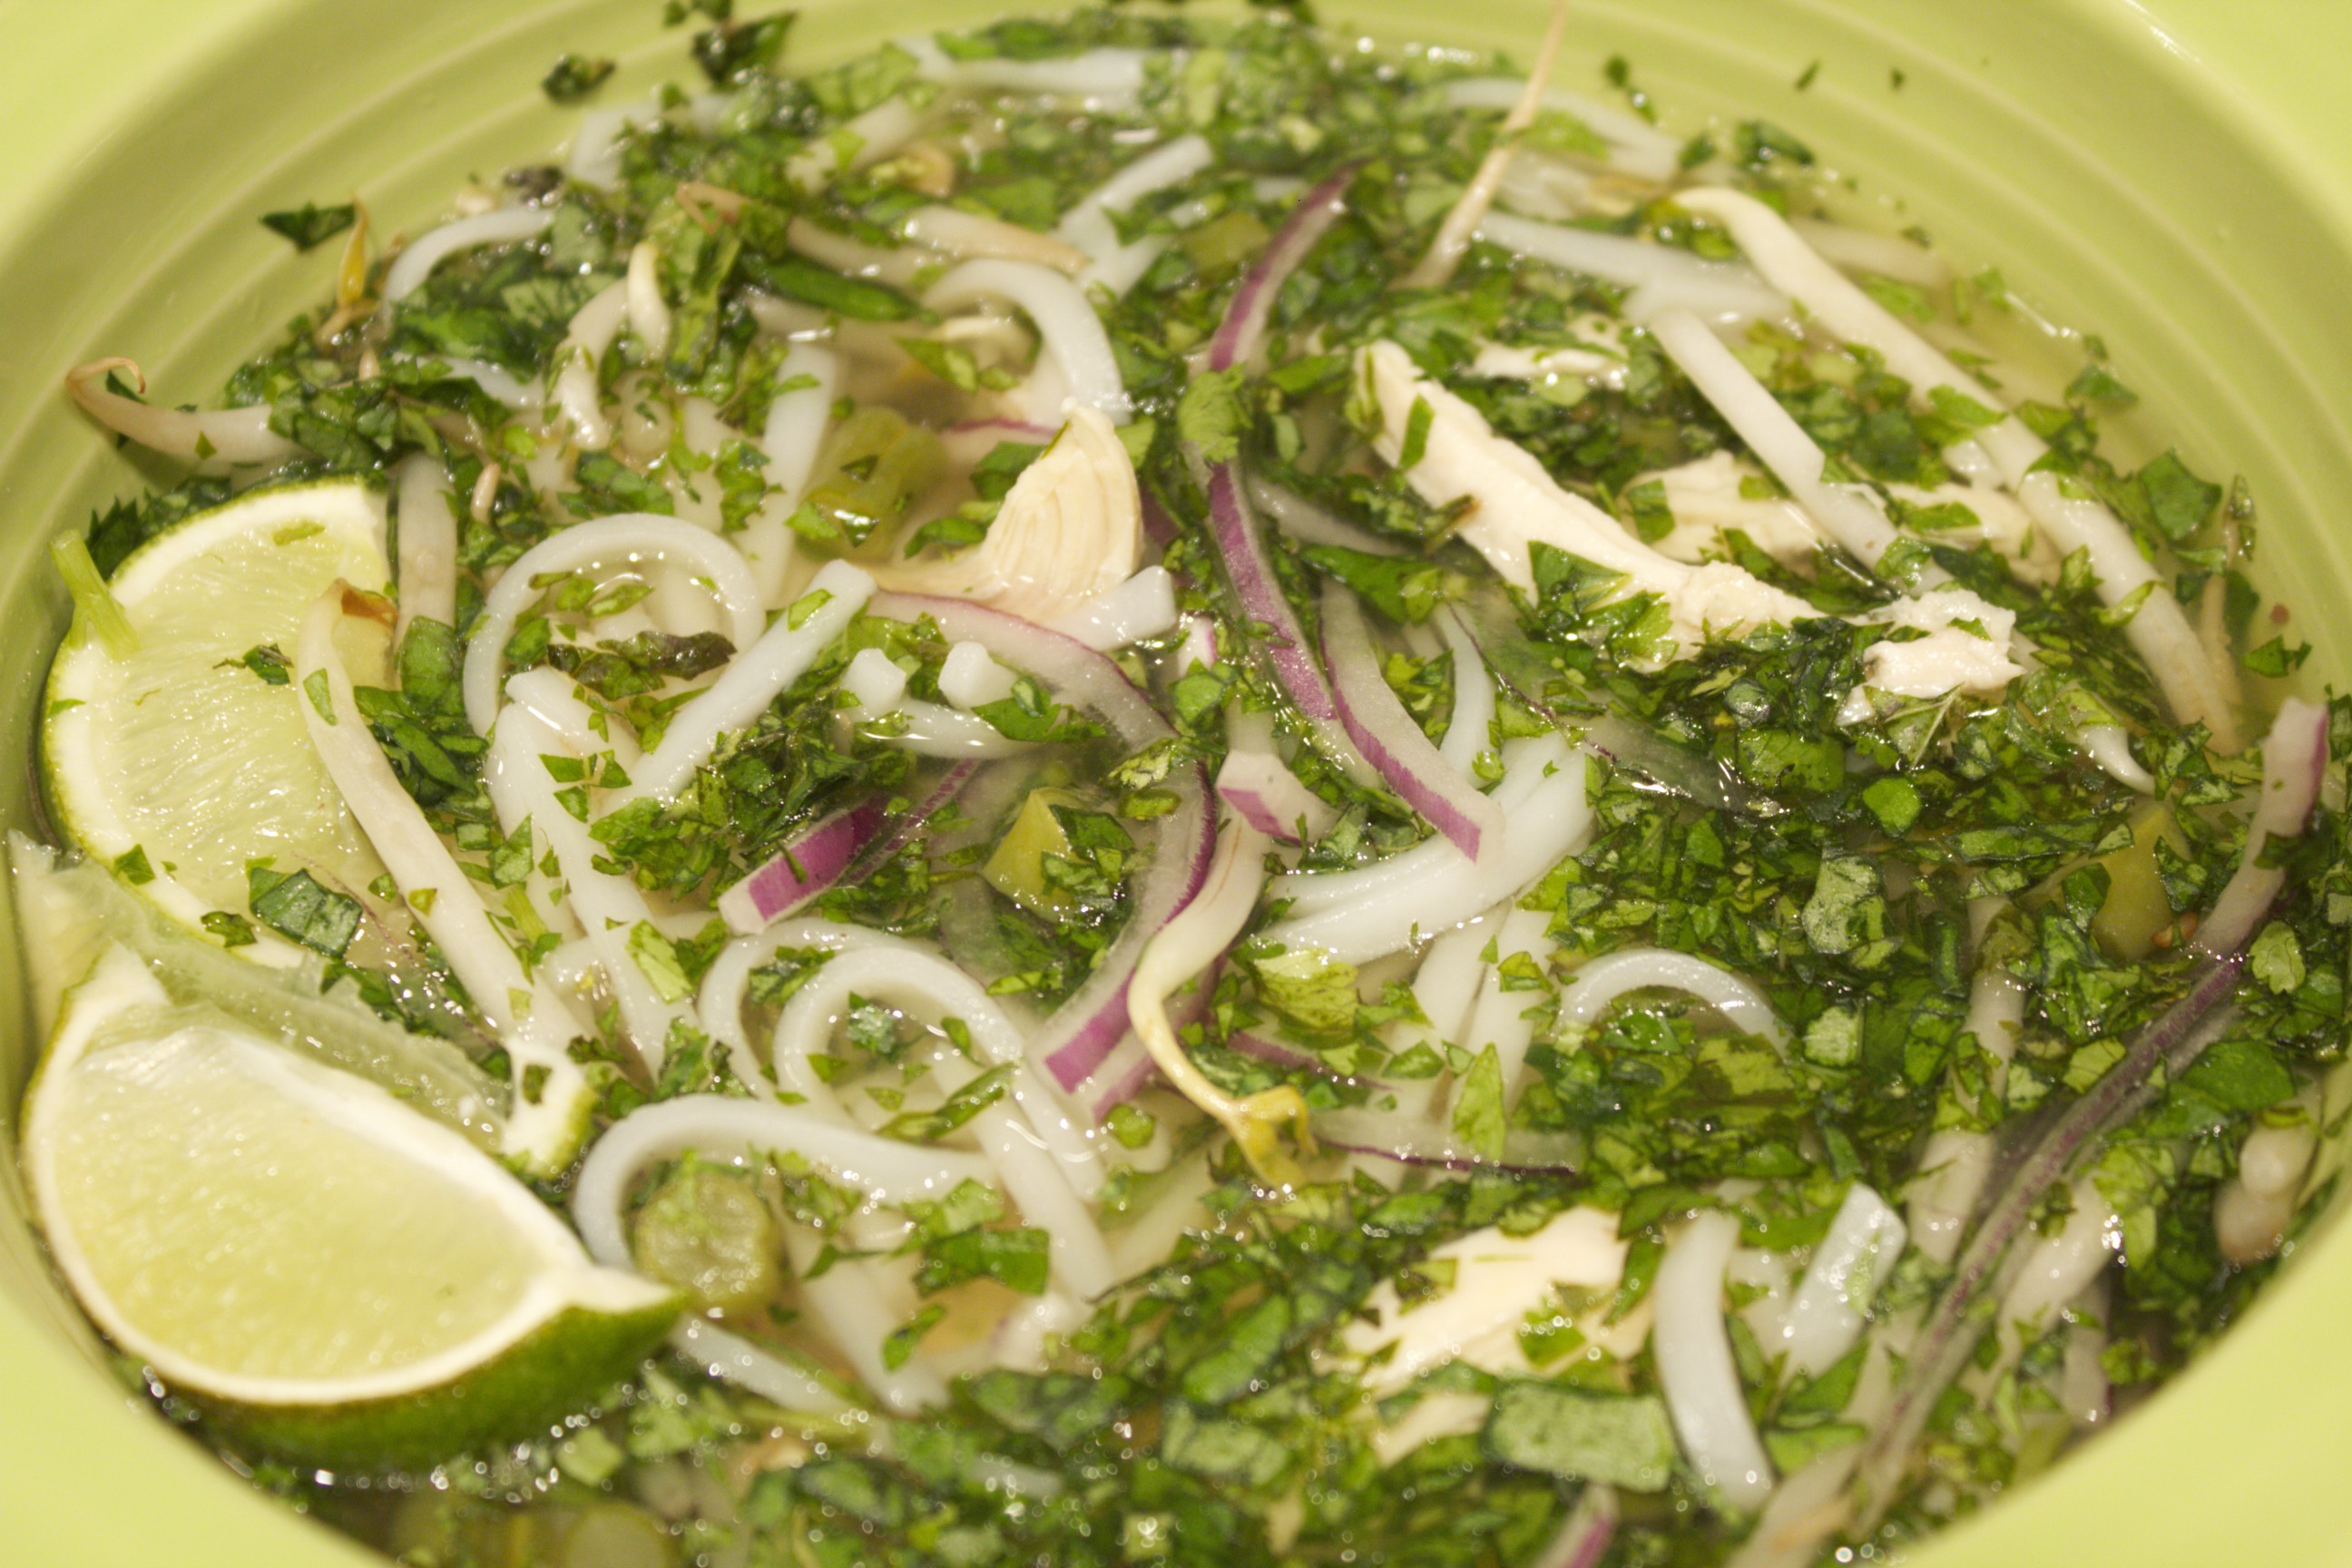 Vietnamese Chicken Pho Share on Facebook and Twitter | Dinner, Gluten Free, Main course | No comments
Day Before Thanksgiving Feast This time of year I get a hankering to cook a Thanksgiving meal, even if I’m not the one having the guests over. My local traditional foods club has farmers that bring in stunning pasture-raised Turkeys, so I couldn’t resist buying a couple. I invited a friend over to cook a no-stress pre-Thanksgiving meal with me and split the bounty. (We cooked the 13-pound Turkey. I still have a wee 7-pound turkey in the freezer.) This is what we made, based on what looked good at the greenmarket when I went shopping that morning: Cranberry glazed turkey: I planned this one. I made a glaze by simmering cranberries, maple syrup, thyme, orange zest, garlic, and brown rice vinegar in a small pot. When the cranberries had burst, I pushed everything through a strainer. I served this same glaze for a recent lunch party on duck breasts.  Cranberry Glaze in the Pot I received the turkey Tuesday night and did a little prep. I dry-brined it with salt (basically just rubbed it all over) and slipped some thyme-rosemary-sage butter under the skin to keep the breast moist. I laid the turkey on a rack in the roasting pan and refrigerated it overnight. Wednesday I baked it breast-side down at 325˚F. for an hour, then flipped it, and cooked the turkey about another 2 hours. I glazed the bird the last 40 minutes. Next time I won’t be lazy, and I’ll tie the turkey legs together.  Cranberry-Glazed Turkey Gravy was the pan drippings with a roux made from chickpea flour and butter (the whole meal was gluten free), with some gelatinous chicken stock. (I had simmered a whole chicken with a bunch of extra feet overnight to make a gelatinous chicken stock.) Stuffing: I made a gluten-free cornmeal with cornmeal and sorghum flour (soaked the flours in buttermilk overnight, then proceeded with the recipe), then sautéed onions with cranberries, dates, and prunes. I added some wine, apple cider, and a smidge of maple sugar to deglaze, and cooked this until the cranberries burst. I added the mix to a bowl with some sage, chopped pecans, toasted cornbread cubes, a pound of turkey sausage (I cooked it first), and a splash of sherry vinegar (and salt and pepper of course) and a couple eggs. I baked this separately in an 8×11 roasting pan at 350 for about 20 minutes. Next time I’ll have the stuffing ready in advance and I’ll fill the bird with it.
 Stuffing in Progress Celery root-apple-sage pancakes: recipe from The Healthy Hedonist Holidays. I used chickpea flour instead of unbleached white flour to make these gluten-free. Chard with cipolline onions: We cooked cipolline onions in olive oil and balsamic vinegar and added a couple bunches of wilted chard. Buttered Green Beans with anchovies, garlic, and sage: We crushed the anchovies with salt so that they disappeared, and finished the green beans off with a splash of lemon juice. Brussels Sprouts with leeks and shiitake mushrooms: We sweated the leeks and mushrooms with olive oil and a splash of tamari, until shrunken and tender. We removed them from the pan. We then added the Brussels Sprouts with butter, water, thyme, and salt, and cooked them until tender. We uncovered the lid and added balsamic vinegar and mustard, stirred the mushroom mix back in, and finished with a sprinkle of fresh tarragon. Squash-Chestnut soup: We cooked hubbard squash soup with chestnuts, and added a splash of scotch. Served it with a swirl of yogurt, although crème fraiche would have been even more luscious.  Hubbard Squash and Chestnut Soup Russet apples: Roasted in ginger-cinnamon mulled cider. Then we feasted, and divided the spoils. No room for dessert, but it wasn’t necessary. Had leftovers of this one (espresso pudding with pumpkin whipped cream).
 Chocolate-Espresso Pudding with Pumpkin Cream and Whipped Cream I’ll admit that on Thanksgiving I had salmon, since I didn’t want to exhaust my enthusiasm for Turkey. The next night I was into Turkey again. This is my second night of leftovers, and it’s so good.  The whole plate: Turkey, Stuffing, Chard with Cipollines, Brussels Sprouts, Russet Apples, and Celery Root Pancakes Share on Facebook and Twitter | Dinner, Gluten Free, Main course, Side Dishes, Uncategorized | No comments
Mussels in White Wine Sauce Today I made videos of a few easy seafood dishes. I started with mussels in white wine sauce. I simmered some shallots and garlic with white wine for a couple of minutes. I added a couple pounds mussels, covered the pan and cooked them until they opened. I transfered the mussels onto two plates, then added some fresh herbs (today it was thyme, parsley and oregano) as well as a chunk of butter and a sprinkling salt to the skillet. When the butter foamed, I poured the sauce over the mussels and mopped up the extra with a hunk of crusty bread. Delicious!  Mussels in White Wine Sauce Share on Facebook and Twitter | Dinner, Main course | No comments
Savory Plum Dishes Now that the summer has transitioned into autumn, I am thrilled to resume my favorite cooking method: braising. I love the way that the prep for a braise is usually short; the oven does all of the hard work. A cut of meat that starts out tough slowly cooks for hours until it is meltingly tender. Best of all, braises taste better the following day, making them ideal dishes for gatherings. A few weeks ago I was inspired by a New York times article by Melissa Clark on braising a brisket with Italian plums and port wine. Because of the wonky weather in New York this year, peaches and plums were mealy and unappealing to eat raw, but I envisioned cooked plums melting down into a beautiful regal sauce. I purchased a second cut grass-fed brisket, which is the fattier of the two possible brisket cuts. Since grass-fed meat tends to be extra lean, this is the better of the two cuts to use. I salted and peppered the six-pound piece, seared it on both sides in a little oil for about 7 minutes per side in a large skillet, then transferred it to a plate. I added a few cups sliced onions and a few cloves minced garlic to the pan, and gently sweated the onions until softened. I then added a cup of port and a cup of rich chicken stock, and scraped up the brown bits on the bottom of the pan. To a baking dish that would fit the brisket, I added a couple pounds of halved Italian plums along with a couple cinnamon sticks, a few stars of star anise, some bay leaves and a handful of fresh thyme branches. I poured the onion-wine mix over the plums, lay the brisket on top, and spooned some of the liquid over the brisket. I covered the pan with foil and placed it in a 325 degree oven for about 5 hours. Every half hour or so I flipped the brisket. The last half hour I uncovered the brisket to thicken the liquid. I let the meat cool to room temperature, then chilled it overnight in the refrigerator. I sliced it while cold and shared the dish with friends. I reheated the sliced pieces in the oven in the sauce. The brisket was succulent and delicious.  Brisket braised with Plums Since I was not yet over plums, I made a quick plum sauce to go over duck breasts. While my duck breasts were searing, I added a bit of the rendered duck fat to an adjacent skillet and sweated some sliced onions. I then added a cup of chicken stock, a cup of port, a cinnamon stick, some star anise pods, a few sprigs thyme, a bay leaf and 2 pounds of halved plums. I let the whole sauce reduce while the duck breasts cooked. The duck and the sauce were finished around the same time, in about 15 minutes. Earlier in the day I had roasted some whole beets in a pan with thyme, olive oil, and water for a couple of hours. When they were ready, I slipped off the skin, cut them into wedges, and drizzled a bit of pomegranate molasses over them.  Thyme-Roasted Beets I served the meal with a mélange of corn, peppers, and zucchini and a few spoonful’s of lacto-fermented carrots. This bright and colorful meal took only 30 minutes of labor.  Duck with Plum Sauce
Share on Facebook and Twitter | Beef, Dinner, duck, ingredients, Main course, Sauces | No comments
Shrimp and Fresh Tomato Sauce Here’s another variation of the succulent cherry tomato sauce. Added to the tomatoes is ½ pound shrimp, which turns this dish into a substantial sauce. The petite wild Oregon Pink Shrimp from Vital Choice are perfect, since they’re already cooked, and they reheat in the three minutes it takes to warm the tomatoes. I keep large bags of the frozen shrimp in my freezer, which inevitably make their way into lots of dishes. They take about 15 minutes to defrost, which makes them great for last minute dishes. I love the way the sweet corn flavor of the polenta complements the juicy herbed shrimp and tomatoes. In order that I don’t have to stir continuously, I cook the polenta over a double boiler (the technique in is The Healthy Hedonist), then fold in some fresh corn right before the polenta is finished. Sometimes I eat the polenta soft—before it’s set—but most of the time I spread it onto an oiled baking dish. Refrigerated, the polenta lasts for up to a week. I cut the polenta into triangles, brush the top with olive oil, and then bake at 400 degrees until browned, which takes about half an hour. If I’m just using a couple of pieces and not the whole pan, I’ll sauté the pieces in a cast iron skillet with some coconut oil until crispy. I add some wilted greens or a salad for a balanced meal.  Shrimp and Fresh Tomato Sauce over Polenta
Cornmeal-Crusted Cod with Fresh Tomato Sauce Miniature tomatoes dazzle in a variety of different sizes, shapes and colors; they are flavorful long after the larger varieties are truly out of season. I love using these miniature packets of flavor to make versatile stove-top sauces. The one that I demo in the video is just as delicious over polenta and simple greens as it is over fish. In the video, I’m demonstrating a single serving of cornmeal-crusted cod, although the tomato sauce is enough for up to four filets. You can swap out the cod for halibut or pollack or any thick white-fleshed fish. Cornmeal-Crusted Cod with Fresh Tomato Sauce I begin with a pint of small tomatoes. I’ve used grape and cherry, or sweet sun-golds—my favorites—when I can find them at my local greenmarket. I often mix a beautiful combination of colors, varieties and sizes. I add to the skillet—besides the halved tomatoes—a teaspoon or so of minced garlic, a couple tablespoons minced shallots, a teaspoon of fennel seeds, a few tablespoons extra virgin olive oil and a splash of balsamic vinegar. I sprinkle a dusting of sea salt and freshly ground black pepper over everything, give it a quick mix, then cover and set the pan aside while I start the fish. I salt and pepper the filet before I dredge it on both sides in cornmeal. When the cast iron skillet (or any other heavy-bottomed skillet will do) is heated, I add a film of coconut oil—unflavored is best—and cook the fish a couple of minutes on each side over medium-high heat until golden. I transfer the pan to a preheated 400˚F oven for 5 minutes to cook the inside of the fish thoroughly. While the fish is in the oven, I turn the heat on the tomatoes and let them stew for 2 to 3 minutes, just until warmed through and juicy. I then stir in a tablespoon or so of minced chives and parsley, which brightens the colors and heightens the flavors. When the fish is ready, I plate it and spoon the sauce over the top. The fish is moist on the inside, crispy on the outside and complemented by the warm tomato sauce. It’s a guest-worthy dish that is easy, seasonal, and delicious.
Share on Facebook and Twitter | Corn, Dinner, Fish, Gluten Free, ingredients, Lunch, Main course, Sauces | No comments
|