|
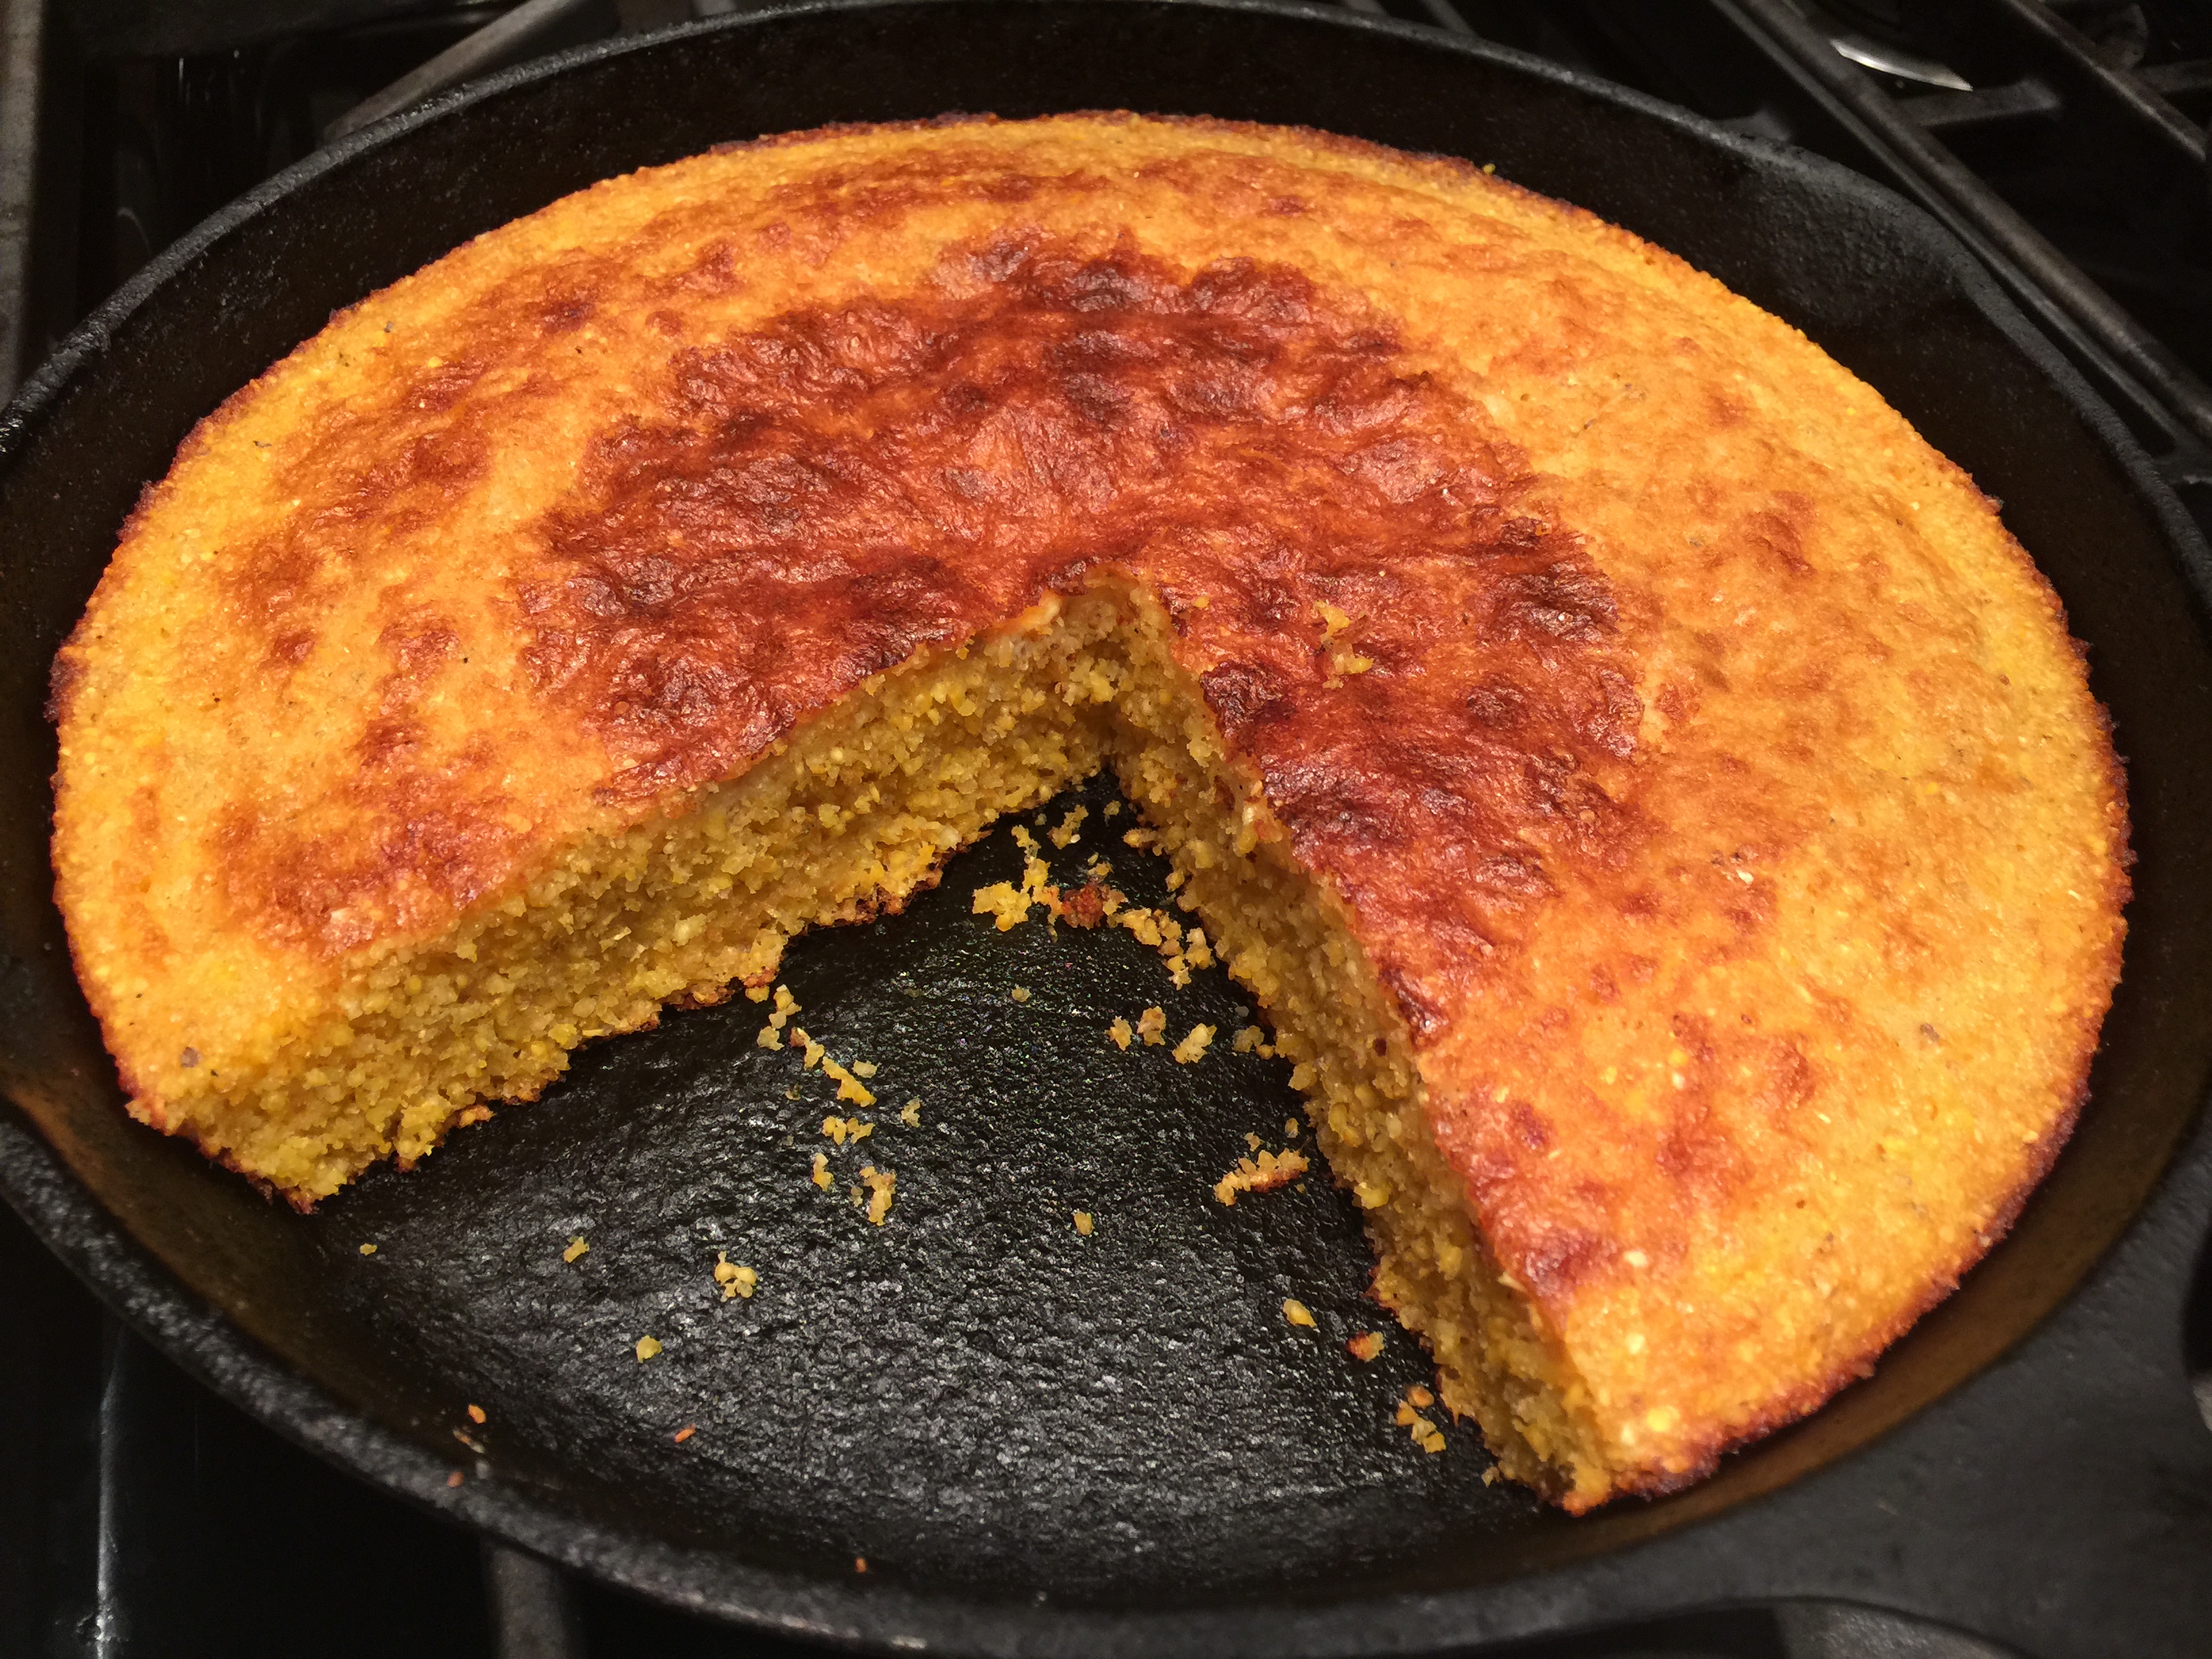
Southern Skillet Cornbread My new favorite cornbread is adapted from a recipe in Cook’s Country magazine. It’s made from pure cornmeal, so it’s got super corny flavor. It’s easy to make, baked at high temperature in a cast iron skillet.
In today’s video, I show how to make a delicious Southern-style skillet cornbread. This cornbread is made completely from cornmeal, without any other flours, making it gluten free. Besides the cornmeal, there are just a few other ingredients besides good quality fat (a mix of coconut oil and butter). The dish is baked in a 10-inch cast iron skillet, and it’s quick to make. The technique for making this dish is also a little unusual. You can make this cornbread using either course cornmeal or fine-grind cornmeal, which yields very different results; or you can mix the two. In the video, I demo a mix; I use 1 1/4 cups of a course-grade polenta and 1 1/4 cups of a fine grind masa harina, cornmeal that’s been treated with edible lime (calcium carbonate) to make it digestible and impart that distinctive tortilla flavor. The two together give the cornbread a delightful texture. To begin, spread both types of cornmeal on a parchment-covered sheet tray and toast in a very hot (450 degree) oven for 10 minutes. Once the cornmeal has been in the oven for 5 minutes, add 1/4 cup aroma-free coconut oil to a 10-inch cast iron skillet, and place that in the oven on a higher shelf to melt and heat. Remove the sheet tray and the cast iron skillet at the same time after 5 more minutes. The cornmeal will have started to brown around the edges. To the melted coconut oil, add 1/4 cup butter and return that to the oven to melt. Transfer the cornmeal to a bowl (it’s still warm) and whisk in 2 cups buttermilk. Add the remaining ingredients: 2 beaten eggs, 1 teaspoon each baking powder and baking soda, and 3/4 teaspoon salt. Notice how the mix starts to bubble as soon as the leaveners are stirred in. By this time, the butter will have melted. Remove the cast iron skillet from the oven, and pour off all of the fat into the bowl with the other ingredients, leaving just enough fat in the skillet to coat the bottom. Thoroughly mix the coconut oil-butter mixture into the other ingredients; then pour the entire contents of the bowl into the prepared skillet. Give the skillet a shake to even and smooth out the batter. Return it to the oven and bake it from 12 -16 minutes, rotating the pan after about 7 minutes. Remove the pan when the top is crusty and golden. Let the cornbread cool for a few minutes before slicing. Make sure to wrap a towel or kitchen mitt around the handle so that you don’t inadvertently touch the skillet. Even though you know you just took it out of the oven, you’re liable to forget out of sheer habit. Cut the cornbread into wedges. Marvel at the lightness of the texture, the corniness of the flavor, and the ease of assembly. Enjoy this luscious treat with your favorite cold weather dish or holiday meal.
Share on Facebook and Twitter | Gluten Free, Grains, Kitchen Tips, Recipes, Side Dishes | No comments
Gluten Free Flours — Part 2 Part 2 Here’s a primer on some of the most useful gluten free flours:
Almond Meal or Flour is ground blanched almonds. It’s great for crusts, as a combo in flours, and as a coating for chicken, fish, or vegetables. Hazelnut meal also makes a tasty nut flour. Nut flours work well in combination with brown rice flours to create a grainy pleasing texture. Almond flour mixed with sorghum flour and a little arrowroot is a good mix for thin tuille cookies. Arrowroot is a root starch thickener, and acts like cornstarch, but is more digestible. Arrowroot is good for thickening sauces and making crispy coatings. Add a couple tablespoons to thin tuille cookie batter to add the necessary gluey component. Amaranth flour is best used in a flour mix (such as 25 per cent of a gluten-free combo) in recipes that do not have a lot of water, such as breads, muffins, or cookies. It adds protein, and tastes nutty and sweet. You can also use amaranth flour to thicken roux, sauces, and gravies. Buckwheat flour is strong and earthy, and best when you want that particular flavor, such as in buckwheat pancakes and waffles. You can also use it as part of a flour combination. Chickpea flour adds protein, moisture and texture. Both the delicious French socca and the Italian chickpea farinata are versions of crêpes made from chickpea flour. Another bean flour combination that is popular now is garfava flour, which is half chickpea flour and half fava bean flour. The mix of beans flours has a less intense flavor than pure chickpea flour. Chickpea flour functions deliciously in baked goods that have strong flavors, such as chocolate, spices or nut butters. (The uncooked batter never tastes good, however.) Bean flours boost the protein content of baked goods, although some people have a hard time digesting them. Coconut flour, also know as coconut fiber, is amazing when it works. Sift it and use in small quantities. It is high in fiber and fat, and low in carbohydrates. Coconut flour is highly absorbent and therefore requires a lot of added liquid to keep baked products moist. You can’t use coconut flours directly to replace wheat flours in recipes, because the recipes don’t call for enough liquid, and the cooking methods cause moisture to be absorbed by the coconut too quickly. It’s best to use recipes that have been specially designed for coconut flour. You’ll notice they all have a high liquid to coconut flour ratio. Muffins made with coconut flour and eggs make a great low-carbohydrate high-energy breakfast, perfect for those on the go. Make sure to refrigerate baked goods made with coconut flour. Cornmeal is great for corn muffins, bread and pancakes, and is a wonderful flour to use for dredging. Use it in combination with rice flour or quinoa flour for excellent light muffins. Purchase the stoneground variety in natural food stores. Millet flour is high in protein. Add it in small amounts, in combination with other flours, to boost the nutrition in baked goods. Potato Starch is a thickener, and it is used to add moisture to baked goods. It can tolerate higher temperatures than arrowroot. Quinoa flour is a good source of protein, gives baked goods a nutty flavor, and adds moisture to gluten-free baked goods. It has a somewhat bitter taste, but is excellent in combination with other flours. Try it with cornmeal in muffins or quick breads. Rice Flour includes three types: brown, white, and sweet rice. All are mild- flavored. Brown rice flour, which is the most nutritious, has a somewhat gritty texture. You can use the grittiness to advantage by combining it with nut flours, such as almond or walnut, to make baked goods with a pleasant nutty crumb. Rice flours, both white and brown, make excellent roux. Sweet rice flour is called glutinous flours, but doesn’t contain gluten. It is a good thickener; you can coat foods with it before sautéing, and small amounts added in baked goods improve the texture. Sorghum flour is high in protein, and has a wheat-like taste. It is becoming very popular in the gluten-free community, since it has a neutral flavor and adds great texture to baked goods. It isn’t gritty like brown rice flour, and doesn’t have the beany flavor of chickpea. You can use it in a gluten-free flour mix; and in many recipes it works well by itself. Tapicoa flour is a flavorless, high carbohydrate starch, and is low in nutrients. On the up side, it is a good binder in baked goods when used in combination with other flours. It is a reliable thickener for sauces and desserts, and is included in batter coatings to make crisp, golden crusts. Teff flour has a nutty, almost sweet flavor, and imparts moistness in gluten-free baking. Use it in small quantities to improve the nutritional quality. Xantham gum is a common ingredient used in gluten free baking to improve the binding quality, which is lacking. The amount that usually works is ¼ teaspoon per cup of flour for cakes and ¼ to ½ teaspoon cup per flour for cookies, quick breads, and muffins. For baked goods that require kneading, 1 to 2 teaspoons per cup flour is needed. Guar gum can be used in place of xantham gum. Keep in mind that it is a good idea to combine the more nutritious gluten-free flours with the high starch flours to improve the nutritional quality. Soy flour, which is commonly used in gluten-free baking, is difficult to digest, and therefore not recommended. Sorghum flour can substitute for soy flour in most recipes. Here are some simple mixes that you can keep on hand. Make up a canister; and for best results, keep it refrigerated. Have fun experimenting with your favorite recipes. For muffins and quick breads try equal parts sorghum flour, tapioca flour, and brown rice flour. For an all-purpose combination, try 2 cups rice flour, 2/3 cup potato starch, 1/3 cup tapioca flour, and 1 teaspoon xantham gum. Share on Facebook and Twitter | Gluten Free, Grains, ingredients | No comments
Greens and Quinoa Pie Greens and Quinoa Pie Spring greens combine with quinoa and sheep or goat cheeses for a light yet hearty savory pie that bakes into an appealing deep golden brown. One 9-inch pie (serves 6)  Greens and Quinoa Pie 1/2 cup quinoa Salt 1 large bunch chicory (1 to 1 1/4 pound), cut into bite-sized pieces (bottom 11/2 inches of hard stems removed ) 1 head romaine, shredded 3 tablespoons extra viegin olive oil, divided 2 cups thinly sliced onions, (2 medium) 1/4 cup thinly sliced scallions, whites and greens 1/4 cup chopped dill 1/2 cup crumbled feta cheese, preferably goat (about 2 ounces) or sheep’s milk 1/2 cup grated gruyere or aged goat cheese (about 2 ounces) 3 eggs Freshly milled black pepper Preheat the oven to 350˚F. Have ready a 9-inch ovenproof pie pan (pyrex is ideal). Rinse the quinoa in a strainer and dry toast in a small pot until almost dry. Add 1 cup water and a pinch salt. Cover and bring to boil, then lower the heat and simmer covered until the grains have swelled and the water is absorbed, about 15 minutes. Do not disturb the steam vents that will form while the quinoa is cooking. Remove from the heat and pour into a large bowl. Wash the chicory and romaine; no need to dry them. Add the chicory to a large pot and wilt over medium heat, stirring frequently or tossing with tongs to push uncooked leaves to the bottom of the pot. (You don’t have to add additional water since droplets clinging to leaves from washing is enough to start the cooking.) Don’t be daunted by the quantity of greens, as it reduces significantly when wilted. Cook until the leaves have wilted and shrunk, about 5 minutes. Add the romaine, and toss frequently, another minute or 2 until wilted. Remove and place in a strainer, squeezing against the strainer to remove excess water. Transfer to a cutting board and chop into small pieces. You should have 2 1/2 to 3 cups packed greens. Transfer to the bowl with quinoa. Warm 1 tablespoon of the oil in a medium skillet. Add onions and sauté over medium high heat until the onions are browned, about 10 minutes. Transfer to a bowl. Stir in the scallions, dill, feta cheese, and gruyere. Whisk together in a small bowl the eggs, 3/4 teaspoon salt, and a generous sprinkling black pepper. Stir the eggs thoroughly into the quinoa mixture. Pour 1 tablespoon of the oil in a pie pan and place in the oven. Heat the oil for five minutes until hot. Remove the pan and swirl the oil to coat the bottom of the pan, then pour in quinoa mixture, evening it with a spatula. Return to the oven and bake uncovered for 20 minutes. Remove pie and evenly drizzle remaining the 1 tablespoon oil over the pie. Return the dish to the oven and bake 20 to 30 minutes longer, until golden brown on the top and bottom. Serve hot or at room temperature. Share on Facebook and Twitter | Grains, Greens, ingredients, Main course, Recipes | No comments
Time for Quinoa It’s springtime, and a good season to celebrate the tiny powerhouse known as quinoa. For the initiated and uninitiated alike, her are a few hopefully useful facts and tips. Called the “mother of all grains” by the Incas, quinoa, pronounced qeenwah, is a tiny powerhouse of nutrients. It is a native of northern South America and was a staple food of the Incas and other Indians in Peru, Ecuador and Bolivia for over 6,000 years. Only in the last few decade has this remarkable food caught on in the United States. Although it looks and cooks like a grain, quinoa is the fruit of the chenopodium family (and is closely related to beets and spinach) but only the edible seeds of the quinoa plant are generally eaten. It has the highest protein content of any grain and unlike others, is a complete protein. Besides being high in lysine, an amino acid that is scarce in other grains, quinoa is one of the few vegetarian foods with all eight of the essential amino acids. It has substantial amounts of iron, phosphorus, magnesium, zinc, vitamin E, and B-vitamins, including folate, as well.
The bitter saponin coating makes it a natural repellent to birds. Most quinoa sold commercially in North America has had the saponin removed, but it is still a good idea to wash it before cooking. Since the seeds are tiny, you need to use a strainer. Place the quinoa in a bowl of water to cover by two inches. Rub it between your submerged hands, then place it in a strainer and rinse for a few seconds until the water runs clear. To make it the most digestible and bioavailable, soak it overnight with enough water to cover. Quinoa has a light pleasing texture, comes in gold, red, and black, and can be used in place of or along with other grains. It’s great to start cooking it as the weather heats up. It’s fast, light, and versatile. Cook it as a pilaf, in casseroles, and as a breakfast porridge. Quinoa mixed with herbs and vegetables makes a satisfying lunch. To cook quinoa, the basic ratio to use is two cups liquid per cup of grain. For a breakfast porridge, cook in three-to-four parts liquid to one cup quinoa. To make the fluffiest version, after you rinse quinoa, add it to a pot and dry toast the grains. Move them around with a spoon in the pot that you are going to use–just until all of the grains have dried and begun to smell fragrant, about 5 minutes. Then add your liquid, bring to a boil and add a pinch salt, cover, then lower the heat and simmer the quinoa without mixing for 10 to 15 minutes, until all of the liquid is absorbed. Little steam tunnels form while it cooks, and it is important to suppress the urge to disturb them. Instead, tilt the pot gently instead to see if the liquid has been absorbed. Each tiny yellow grain has a barely noticeable external germ that, when cooked, circles the grain like a translucent Saturn ring. The ring gives a subtly soft crunch that contrasts pleasingly with the softer part of the rest of the grain. Share on Facebook and Twitter | Grains, ingredients | No comments
|