|
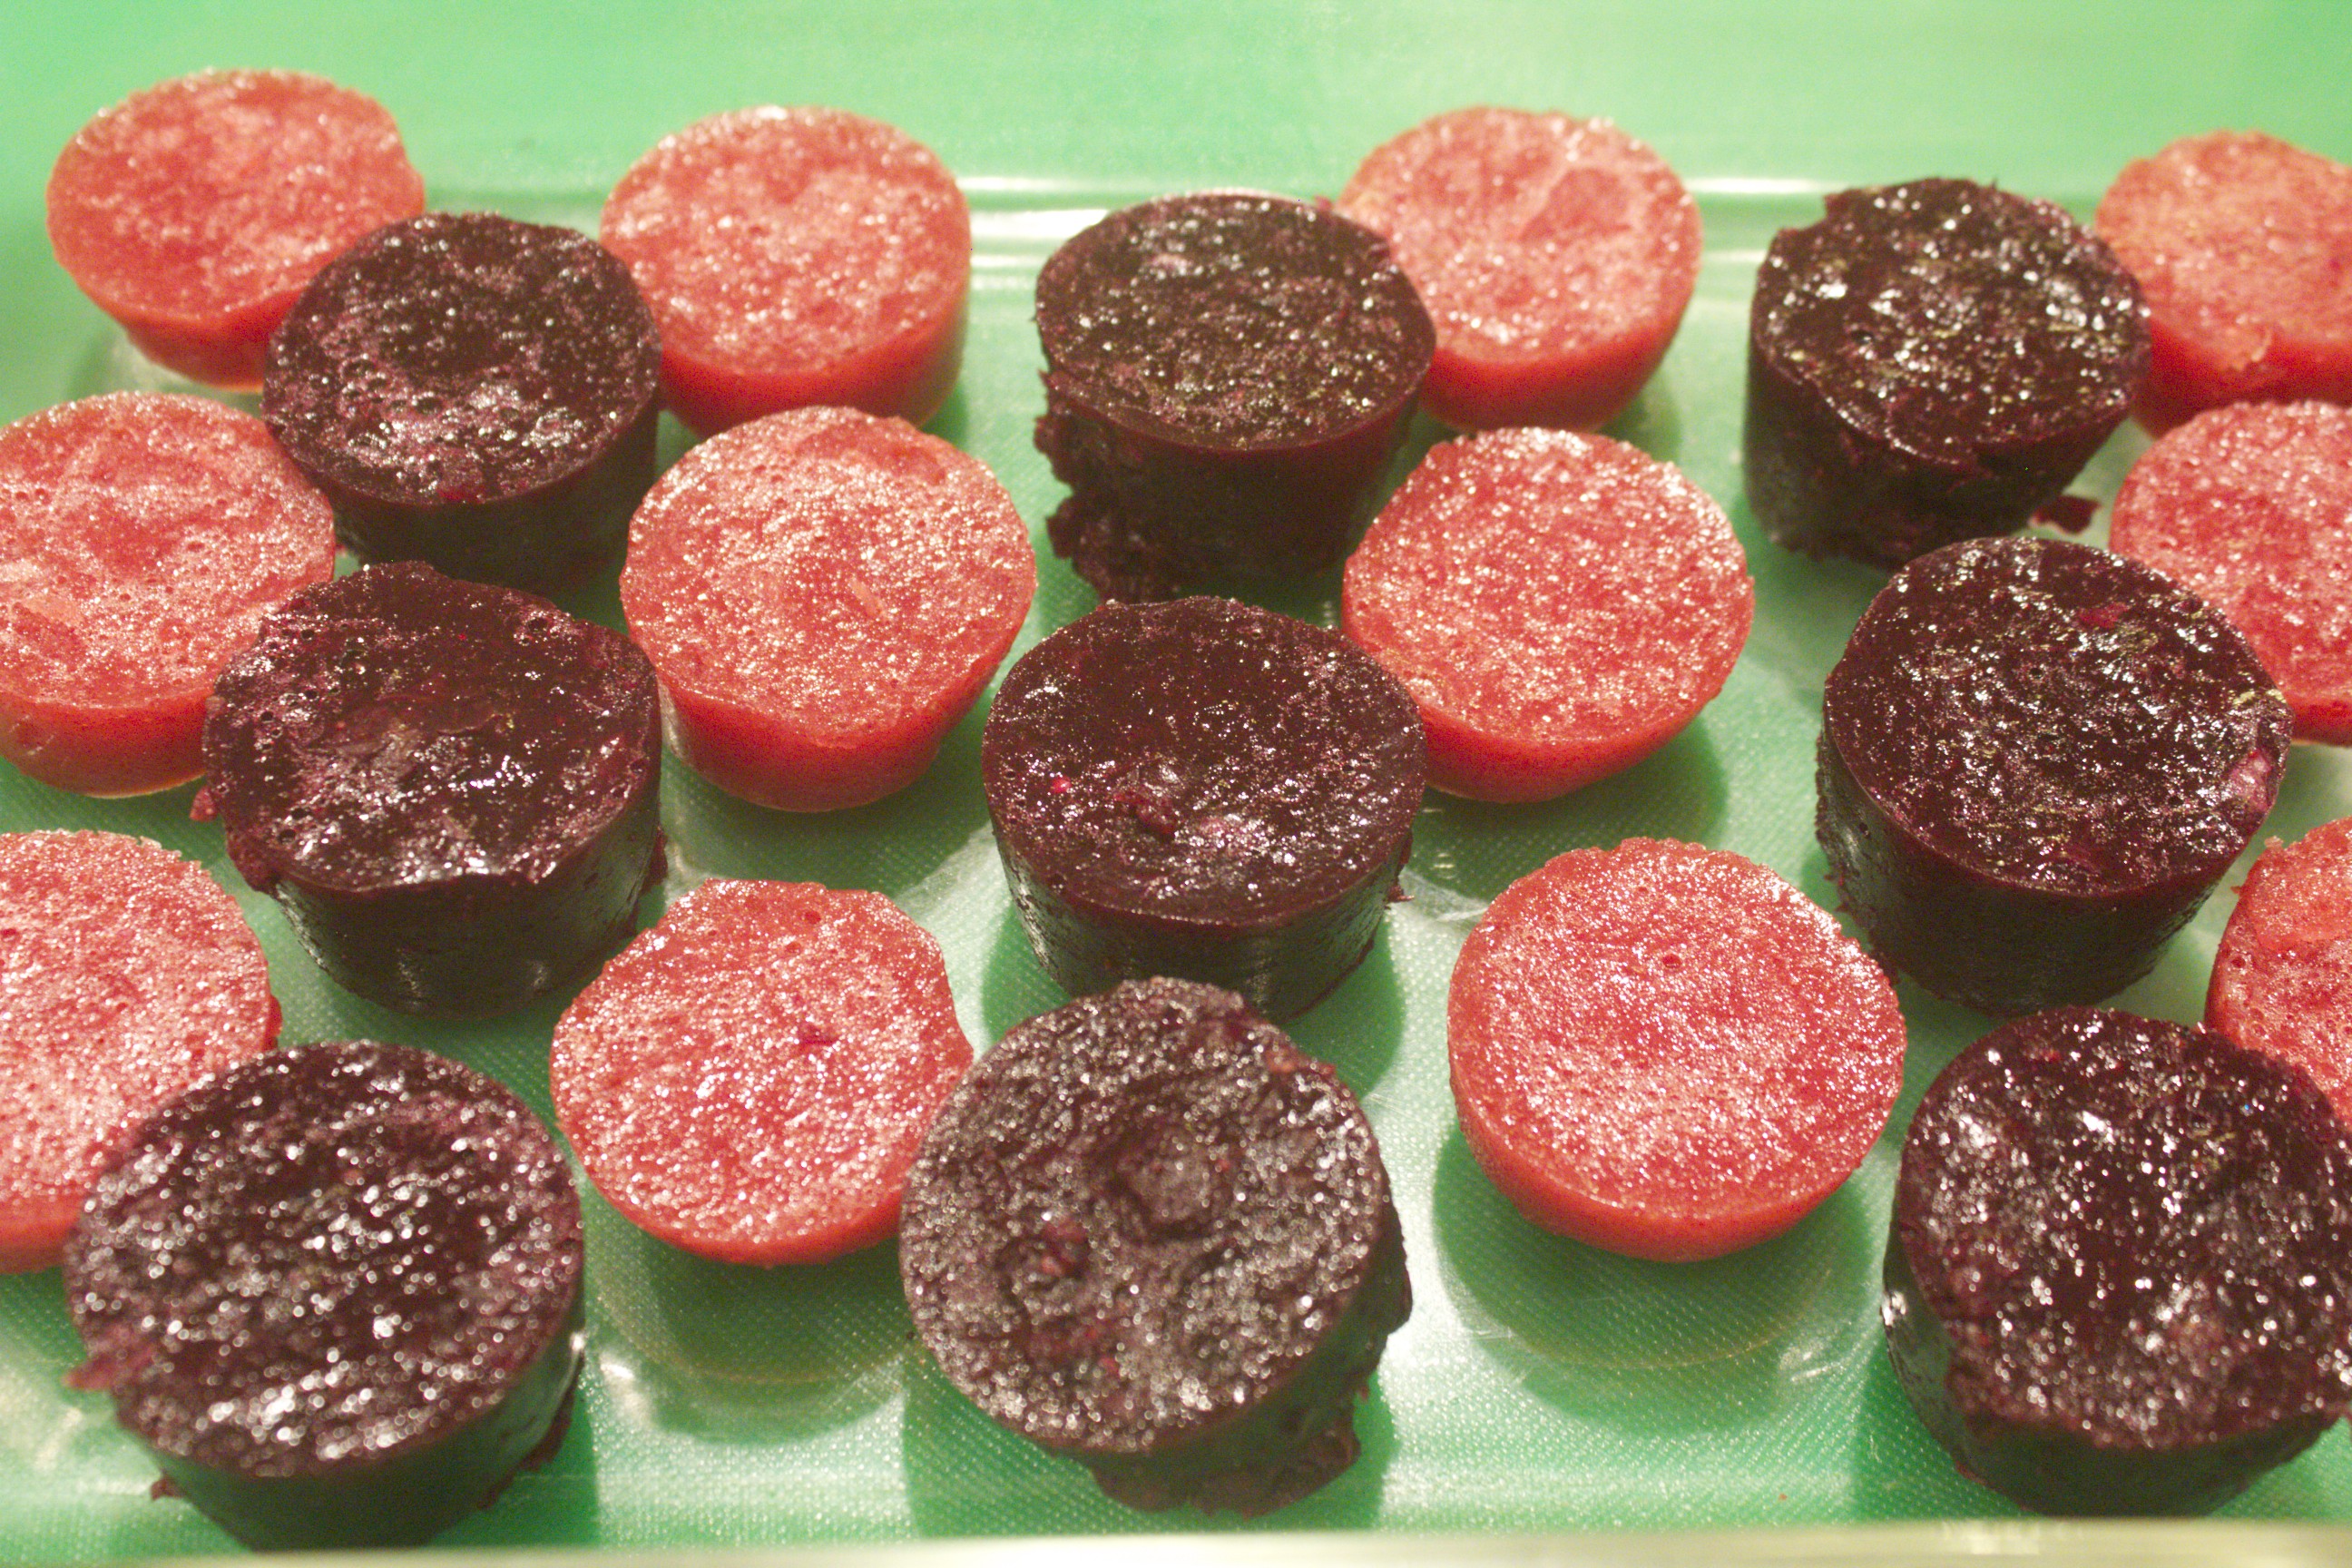
Not Your Ordinary Jello Shot
In today’s gelatin shot video, I demonstrate how to make berry jigglers, also known as gelatin shots. In case just hearing the word “gelatin” makes you think of images of wobbly neon molds popular in bygone eras, think again. These delightful bites are made purely from berries, so they’re more like gelled fruit bites. They have only the minimal number of ingredients; and good quality gelatin makes these refreshing nibbles extra nutritious. Gelatin has many healing properties: it soothes the gut lining; it strengthens bones, ligaments, skin and hair; and it regulates blood sugar. And that’s just the short list. To get the most healing benefits from these jiggers, make the effort to obtain powdered gelatin from grassfed cows, which is readily available nowadays. In the video, I demonstrate two flavors of jigglers, beginning with the blueberry version. It hardly matters whether you use fresh or frozen fruit. Add 2 1/2 cups berries to a medium pot or saucepan along with 1/2 cup of liquid. In the demonstration, I use coconut water, but apple or other fruit juice works as well. Let the berries heat to a gentle bubble to soften. Then, blend the berries until smooth. This is a good occasion to use an immersion blender if you have one. Tilt the pot to make sure to blend the berries evenly without splattering. Transfer them to a bowl to cool for about 10 minutes. Gelatin dissolves best in warm liquid, not super hot. I also demonstrate a version made with strawberries and raspberries. Working with berries with seeds requires an extra step; the seeds need to be strained. After the berries are heated and puréed, press them through a fine-meshed wire strainer. Use the bottom of a ladle, rotating it in a circular motion to push the puree through quickly and efficiently. You’ll be left with just a handful of seeds in the strainer basket, which you can discard or give to the compost worms. Make sure to use a spatula to collect any of the puree that is stuck to the bottom of the strainer—that’s good stuff you don’t want to waste. Since raspberries tend to be a bit tart, stir in a tablespoon or so of honey to sweeten them just a tad. Now it’s time to add the gelatin. Two tablespoons is the perfect amount to set each of these purees just right (neither too hard nor too loose). Sprinkle the powder evenly over the top, then stir the gelatin in until it’s completely dissolved. Next, pour the mix into molds and chill until set, about 2 hours or so. Use whatever you like or have for a mold. Some examples of kitchen favorites that make good molds include 8×8-inch baking pans, ice cube trays, or—my personal favorite, and the type that I show in the video—silicon mini muffin molds. These flexible molds make it especially easy to pop out the individual jigglers. After the stint in the refrigerator, unmold by running a blunt knife or small spatula around the edge of the mold, then lift—or in the case of the silicon—pop out the pieces. If you’ve poured your puree into a baking dish, simply slice the jigglers into squares before lifting out the pieces with an offset spatula. Stack the jiggers in a covered container, and refrigerate for up to two weeks. These shots are wonderful to keep on hand for an instant snack or low-key dessert. I like to eat a few of these in the morning instead of a piece of fruit. Once you’ve made these a couple of times, I’m certain you’ll want to keep a regular stash. I know I do. Share on Facebook and Twitter | desserts, Fruit, Snacks, Uncategorized | No comments
Acai Bowls
Acai berries contain many beneficial compounds, such as powerful antioxidants, fiber, monounsaturated fats (oleic acid), and anthocyanins, which are all clinically proven to have health benefits. Because they’re so low not only in sugar, but also in the acid that protects most fruits, they must be picked, processed, and flash frozen before being transported out of the Amazon. Otherwise the fruit would oxidize, turn brown, and lose its beneficial nutrients. The berries are squeezed into juice or—my favorite—pureed into frozen smoothie packs. These are sold in the freezer section of natural food stores. You can take advantage of the packs by making delicious frozen treats without using an ice cream maker. The only equipment required is a food processor. In today’s video, I demonstrate two delicious bowls that are suitable for dessert, snacks, or even breakfast. Each one has healthy fat added to keep your blood sugar stable and help you feel satisfied for hours. They’re quick to make: You whirl a few ingredients together, then immediately eat what you’ve made. You can store leftovers in the freezer, but you do have to let them thaw before eating. The first bowl that I demonstrate in the video is flavored with cherries, cocoa, and almonds, all of which complement the acai. Begin by adding 2 unsweetened smoothie packages to the bowl of a food processor. It’s best to let the acai pack sit out for 5 minutes or so to thaw slightly, so it’s not rock hard when you whirl it. Add a cup of frozen cherries, half a ripe avocado, a couple tablespoons cocoa powder, a tablespoon raw honey, and 1/4 teaspoon almond extract. Now you’re ready to whirl, except you need to add about 1/2 cup of liquid to loosen up the mixture. (In the demo video I add coconut milk, but almond and cashew milk are both delicious as well.) A quick whirl in the food processor melds these ingredients into a luscious concoction. To add a bit of texture, top the two servings with a sprinkling of almonds and cocoa nibs, and a dash of cocoa powder. The second bowl features bananas and almond butter. Again, start with two packages of acai smoothie packs, the contents broken into chunky pieces. Add one chopped frozen banana, 3 pitted medjool dates, a tablespoon almond butter, and a dash cinnamon. Loosen the whole mix with 1/2 cup of coconut milk. Again, a quick whirl transforms the whole mix into frozen ambrosia. Top this banana-almond acai bowl with large flakes of dried coconut and rosy goji berries. These simple blends are so easy to make with ingredients that you can keep handy in your freezer and pantry. These bowls (which can serve as a snack, a breakfast, or a dessert) underscore that a luscious frozen treat can both satisfy a sweet tooth and be truly health-promoting.
Share on Facebook and Twitter | Breakfast, desserts, Fruit, Gluten Free, ingredients, Recipes, Snacks, techniques, Uncategorized | No comments
Fermented Tomato Salsa
In today’s Video, I show how to ferment a tomato salsa; making this lactoferment is a great way to celebrate and enjoy the luscious tomatoes available right now. You may not be familiar fermented salsa: but it is truly delicious and you get to reap the benefits of your labor quickly. Just 24 to 48 hours of fermentation results in a salsa with a delightfully tangy flavor and a long-lasting life. Salt (or a mixture of salt and whey) initiates the fermentation process; it inhibits the growth of undesirable bacteria long enough for the lactobacilli, the delightful microorganisms already present on plants, to be converted to lactic acid. The nutrient content of the salsa is increased; the versatile condiment turns into a healthy probiotic. I demonstrate the two versions in the video: one made with salt, and one made with a combination of salt and whey. Fresh whey is simple to make. You place a cheesecloth-lined strainer over a bowl and add a couple cups of yogurt to the strainer. Within an hour or so, you’ll have a decent amount of liquid in the bowl: that’s the whey. You can transfer it to a covered jar and keep it stored in the refrigerator for up to six months. The longer you strain the yogurt, the more whey you’ll have and the thicker your yogurt will be. You can strain it for a few hours to produce thick, rich Greek-style yogurt, or you can strain it overnight to produce even thicker yogurt cheese. Whey gives the ferment a jumpstart, and the version with whey is usually ready within one day. Alternatively, you can leave out the whey and just add salt; you’ll still get wonderful results within two days. For either version, start with 1 ½ pounds tomatoes, diced small. The salsa is especially vibrant with a mélange of colorful tomatoes; a quart’s worth of quartered cherry tomatoes is also suitable. Next add a couple cloves minced garlic and 1 or 2 minced jalapeños to the tomatoes. It’s also good to add something oniony: I favor a mix of red onion and scallions, about ½ cup of each. No salsa is complete without a mound of chopped cilantro, so add at least ½ cup. To this, add ¼ cup lime juice. Now it’s up to you either to add 2 teaspoons salt or 1 teaspoon salt plus ¼ cup whey. Either way, make sure to push the salsa down into your 1-quart jar so that the liquid covers the top. Cover tightly; then leave the jar out on the counter for 1 to 2 days. Within a day or two, you’ll notice bubbles in the liquid. At that point, transfer your ferment to the refrigerator, where it will stay fresh for a few months. Use it to add zest to your meals and snacks.
Share on Facebook and Twitter | Fruit, Gluten Free, Kitchen Tips, Side Dishes | No comments
Strawberry Guacamole 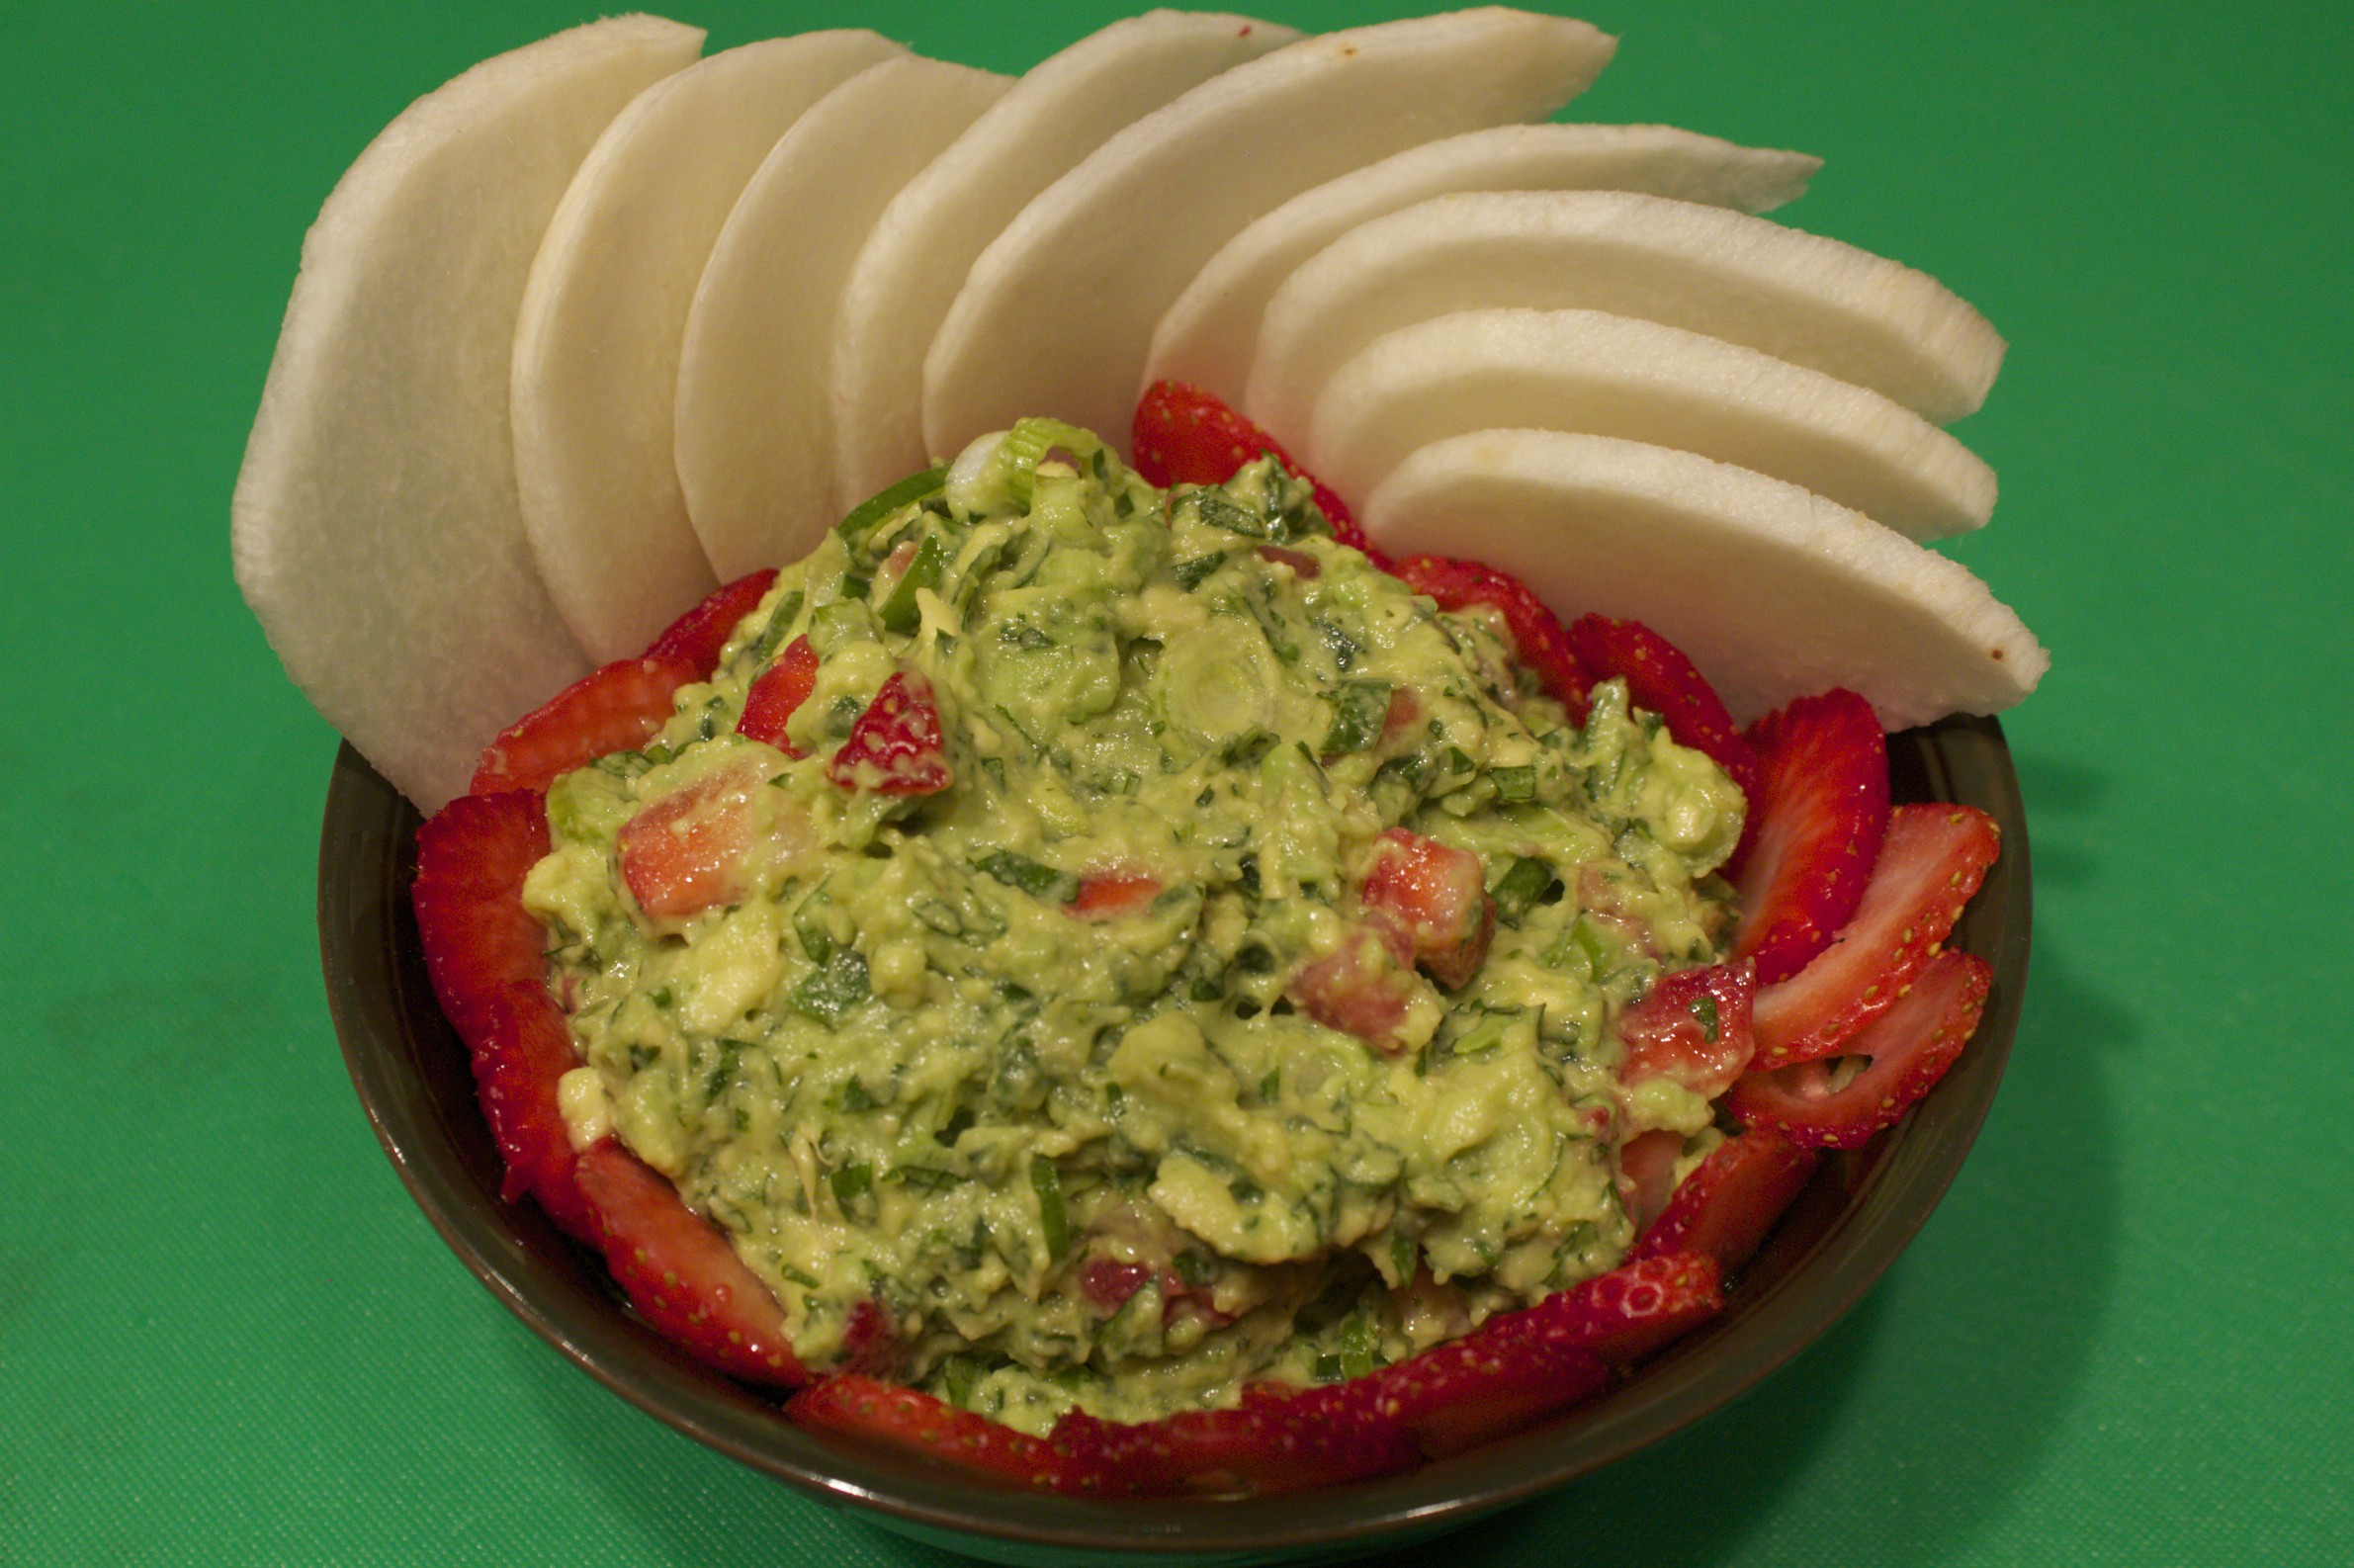 Strawberry Guacamole with Jicama Chips Fruit and avocado (which is technically a fruit itself) go well together, and it is traditional in Mexico to enjoy fruit-studded guacamole. Strawberries and guacamole are an especially refreshing and nutritious combination, containing lots of vitamin C from the strawberries and vitamin E from the avocados, as well as numerous phytochemicals and minerals from both. In the video, I show how to put this dish together in minutes. To make this attractive, summery version of a classic, start with a couple of ripe avocados. Cut them down the middle, and pop out the flesh into a bowl. Fork- mash them to break them up a bit, and then add a couple of tablespoons fresh lime juice as well as a teaspoon of salt. Mix in some essential guacamole ingredients: a couple of thinly sliced scallions, a quarter cup chopped fresh cilantro, and a couple of minced Serrano chiles. Mix all the green ingredients well before gently folding in a cup of chopped strawberries. Keep a few extra sliced strawberries as a garnish around the side of the bowl. I like to serve this colorful dip with jicama, the root vegetable that looks like a tuber but has a refreshing taste resembling that of a water chestnut. Make sure to choose a firm one free of too many blemishes. Peel the skin with a Y-shaped peeler, and cut it in half to safely position the vegetable cut-side down on the board. Then you can slice it into “chips.” Jicama makes a great alternative to the more typical corn chips. It is low-calorie and contains lots of fiber, as well as Vitamin C, making this a nutritious, light-but-filling snack or appetizer, as well a refreshing way to celebrate late spring and summer. Share on Facebook and Twitter | Fruit, Snacks, Vegetables | No comments
Sautéed Apples in Ghee One of my favorite quick morning dishes to make throughout the winter is sautéed apples in ghee. Ghee—clarified butter with the milk solids and water removed—is ideal for high heat cooking since it doesn’t burn as easily as regular butter. It still contains all the good qualities of butter, however, such as fat-soluble vitamins, short- and medium-chain fatty acids, and selenium. To get the most nutrition and best flavor, it’s best to purchase good quality ghee from cows that have been pasture-raised, or you can make your own from your favorite high quality butter. Sautéed apples are quick and simple enough to make for breakfast. In the video, I show my favorite way to peel and cut an apple. With a Y-shaped peeler—my favorite—I make a ring around the top and one around the bottom as well. I then peel the sides and quarter the apple. I lay the quarters on their sides, and cut out the core in one easy-angled cut. This is the most efficient way to core an apple, and you don’t need any special equipment. Best of all, it’s safe because, after coring the apple, you then have a flat side that rests firmly on the board. I then slice each quarter into 3 or 4 pieces. The next part is simple: I warm some ghee in a medium skillet over medium heat, add the apples and a dash cinnamon powder, and cover the skillet. I check on the apples after about 2 or 3 minutes, give them a toss, and cook them a couple of minutes more. That’s all there is to it: the tender apples smell and taste heavenly. They make a great topping for oatmeal, pancakes, waffles, or yogurt. They can also serve as a succulent side dish with scrambled eggs or other protein. 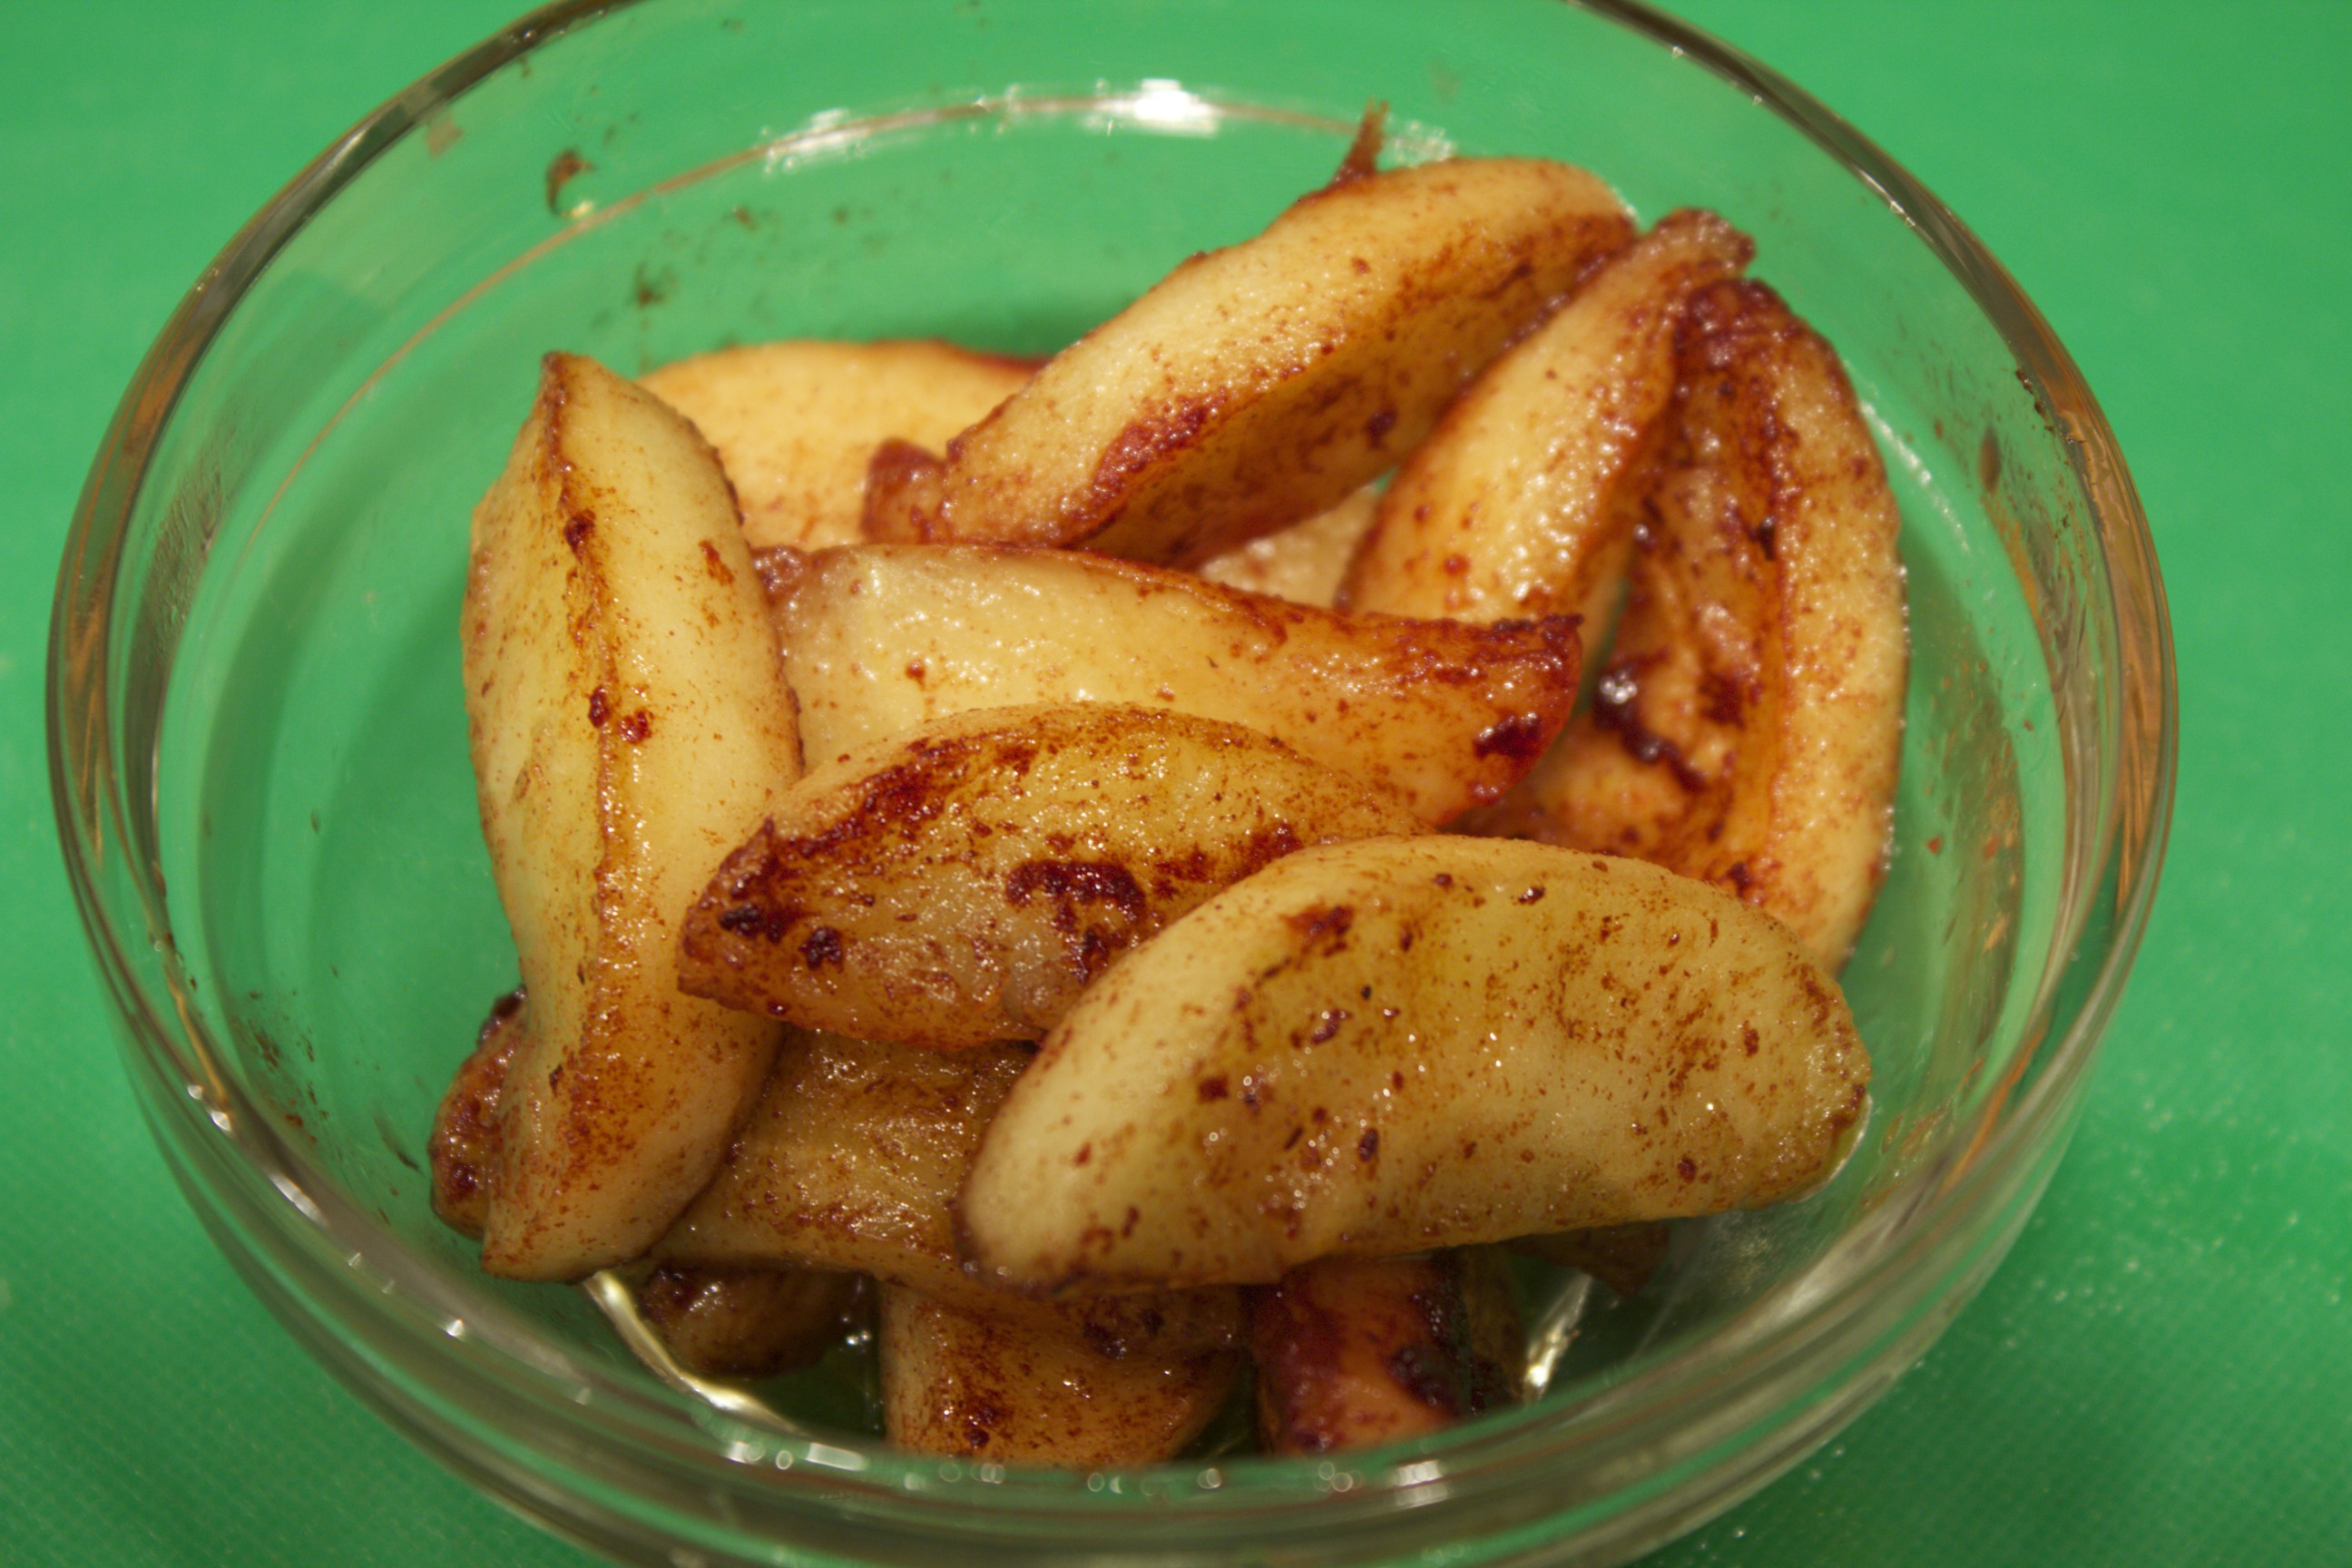 Sautéed Apples in Ghee Share on Facebook and Twitter | Breakfast, Fats & Oils, Fruit | No comments
Very Berry Power Smoothie Sometimes an antioxidant, nutrient-dense smoothie makes a quick and powerful meal. The one in this video is rich and filling enough to keep your energy and blood sugar stable for hours. Best of all, it tastes delicious. It’s a combo of mixed frozen berries, yogurt, avocado, raw honey, coconut oil, egg yolks from pastured eggs, and coconut water. I also added a splash of macadamia nut oil because I like the nutty flavor. I made this video for Vital Choice, a company whose products I love. Not only do they have the finest wild Alaskan seafood, but they also have some other choice products such as frozen berries and macadamia nut oil, an oil that has similar nutritional properties to extra virgin olive oil. They presented the video on their newsletter, and I received the question from a viewer of why I don’t use the egg whites in the smoothie. Here is my answer: I don’t use the raw egg white because it contains a protein called avidin that interferes with the body’s absorption of biotin (Vitamin B7). It also contains a protein called “conalbumin,” which binds to iron (making it not biologically available to the body.) Also, trypsin inhibitors make digestion of the protein in the raw egg white more difficult. All of these is deactivated when the white is cooked. That being said, I still may use a raw egg white in a classic Caesar salad dressing or–once in a great white, a mousse–but I don’t make a practice of it, especially for something like a breakfast smoothie. The raw yolk, on the other hand, is great to eat raw or barely cooked. It’s great to have a lot of quick breakfast ideas in your repertoire.
Share on Facebook and Twitter | Breakfast, Eggs, Fats & Oils, Fruit, Health Tips, ingredients, Natural Sweeteners | No comments
Young Coconuts and How to Crack Them Coconut water is the liquid found inside a young coconut. Don’t mistake it for coconut milk, which comes from the meat of a mature coconut. In addition to natural sugars, which make it taste deliciously sweet, the water contains a complex array of vitamins and minerals. The nutritious beverage is high in potassium, chlorides, calcium, and magnesium.  Green off of the Tree and Shaved As a tree sap, coconut water is essentially the “blood” of the coconut palm. The electrolyte profile of coconut water is somewhat similar to human plasma and has been used by doctors as an intravenous solution and injected directly into the bloodstream to prevent dehydration. When freshly extracted from the coconut, the liquid is free from germs and parasites. Sure, you can buy the water in packs from the grocery store, but it’s great fun to whack open the fruit yourself. Not to mention that there’s no comparison in the flavor between the fresh and the bottled. Young coconuts are large and green off the tree, but come already shaved in this country, so thankfully, you don’t need a machete to open them. It is not difficult to open these neatly, so that you can drink the water and scoop out the soft gel-like meat. I use a serrated knife to shave around the top part of the coconut. Then I take the heel of a heavy knife. I use a cleaver and whack it a few times. I hold the coconut on an angle, which makes it really safe. The key is to whack the coconut with confidence. After three or four whacks, the lid just lifts off. I can put a straw in this and drink the liquid and use a spoon to scoop out the gel. This is the best sports drink, thirst quencher, and cooler around. The best brand of purchased young coconut products is from exoticsuperfoods.com. You can buy packs of the young meat and bottles of fresh coconut water, which is second only to the ones you crack open yourself.
Share on Facebook and Twitter | Fruit, Health Tips, ingredients, Kitchen Tips, Where To Buy (Sources) | No comments
Getting the Seeds out of Berry Sauces Here’s a word on berries, and a video to show how to get the seeds out of berry sauces. Straining the Seeds out of Berry Sauces When you visit a local market in summer, you’ll see containers of colorful berries stacked high.
Strawberries are the first to appear in early spring and have all but disappeared by mid summer. Tiny wild varieties, sweet as candy, will make an appearance in late summer. In the meantime, there are blueberries, blackberries, and raspberries of various colors: these nutritional powerhouses, packed with vitamins, antioxidants and fiber, appear in markets in July, and last all the way through September. The late harvest berries are often the most delicious. Combined with early harvested pears, raspberries can be the chief ingredient in tantalizing cobblers and compotes. First-of-the-season apples and blackberries make a succulent combination as well. Treat berries with care. Blueberries are sturdy and last a couple of weeks, but the other “seedier” types last only a couple of days in the refrigerator. It’s best to wash berries right before eating. Raspberries and blackberries are especially delicate; moisture makes them mold quickly. Rinse these berries very carefully and dry them gently on paper towels; you can even roll raspberries on a damp cloth to clean them and dislodge any insects. You can make your berries last longer by freezing or pureeing them. To freeze, lay them on a tray in a single layer and place in the freezer. After a couple of hours, pile the frozen pieces into a freezer bag. I love having a selection of frozen berries available to use when I please. When I don’t have a stash of berries that I have frozen myself, I purchase organic brands (Cascadian Farms, for example) that are readily available at you local store. Fresh sauces, or coulis, are especially delicious when made out of berries. These tasty sauces are wonderful to have on hand even when the temperatures have dropped outside. Once the berries are pureed, however, those little seeds found in strawberries, raspberries, and blackberries can seem quite prominent. There’s no need to put up with those pesky seeds when there’s a nifty little trick for quickly straining them out. Here’s what you do: If the berries are frozen, defrost them first. Blend them (with all the defrosted juice) with a little water, then pour the mix into a strainer set over a bowl. You’ll notice that, at first, the puree just sits in the strainer, not budging at all. With the bottom of a ladle, swirl the fruit in a circular motion against the strainer. The puree goes through the strainer in seconds, leaving the seeds caught in the basket. With a spatula, be sure to scrape all the good pulp that is caught on the underside of the strainer. To turn the pulp into a sauce, add a splash of maple syrup, a bit of vanilla and lemon juice. Now you’re got a berry sauce that is smooth and delicious. Share on Facebook and Twitter | Fruit, ingredients, Kitchen Tips | 5 comments
August Report from the Union Square Greenmarket Saturday was my first day back at Union Square greenmarket after a period of traveling. I had to restrain myself from buying everything in sight. Here’s some notes and a record of what I made from my purchases: These late New York season strawberries were irresistible – super sweet, the best strawberries of the year.  End of Season Late Strawberries I was thrilled to see piles of watermelons. It’s melon season, of course.  Large and Sweet A note to purchasing just the right ripe melon: Please make sure to knock on the melon, as if you were knocking on someone’s door. If it’s ripe and sweet, it will sound hollow. I scored with this one.
 Fresh Watermelon Juice The extra went into these popsicle molds.
 Watermelon Juice Pops The sight of these elephant-sized zucchini stopped me in my tracks.  "Monster" Zucchini I was assured that once the seedy middle was cut out, the remaining part would be sweet. While I am intrigued by the thought of stuffing one of these, I refrained from purchasing them . Instead I came home with a large bunch basil, some yellow and green zucchini, a few ears of corn, and a couple of racks of lamb riblets. When I got home, I picked the leaves off of the basil and pureed it with extra virgin olive oil to keep it fresh. I knew I had little time to make dinner today, but nonetheless I wanted a delicious meal. I got home in the late afternoon, and had a lot to do besides make dinner. I decided to construct a meal that would cook slowly (lamb riblets take over 2 hours) but would require minimal active time. I had defrosted the lamb riblets overnight in the refrigerator. I had some barbecue spice rub (from The Healthy Hedonist, which consisted of a mix of salt, maple sugar, cumin, chili powder, black pepper, cayenne, and paprika) in a little container, so rubbing the mix on the riblets and placing them in the oven on a parchment-covered baking sheet took only a matter of minutes. An hour later, I turned down the heat from 325˚to 225˚. An hour after that (by this time it was 6:45) I started the rest of the dinner. I grated the zucchini (one yellow and one green) and mixed it in a bowl with ½ teaspoon salt. I let it sit for fifteen minutes. Meanwhile, I filled a medium pot with water, placed it on the stove, and husked the corn. Fifteen minutes later, I cranked up the heat on the burner under the pot. I squeezed the water out of the zucchini, and placed it back in the bowl, and mixed it with a couple of tablespoons unbleached white flour, a scoop of the basil puree made the day before, and one egg. I dropped the corn in the boiling water and a tablespoon or so of coconut oil to heat in a large non-stick skillet. I dolloped spoonfuls of pancake batter into the skillet (two zucchini yielded 7 medium- sized) and cooked the pancakes for 2 to 3 minutes per side, until golden.
 Zucchini pancakes, corn on the cob, lamb riblets Share on Facebook and Twitter | Dinner, Fruit, Greenmarket Bits, Kitchen Tips, Main course | No comments
Last Pomegranate of the Season It’s the end of pomegranate season. Although the peak season for the heavy red fruit is autumn, pomegranates store well in the refrigerator for up to a couple of months. Even at the end of February there are usually a few stragglers that can be found. I happen to have one such red beauty left in my refrigerator that I plan on making the most of. Here’s some direction on how to open a pomegranate easily and neatly:
The white pith floats to the top, where it can be strained out along with the water. Enjoy them sprinkled on a salad, or over cooked greens or dessert. Or simply eat the juicy arils, seeds and all, as a delicious snack. While pomegranates won’t make another appearance for a good eight months or so, you can continue to enjoy pomegranate juice and pomegranate molasses or syrup, which are available year round. Share on Facebook and Twitter | Fruit, ingredients, Kitchen Tips | No comments
|