|
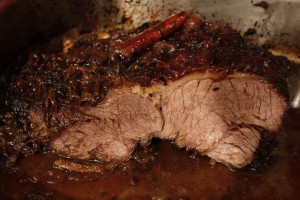
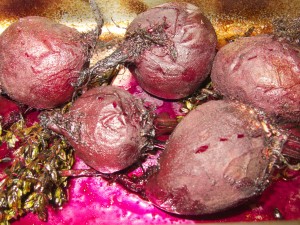
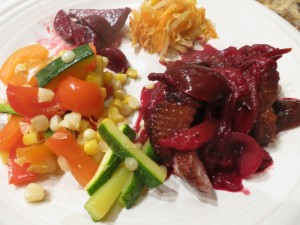
Savory Plum Dishes Now that the summer has transitioned into autumn, I am thrilled to resume my favorite cooking method: braising. I love the way that the prep for a braise is usually short; the oven does all of the hard work. A cut of meat that starts out tough slowly cooks for hours until it is meltingly tender. Best of all, braises taste better the following day, making them ideal dishes for gatherings. A few weeks ago I was inspired by a New York times article by Melissa Clark on braising a brisket with Italian plums and port wine. Because of the wonky weather in New York this year, peaches and plums were mealy and unappealing to eat raw, but I envisioned cooked plums melting down into a beautiful regal sauce. I purchased a second cut grass-fed brisket, which is the fattier of the two possible brisket cuts. Since grass-fed meat tends to be extra lean, this is the better of the two cuts to use. I salted and peppered the six-pound piece, seared it on both sides in a little oil for about 7 minutes per side in a large skillet, then transferred it to a plate. I added a few cups sliced onions and a few cloves minced garlic to the pan, and gently sweated the onions until softened. I then added a cup of port and a cup of rich chicken stock, and scraped up the brown bits on the bottom of the pan. To a baking dish that would fit the brisket, I added a couple pounds of halved Italian plums along with a couple cinnamon sticks, a few stars of star anise, some bay leaves and a handful of fresh thyme branches. I poured the onion-wine mix over the plums, lay the brisket on top, and spooned some of the liquid over the brisket. I covered the pan with foil and placed it in a 325 degree oven for about 5 hours. Every half hour or so I flipped the brisket. The last half hour I uncovered the brisket to thicken the liquid. I let the meat cool to room temperature, then chilled it overnight in the refrigerator. I sliced it while cold and shared the dish with friends. I reheated the sliced pieces in the oven in the sauce. The brisket was succulent and delicious. Since I was not yet over plums, I made a quick plum sauce to go over duck breasts. While my duck breasts were searing, I added a bit of the rendered duck fat to an adjacent skillet and sweated some sliced onions. I then added a cup of chicken stock, a cup of port, a cinnamon stick, some star anise pods, a few sprigs thyme, a bay leaf and 2 pounds of halved plums. I let the whole sauce reduce while the duck breasts cooked. The duck and the sauce were finished around the same time, in about 15 minutes. Earlier in the day I had roasted some whole beets in a pan with thyme, olive oil, and water for a couple of hours. When they were ready, I slipped off the skin, cut them into wedges, and drizzled a bit of pomegranate molasses over them. I served the meal with a mélange of corn, peppers, and zucchini and a few spoonful’s of lacto-fermented carrots. This bright and colorful meal took only 30 minutes of labor.
Share on Facebook and Twitter | Beef, Dinner, duck, ingredients, Main course, Sauces | No comments
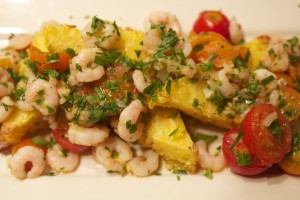
Shrimp and Fresh Tomato Sauce Here’s another variation of the succulent cherry tomato sauce. Added to the tomatoes is ½ pound shrimp, which turns this dish into a substantial sauce. The petite wild Oregon Pink Shrimp from Vital Choice are perfect, since they’re already cooked, and they reheat in the three minutes it takes to warm the tomatoes. I keep large bags of the frozen shrimp in my freezer, which inevitably make their way into lots of dishes. They take about 15 minutes to defrost, which makes them great for last minute dishes. I love the way the sweet corn flavor of the polenta complements the juicy herbed shrimp and tomatoes. In order that I don’t have to stir continuously, I cook the polenta over a double boiler (the technique in is The Healthy Hedonist), then fold in some fresh corn right before the polenta is finished. Sometimes I eat the polenta soft—before it’s set—but most of the time I spread it onto an oiled baking dish. Refrigerated, the polenta lasts for up to a week. I cut the polenta into triangles, brush the top with olive oil, and then bake at 400 degrees until browned, which takes about half an hour. If I’m just using a couple of pieces and not the whole pan, I’ll sauté the pieces in a cast iron skillet with some coconut oil until crispy. I add some wilted greens or a salad for a balanced meal.
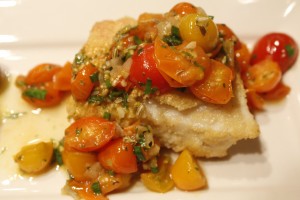
Cornmeal-Crusted Cod with Fresh Tomato Sauce Miniature tomatoes dazzle in a variety of different sizes, shapes and colors; they are flavorful long after the larger varieties are truly out of season. I love using these miniature packets of flavor to make versatile stove-top sauces. The one that I demo in the video is just as delicious over polenta and simple greens as it is over fish. In the video, I’m demonstrating a single serving of cornmeal-crusted cod, although the tomato sauce is enough for up to four filets. You can swap out the cod for halibut or pollack or any thick white-fleshed fish. Cornmeal-Crusted Cod with Fresh Tomato Sauce I begin with a pint of small tomatoes. I’ve used grape and cherry, or sweet sun-golds—my favorites—when I can find them at my local greenmarket. I often mix a beautiful combination of colors, varieties and sizes. I add to the skillet—besides the halved tomatoes—a teaspoon or so of minced garlic, a couple tablespoons minced shallots, a teaspoon of fennel seeds, a few tablespoons extra virgin olive oil and a splash of balsamic vinegar. I sprinkle a dusting of sea salt and freshly ground black pepper over everything, give it a quick mix, then cover and set the pan aside while I start the fish. I salt and pepper the filet before I dredge it on both sides in cornmeal. When the cast iron skillet (or any other heavy-bottomed skillet will do) is heated, I add a film of coconut oil—unflavored is best—and cook the fish a couple of minutes on each side over medium-high heat until golden. I transfer the pan to a preheated 400˚F oven for 5 minutes to cook the inside of the fish thoroughly. While the fish is in the oven, I turn the heat on the tomatoes and let them stew for 2 to 3 minutes, just until warmed through and juicy. I then stir in a tablespoon or so of minced chives and parsley, which brightens the colors and heightens the flavors. When the fish is ready, I plate it and spoon the sauce over the top. The fish is moist on the inside, crispy on the outside and complemented by the warm tomato sauce. It’s a guest-worthy dish that is easy, seasonal, and delicious. Share on Facebook and Twitter | Corn, Dinner, Fish, Gluten Free, ingredients, Lunch, Main course, Sauces | No comments
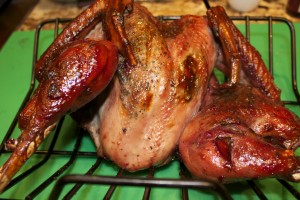
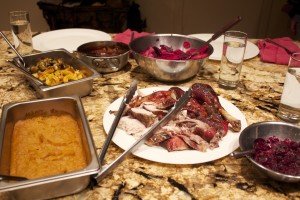
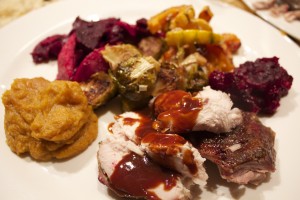
Wednesday Night Thanksgiving Even though the family was going out for the Thursday Thanksgiving meal, I still felt that yearly drive to make a whole turkey with lots of sides. It’s not important to me exactly which day I cook, as long as it’s around the holiday. The local farmer from the food club that I belong to had beautiful pasture-raised turkeys, so a friend and I decided to cook Wednesday, and have a mini celebration one day before the holiday. We split all the dishes we made – she had enough for her family the next day, and we had enough for one full meal of leftovers, which my husband and I enjoyed for lunch today. I had picked what vegetables looked good at the greenmarket, and we improvised a bunch of easy-to-make sides to go along with our beautiful turkey. Our turkey was small, about 10 pounds, perfect for about ten people. Tuesday night I chopped a couple tablespoons sage and mixed it with about a tablespoon of salt. I butterflied the turkey (I set aside the backbone along with the neck for stock), and slipped the sage-salt mixture under the skin. I sprinkled salt and pepper over the outside. I set the turkey on a rack in a roasting pan breast-side-down overnight. I took the bird out of the refrigerator an hour before baking and brushed the back with olive oil and added a couple cups water to the roasting pan. I roasted it at 350 for about an hour, then flipped the bird using wadded up aluminum foil, and cooked the bird another ½ hour. I then brushed it with cranberry glaze (made from 1 cup of cranberries cooked with ½ cup maple syrup and ¼ cup rice syrup until the cranberries burst.The mix was then strained.) I returned the turkey to the oven for 10 minutes, then added more glaze and roasted it another 15 to 20 minutes, until the temperature of the thigh was about 180˚F. I added water to the bottom a couple of times to keep the juiced from burning. The result: a beautiful deep red turkey – juicy and flavorful.
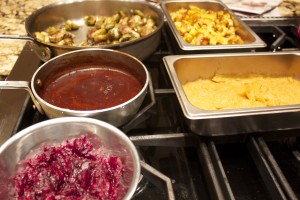
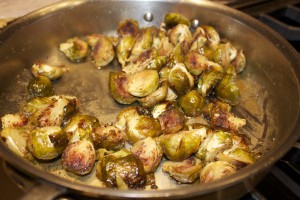
Gravy: I deglazed the pan with turkey stock (the neck and backbone I cooked in about 4 cups water for an hour while the turkey was roasting.) with about ½ cup of red wine. I made a roux of 2 tablespoons butter and 2 tablespoons flour cooked until light brown. I added the liquid and cooked it until thickened. The gravy was delicious – a deep red brown with hints of cranberry flavor. Cranberry sauce: I simmered 2 cups cranberries with the juice of one orange and 1/3 cup maple sugar. I added a splash brown rice vinegar and a teaspoon fresh thyme. I baked sweet potatoes (3 cups flesh), scooped them out and added a jar (1 ½ cups) chestnuts, ¼ cup butter, 1 tablespoon brandy, splash roasted vegetable stock to thin, salt, butter, and sprinkle of nutmeg, and puréed the whole lot. I roasted Brussels sprouts with extra virgin olive oil and salt for twenty minutes at 375˚F. I added a couple tablespoons butter with a small scoop mustard and about a cup roasted vegetable stock to a skillet. The mix was cooked until it reduced to a glaze, then the Brussels sprouts were stirred in.
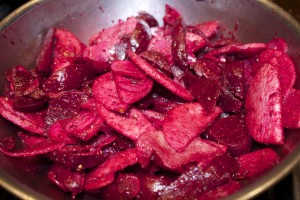
Beets: Beets were roasted in the oven for about 2 hours, then mixed with thinly sliced Asian pears, thinly sliced radishes, 1 teaspoon ground star anise and 1 teaspoon coriander warmed with 2 tablespoons extra virgin olive oil, 2 tablespoons aged balsamic vinegar, salt and black pepper.
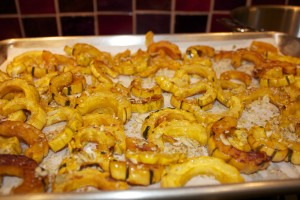
Delicata squash: Half rings were roasted with extra virgin olive oil and salt at 375˚F, then drizzled with pumpkin seed oil, lime juice, cayenne, and crushed pumpkin seeds. It was loads of fun – and good therapy too – hanging with a friend and cooking the day away. You don’t have to have a huge gathering to enjoy a delicious feast! Share on Facebook and Twitter | Dinner, Main course, Sauces, Side Dishes | No comments
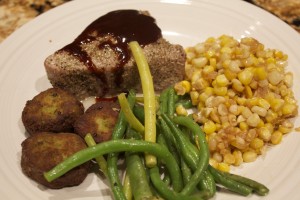
Olive Oil Poached Tuna I had corn left over from the duck confit meal, and I had edamame cakes that I had previously frozen, so I decided to work my dinner around those. Since I was near Chelsea Market, I stopped in The Lobster Place (lobsterplace.com/), one of the best fish markets in New York City. I picked up a couple of gorgeous chunks of tuna to poach in olive oil that I had already in my refrigerator. You can oil poach with tuna, salmon, halibut, and shrimp, and use the oil as much as four times. Don’t worry – the oil doesn’t smell, because you are heating it to 120˚F, which is really low. The oven is heated to 225˚. You need a thermometer – a probe is the best variety. I have a Poulder, but any type is good. You need to have enough oil in the pan to be able to immerse your fish in oil and your skillet should have straight sides. I rubbed the steaks with a combination of salt, pepper, and ground fennel. My refrigerated oil looked solid (extra virgin olive oil is a monounsaturated fat, which goes semi-solid when cold) but it quickly melted over low heat. As soon as the oil had melted, I added the thermometer. I hold back on some of the oil, because it is easy to overshoot the 120˚F. When that happens, I can add a glob of cold oil and lower the temperature quickly. Otherwise, I simply wait for the oil to cool until the proper temperature. Add the fish (make sure it’s completely immersed) and place the skillet in the oven for 25 minutes. When ready, remove the fish and strain the oil. I served the fish with the following recipe for Teriyaki Ketchup from my book The Healthy Hedonist. In the book it’s paired with a tuna burger. 2 tablespoons shoyu (natural soy sauce) 1/4 cup sake or mirin (substitute with dry sherry) 2 tablespoons maple syrup 2 teaspoons tomato paste 1 teaspoons dijon mustard
Share on Facebook and Twitter | Dinner, Fats & Oils, Recipes, Sauces | No comments
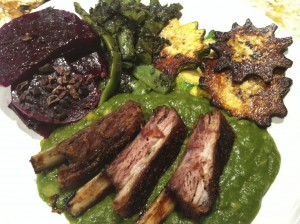
The Meal Continues Although the lamb riblet meal blog entry was almost two weeks ago, I’ve done a lot of cooking since then. I’m going to use this “hunker down” period in New York to catch up with some of the more noteworthy meals. It’s eerily quiet outside. Subways and businesses are shut down – pretty much everything is closed in preparation for the hurricane. In the city, though, it has not even started to rain. After my last post, I had about 7 leftover riblets. I would not have cooked so many at once, but I had bought a 3 1/2 pound pack from 3 Corner Field Farm (www.dairysheepfarm.com) at the Greenmarket one Saturday. Since I had to defrost all of the riblets at once, I knew we would have enough for two meals. I wanted the meals to be different from each other. The day after making the riblets I taught a pasta-making class to the professional students at the Natural Gourmet. The class was small that day, and there was a lot of food left over. I made use of the cooked beets and white bean sauce. I tossed the beets with balsamic vinegar and cocoa nibs, and blended the white bean sauce with some Swiss Chard, which I wilted quickly first. The reheated riblets were delicious over the creamy sauce. I picked up some patty pan squash at the greenmarket on the way home, which I sliced, sprinkled with salt, and then left to “sweat” for 20 minutes. I sautéed them until golden on each side, a couple of minutes per side. The flat beans I cooked in a small amount of water (sort of steaming it in the pan) with a sprinkle of salt. When they were cooked, after about 5 minutes, I tossed them with the basil puree I had made the day before. It was a delicious, quick, vegetable-packed meal. Here’s the recipe for the White Bean Sauce, from my first book The Voluptuous Vegan. You can freeze it and have the sauce ready to whip out at a moment’s notice. Serves 6 2 tablespoons extra virgin olive oil 2 cups onions 8 cloves garlic, thinly sliced 3 ½ cups cooked cannellini beans (or navy or great northern) or 2 15-ounce cans Salt 5 sprigs fresh sage Handful fresh thyme sprigs 1 bay leaf 2 teaspoons fresh lemon juice Freshly Milled Black Pepper Warm the olive oil in a medium pot. Add the onions and cook over medium-low heat until the onions are softened and starting to brown, about 7 minutes. Add the garlic and cook a few more minutes. Add the beans and 2 ½ cups water (or better yet, bean cooking liquid if you have it) along with 1 ½ teaspoons salt. Tie the herbs together with a cotton string and add them to the pot along with the bay leaf. Cover, and bring to a boil. Lower the heat and simmer, partially covered, for 15 minutes to allow the flavors to marry. Add the lemon juice and a sprinkling black pepper. Taste and add more salt if necessary. Remove the bay leaf and tied herbs.
|
