|
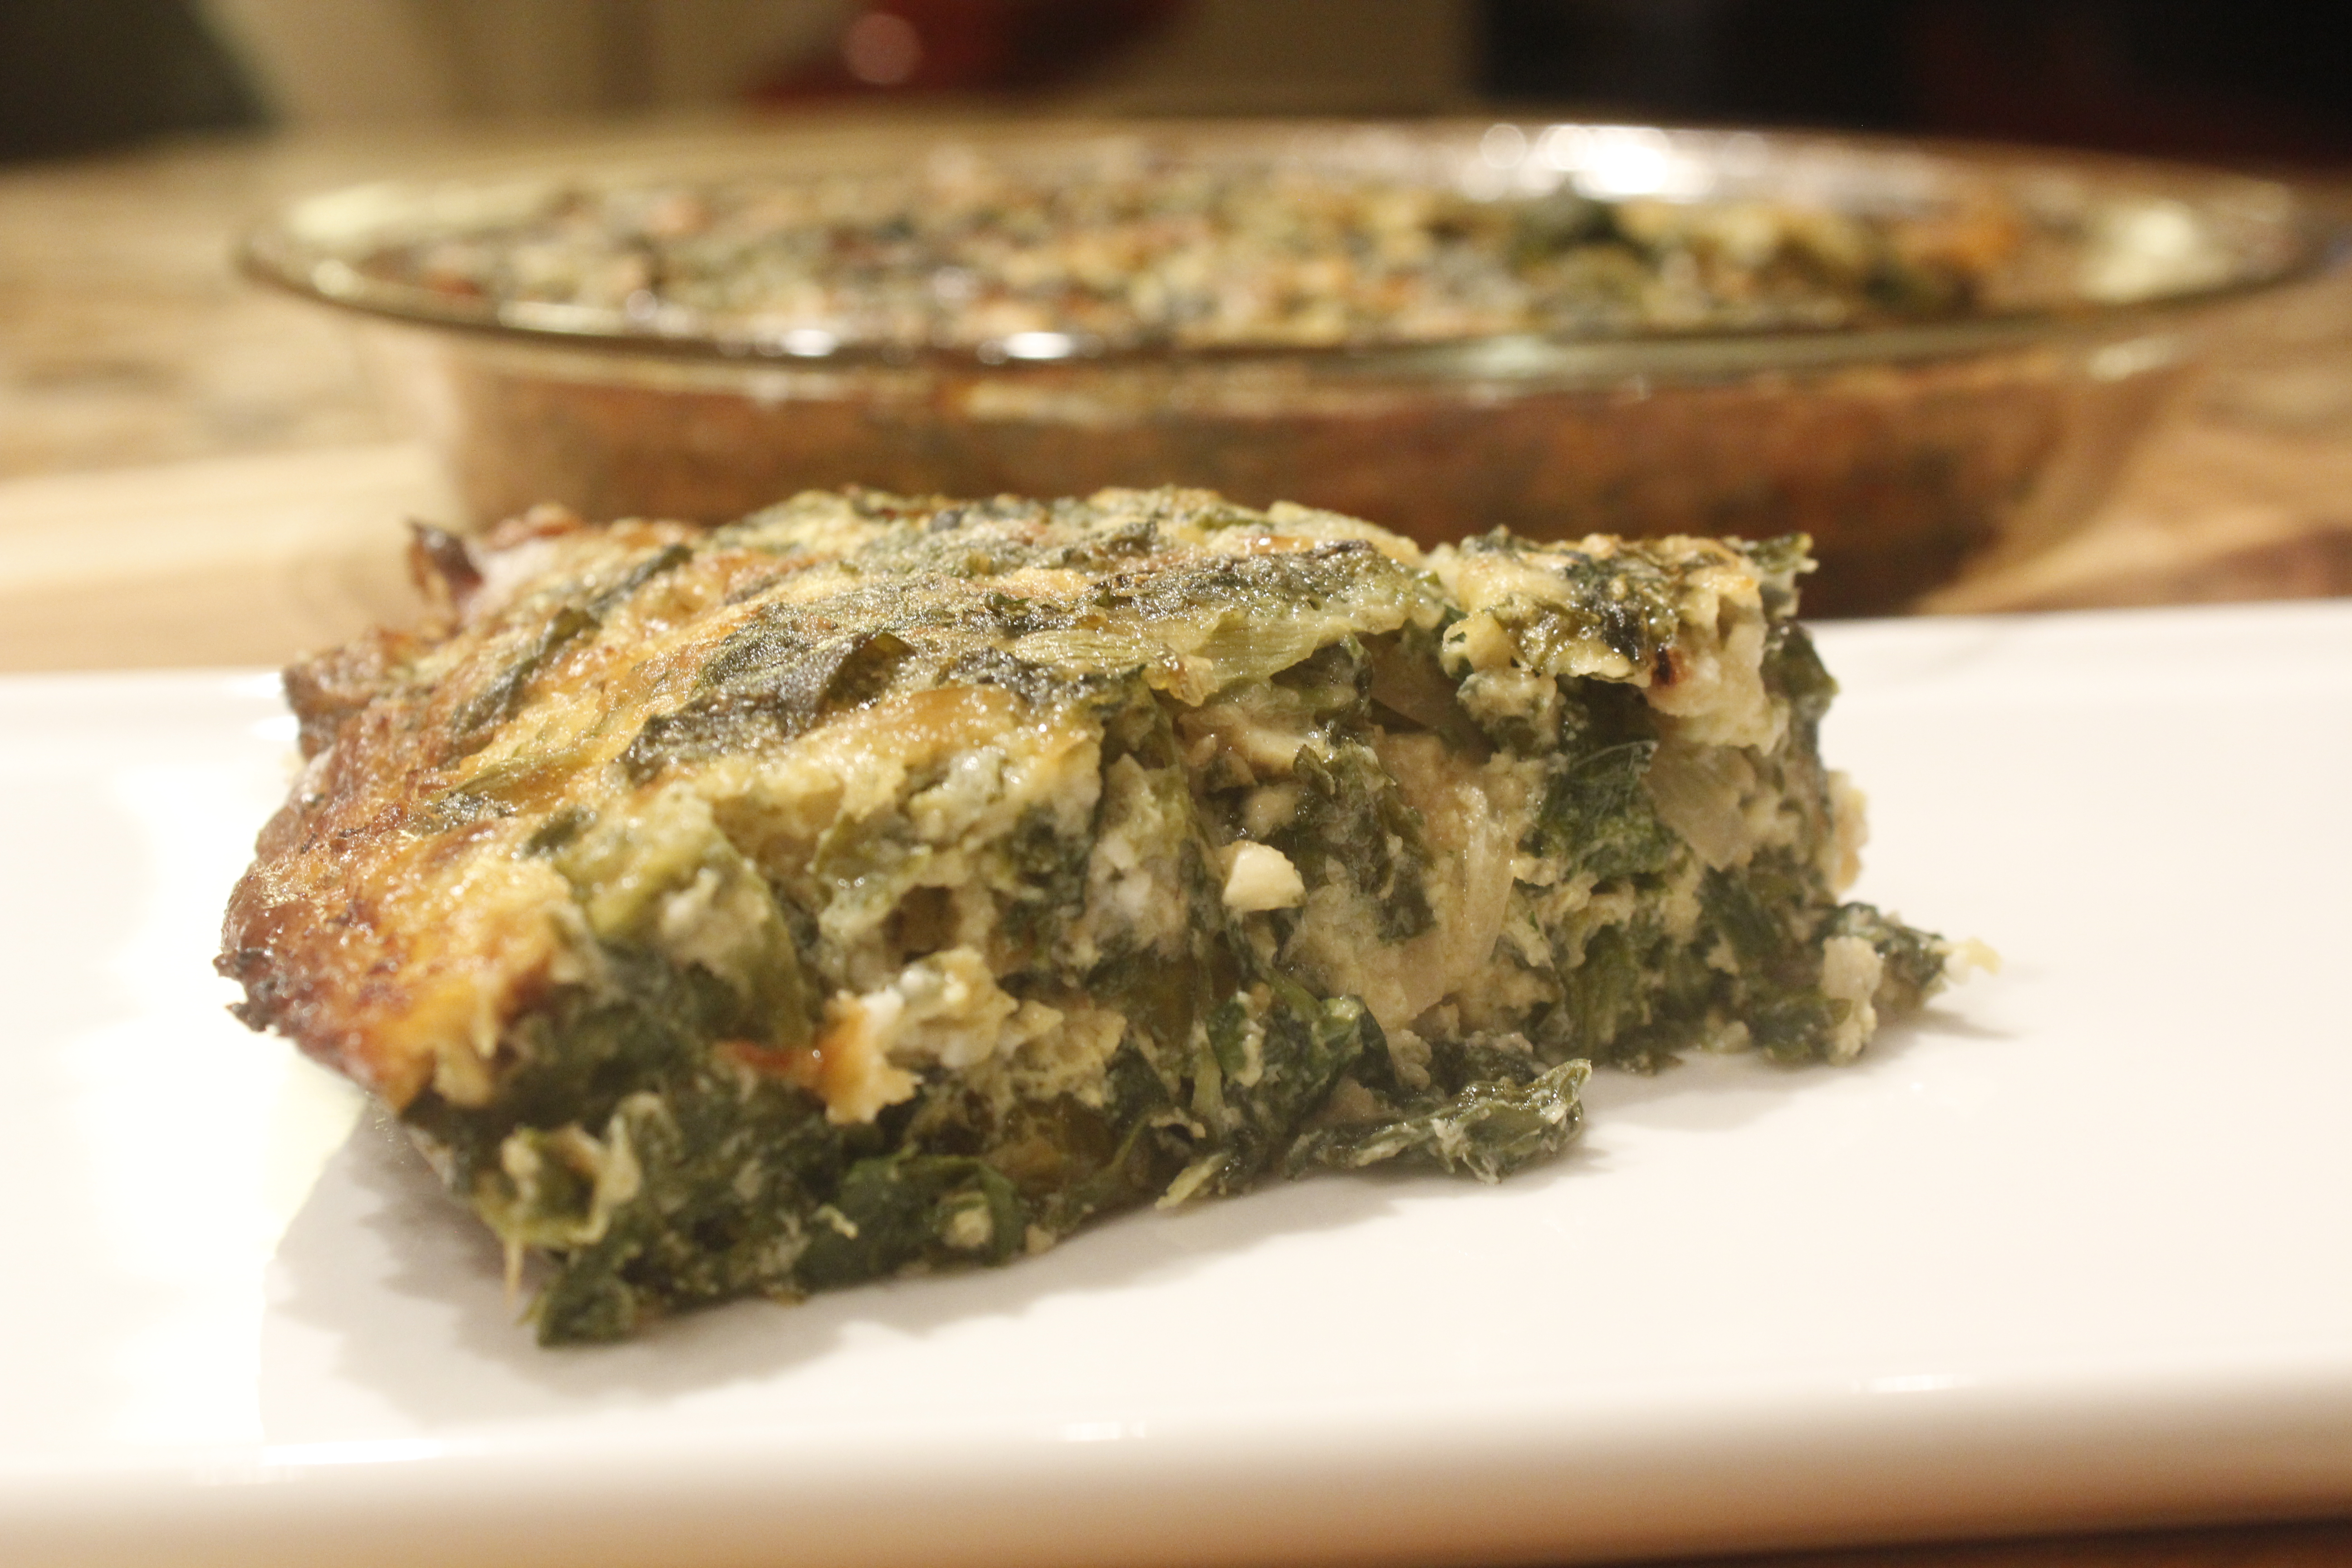
Spring Greens Pie (kuku)
One of the first signs of spring is the abundance of greens that show up in farmers’ markets and grocery stores. In today’s video on how to make a greens kukuI take advantage of the copious selections and demonstrate a kuku, a Persian frittata which resembles a crustless quiche. While it’s baking, the pie forms a bottom crust as well as a top crust. The result is a luscious spring greens pie. The selection of greens that I show in the video includes chicory, which adds a delightful bitterness, as well as arugula and watercress, which lend a bright peppery bite. The more exotic additions include two that are just starting to show up at the farmer’s market: Claytonia, a delicate mild-flavored green; and sorrel, a delightfully lemony herb with a bright tart liveliness. Since this kuku lends itself to countless variations, you can also make it with the other spring greens you find or fancy, and mix in some fresh leafy herbs: Basil, chives, cilantro, dill, and chervil are all excellent choices. Begin by wilting the greens. A drop of water in the skillet gets the leaves off to a good start. Start with the amount that will fit in the pan, and add more as the greens start to cook. Add handfuls to the skillet, and use a tongs to turn the uncooked leaves to the bottom of the skillet. The heat of the pan and the cooked greens help cook the raw ones quickly. You’ll want about 4 cups of cooked greens and mixed herbs total; to end up with this amount, begin with 2 to 3 large bunches—about 3 to 4 pounds before cooking. No need to wilt the fresh herbs; simply chop them. When the greens are sufficiently wilted, transfer to a strainer set over a bowl, and allow to cool and drain. Press the greens against the strainer to remove any excess liquid. Transfer to a cutting board, chop into bite-sized pieces, and set aside. While the greens are cooling, warm enough olive oil to coat the bottom of a medium skillet over medium heat, and add a heaping cup or so sliced onions. Sauté for a few minutes, toss in a few cloves minced garlic, and cook until the onions are caramelized. Dollop a tablespoon butter (or coconut or olive oil) onto a 9-inch pie plate, and set the plate in a 350 degree oven to warm in the pan for a few minutes as you mix the ingredients for your pie together. In a medium bowl, whisk together 4 eggs. Stir in 1/2 teaspoon salt, a tablespoon flour and 1/2 teaspoon baking powder. Since you’re using such a small amount of flour, even unbleached white flour is okay—so long as you don’t have gluten intolerance. The flour in combination with the baking powder lends an extra lift to the pie, making it especially airy. Stir in the chopped greens, the fresh herbs, the onions and the garlic. In the kuku in the video, I add also a cup of crumbled sheep’s milk feta as well as a cup of sheep’s milk gruyere. That touch of flavorful cheese imparts rich flavor, but the kuku is already certainly scrumptious when made without the dairy. Stir in a generous dusting of black pepper, and mix everything well. You’ll notice that the eggs bind the greens together inconspicuously and disappear into the batter. By this time, the butter will have melted and the pan will be hot. Remove it from the oven and swirl the butter around so that it coats the pan evenly. Pat the filling into the pie plate, and return to the oven to bake for about 20 minutes, until you see some browning around the sides. Dollop another tablespoon of fat on top—the heat of the oven will spread it—and return the kuku to the oven for another 20 minutes or so, until it develops a gorgeous deep golden top crust. This pie stays fresh for days in the refrigerator. You can just cut yourself a piece and heat up what you want to eat, or reheat the whole pan. The one-dish meal can be served any time of the day for a light meal or snack. In Judeo/Christian traditions, eggs are a symbol of rebirth and are featured on spring religious holidays. It feels appropriate to celebrate this long-awaited season with this delicious greens and eggs medley.
Share on Facebook and Twitter | Eggs, Greens, Main course, techniques | No comments
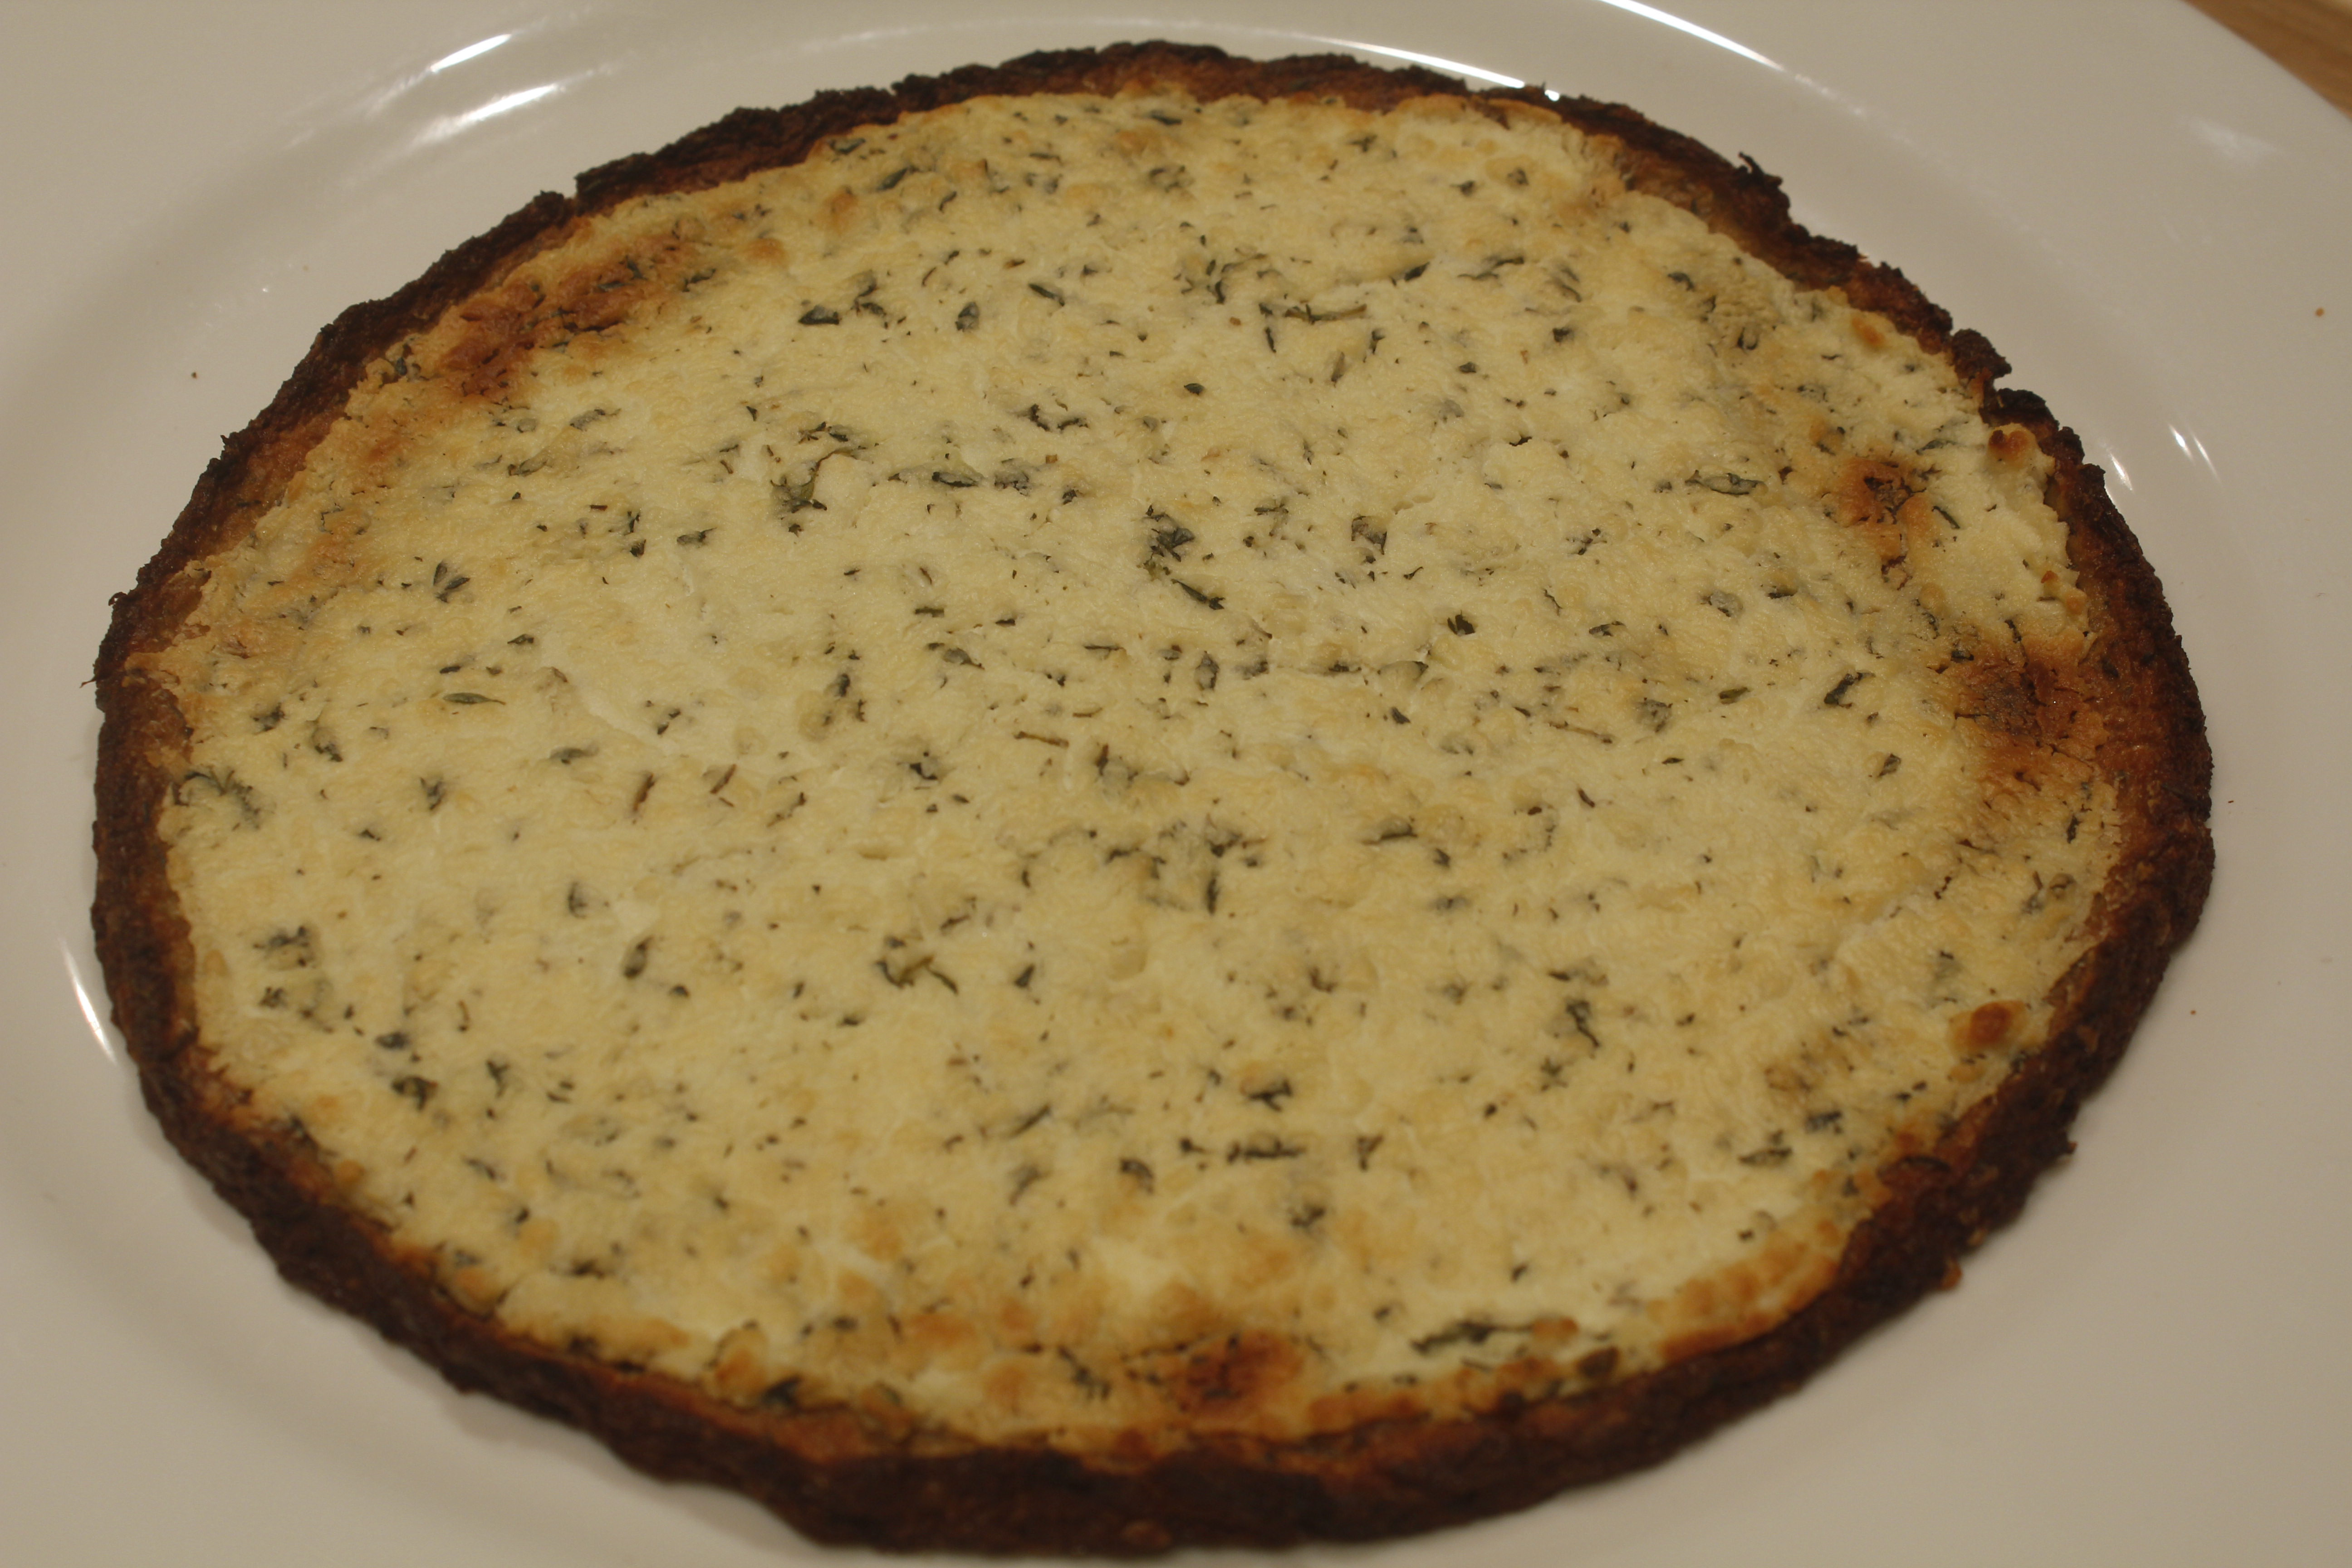
Cauliflower-crusted Pizzas
In today’s video on cauliflower-crusted pizzas, I show how to make a couple of variations on a cauliflower-crusted pizza. These delicious pizzas are light and low carb, yet as satisfying as traditional pizza. And, of course, you can vary the toppings to suit your preferences. To begin, cut a medium-sized cauliflower into florets. Pulverize the florets in a food processor until they take on a crumbly, couscous-like texture. Because you’re grinding the cauliflower raw, you’re not in danger of turning it into a puree. Next, have ready a pot with about an inch of boiling water. Add the cauliflower and blanch for 2 to 3 minutes, then pour into a fine mesh strainer to drain. Let the cauliflower cool for a few minutes. Now—and this part is very important—wrap the cauliflower granules in a tea towel and squeeze to extract as much liquid as you can. You may be surprised at just how much water comes out. Finally, turn the squeezed mass into a bowl; by this time, the cauliflower actually has the texture of a dough, and you’re ready to flavor it. The crust needs a binder; for this purpose, a couple of lightly beaten eggs are essential. To flavor the dough, stir in a teaspoon of dried thyme, and half that amount of garlic powder and salt. Next, decide whether or not you wish your crust to contain a little cheese or to be dairy free. Stir in 1/2 cup of grated Parmesan for a delectable cheese version. For an equally scrumptious dairy-free variation, replace the cheese with 1/4 cup almond flour and 1 tablespoon nutritional yeast. The nutritional yeast lends a cheese-like flavor to the combination. In the video, I demonstrate a half version of both the crust with cheese and the crust with almond flour. The next step is to press out the crust on a parchment-covered baking sheet. A medium sized head of cauliflower should press into about two 8-inch pizzas. Press the crust down to about 1/8-inch thickness, leaving a raised border around the edges. You do need to bake it until golden before topping. 30 to 40 minutes in a 400˚F oven will color the crust just right. You can assemble the crusts and bake them up to a day in advance; refrigerate them until you’re ready to add the toppings and bake the pizzas. I present two toppings in the video, but these are merely two ideas out of many. The first one is a classic combination of toppings: the requisite tomato pizza sauce and dollops of fresh mozzarella. Refrain from overdoing the mozzarella since it tends to spread a lot when it melts. This one also has crumbled cooked ground beef and wilted spinach. The surface is then dusted with grated Parmesan. The second is a goat cheese topping. Four ounces of soft cheese are mashed in a bowl with a clove of minced garlic, a dollop of Dijon mustard, a couple tablespoons fresh thyme, a tablespoon olive oil, and a sprinkle of salt. Using an offset spatula makes spreading the cheese over the crust smooth and effortless. Both pizzas return to the oven for 10 minutes, until the toppings have colored, the cheese is melted, and everything is heated through.
Transforming cauliflower into a crust is exciting, and the pizzas taste amazing. This is a deliciously fun way to have your pizza and your vegetables too! Share on Facebook and Twitter | Gluten Free, Main course, techniques, Uncategorized, Vegetables | No comments
Preserved Lemons
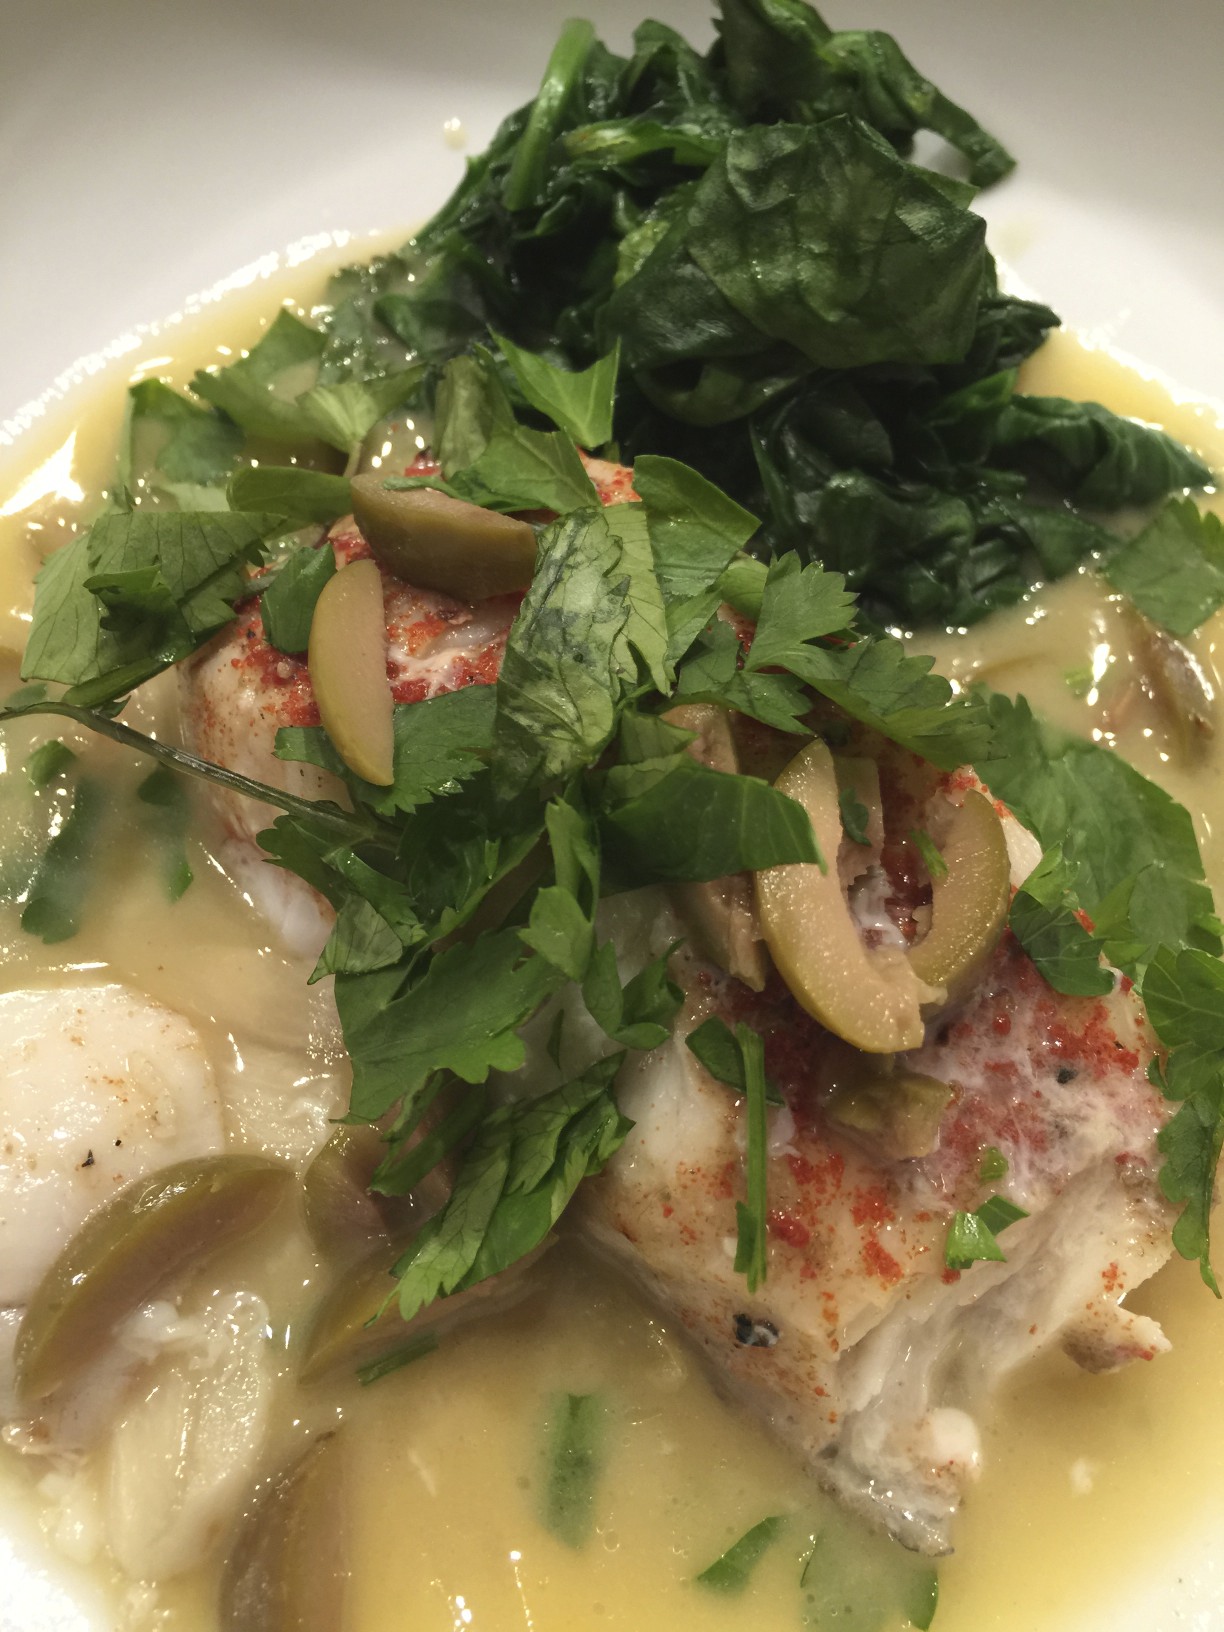
In today’s video on preserved lemons, I show how to make a condiment that can brighten so many of your dishes: preserved lemons. Best of all, they have real lasting power, remaining fresh in the refrigerator for an impressive six months or so. After I put up the lemons, I go on to demonstrate one way to use them in a delicious and easy dish of steamed black cod. Sure, you can purchase a jar of ready-made preserved lemons, but nothing beats the fresh taste of ones that you cure yourself. You’ll see from the video that they take only about five minutes of prep. Use organic lemons for the best results; after all, you’ll be eating the softened rinds. The only other ingredient you need is salt (I recommend a good sea salt). You also need a very clean jar. You can sterilize your jar by immersing it in boiling water for a couple of minutes. Make sure to scrub and dry the lemons as well. How many you use depends on the size of your jar. In the demo, I use a pint-sized jar, but you can certainly use a larger one. To prep the lemons, cut a sliver (a dime-sized piece) off of each end. Set the lemon on one end and, starting from the top, make a vertical cut three quarters of the way into the fruit, so that the two halves remain attached at the base: do not cut it in half. Turn the lemon upside down and make a second vertical cut at a 90-degree angle to the first, again three quarters of the way into the fruit. Fill each cut with as much salt as it will hold. Place a little salt at the bottom of the jar, then squish and push the lemons in. You’ll notice that lemon juice will rise to the top. Since the preserved lemons need to be covered in lemon juice, you may need to squeeze a couple of extra lemons to fill the jar. Screw on the lid, and turn the jar upside down a few times over the first few days to make sure that lemon juice is always covering the lemons. After four to six weeks, your lemons will be pliable and ready to use. It’s the softened rind that is the most exciting part to add to your dishes. Its flavor is tangy, slightly fermented, with that unmistakable brightness that is associated with Moroccan and Middle Eastern cooking. I also demo two servings of steamed black cod. To make the steaming liquid, add 1/2 cup chicken stock, 1/4 cup white wine, 2 cloves sliced garlic, a splash olive oil, and a couple tablespoons thinly sliced preserved lemon to a 4-quart pot. The steaming liquid will become the sauce, to which the preserved lemon in the steaming liquid will lend a bright citrus finish. Sprinkle each piece of cod with a dusting of salt, paprika, cayenne, and ground cumin. When the steaming liquid is bubbling and steam starts wafting through the steam holes, lay the fish on top of the basket and cover. It will be steamed to perfection in a mere 7 minutes. Plate the fish, pouring the steaming liquid (which now reduced, has become the sauce) over the fish. A sprinkling of chopped green olives, parsley, and cilantro complements the other flavors. Marvel at how this zesty and convenient condiment can add such lively flavor to a dish that is simple enough for weeknight dining, yet celebratory enough for entertaining company. Share on Facebook and Twitter | condiments, Fish, Main course, Pantry Items | No comments
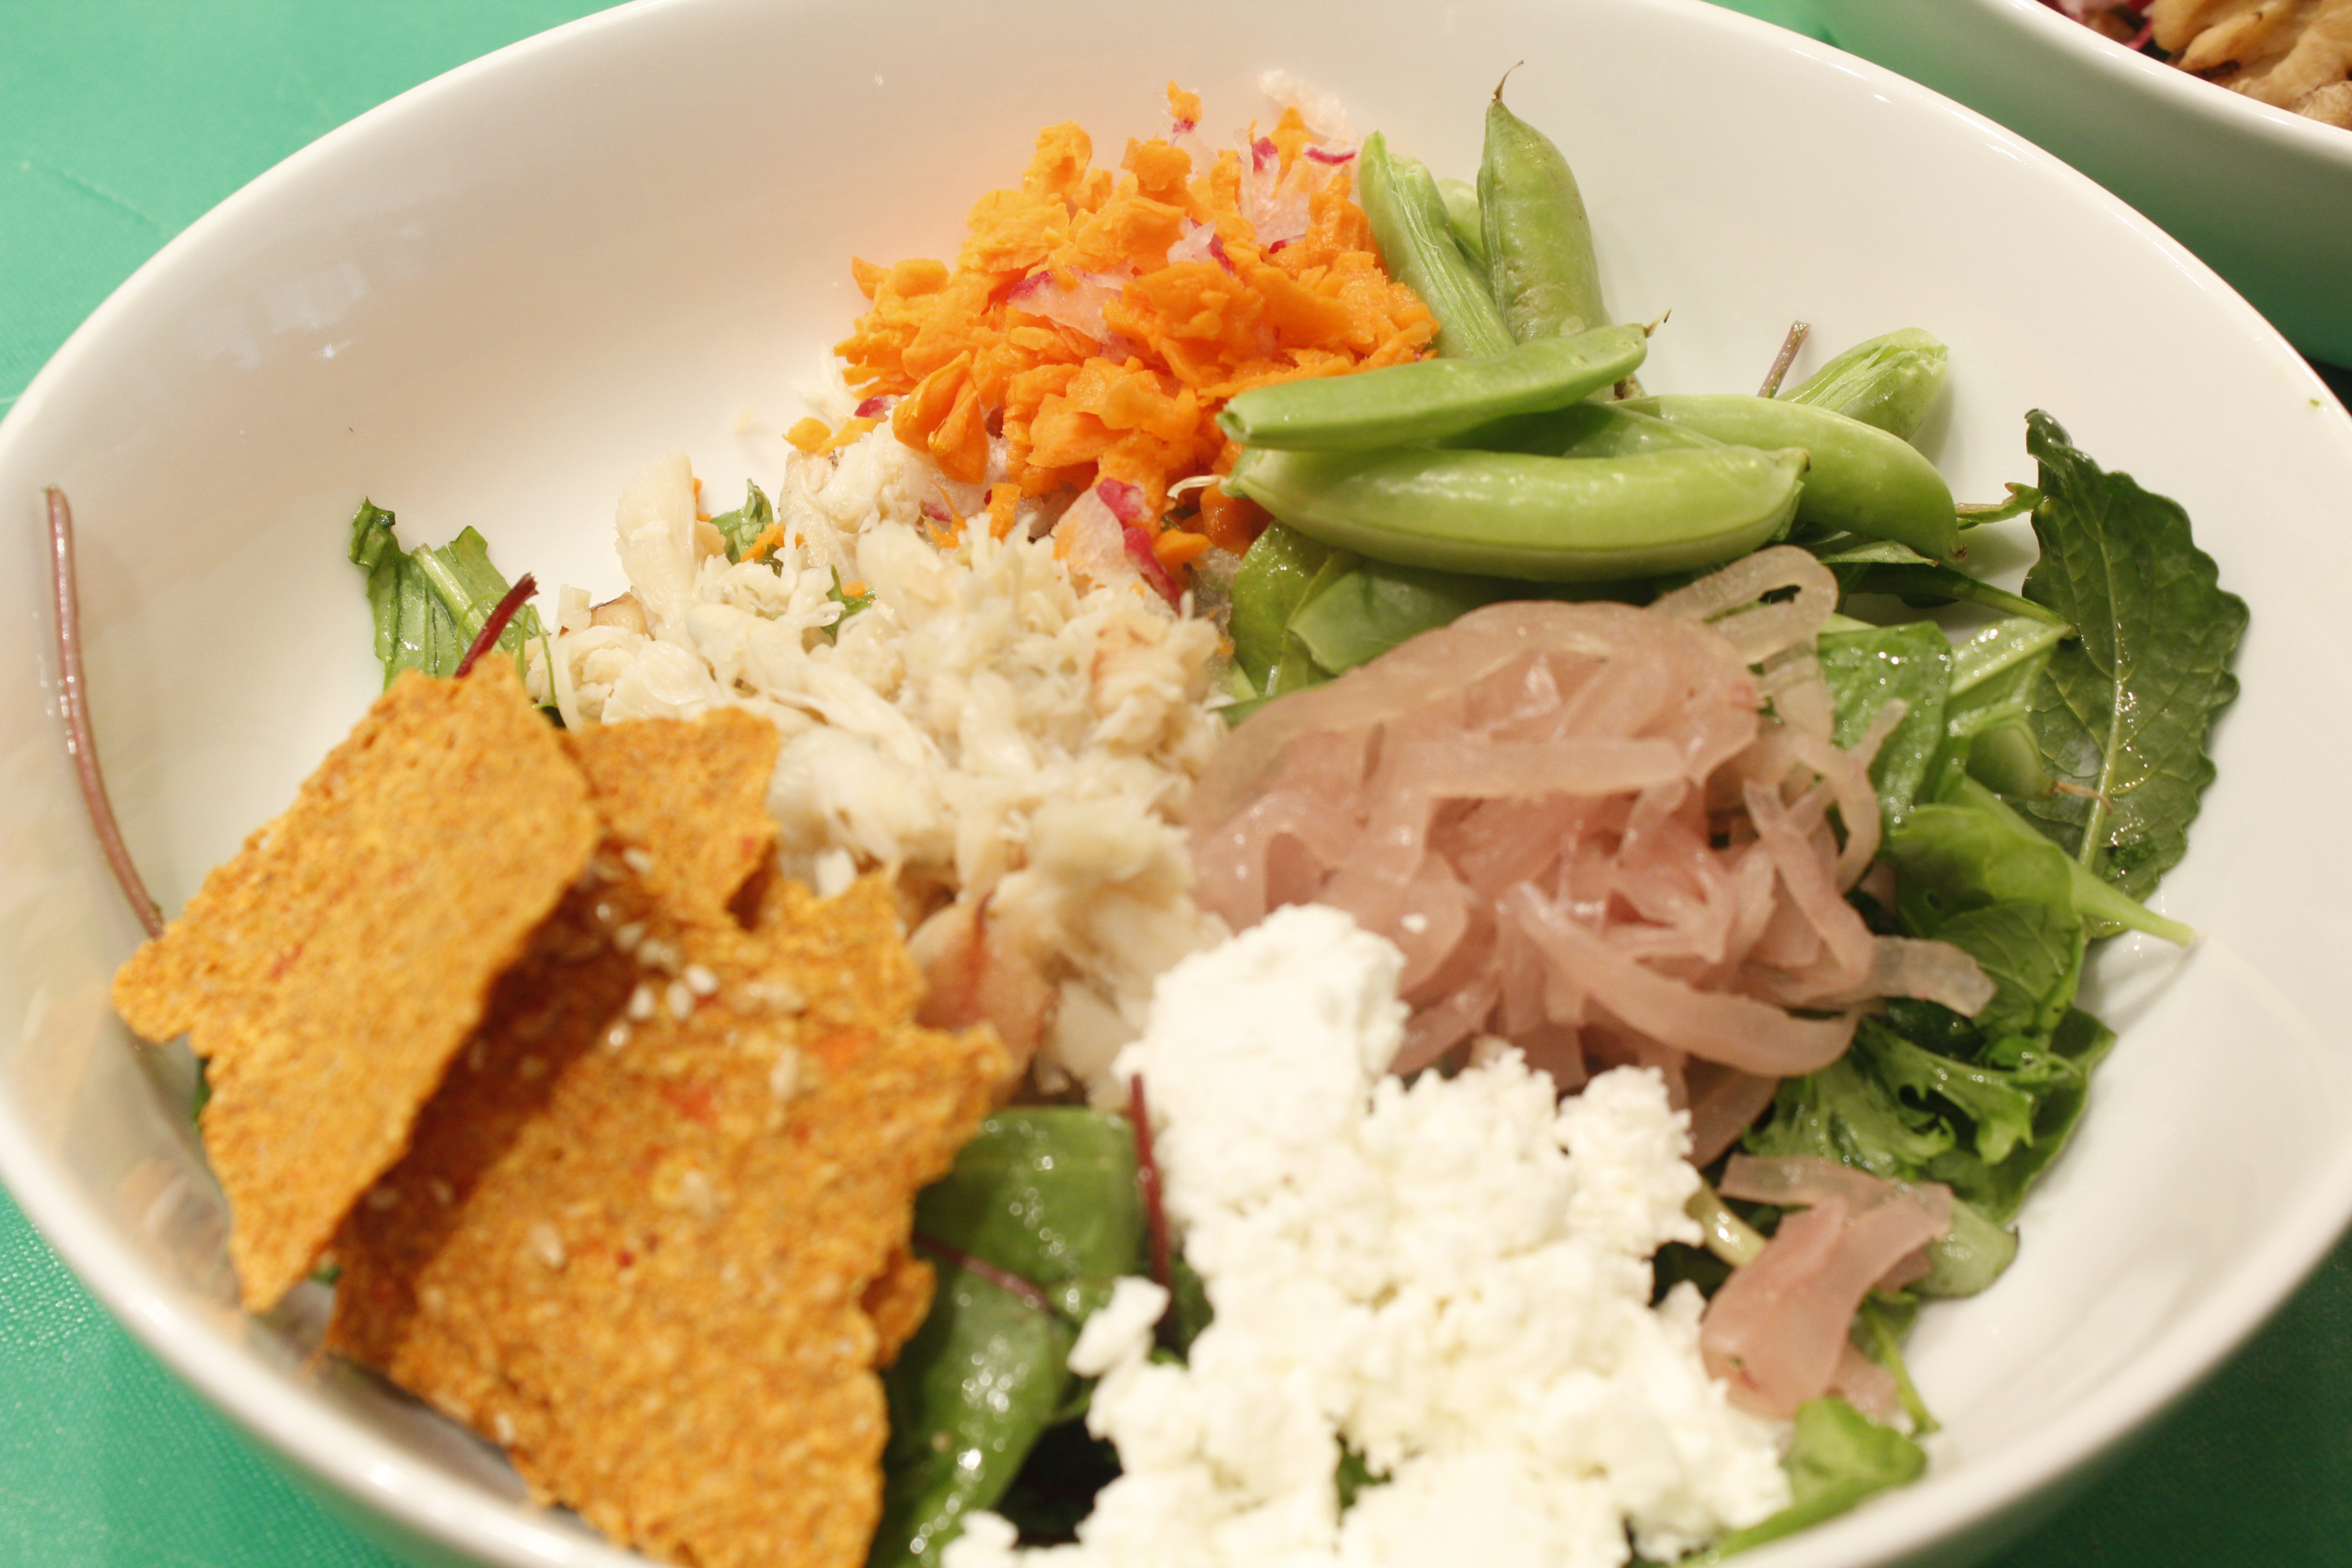
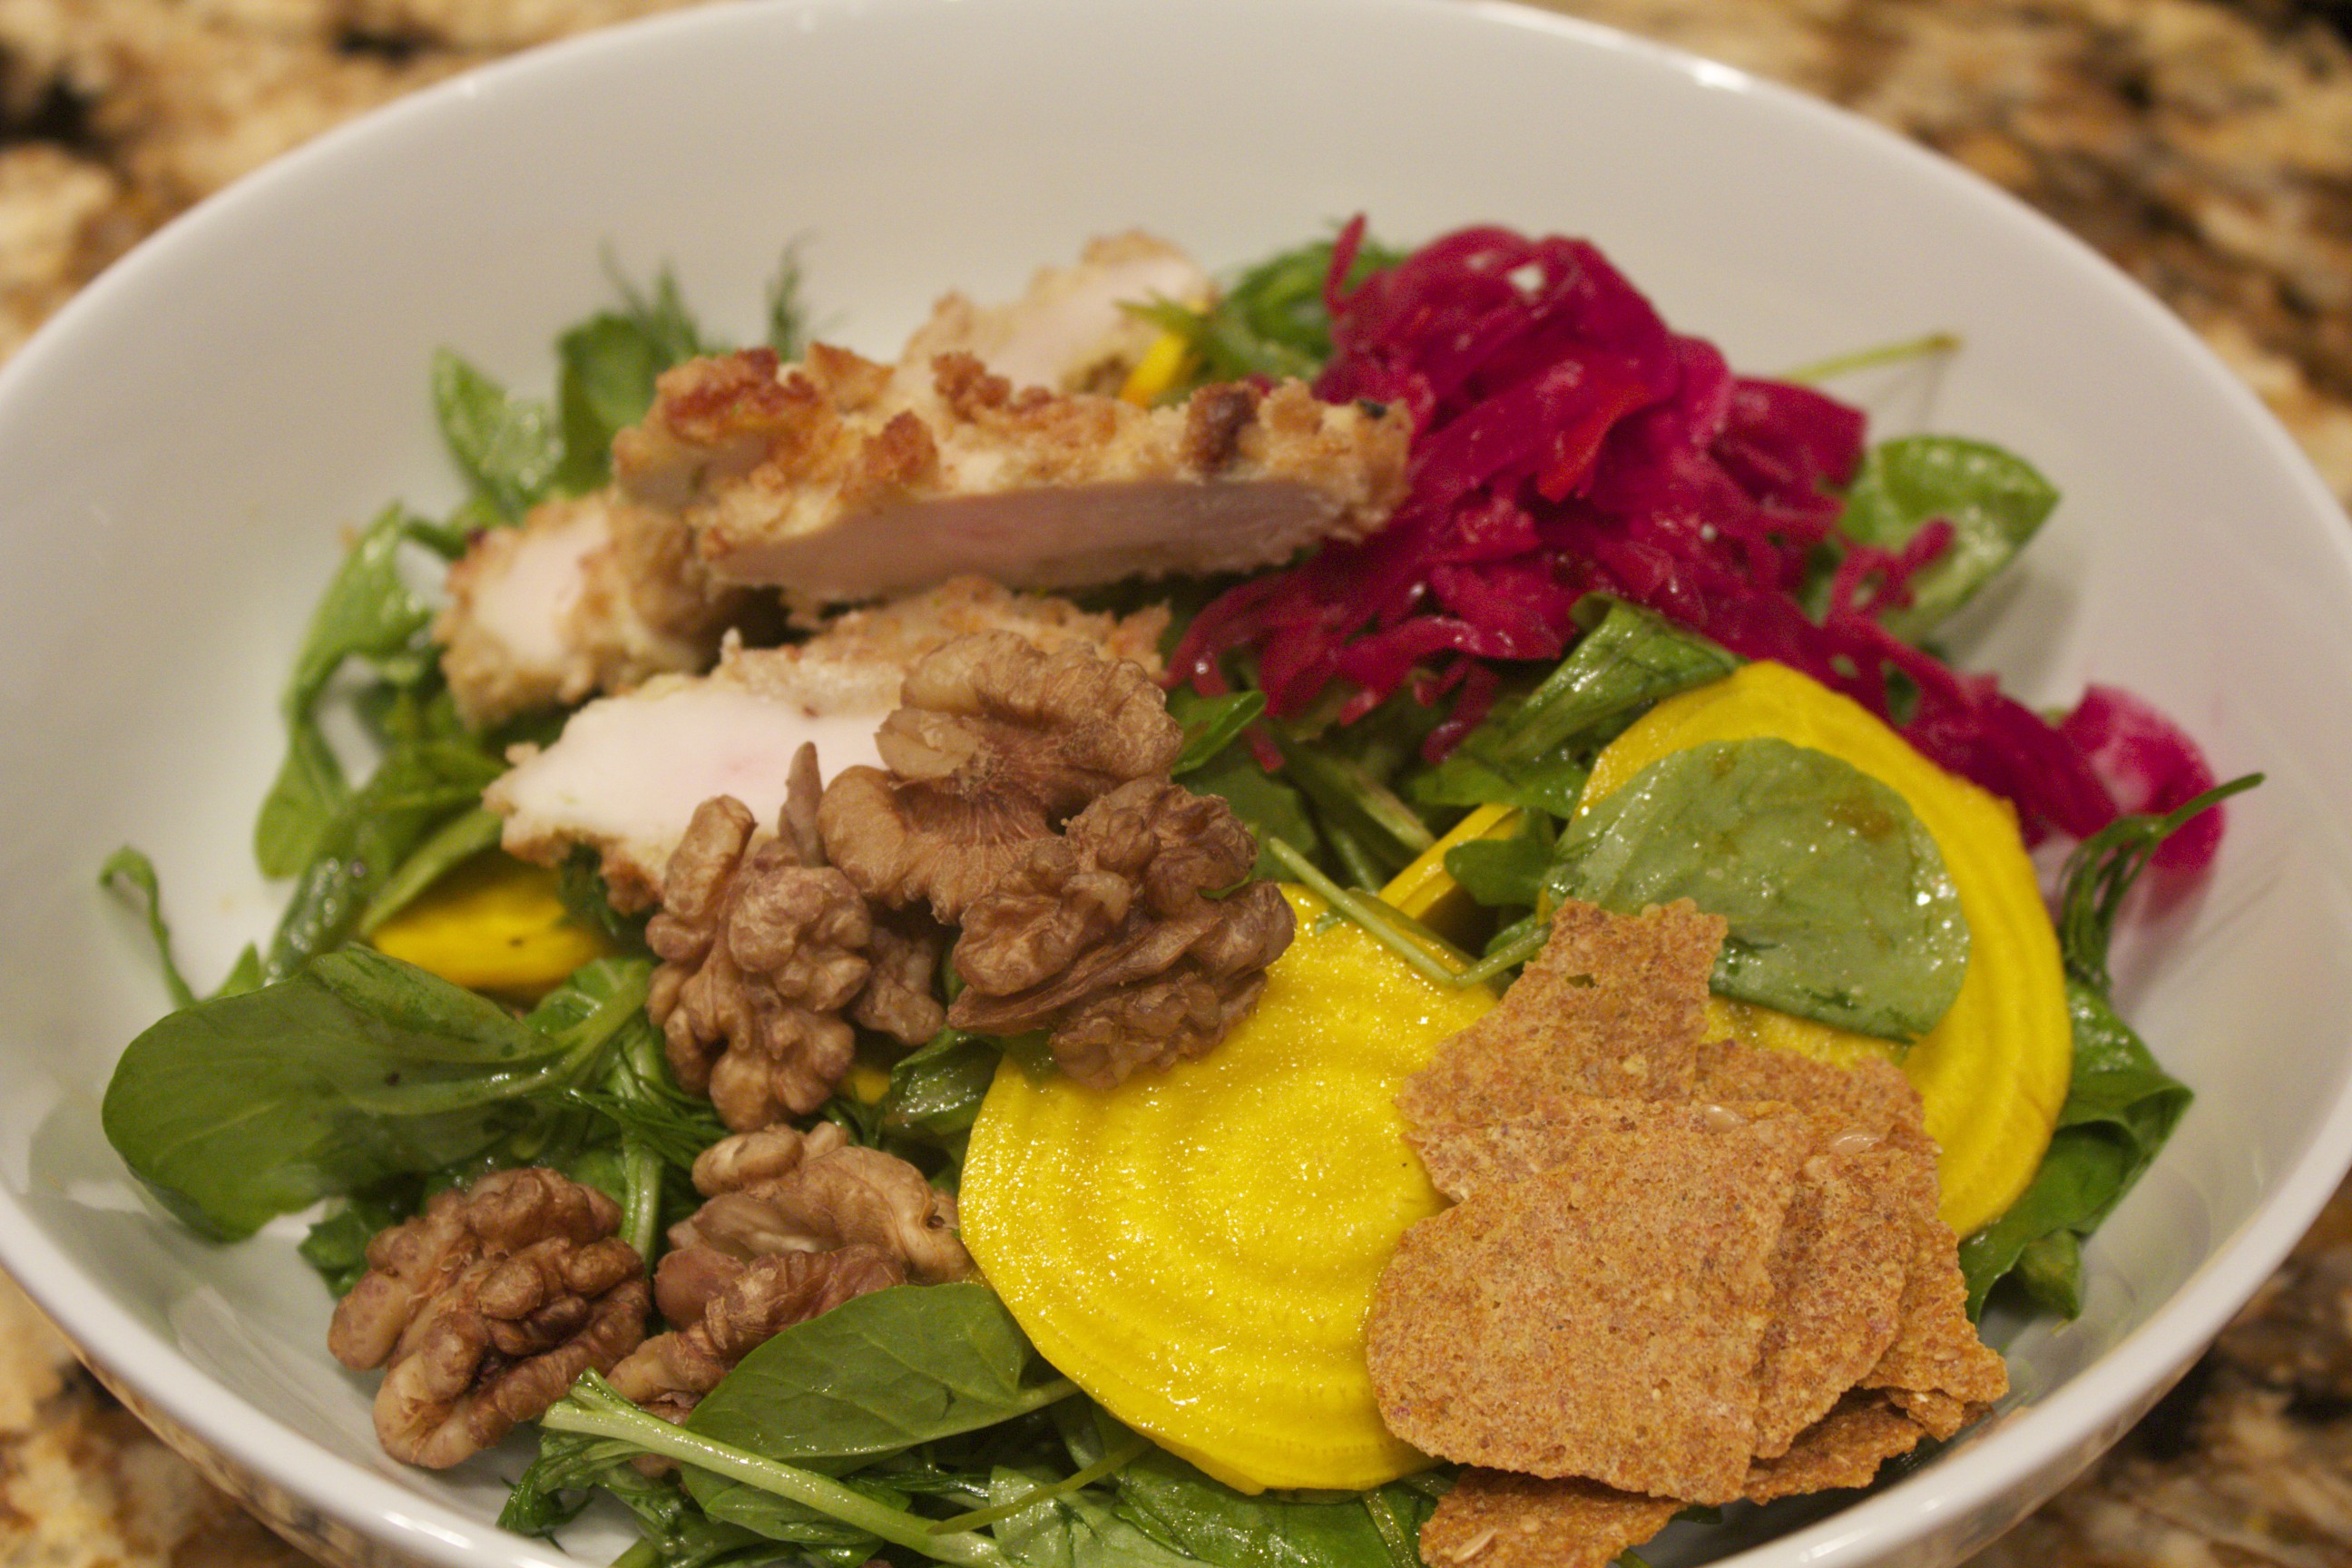
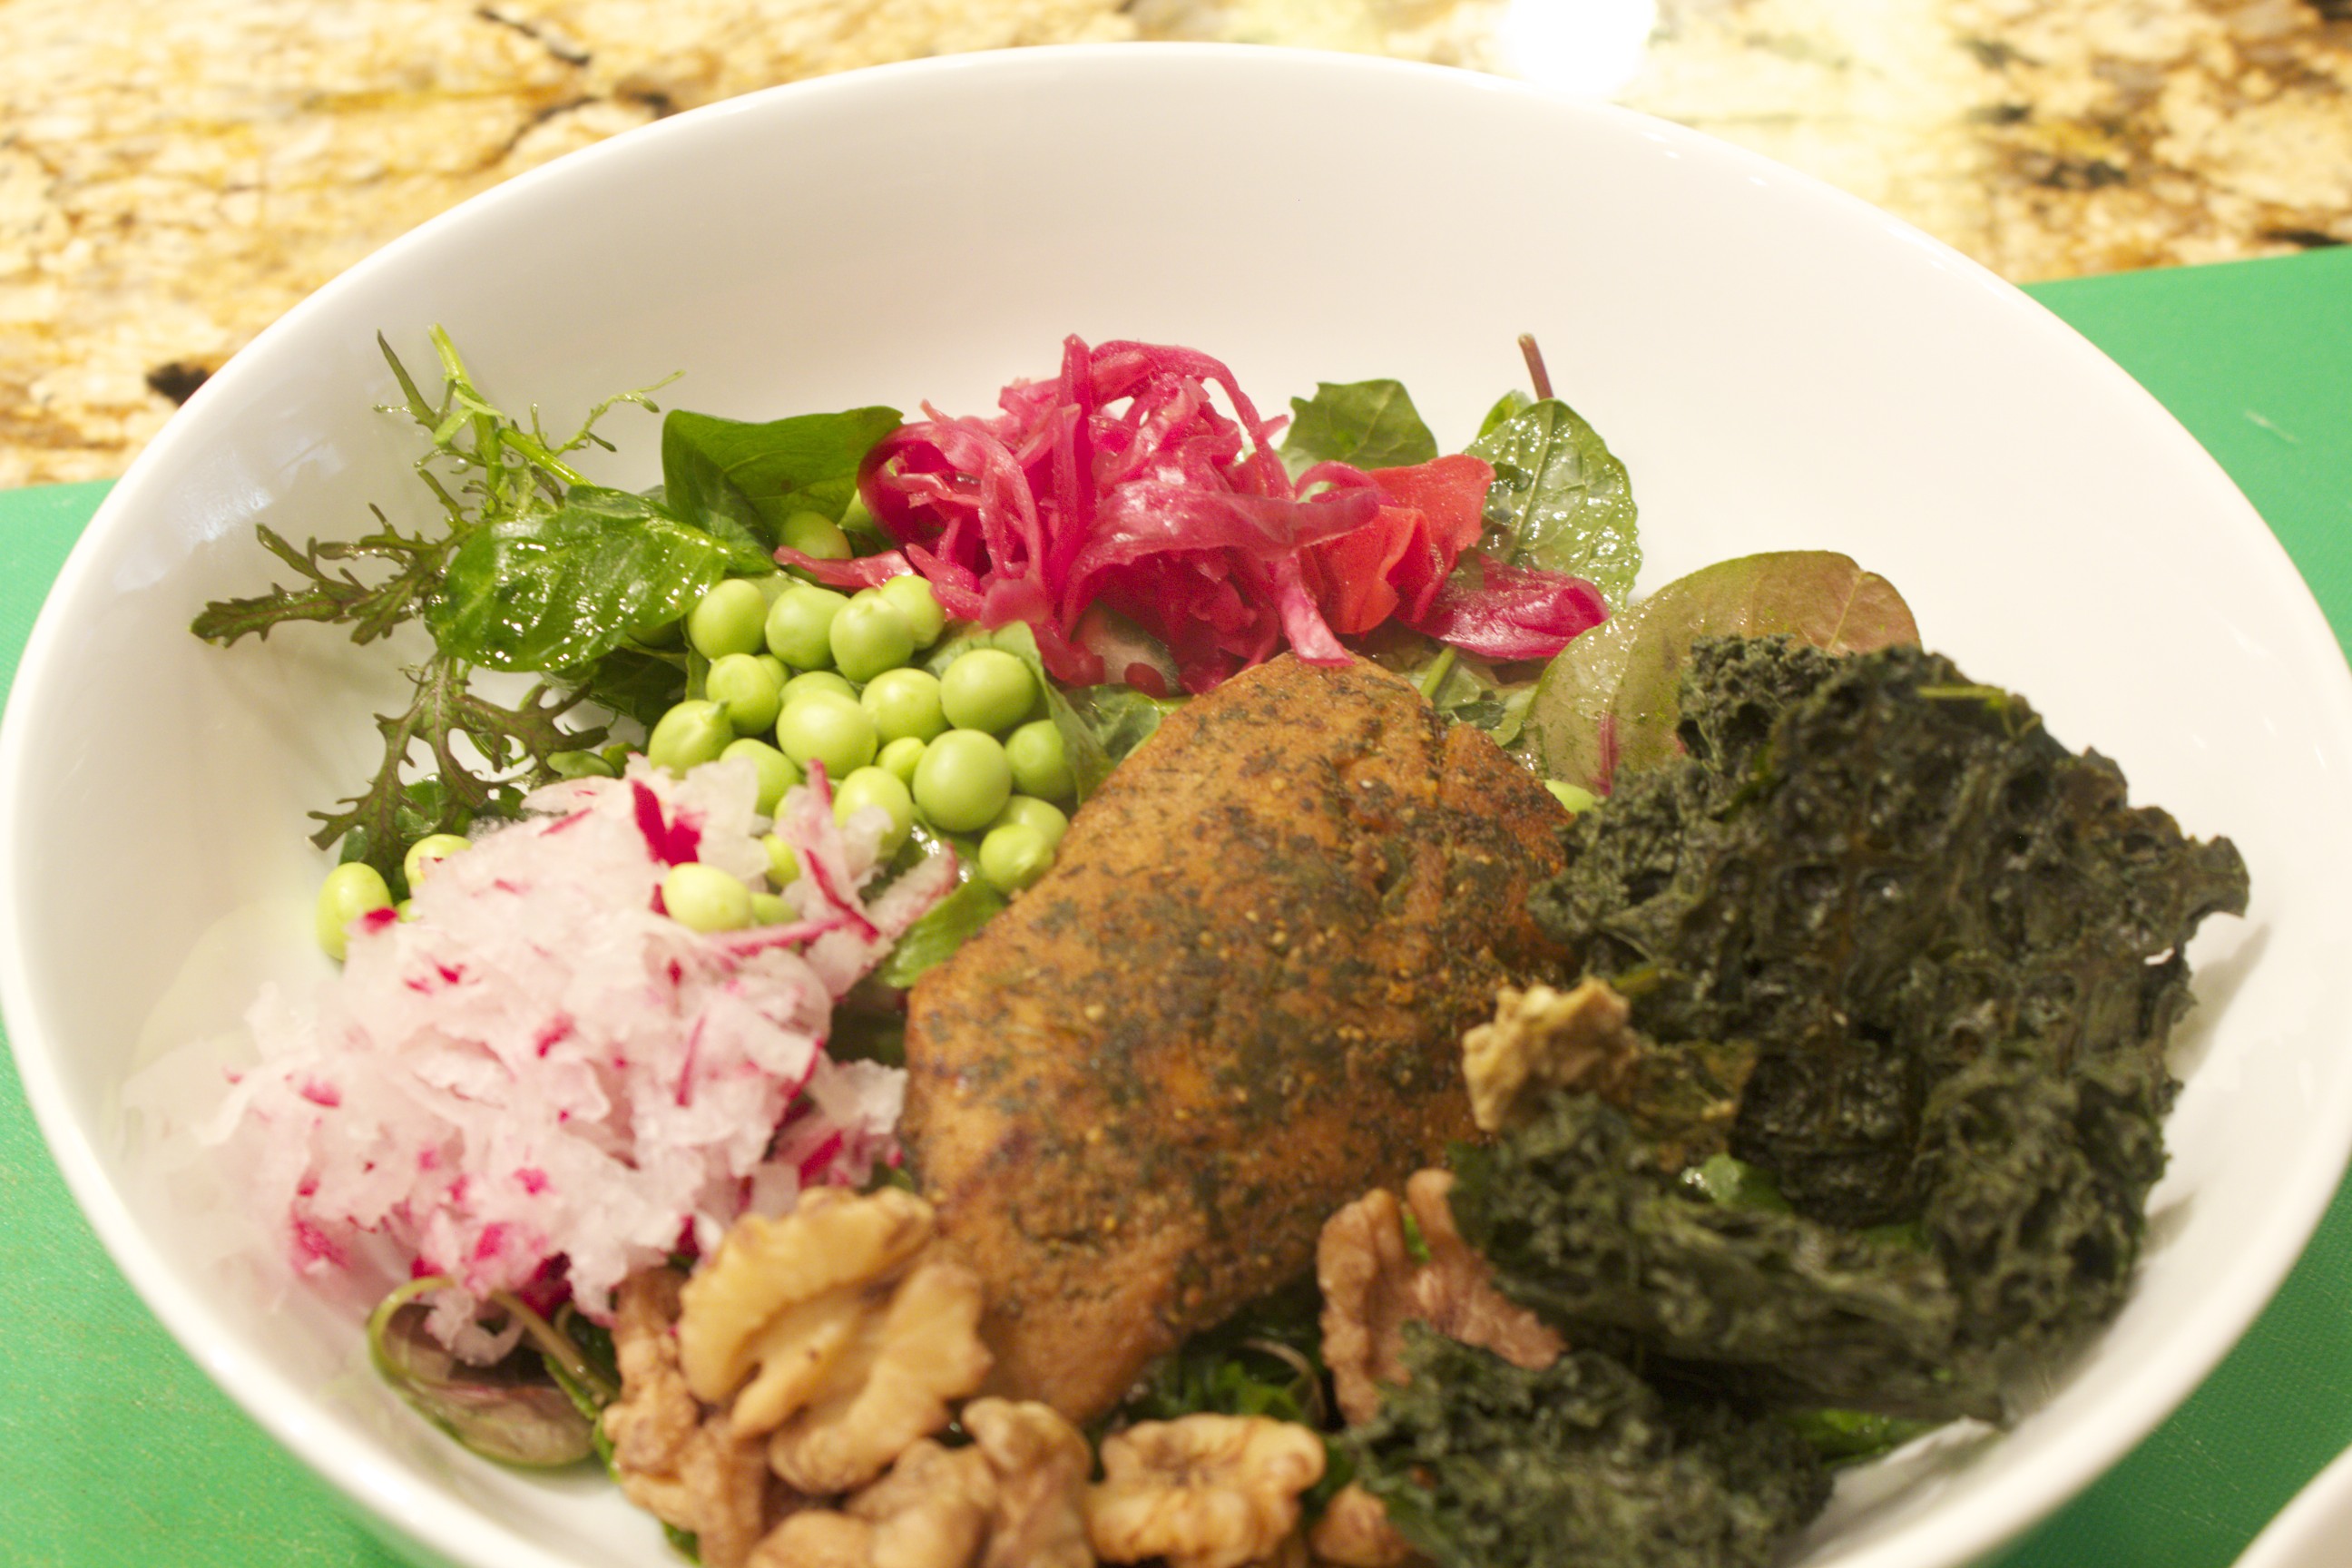
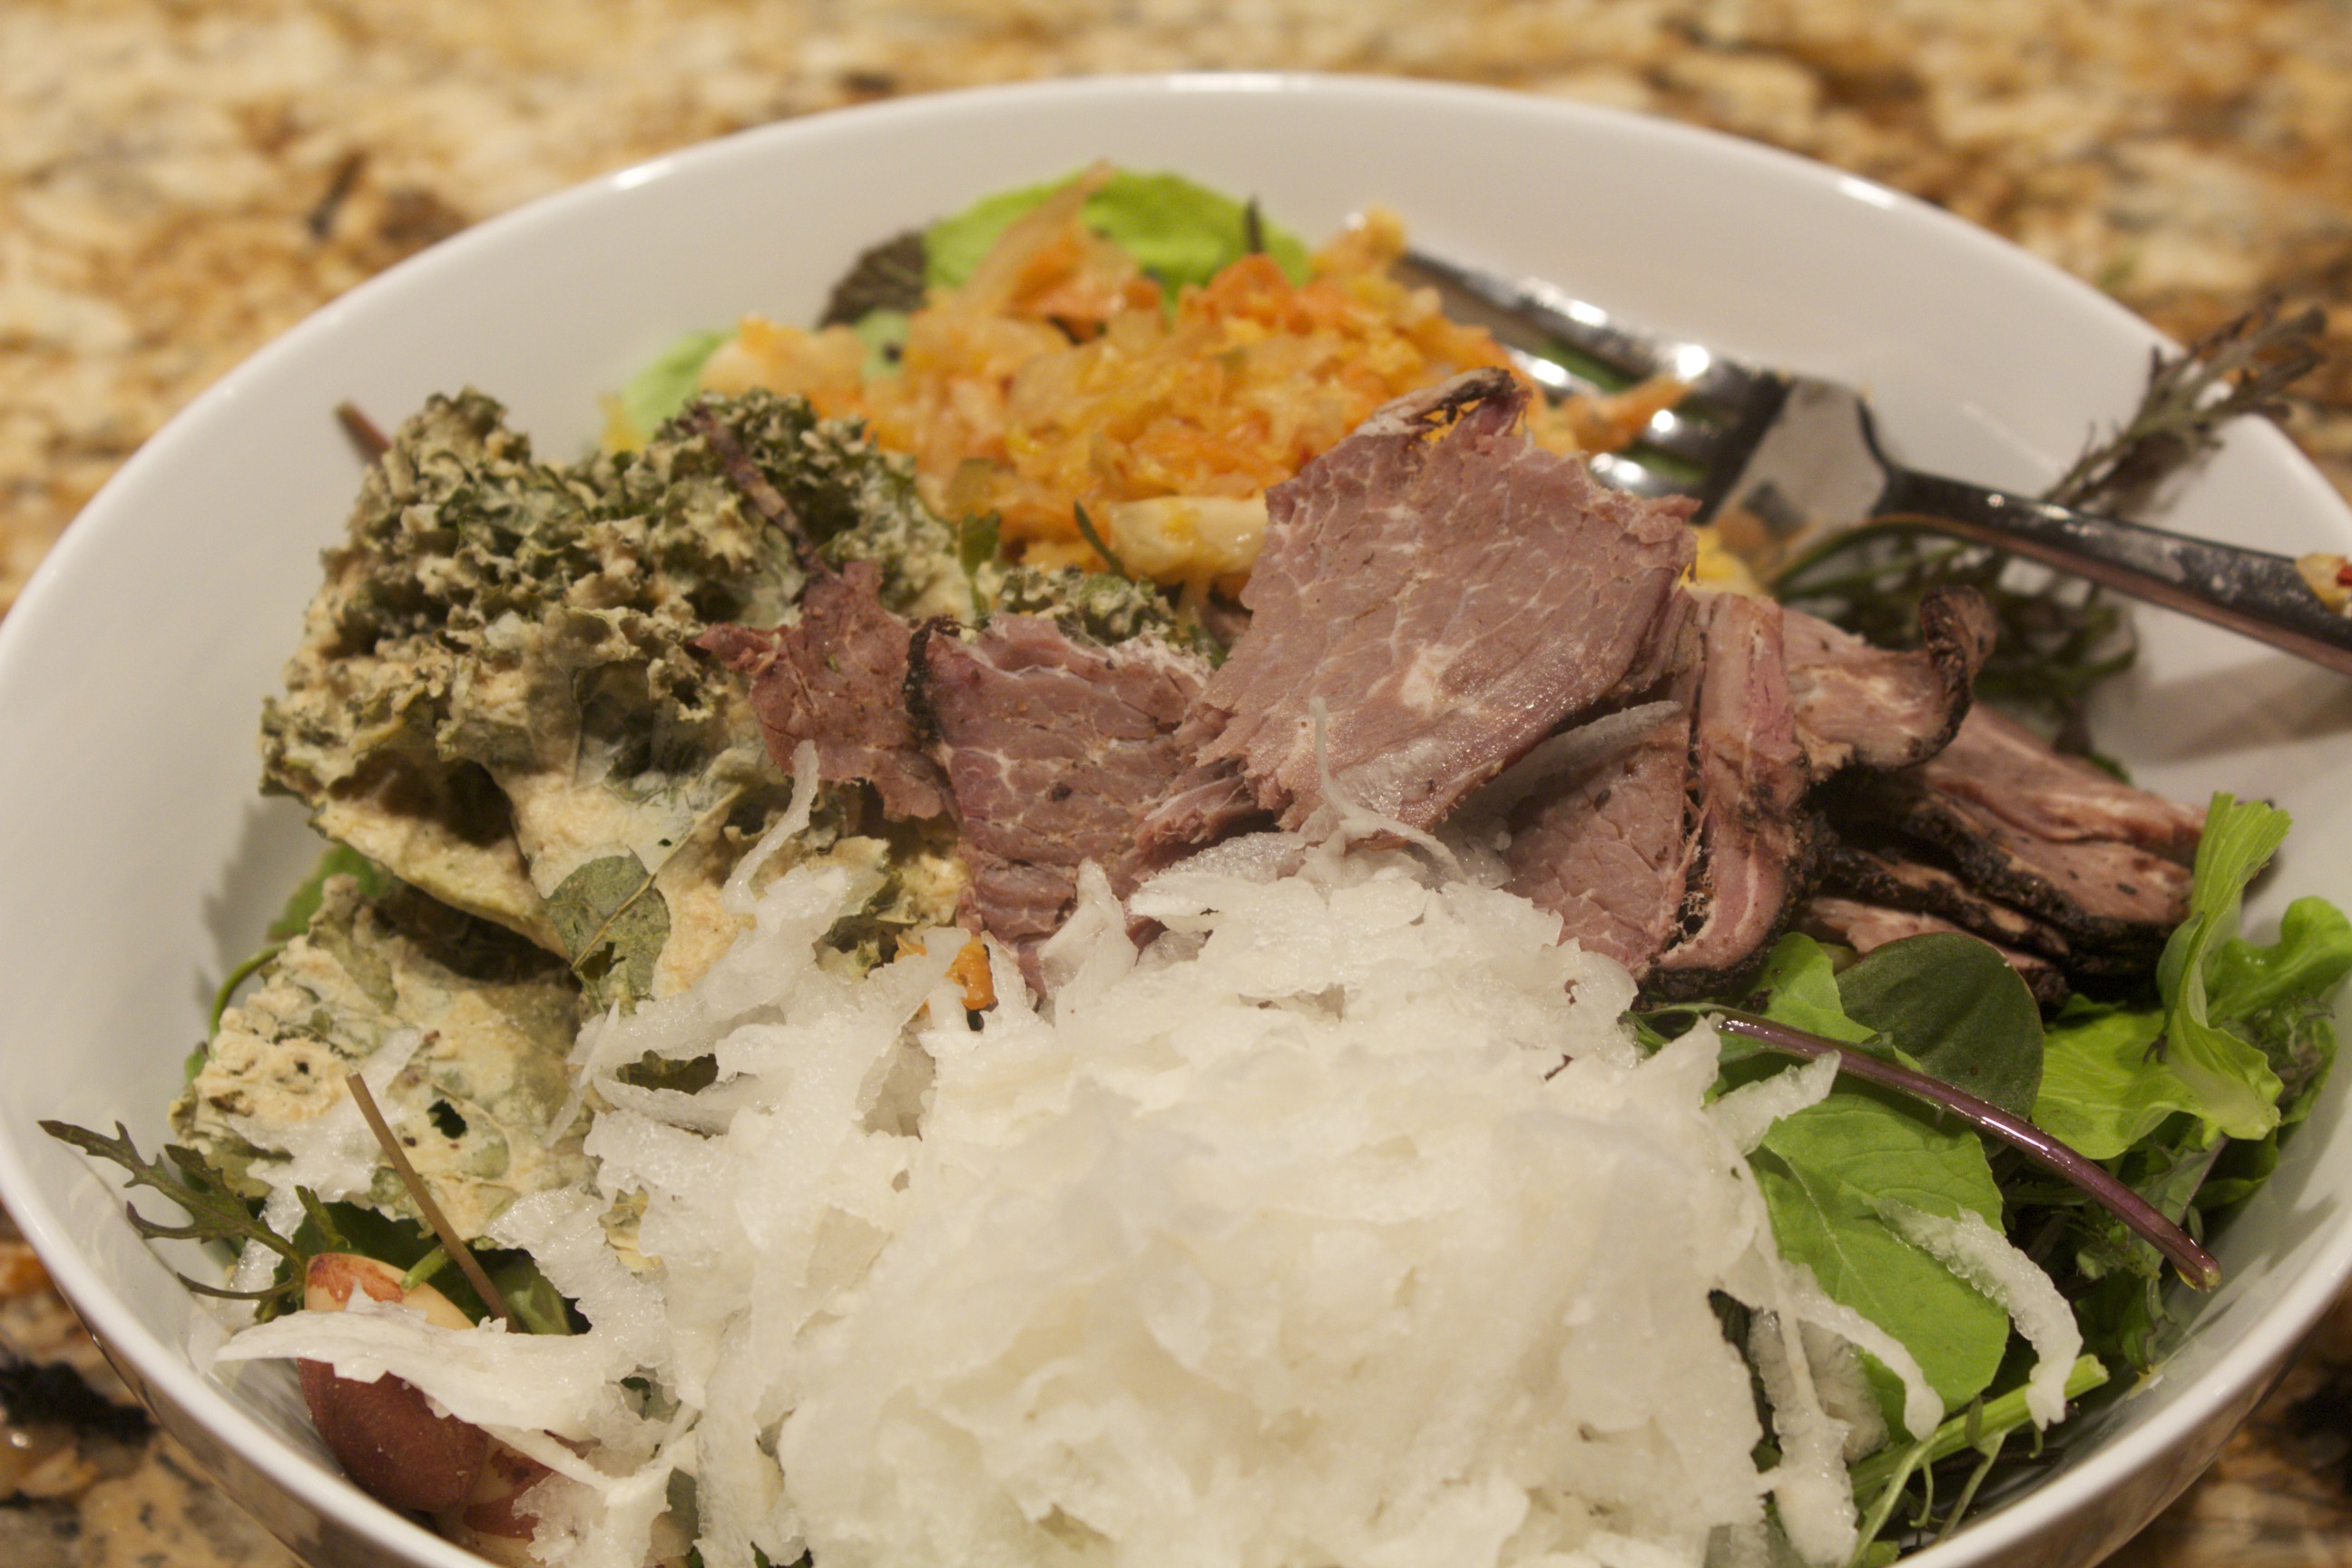
Building a Satisfying Salad In today’s video, I demonstrate one of my favorite summer lunches, a beautiful light yet substantial main course salad. The focus of the video is on the components that make up a satisfying salad. My ideal summer salad has a homemade dressing, a gorgeous mix of greens, a protein, a raw vegetable or two, a fermented vegetable, a sprinkling of something fatty, and some kind of crunchy, dehydrated vegetable or sprouted chip. This composed salad lends itself to infinite variations, and I explore three. Happily, all of these colorful, multi-textured salads take only minutes to assemble, and they are hearty enough to keep you going strong until dinner.
The most important factor in a salutary salad is the dressing. Bottled salad dressings are not healthy; they all contain inflammatory polyunsaturated oils, such as soybean oil, as their primary ingredient. Making your own dressing, however, is quick and cost-effective as well as healthy and delicious. Here’s how to make a basic vinaigrette: First, place a damp dishtowel in a ring shape on your counter to hold your bowl steady. Doing this will free both hands. Place a dab of mustard in the bowl, then add a tablespoon of minced shallots. Next, pour in a couple tablespoons of your favorite vinegar (the dressing used in the video is golden balsamic), then whisk in about 6 tablespoons of extra virgin olive oil. You can also add a splash of flax seed oil to boost the omega-3 content. Stir in a few tablespoons of fresh herbs, and make sure to include a generous sprinkling of salt and black pepper. Transfer the dressing to a jar, and refrigerate it for up to two weeks. You now have a delicious dressing available whenever you want to enjoy a salad.
Next, pick a selection of delectable greens. Bins at your local greenmarket contain the most exciting varieties; but mesclun, arugula, and watercress are readily available in most grocery stores. Toss the greens with just enough dressing to coat, and place in your salad bowl. Now for the composed part: Top the greens with a serving of protein. The three examples in the video feature tinned crab, smoked mackerel, and lamb pastrami. Other delicious pantry staples or ready-to-use proteins include tinned sardines, salmon, tuna, smoked oysters, and shrimp. Cold proteins, such as poached fish, chicken, turkey, or beef from a previous meal can be used as well.
Since so many fine fresh vegetables are available in the summer, be sure to add a fresh raw vegetable or two. In the video, I show grated radishes and carrots, thinly sliced beets, sliced snow peas, shelled English peas, and whole sugar snap peas, which, when fresh, are delicious eaten raw. I recommend also including a fermented vegetable; not only are fermented vegetables refrigerator staples, but they lend a wonderful tangy flavor to the salad, and they make the proteins in the salad easy to digest.
Next, sprinkle over your salad a “fatty” component such as nuts, olives, or crumbled cheese. A little of these go a long way. The last essential ingredient—again, something that keeps well in the pantry—is some kind of a crunchy vegetable chip. There are so many tasty dehydrated vegetable chips on the market now: kale chips, onion chips, arugula chips, and dehydrated vegetable crackers, to name a few. A little mound adds a fun element to the salad. Mix and match and come up with all kinds of salad variations. I hope that you develop your own hot weather favorite combinations and that you turn out to be as excited about these salads as I am!
Share on Facebook and Twitter | Gluten Free, Lunch, Main course, techniques, Uncategorized | No comments
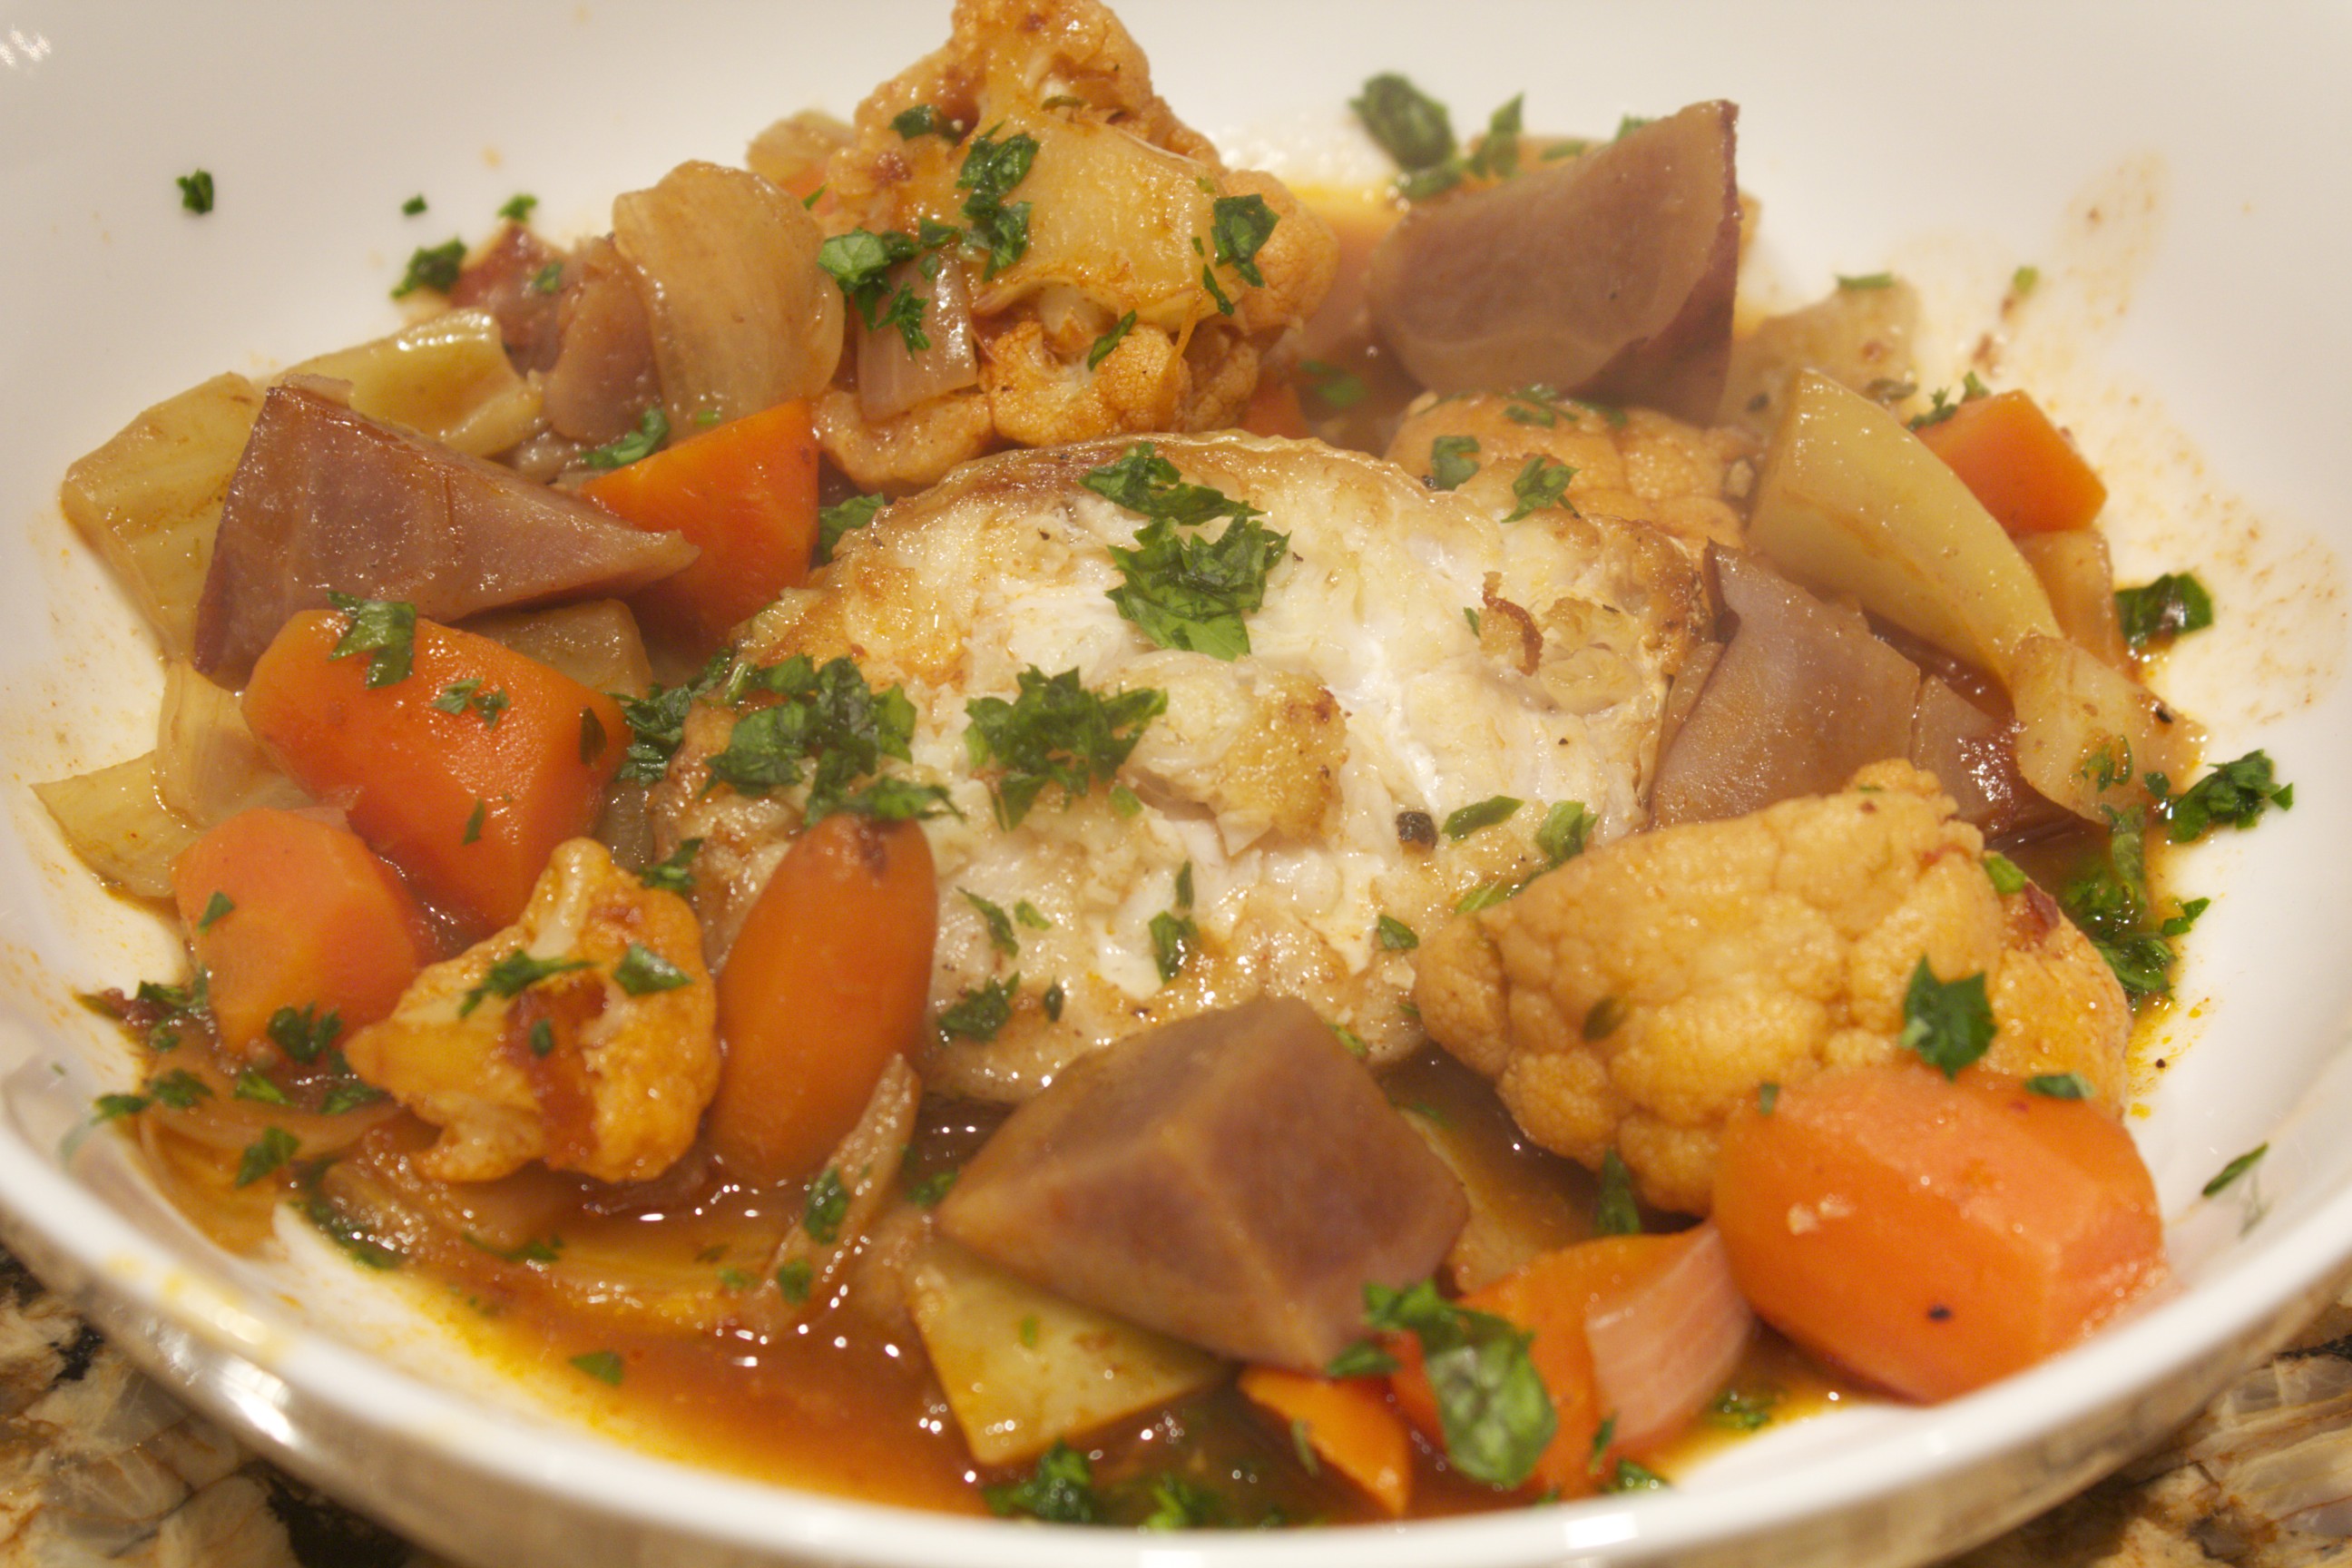
Dinner: Braised Tile Fish Steaks I went to the greenmarket the other day in search of a thick piece of fish which I wished fervently to braise in chicken or beef stock. I couldn’t get the braising bug out of my head since recently reading the Mark Bittman NY times article on that very subject. I was even prepared to purchase a whole fish, fillet it, and keep the carcass frozen until I had two or three, and I could make a broth. What I came home with was a whole tile fish because it just looked too fresh and delectable to pass up. The fishmonger insisted that I cut the flesh into steaks, which sideswiped my plans for a tidy carcass, but I still had the head, tail, and some flesh leftover.  tile fish steaks
I ended up cutting four thick steaks. I first salted and peppered the pieces and seared them for five minutes per side in a large skillet using aroma-free coconut oil as the fat. I then set aside the steaks while sweating in the same skillet –for 10 minutes or so–a bunch of vegetables: onions, fennel, purple potatoes, carrots, and cauliflower. I stirred in some saffron, smoked paprika, and a tad tomato paste before adding a few cups of rich chicken bone broth. The liquid reduced for 10 minutes; then I returned the fish to the pan and covered it. The fish braised until cooked through, about 15 minutes–the vegetables were perfectly tender by that time as well. I served the dish in a shallow bowl so that each bite could be draped in the silky sauce. The side was garlicky sautéed spinach. It turned out to be a quick, delicious meal.
Share on Facebook and Twitter | Dinner, Fish, Main course | No comments
Turkey Hash I’ve already cooked a couple of turkeys this season while testing recipes, so I’ve had a good deal of practice using up the inevitable leftovers. While I enjoy consuming my fill of turkey sandwiches and turkey soup, this year one of my favorite ways to make a new dish out of the cooked turkey has been to make it into a hash—a quick delicious one-skillet meal that is equally tasty for breakfast, lunch, or supper. I incorporate wild rice into my version—a departure from the more usual turkey-potato variety—so I make sure to have a little extra on hand as a “deliberate” leftover. Wild rice has an impressive nutrient profile and adds a nutty earthy quality to the other ingredients. Preparing hash is also a good way to use up other odds and ends of vegetables and herbs. To make the mélange, I start with a half cup of diced onions. I sweat these in clarified butter or ghee, butter, or olive oil for about 10 minutes in a large skillet until quite soft. In the video I use ghee, one of my favorite cooking fats. While the onions are slowly cooking, I prep the rest of the ingredients: I dice my turkey and vegetables so that I’m ready to add these as soon as the onions are tender. I then add 2 cups finely chopped turkey, 1 cup of cooked wild rice, ½ cup diced green bell pepper, and another cup of vegetables as well, which varies depending on what I have on hand. In the video, I add ½ cup each of chopped celery and carrots, but shaved Brussels sprouts, broccoli, or cauliflower—all chopped small— are delicious too. If I have ½ cup of chestnuts, I add those as well. To moisten the ingredients, I stir in ½ cup of chicken or turkey broth, about ½ teaspoon dried thyme (or 2 teaspoons fresh), ¼ teaspoon dried sage (or 1 teaspoon fresh), and ½ to ¾ teaspoon salt, depending on how salty my broth is. I cook the mix uncovered over medium heat, stirring from time to time, until the broth is absorbed and the flavors have married. I sprinkle a generous grind of fresh pepper and a tablespoon of fresh-chopped parsley over the dish. This is truly a versatile one-pot meal. 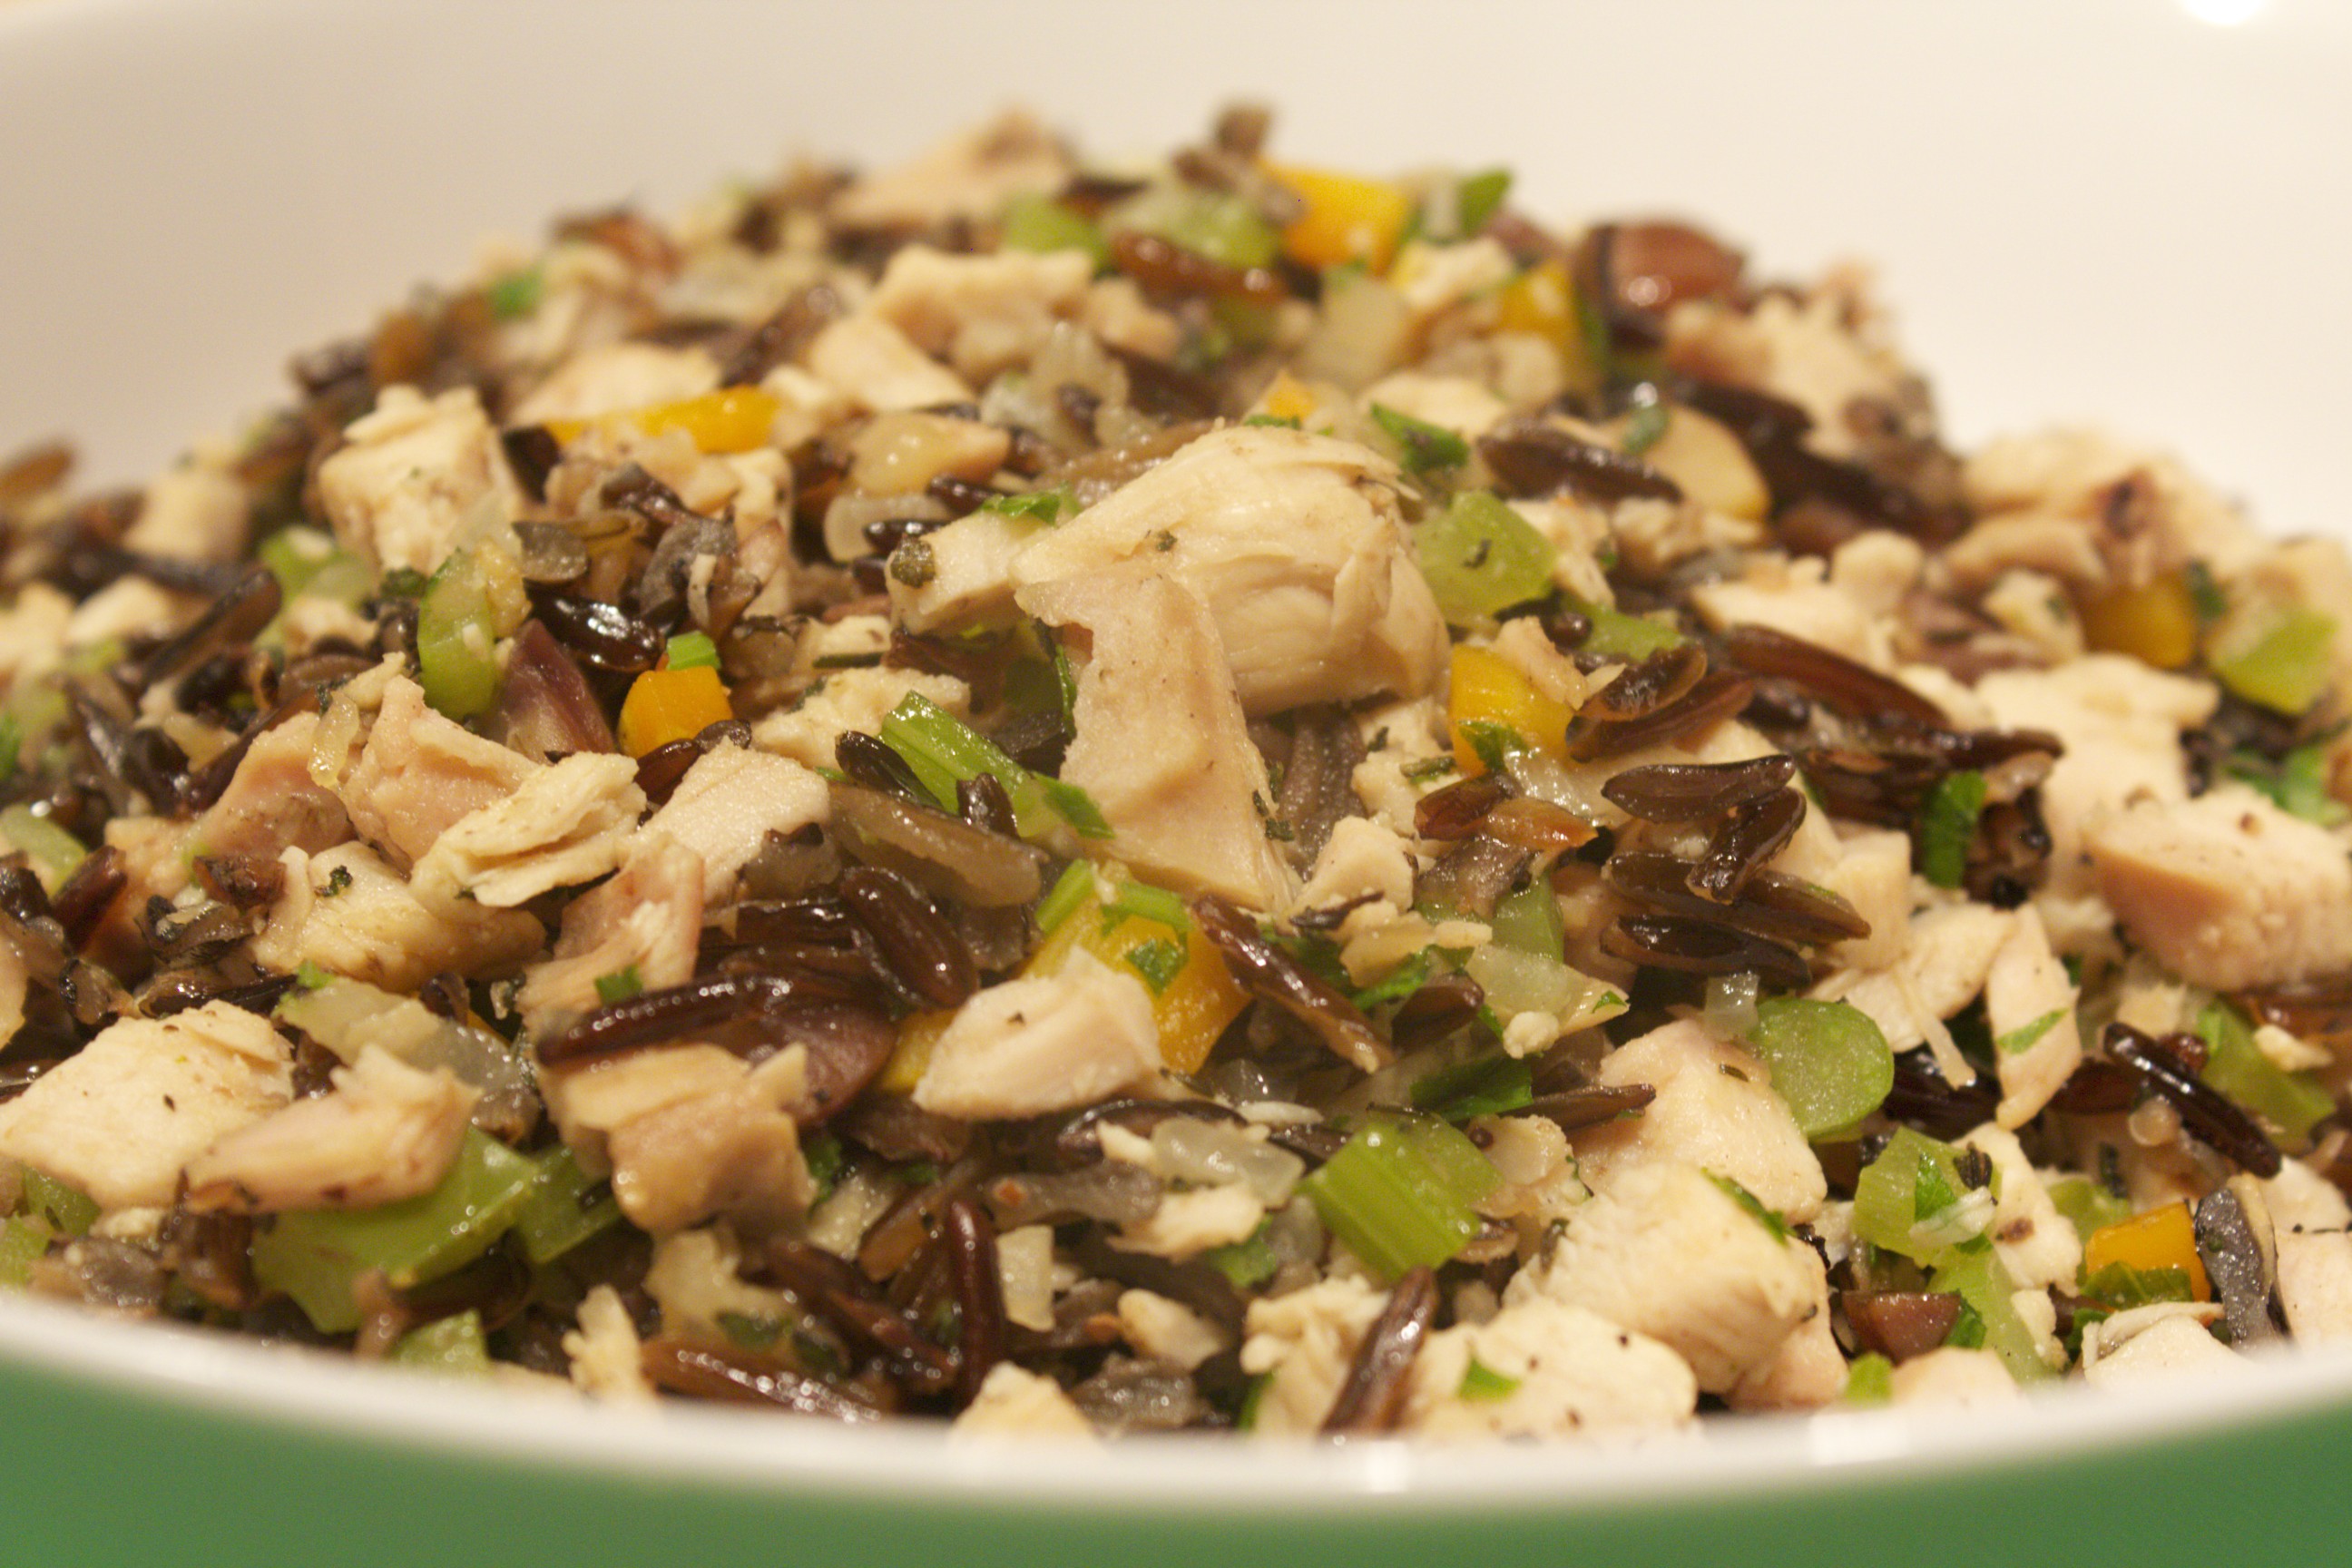 Turkey Hash with Wild Rice Share on Facebook and Twitter | Lunch, Main course | No comments
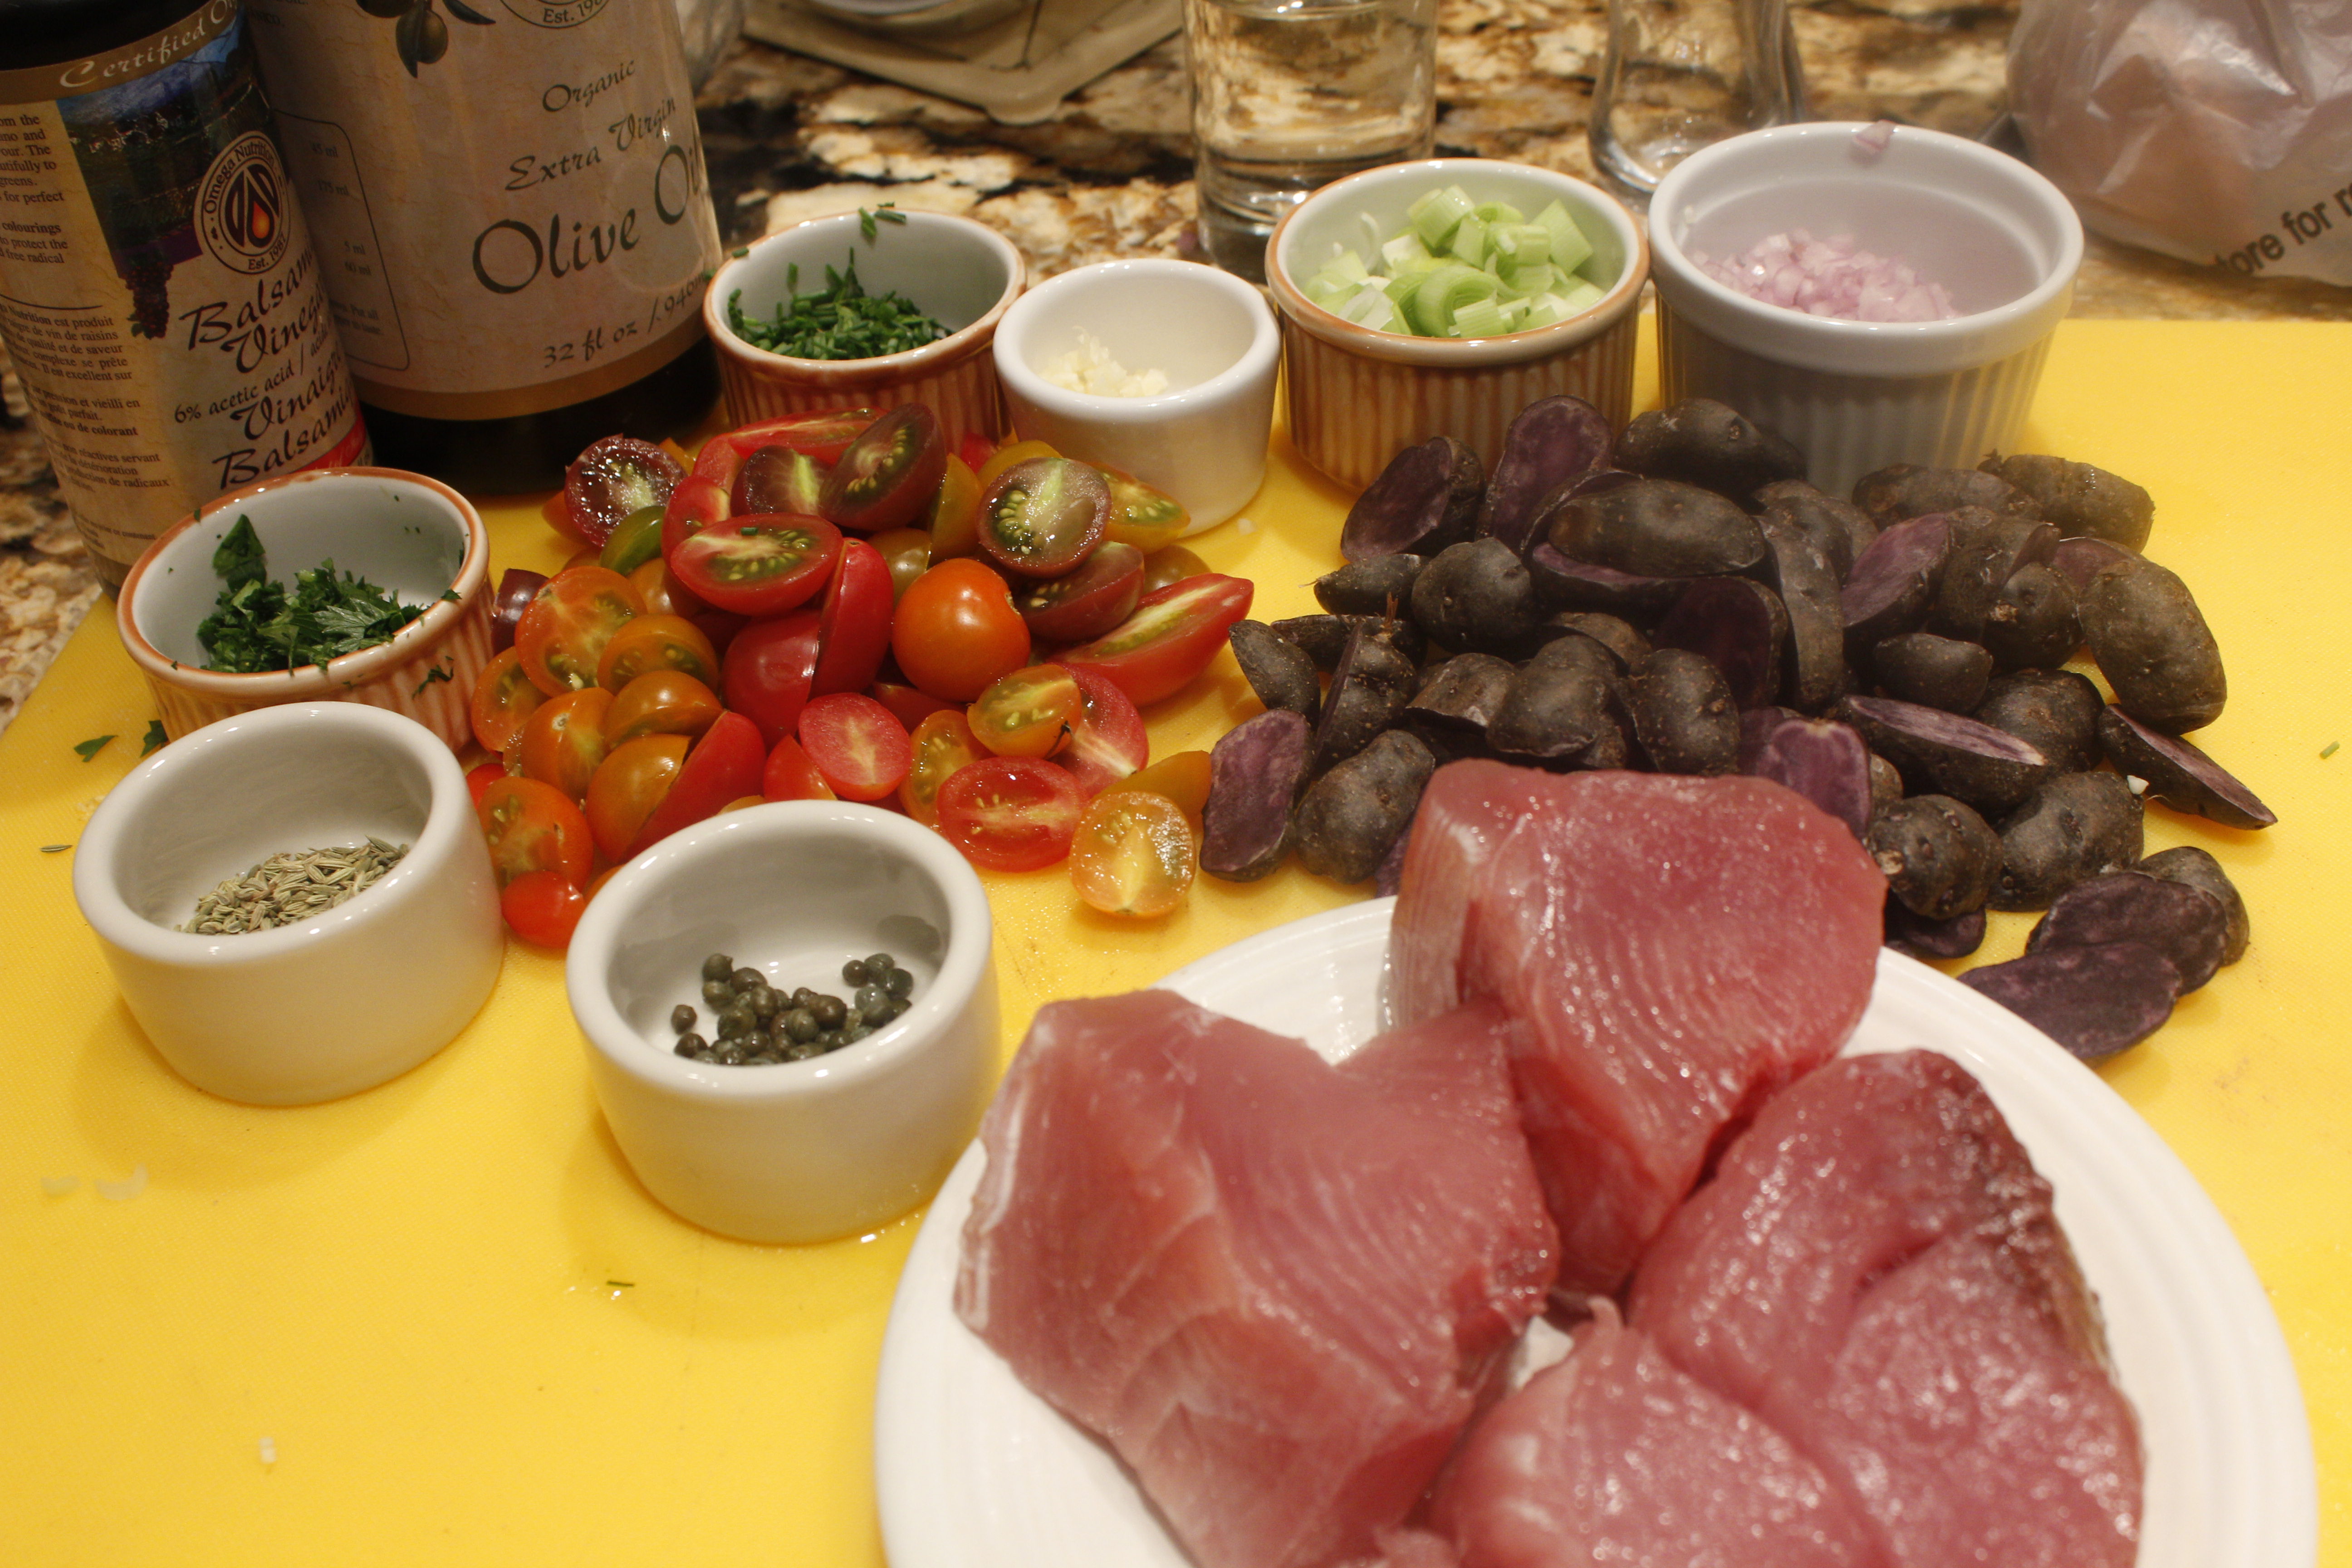
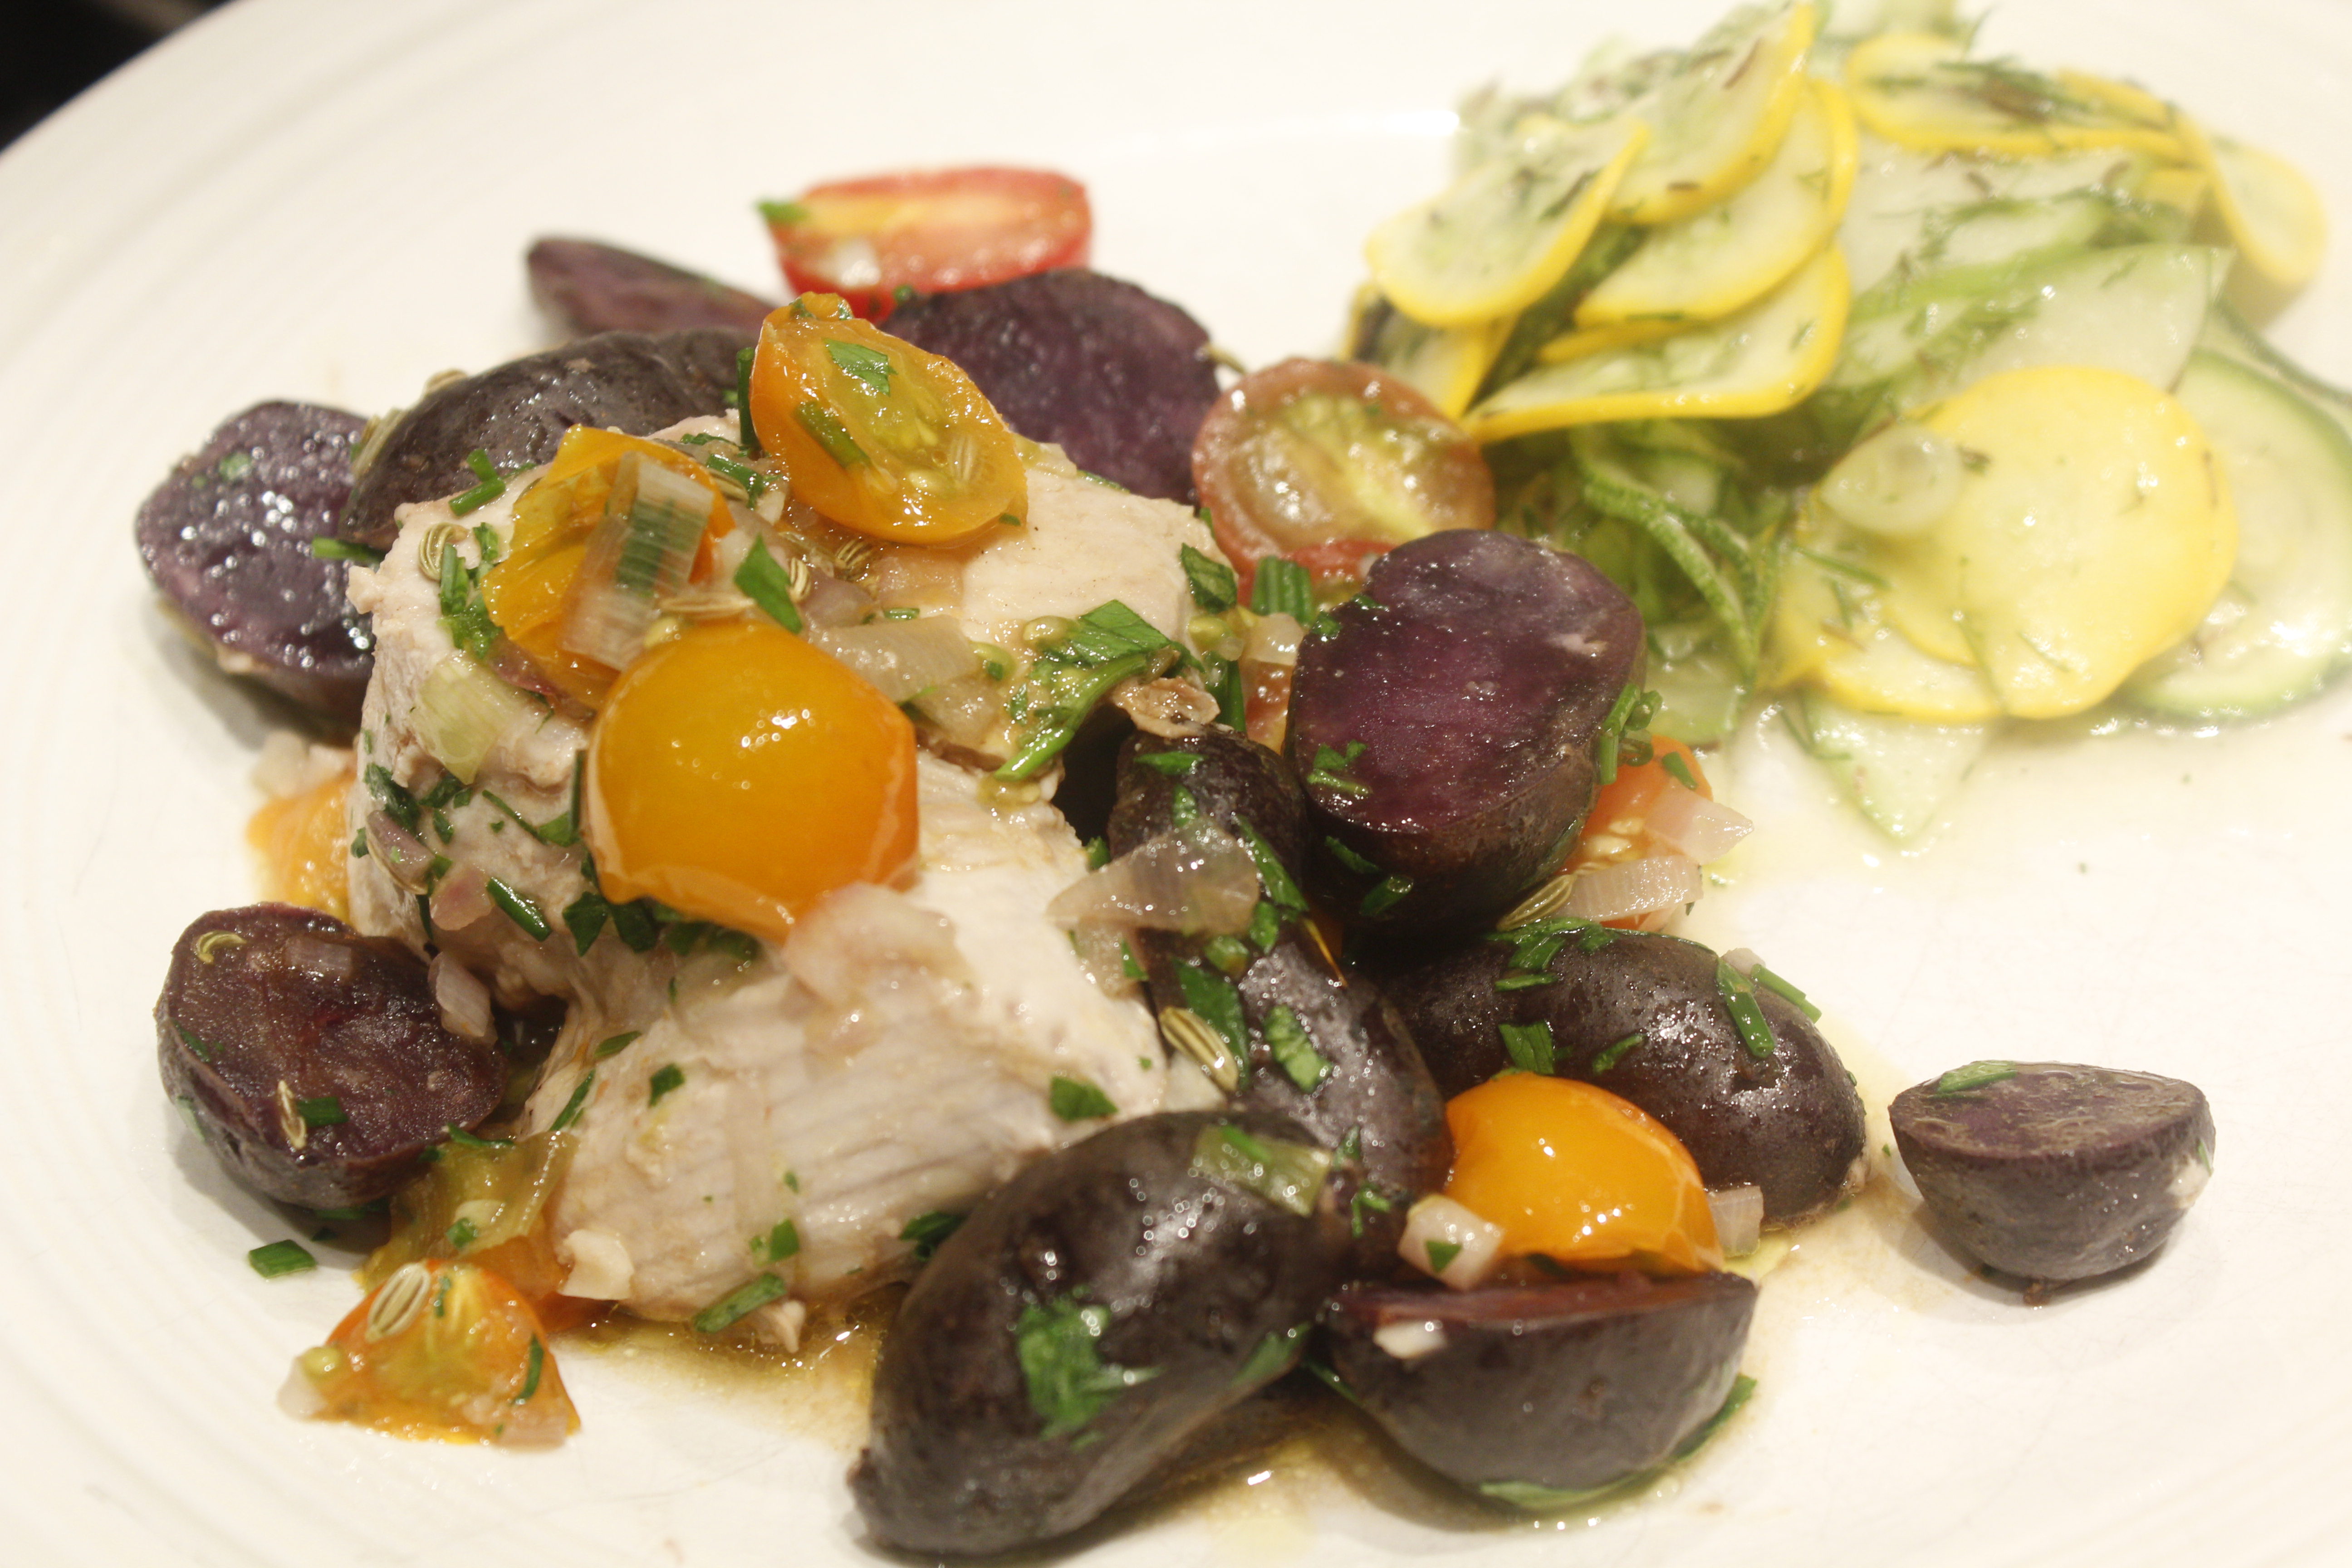
Sun-gold Tomatoes with Purple Peruvian Potatoes Recently, the greenmarket has had beautiful thick slabs of fresh tuna caught off the coast of Long Island. Bins of purple Peruvian potatoes have beckoned me as well. I love their appealing purple flesh and the fact that they are something like 40 times more nutritious than white potatoes. The summer sun gold tomatoes taste like candy, so I haven’t been able to resist buying scores of those. I started the dish in a large pan with a few leeks, then added the potatoes, and cooked the whole lot for about five minutes in a dollop of extra virgin olive oil. I then added the halved tomatoes, shallots, garlic, capers, balsamic vinegar, a bit more olive oil and the tuna. It took only four minutes to cook the dish. I then sprinkled the dish with chives and parsley before serving.
I served the tuna with a thinly shaved zucchini and apple salad with dill and black cumin. It was a delicious lunch!
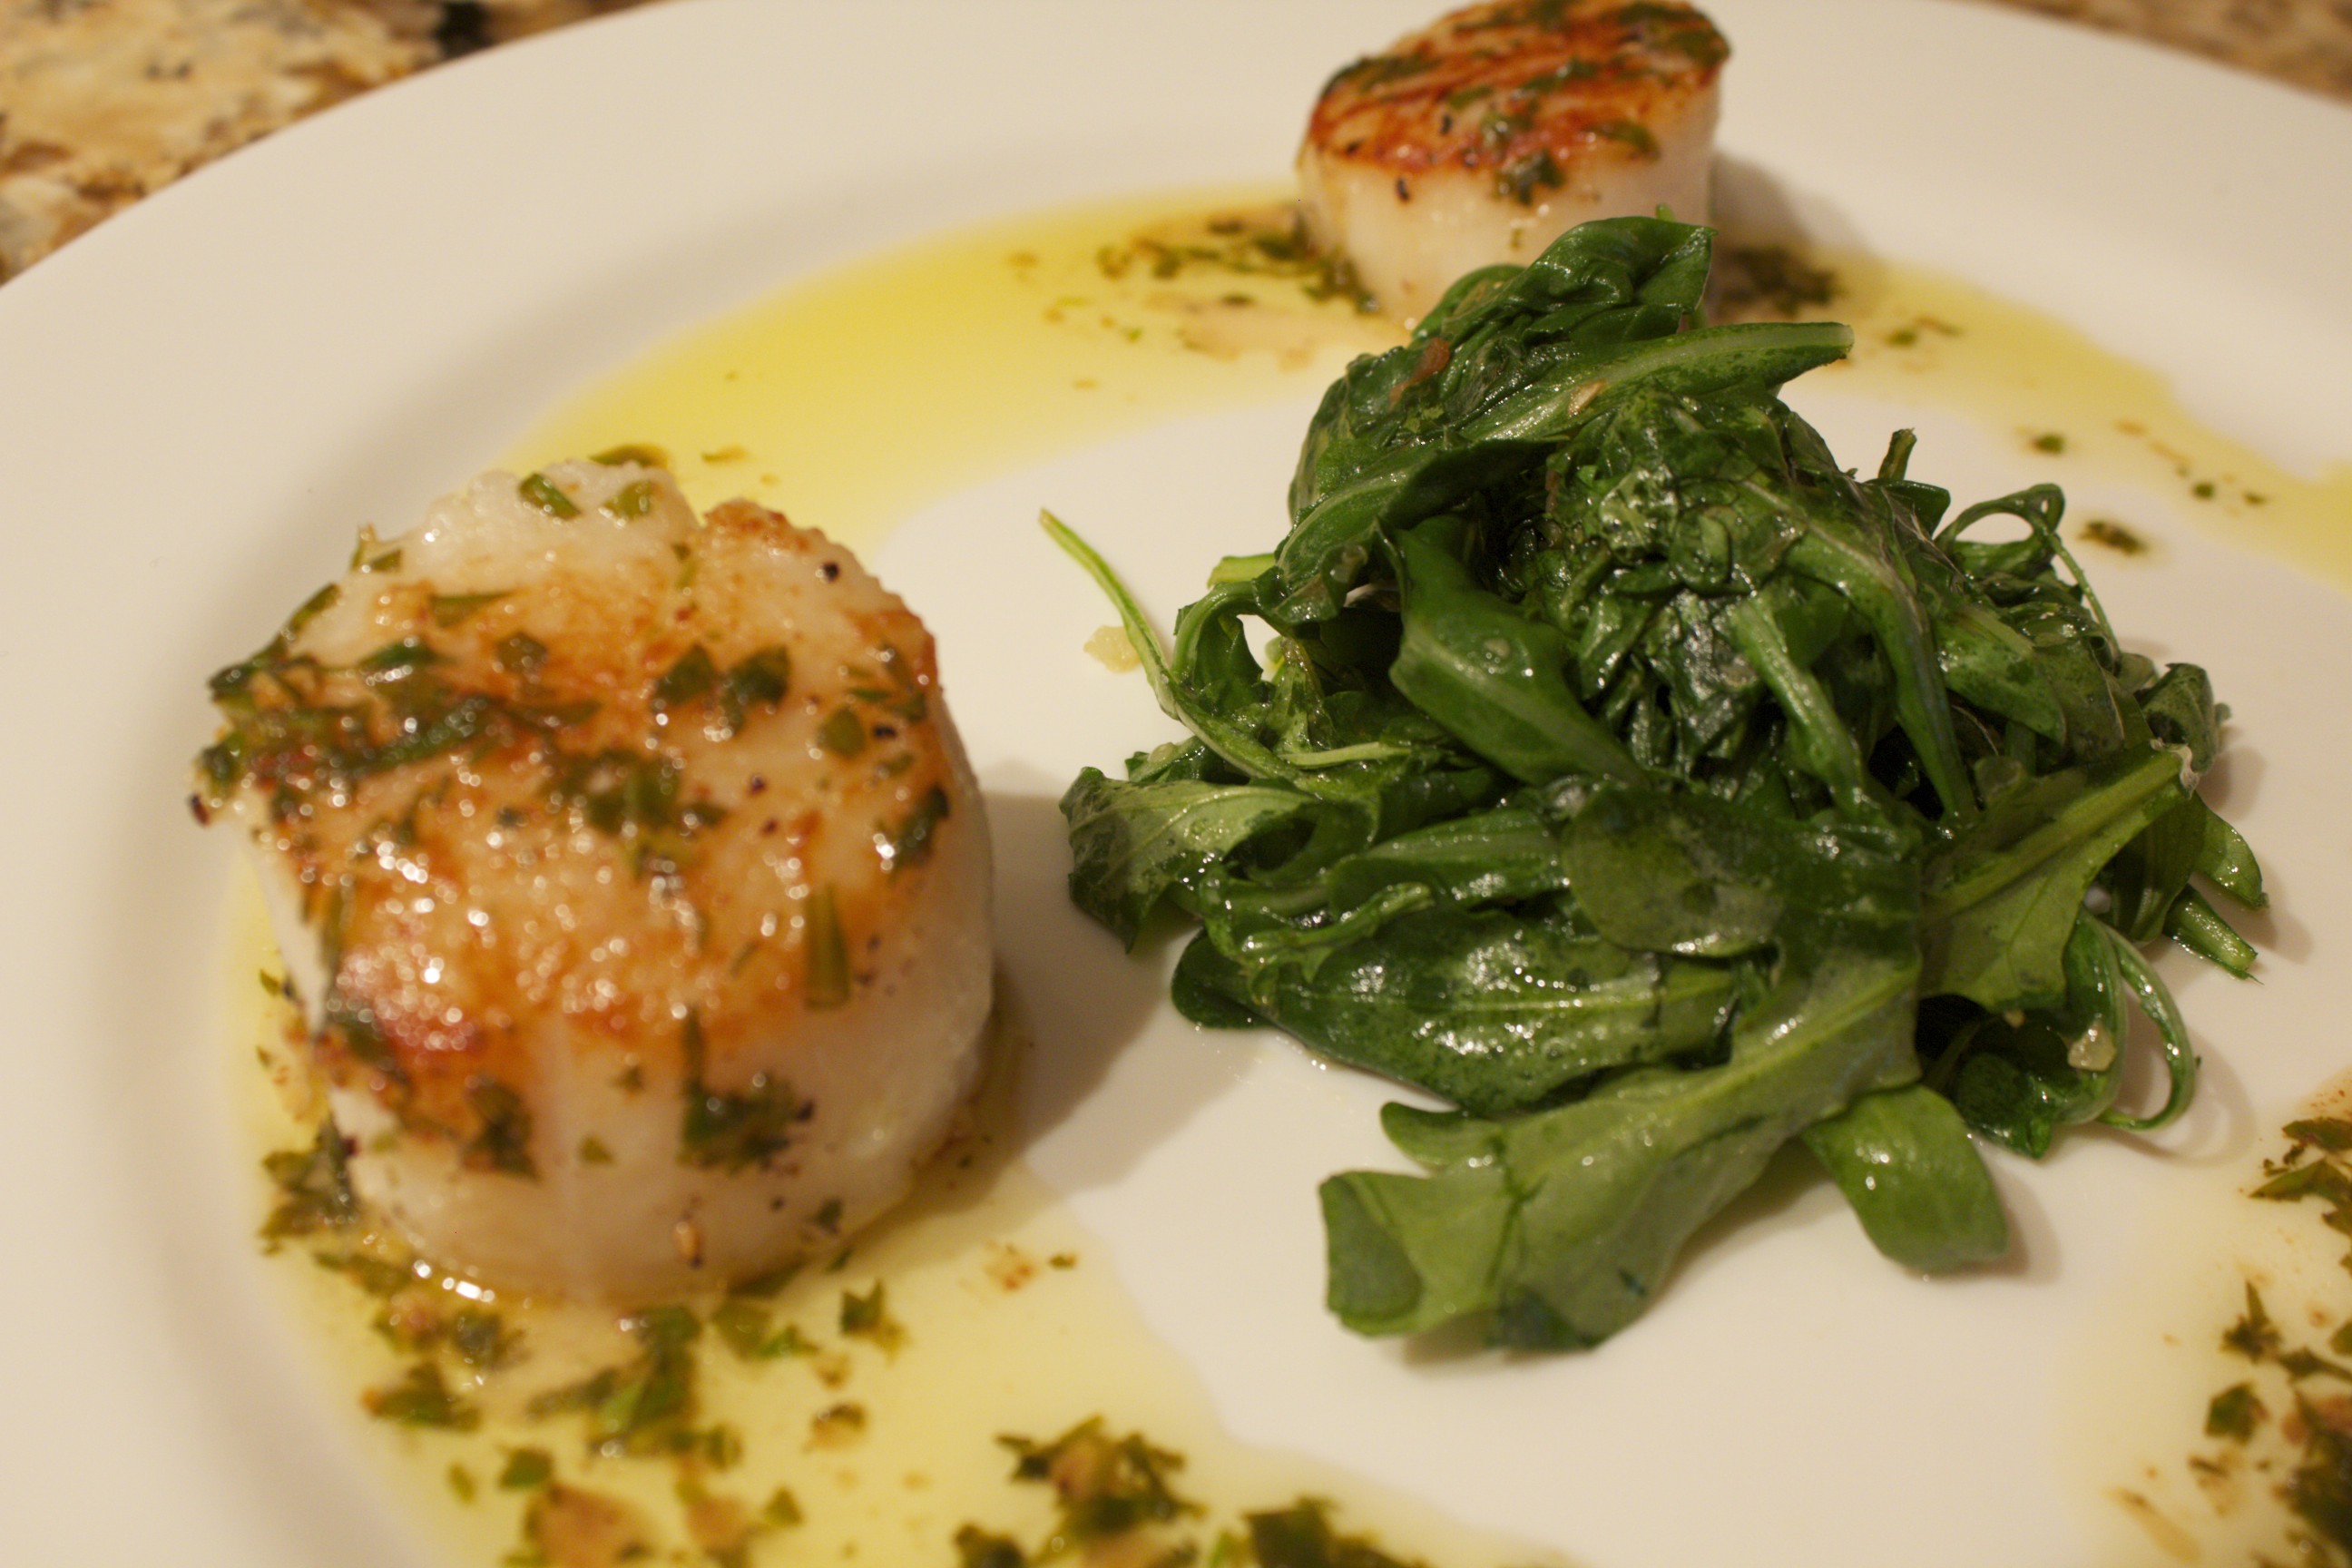
Scallops with Lemon-Tarragon Browned-Butter Sauce and Garlicky Arugula After the heavier foods of winter, spicy and bitter spring greens are cleansing to the body and taste delicious. Peppery lettuces such as arugula and watercress are typically served raw in salads, but they are very tasty when cooked as well. In this video, I show how to make a quick spring meal that you can put together in just 10 minutes. It features seared scallops in a lemony tarragon browned-butter sauce as well as garlicky sautéed arugula. Scallops in Lemon-Tarragon Browned-Butter Sauce Start with the scallops, since they take longer to cook than the greens. Make sure to purchase dry scallops that have not been soaked in any solution. Dry them well with a paper towel, and pull the tough little muscle off. (It is often attached at the side.) Toss the scallops with a little salt and freshly ground black pepper. Heat a thin film of fat in a non-stick or cast iron skillet over medium flame. Fats that are good for this dish include ghee, aroma-free coconut oil, or extra virgin olive oil. Heat the oil over a medium-high flame until your hand, when it’s held one inch above the pan, feels hot. Add the scallops—they should sizzle—and cook for about three minutes, until seared on the first side. Using a tongs, flip the scallops and cook them on the second side for another three minutes or so until they feel firm, with just a little give. Meanwhile, melt 4 tablespoons butter in a small pot on another burner over medium-high heat. You’ll notice that the butter starts gurgling right away, which means that the water content of the butter is evaporating. After about three minutes, the butter will foam and smell nutty. Use a spoon to push the foam aside and see the color of the butter, which should have turned a burnished chestnut color. Immediately remove the pan from the heat and pour in a couple of teaspoons or so of lemon juice to stop the cooking process. Add a tablespoon chopped tarragon to infuse the lemony buttery sauce with a fresh herby flair. Now you have a delicious sauce that is versatile as well. In a medium skillet, add a splash of olive oil with a couple cloves minced garlic. Start heating the oil and the garlic at the same time, which will keep the garlic from burning. When the oil starts to sizzle, and the garlic just starts to take on some light color, add a pile of greens and toss to cook. In the video, I use arugula, but watercress is delicious as well. The greens wilt and are ready in under a minute. Sprinkle with a dash salt and a splash lemon. Greens cook down a lot, so make sure you plan for two cups of loosely packed greens per person. Serve the scallops drizzled with the browned butter sauce accompanied by a mound of the garlicky greens. You’ll marvel at how something so tasty was so easy to make.
Share on Facebook and Twitter | Dinner, Lunch, Main course, Recipes, techniques | No comments
Quick Vietnamese Pho with Fresh Herbs This quick Vietnamese pho, pronounced fuh, as in fun, is a soothing one-pot meal that’s flavorful and light, especially after the heavier foods of winter. Watch the Video Quick Vietnamese Pho with Fresh Herbs The first step is to toast some spices—a couple of tablespoons of coriander, a few cloves, a pieces of star anise, a spoonful of black peppercorns— in a dry heavy-bottomed skillet over medium heat until the spices smell fragrant, which takes only a couple of minutes. I then wrap the spices in a cheesecloth along with some chunks of ginger and onions. l add this bouquet to two quarts of chicken broth (this is where a homemade one really shines) along with a pound of boneless chicken (breasts or legs are fine), a tablespoon of natural brown sugar, a couple of tablespoons of Vietnamese fish sauce, and a few pinches of salt. The fish sauce consists simply of fermented anchovies, which gives the broth authentic Southeast Asian pizazz. After bringing the liquid to a boil, I lower the heat and simmer the broth very gently (so as not to toughen the chicken) for 20 minutes or so, until the chicken is cooked through. I love that I can flavor the broth and cook the chicken all at the same time. While the chicken is cooking, I pour hot water over fettuccine rice noodles, and I assemble the garnishes. I chop some fresh mint, cilantro and basil, cut some limes, slice some red onions, and finely chop a couple of hot chile peppers. When the chicken is cooked, I remove it from the broth and discard the spice bag. As soon as the chicken is cool enough to touch, I tear it into chunky pieces. To assemble the final dish, I ladle the broth over the noodles and chicken, then add the garnishes. I start with the onions and bean sprouts and then add a big handful of the fresh herbs. A sprinkle of the hot chiles and a squeeze of fresh lime at the last minute makes the dish sing! Assembling the dish to order allows me to adjust the spice level for all who are eating. The flavorful herbed broth is nourishing and cleansing, not to mention delicious! 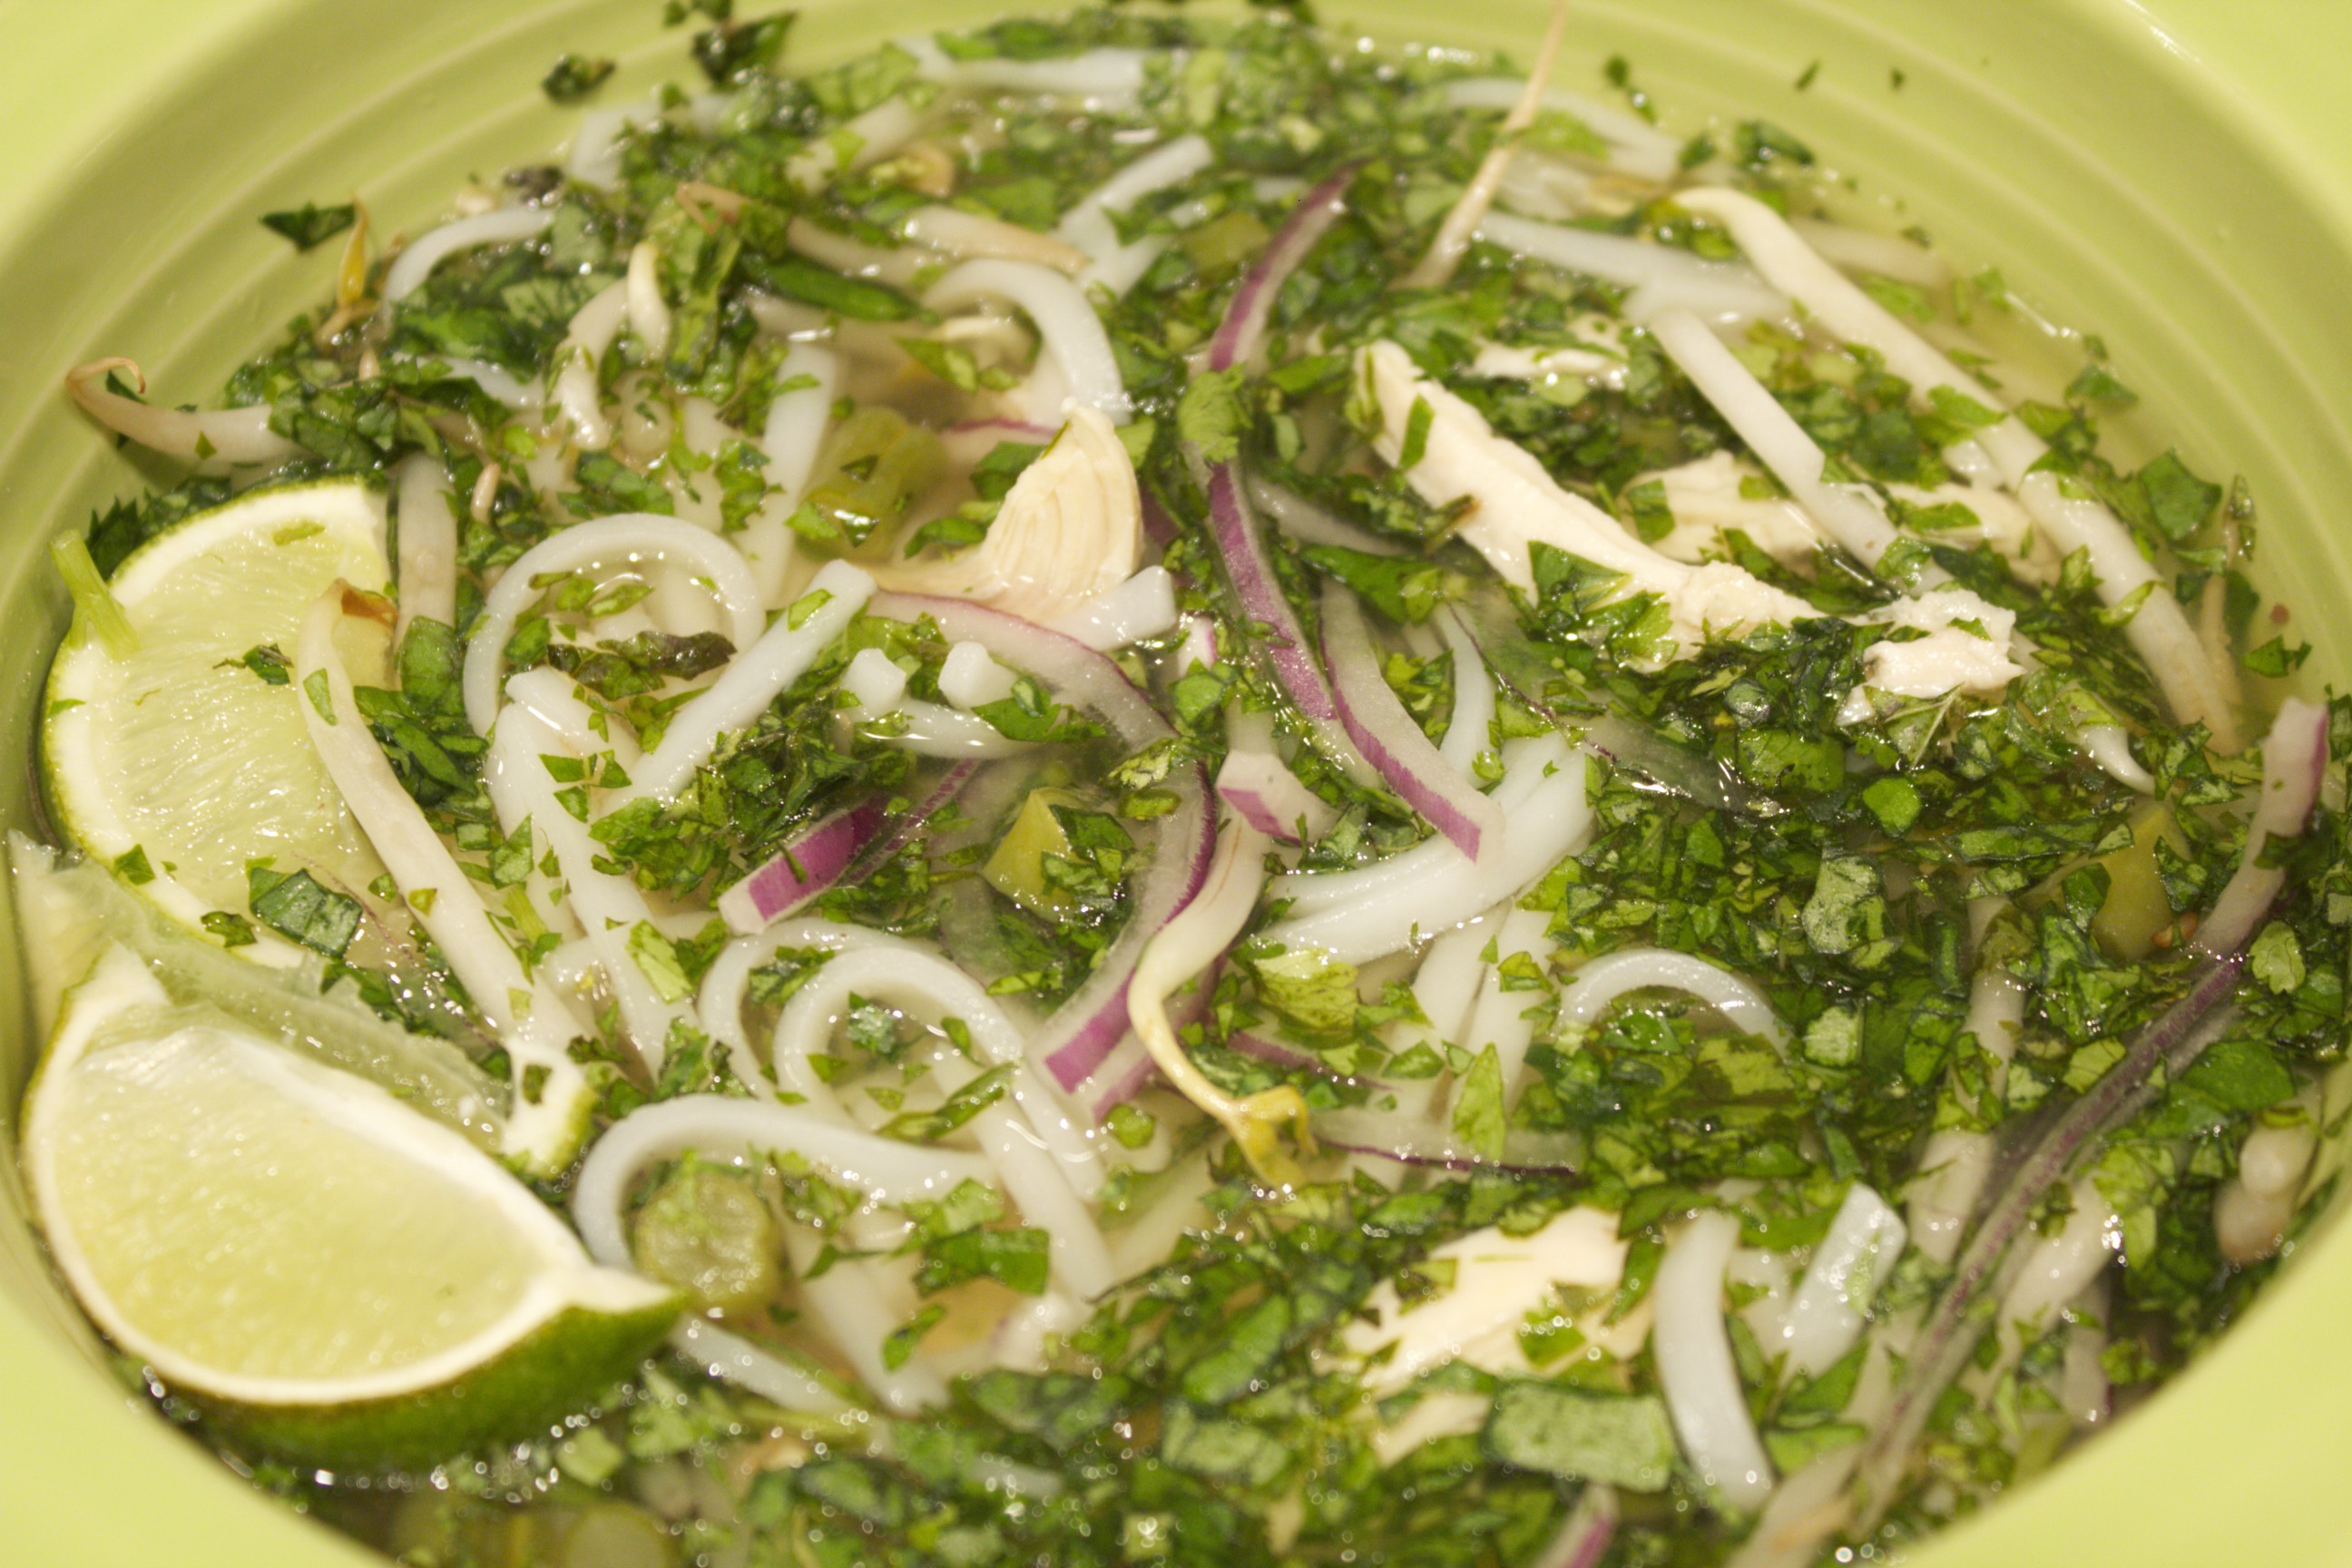 Vietnamese Chicken Pho Share on Facebook and Twitter | Dinner, Gluten Free, Main course | No comments
My Favorite Winter Salad After a season of holiday indulgence and too many meals out, it’s time to begin the new year with a little lighter fare. I’m busy with obligations, but I don’t want to skimp on good food. So I turn to my favorite nourishing winter salads that I can make in minutes. This hearty winter salad that I show on the video consists of arugula, oranges, fennel, and sardines, with a complement of olives, walnuts and feta cheese. It’s composed in such a way that I don’t even need a separate dressing.  Sweet, Salty, Crunchy, Juicy I start with a nest of baby arugula, or watercress, or mesclun greens. In the video, I use arugula with some farmer’s market pea shoots mixed in. I next add an orange that is cut into segments known as supremes. I cut the orange over a bowl to make sure to catch the juices that will become part of the dressing. I sprinkle the greens and orange with salt and then add a layer of paper-thin sliced fennel, which is arguably the most appealing way to eat raw fennel. Using the mandolin is the easiest way to get such slices. Next, I sprinkle in some black olives—a flavorful variety such as kalamata or nicoise—followed by a handful of walnuts. I then crumble my favorite feta cheese, a sheep’s milk feta, over the salad. Finally, I crown the salad with sardines. I use sardines packed in extra virgin olive oil, so that the oil from the tin of the sardines becomes part of the dressing, mixing with the juice of the oranges. Every bite is exciting—a medley of sweet, salty, juicy, and crunchy. Moreover, this salad is a nutritional winner, packed with a range of nutrients, from omega 3’s to vitamins C and E, and loaded with phytochemicals and minerals as well. You can pack this salad to take on the go. Layer the greens with the fennel, olives, walnuts, and feta. Put the juicy orange slices in a separate container. Salt the salad, add the oranges, and top with the sardines right before eating. Share on Facebook and Twitter | Fish, Greens, Kitchen Tips, Lunch, Main course, techniques | No comments
|