|
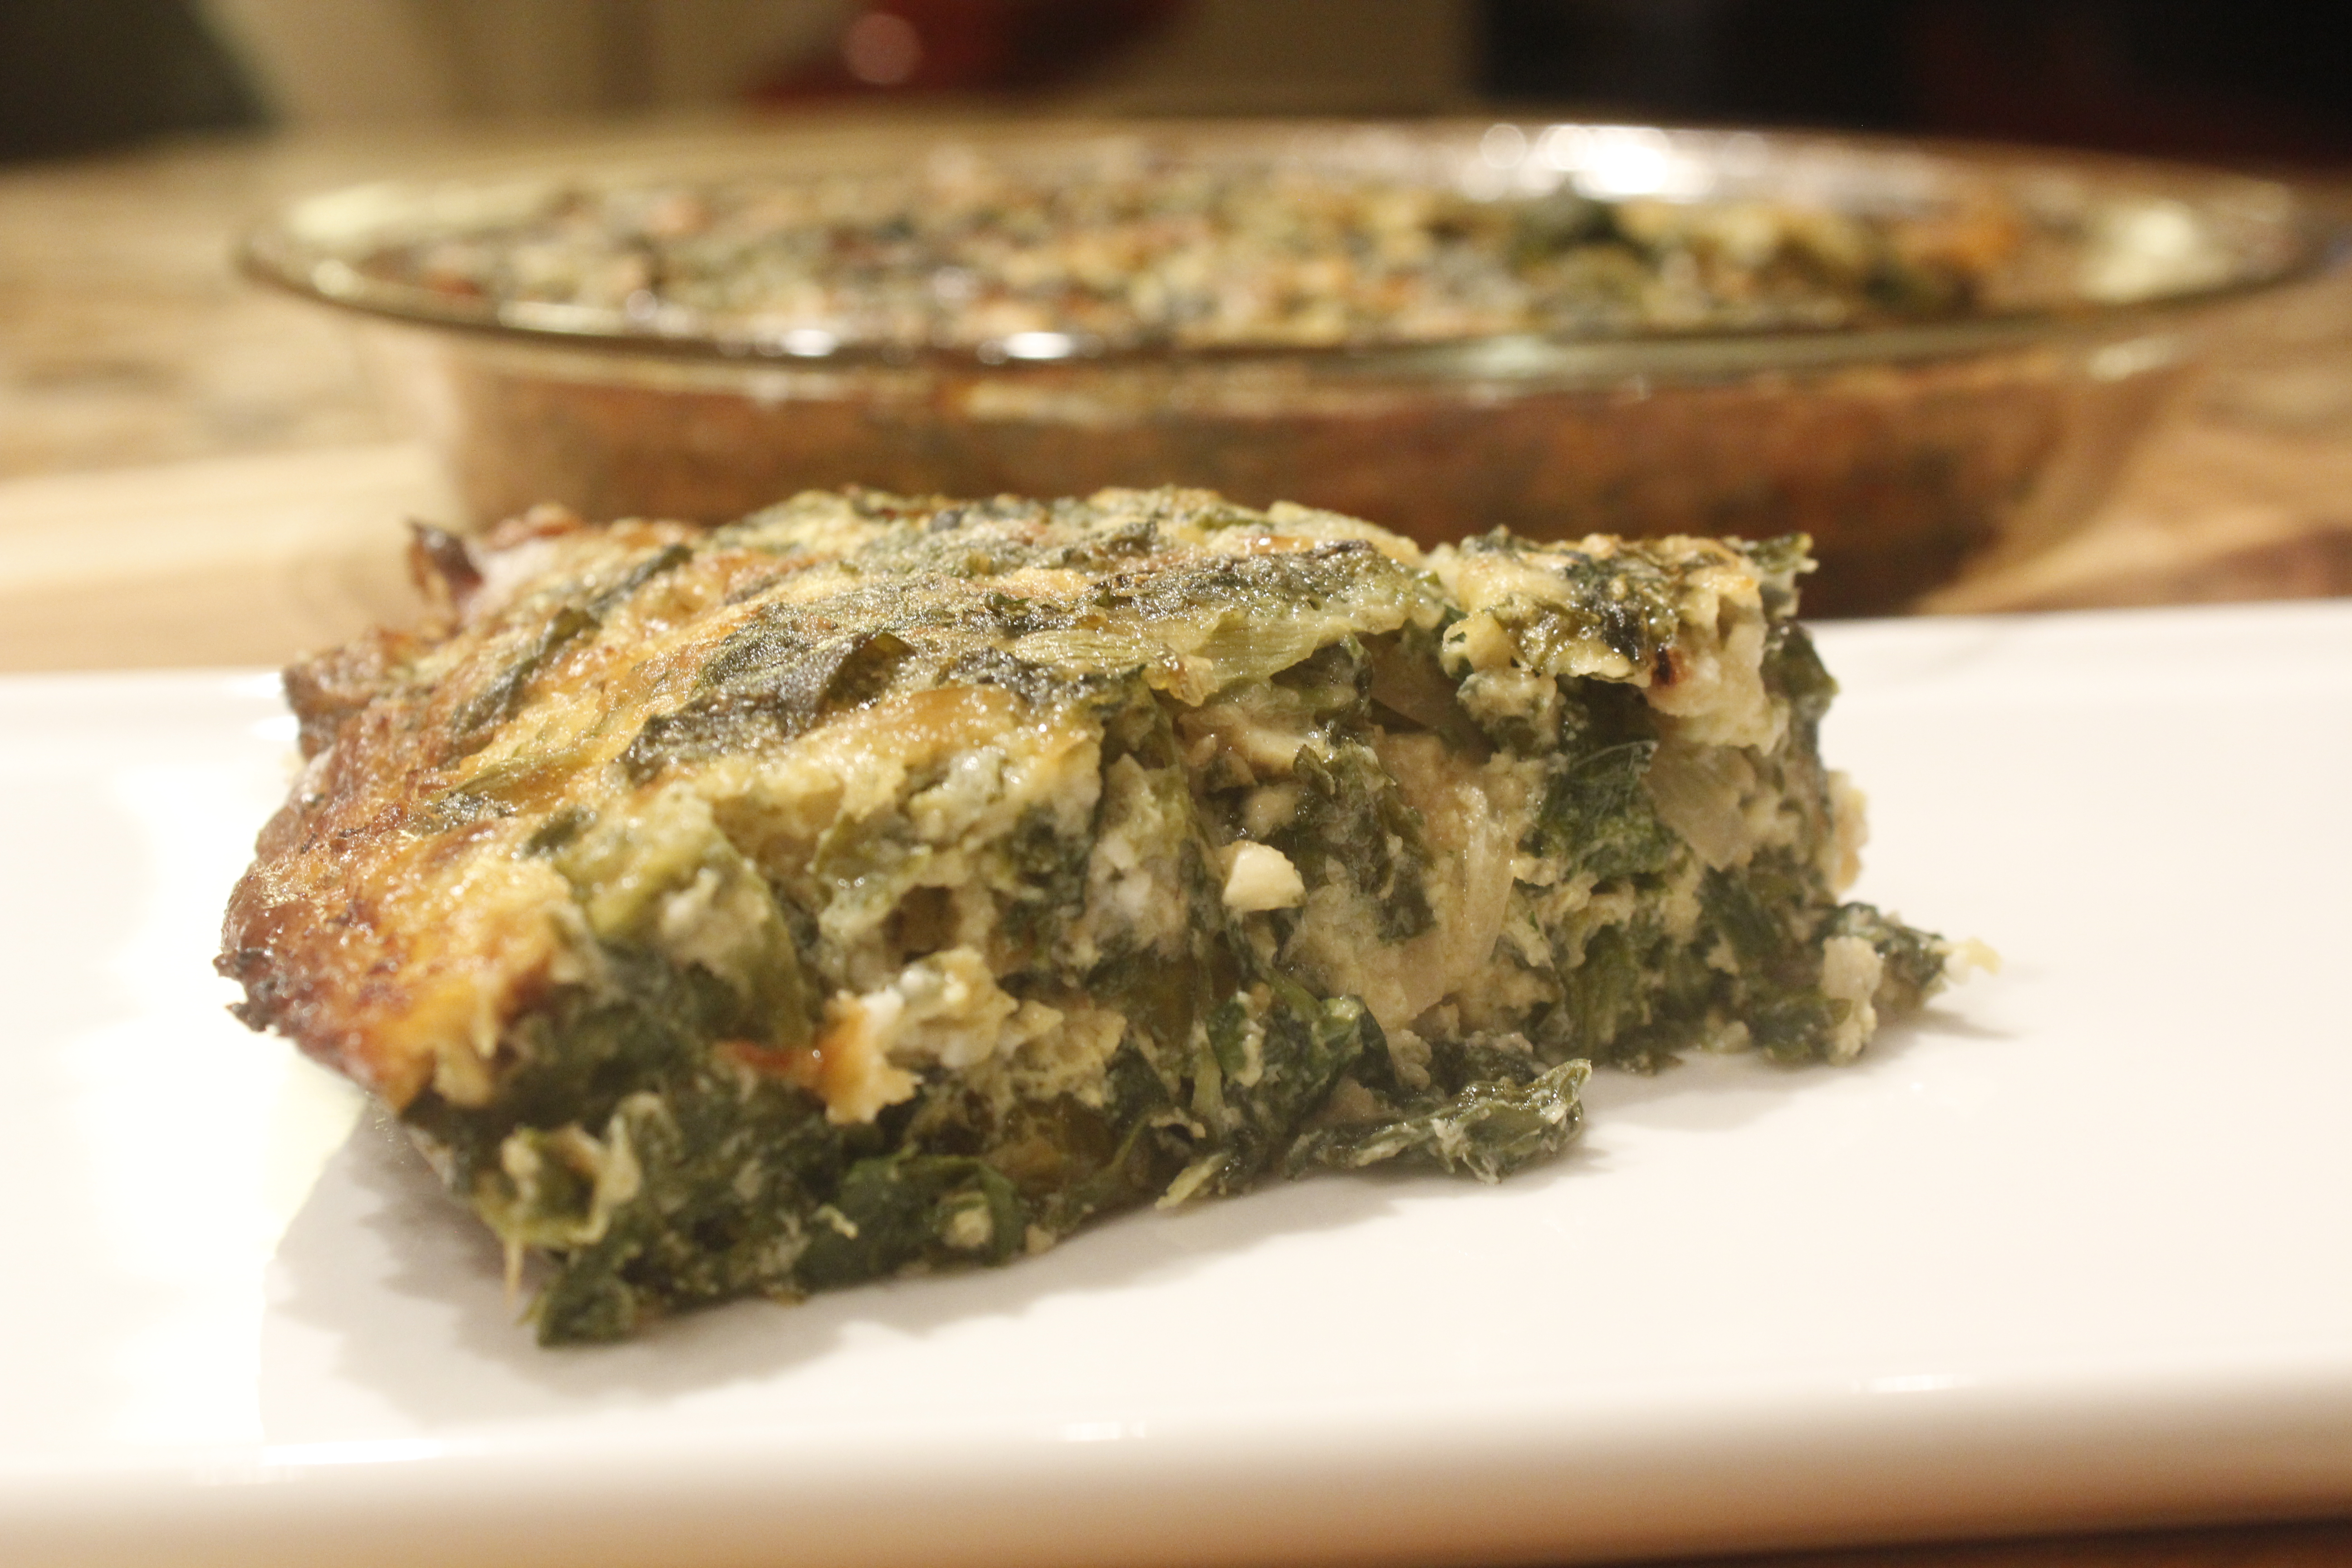
Spring Greens Pie (kuku)
One of the first signs of spring is the abundance of greens that show up in farmers’ markets and grocery stores. In today’s video on how to make a greens kukuI take advantage of the copious selections and demonstrate a kuku, a Persian frittata which resembles a crustless quiche. While it’s baking, the pie forms a bottom crust as well as a top crust. The result is a luscious spring greens pie. The selection of greens that I show in the video includes chicory, which adds a delightful bitterness, as well as arugula and watercress, which lend a bright peppery bite. The more exotic additions include two that are just starting to show up at the farmer’s market: Claytonia, a delicate mild-flavored green; and sorrel, a delightfully lemony herb with a bright tart liveliness. Since this kuku lends itself to countless variations, you can also make it with the other spring greens you find or fancy, and mix in some fresh leafy herbs: Basil, chives, cilantro, dill, and chervil are all excellent choices. Begin by wilting the greens. A drop of water in the skillet gets the leaves off to a good start. Start with the amount that will fit in the pan, and add more as the greens start to cook. Add handfuls to the skillet, and use a tongs to turn the uncooked leaves to the bottom of the skillet. The heat of the pan and the cooked greens help cook the raw ones quickly. You’ll want about 4 cups of cooked greens and mixed herbs total; to end up with this amount, begin with 2 to 3 large bunches—about 3 to 4 pounds before cooking. No need to wilt the fresh herbs; simply chop them. When the greens are sufficiently wilted, transfer to a strainer set over a bowl, and allow to cool and drain. Press the greens against the strainer to remove any excess liquid. Transfer to a cutting board, chop into bite-sized pieces, and set aside. While the greens are cooling, warm enough olive oil to coat the bottom of a medium skillet over medium heat, and add a heaping cup or so sliced onions. Sauté for a few minutes, toss in a few cloves minced garlic, and cook until the onions are caramelized. Dollop a tablespoon butter (or coconut or olive oil) onto a 9-inch pie plate, and set the plate in a 350 degree oven to warm in the pan for a few minutes as you mix the ingredients for your pie together. In a medium bowl, whisk together 4 eggs. Stir in 1/2 teaspoon salt, a tablespoon flour and 1/2 teaspoon baking powder. Since you’re using such a small amount of flour, even unbleached white flour is okay—so long as you don’t have gluten intolerance. The flour in combination with the baking powder lends an extra lift to the pie, making it especially airy. Stir in the chopped greens, the fresh herbs, the onions and the garlic. In the kuku in the video, I add also a cup of crumbled sheep’s milk feta as well as a cup of sheep’s milk gruyere. That touch of flavorful cheese imparts rich flavor, but the kuku is already certainly scrumptious when made without the dairy. Stir in a generous dusting of black pepper, and mix everything well. You’ll notice that the eggs bind the greens together inconspicuously and disappear into the batter. By this time, the butter will have melted and the pan will be hot. Remove it from the oven and swirl the butter around so that it coats the pan evenly. Pat the filling into the pie plate, and return to the oven to bake for about 20 minutes, until you see some browning around the sides. Dollop another tablespoon of fat on top—the heat of the oven will spread it—and return the kuku to the oven for another 20 minutes or so, until it develops a gorgeous deep golden top crust. This pie stays fresh for days in the refrigerator. You can just cut yourself a piece and heat up what you want to eat, or reheat the whole pan. The one-dish meal can be served any time of the day for a light meal or snack. In Judeo/Christian traditions, eggs are a symbol of rebirth and are featured on spring religious holidays. It feels appropriate to celebrate this long-awaited season with this delicious greens and eggs medley.
Share on Facebook and Twitter | Eggs, Greens, Main course, techniques | No comments
Very Berry Power Smoothie Sometimes an antioxidant, nutrient-dense smoothie makes a quick and powerful meal. The one in this video is rich and filling enough to keep your energy and blood sugar stable for hours. Best of all, it tastes delicious. It’s a combo of mixed frozen berries, yogurt, avocado, raw honey, coconut oil, egg yolks from pastured eggs, and coconut water. I also added a splash of macadamia nut oil because I like the nutty flavor. I made this video for Vital Choice, a company whose products I love. Not only do they have the finest wild Alaskan seafood, but they also have some other choice products such as frozen berries and macadamia nut oil, an oil that has similar nutritional properties to extra virgin olive oil. They presented the video on their newsletter, and I received the question from a viewer of why I don’t use the egg whites in the smoothie. Here is my answer: I don’t use the raw egg white because it contains a protein called avidin that interferes with the body’s absorption of biotin (Vitamin B7). It also contains a protein called “conalbumin,” which binds to iron (making it not biologically available to the body.) Also, trypsin inhibitors make digestion of the protein in the raw egg white more difficult. All of these is deactivated when the white is cooked. That being said, I still may use a raw egg white in a classic Caesar salad dressing or–once in a great white, a mousse–but I don’t make a practice of it, especially for something like a breakfast smoothie. The raw yolk, on the other hand, is great to eat raw or barely cooked. It’s great to have a lot of quick breakfast ideas in your repertoire.
Share on Facebook and Twitter | Breakfast, Eggs, Fats & Oils, Fruit, Health Tips, ingredients, Natural Sweeteners | No comments
Poached Eggs Poached eggs not only are suitable for brunch, but with the right accompaniments, make a light and nutritious supper as well. If you keep in mind three basic pointers, poached eggs are not difficult to master. With fresh eggs, the right temperature water, and a little care in adding the eggs, you’ll have beautifully formed creations every time. Watch this demo to see all three key steps. Use the freshest eggs that you can find to keep the proper shape of the white intact. Very fresh eggs—like that kind that you get from your local farmer—cook up perfectly without anything added to the water. If your eggs are not farm-fresh, add a teaspoon salt and a couple of teaspoons vinegar to your pot of simmering water to help coagulate the egg whites. Have the water ready at a simmer. You don’t want the eggs to be torn apart by agitation, which is what faster boiling water will do. On the other hand, if the water is not hot enough, the eggs will not cook quickly enough and the whites of the eggs will spread. Gentle bubbles in the water are the cue that the temperature is correct. Break the eggs one at a time into a dish or small plate. Create a little whirlpool by swirling a spatula or spoon in the water. Then drop the eggs— one at a time— into the whirlpool. (You can also slide the eggs in along the sides of the pot.) Simmer 3 to 5 minutes, until the whites are coagulated but the yolks are still soft. Remove the eggs from the pan with a slotted spoon or skimmer. Drain very well and serve. You can trim off any ragged edges if you like. If you want to make a large number of poached eggs but not serve them right away, immediately plunge the cooked ones into cold water. Reheat briefly in hot water right before serving. The classic here is eggs benedict, and yes, it is mighty tasty.  Classic Poached Eggs For a variation, try serving the eggs over a steamed artichoke and smoked salmon in lieu of the English muffin and bacon.  Poached Eggs over Artichokes and Smoked Salmon One delicious and light way to serve poached eggs is on a bed of wilted spinach and smoked salmon. I make a quick blender sauce of yogurt, avocado, cilantro, a bit of salt and a sprinkle of lime juice and ladle it over the top. It’s delicious and satisfying.
Share on Facebook and Twitter | Breakfast, Eggs, techniques | No comments
Eating for Radiant Skin: part 3 A Word about Fat: Fat is important for skin health. It’s a mistake to be on a low-fat or no-fat diet. You need fat in order to digest, transport, and absorb Vitamin A,D,E, and K. It’s soothing to the nervous system. Every cell in the body has a surrounding membrane – which is where communication between cells take place – that is made up of fat. You need an array of fats. You need saturated fats to maintain structure; mono and polyunsaturated fats to maintain elasticity. All fats and oils that we consume are made up of a combination of monounsaturated, polyunsaturated, and saturated fats. Polyunsaturated fats, also know as omega 3’s and 6’s, are the ones your body does not make. These are called essential fatty acids because you have to get them from food sources. Omega 3’s are good for countering inflammation in the body. Good sources for omega 3’s are fatty fish such as sardines, anchovies, tuna, and salmon; nuts, seeds, and organic eggs. Because of the standard American highly refined diet, most people have far too many Omega 6’s and not enough Omega 3’s. The ideal ratio is somewhere between 1 to 4 times as much omega 6’s as 3’s. Most Americans get 20 times more omega 6’s than 3’s. Poor quality oils and feed lot meat contribute to an excess of Omega 6 fatty acids in the body. It is easy to get good quality Omega 6’s from whole nuts and seeds, where they are less likely to be rancid. Refined polyunsaturated oils are unstable; they are exposed to high temperatures, chemical solvents, light and oxygen. The essential oils in them are destroyed, and they are rancid and oxidized. They suppress the immune system and cause inflamation. Eating a lot of polyunsaturated oil increases cholesterol in the tissues and cell membranes. The best fats for cooking, which can take the heat without becoming rancid or oxidized, are butter, ghee (clarified butter), olive oil, coconut oil, and sesame oil. To get a good supply of omega 3’s, I turn to the tinned fishes that I keep in my pantry. From these pantry staples I have developed nutritious, delicious meals that I can get on the table in minutes.  Wild Salmon, Mackerel, and Sardines from Vital Choice A couple of years ago I met the folks at Vital Choice when I was at the wise traditions conference. They had a lot of samples of their fish, including everything from the tinned mackerel, sardines, and salmon to the wild king salmon. They were by far the most delicious tinned fish I had ever tasted, and I was impressed with the flash frozen salmon as well. We were served smoked cod from them as a first course as well, another delicious fish they sell. I returned home from the conference with multiple tins of each pantry staple and I ordered a lot more stuff when I returned home. Now I make sure to keep a supply of the flash-frozen salmon as well in my freezer. (By the way, the Vital Choice catalogue is extensive, and among other products includes macadamia nut oil, dark chocolate, and a variety of different kinds of fish oil.) One of my super quick go-to lunches is either the mackerel (or sardines) mashed with avocado, lemon, and salt on a bed of greens. I eat it on a bed of greens. Here’s a quick video on how to make it: Here’s a composed salad made with the sardines:  Composed Sardine Salad Here’s a quick video on how to make it: Another quick dish that I make a lot is with the flash-frozen wild salmon.  Salmon in Dashi Here’s the video on how to make this: This last dish is made with the canned salmon and fresh salmon roe.  Salmon Frittata with Salmon Roe and Avocado Salmon roe is a nutritional powerhouse, loaded with anti inflammatory omega 3’s as well as Vitamin A and D. Here’s how to make it: Delicious, nutritious, fast, and easy!
Share on Facebook and Twitter | Breakfast, Dinner, Eggs, Fats & Oils, Health Tips, Lunch, Main course, Pantry Items | No comments
Hurricane Sunday Comfort Food Hurricane Sunday was nursery night all day. We stayed in cozy clothes and ate breakfast for every meal. A couple of noteworthy highlights: Mochi with avocado, smoked salmon, and fresh dill. Mochi recently came back on my radar. The sticky pounded rice squares are available in the refrigerator section of natural food stores. Cut off a square no bigger than 2×2 and bake it at 450˚F for 10 minutes, until it puffs. A toaster oven works just fine. Slice open a pocket and fill it with whatever you like, then make sure to eat it while it’s hot and gooey. Another favorite combination is mochi (raisin-cinnamon) with almond butter and sliced bananas with a drizzle honey.  Mochi with Avocado, Smoked Salmon, and Fresh Dill Supper continued in the breakfast mode: Baked eggs with Fresh Corn Polenta I pureed the kernels from a couple of ears corn, sautéed them in a little butter, then added about ¼ cup of corn grits, ¼ teaspoon salt, and a cup water. I cooked it in a medium skillet, stirring frequently, for about 5 minutes, then stirred in a sliced roasted red pepper. I transferred the whole corn mass to a pie plate, made a few craters, and cracked an egg into each indent.  Ready to Bake I sprinkled a lttle salt over the eggs along with a few drops water, and baked them in a 350 degree oven for about 25 minutes. Seriously delicious.  Baked Eggs with Fresh Corn Polenta Share on Facebook and Twitter | Breakfast, Corn, Dinner, Eggs, ingredients, Main course, Recipes | No comments
Grazin’ Angus Acres Eggs From the Union Square Green Market If you want eggs from chickens that are truly roaming around outside, you have to go for what is called “pastured” eggs. These are the types of eggs that one usually finds when buying at a greenmarket, farm, or community buying club. Pastured chickens are free to roam, peck, and wander around in the fresh air. They eat supplementary feed to round out their diet of foraged bugs, worms, and fly larvae. Pastured eggs have beautiful orange yolks, which stand up proudly on top of the glossy whites. Pastured eggs are loaded with Omega 3’s and beta carotenes. They taste immeasurably better and have more vital energy than a supermarket egg, even the organic variety. I’ve never heard of a pastured egg from a well-treated healthy chicken containing salmonella. It’s a given for me that these eggs are definitely worth seeking out.  Grazin' Angus Acres Eggs That being said, even at Union Square there’s quite a selection of eggs to choose from, and a price range that goes from 4 to 8 dollars a dozen. I wanted to find out why this was so. To satisfy my curiosity, I spoke at length two days ago to the farmer manning the booth at Grazin’ Angus Acres. I asked him why his eggs were so much more expensive than everyone’s at the market. What I got was an interesting earful of details about his farming methods. Grazin’ Angus Acres 450 acre farm, located in Ghent, New York, is for grass fed and finished Black Angus beef. They also have pasture raised chickens for eggs. During the summer months they also raise chickens for meat. The owner Dan Gibson says “it’s all about the grass.” He works an additional couple thousand acres where he raises grasses and hay to feed the cattle and chicken throughout the winter. Dan proudly displays pictures of his egg mobiles and his happy chickens roaming on the grass. The farmer at the booth told me that one of the reason Dan’s eggs are so expensive is that he keeps his chicken on pasture the entire year. The grasses he grows for the winter are also expensive. The supplemental feed that he purchases for them is organic, grown by a local farmer. (I had heard before from other farmers that what usually drives up the price of eggs is the use of organic supplemental feed.) The feed currently includes organic corn and soy, but they are working on developing a feed that does not contain soy. Dan Gibson’s egg mobiles are quaint-looking old hay rig tractor gear that he built with local lumber. The chicken are ushered into the egg mobiles every night to protect them from predators. The chickens and cattle on the farm have a symbiotic relationship around the cultivated grasses. At Grazin’ Angus Acres they have four kinds of grasses, including high sugar carbohydrate rye grasses and two broad leaf clovers – all of which fix nitrogen out of the air and bring it into the soil. The fertile soil feeds the grasses which feeds the cows and chickens. The folks at Grazin Acres manage the grazing carefully. They corral the cows into a designated area for a 24 hour period, where the cows eat most of the grass and trample the rest. They leave behind their organic material. The chickens are brought in about three days later, just as the fly larvae are about to emerge. The chickens scratch the patties apart, eat the larvae (which cut down on the number of flies on the farm), and spread the manure. There’s no need for a tractor or fossil fuel. Chicken manure is apparently the best organic fertilizer known to man. It helps the grass grow, which helps the cows grow, which helps the chickens. The relationship is perfectly symbiotic. Of his 400 hens, 200 are Black Australorp and 200 are Barred Plymouth Rocks. The average hen lays 6 eggs a week, which comes to about 10 dozen a day. Grazin’ Angus Acres are at the Union Square green market Friday and Saturday. They are at Carroll Gardens and The Natural History Museum on Sundays.  Australorp Hen  Barred Plymouth Rock Hen Share on Facebook and Twitter | Eggs, Greenmarket Bits, ingredients, Where To Buy (Sources) | No comments
|