|
Cauliflower-crusted Pizzas
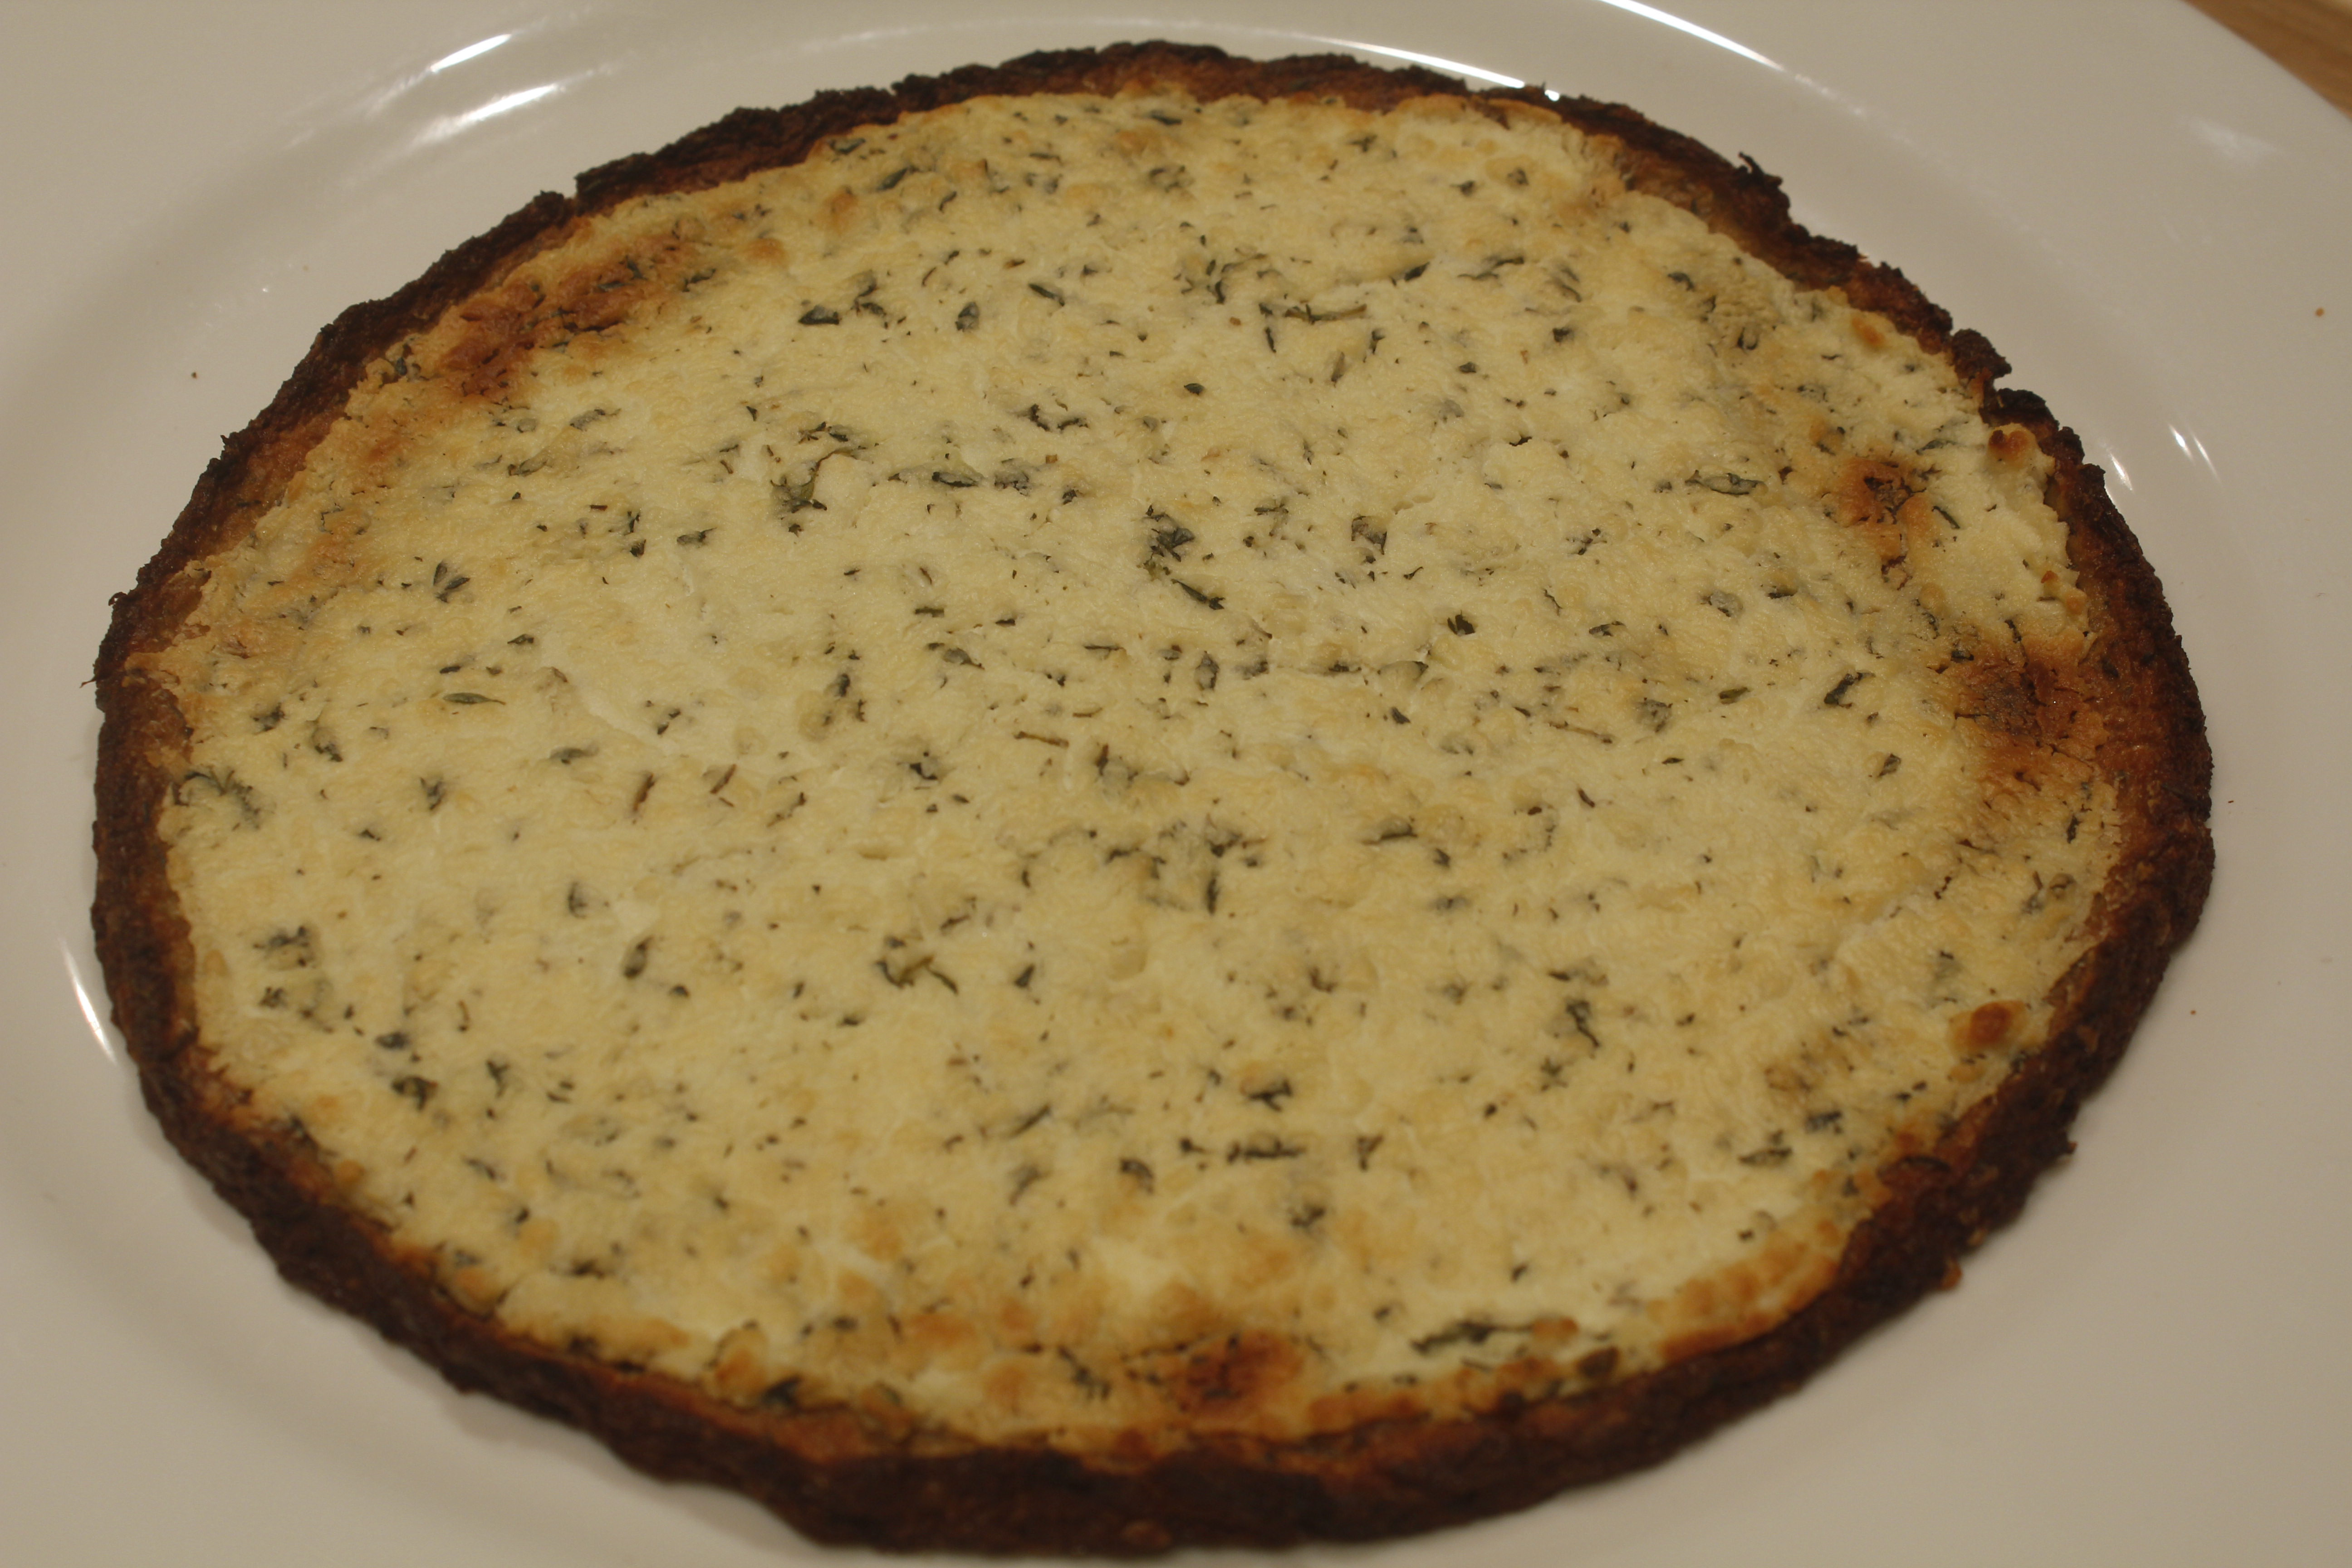
In today’s video on cauliflower-crusted pizzas, I show how to make a couple of variations on a cauliflower-crusted pizza. These delicious pizzas are light and low carb, yet as satisfying as traditional pizza. And, of course, you can vary the toppings to suit your preferences. To begin, cut a medium-sized cauliflower into florets. Pulverize the florets in a food processor until they take on a crumbly, couscous-like texture. Because you’re grinding the cauliflower raw, you’re not in danger of turning it into a puree. Next, have ready a pot with about an inch of boiling water. Add the cauliflower and blanch for 2 to 3 minutes, then pour into a fine mesh strainer to drain. Let the cauliflower cool for a few minutes. Now—and this part is very important—wrap the cauliflower granules in a tea towel and squeeze to extract as much liquid as you can. You may be surprised at just how much water comes out. Finally, turn the squeezed mass into a bowl; by this time, the cauliflower actually has the texture of a dough, and you’re ready to flavor it. The crust needs a binder; for this purpose, a couple of lightly beaten eggs are essential. To flavor the dough, stir in a teaspoon of dried thyme, and half that amount of garlic powder and salt. Next, decide whether or not you wish your crust to contain a little cheese or to be dairy free. Stir in 1/2 cup of grated Parmesan for a delectable cheese version. For an equally scrumptious dairy-free variation, replace the cheese with 1/4 cup almond flour and 1 tablespoon nutritional yeast. The nutritional yeast lends a cheese-like flavor to the combination. In the video, I demonstrate a half version of both the crust with cheese and the crust with almond flour. The next step is to press out the crust on a parchment-covered baking sheet. A medium sized head of cauliflower should press into about two 8-inch pizzas. Press the crust down to about 1/8-inch thickness, leaving a raised border around the edges. You do need to bake it until golden before topping. 30 to 40 minutes in a 400˚F oven will color the crust just right. You can assemble the crusts and bake them up to a day in advance; refrigerate them until you’re ready to add the toppings and bake the pizzas. I present two toppings in the video, but these are merely two ideas out of many. The first one is a classic combination of toppings: the requisite tomato pizza sauce and dollops of fresh mozzarella. Refrain from overdoing the mozzarella since it tends to spread a lot when it melts. This one also has crumbled cooked ground beef and wilted spinach. The surface is then dusted with grated Parmesan. The second is a goat cheese topping. Four ounces of soft cheese are mashed in a bowl with a clove of minced garlic, a dollop of Dijon mustard, a couple tablespoons fresh thyme, a tablespoon olive oil, and a sprinkle of salt. Using an offset spatula makes spreading the cheese over the crust smooth and effortless. Both pizzas return to the oven for 10 minutes, until the toppings have colored, the cheese is melted, and everything is heated through.
Transforming cauliflower into a crust is exciting, and the pizzas taste amazing. This is a deliciously fun way to have your pizza and your vegetables too! Share on Facebook and Twitter | Gluten Free, Main course, techniques, Uncategorized, Vegetables | No comments
The Myriad Uses of Cooked Squash
‘Tis the season to be savoring sweet squash. In today’s video, I demonstrate the richness and versatility of cooked squash. With a tub of the bright orange flesh on hand, you can quickly whip up any number of autumnal dishes. You can keep cooked squash refrigerated for up to a week, or you can freeze it. Although there are all kinds of wonderful varieties of squash and pumpkin available in farmers’ markets, in the video I demonstrate with butternut: the smooth, flavorful workhorse of the squash world. To prep the squash—use a 21/2 to 3-pound butternut—slice it down the middle, and place it face down on a parchment-covered baking sheet. Roast it at 325˚F to 375˚F (the temperature depends on what’s already in the oven cooking; anything within this range is good!) until very tender, about 45 minutes. Rest the squash until cool enough to handle, then scoop out and discard the seeds, which is much easier to do after the squash is cooked. Scoop the flesh into a bowl and reserve. The first recipe in the video is for a speedy soup. To begin, in a medium pot sauté 1/2 cup of chopped leeks along with a tablespoon or so of minced ginger in a couple tablespoons fat (coconut oil, ghee, or extra virgin olive oil are all good) over medium heat. When the vegetables are softened, add a quart of stock—this is a great place to use a homemade chicken or vegetable broth—a can unsweetened coconut milk, the reserved squash flesh, and 1 1/2 teaspoons salt. Let the soup cook a few minutes to marry the flavors, then finish with a flick of cayenne and a splash of lime juice. Voilà: a delicious soup! Serve up a hearty bowl dusted with chopped cilantro. The second recipe is for a light yet substantial pumpkin pie-spiced breakfast pancake. The recipe makes 2 servings, but you can easily scale it up. Start with a couple tablespoons coconut flour in a bowl. Add a mix of spices: 1/2 teaspoon cinnamon powder; and a pinch of nutmeg, ginger, and allspice. Add a large pinch baking soda and salt, and whisk together the dry ingredients. Then add 1/2 cup squash flesh, a couple of lightly beaten eggs, a tablespoon maple syrup, 1/2 teaspoon vanilla extract, and 1 tablespoons melted fat (butter or coconut oil). Mix vigorously, and you’re ready to make pancakes. To cook, film a griddle or nonstick skillet with oil until your hand held 1 inch above the pan is uncomfortable. This batter is a little more delicate than a typical flour-based batter; for best results, opt for medium-size pancakes, and above all, resist crowding the pan. Drop the batter—a tablespoon at a time—into the sizzling skillet until you have four swelling hotcakes. Leave the pancakes alone until browned and toasty on the bottom, then flip and cook a few more minutes on the second side. Transfer to a plate, and repeat with the remaining batter. Serve these airy cakes with butter, fruit, or a drizzle more sweet syrup. These are just two of the many wonderful dishes that you can make with squash flesh. Yes, it takes 45 minutes or so to cook the squash, but the oven does the work, so it’s not your time. With cooked squash on hand, you can whip any number of delectables together in minutes. Share on Facebook and Twitter | Breakfast, Kitchen Tips, Soups, Uncategorized, Vegetables | No comments
Lacto-fermented Sauerkraut In today’s video, I show how to make traditional sauerkraut, one of the popular dishes that Eastern Europeans of yore would put up in storage in November so that they could have vegetables that would last the entire winter. Cabbage is especially amenable to culturing. While giving it a delightfully tangy flavor, the time-honored fermentation process turns pedestrian cabbage into an uber-raw natural probiotic. Lactobacilli are delightful microorganisms already present on the leaves and roots of plants. With a little encouragement, they convert the starches and sugars in the leaves to lactic acid—thus the term “lacto-fermentation.” Salt initiates the process; it inhibits the growth of undesirable bacteria long enough for the lactic acid to start forming. Enzymes break down the cabbage into more digestible molecules, and the lactic acid preserves it by eliminating unwanted organisms and increases the level of Vitamin C. In the end, “predigested” fermented cabbage also promotes the growth of healthy flora throughout the intestines, making harder-to-digest foods much more digestible. Here’s how you make the ferment: In the video I demonstrate the process with a medium head of green cabbage, shredded finely; you should have 10 cups or so. Stir in a couple of grated carrots and four teaspoons salt, a good amount for a quart-worth of packed kraut. Use a good quality unadulterated salt that has trace minerals, such as celtic sea salt. To help get the juices of the cabbage flowing, massage the cabbage with your hands; get in there and squeeze hard. You can also pound the cabbage with a mallet to help it start to sweat. Once you have a lot of shiny, juicy cabbage in the bowl, stir in the other ingredients. In today’s ferment, I’m adding a tablespoon each of minced ginger and garlic, about ½ cup of sliced scallions, and a minced red Fresno chile, a mild and colorful chile which I found at my local grocer. 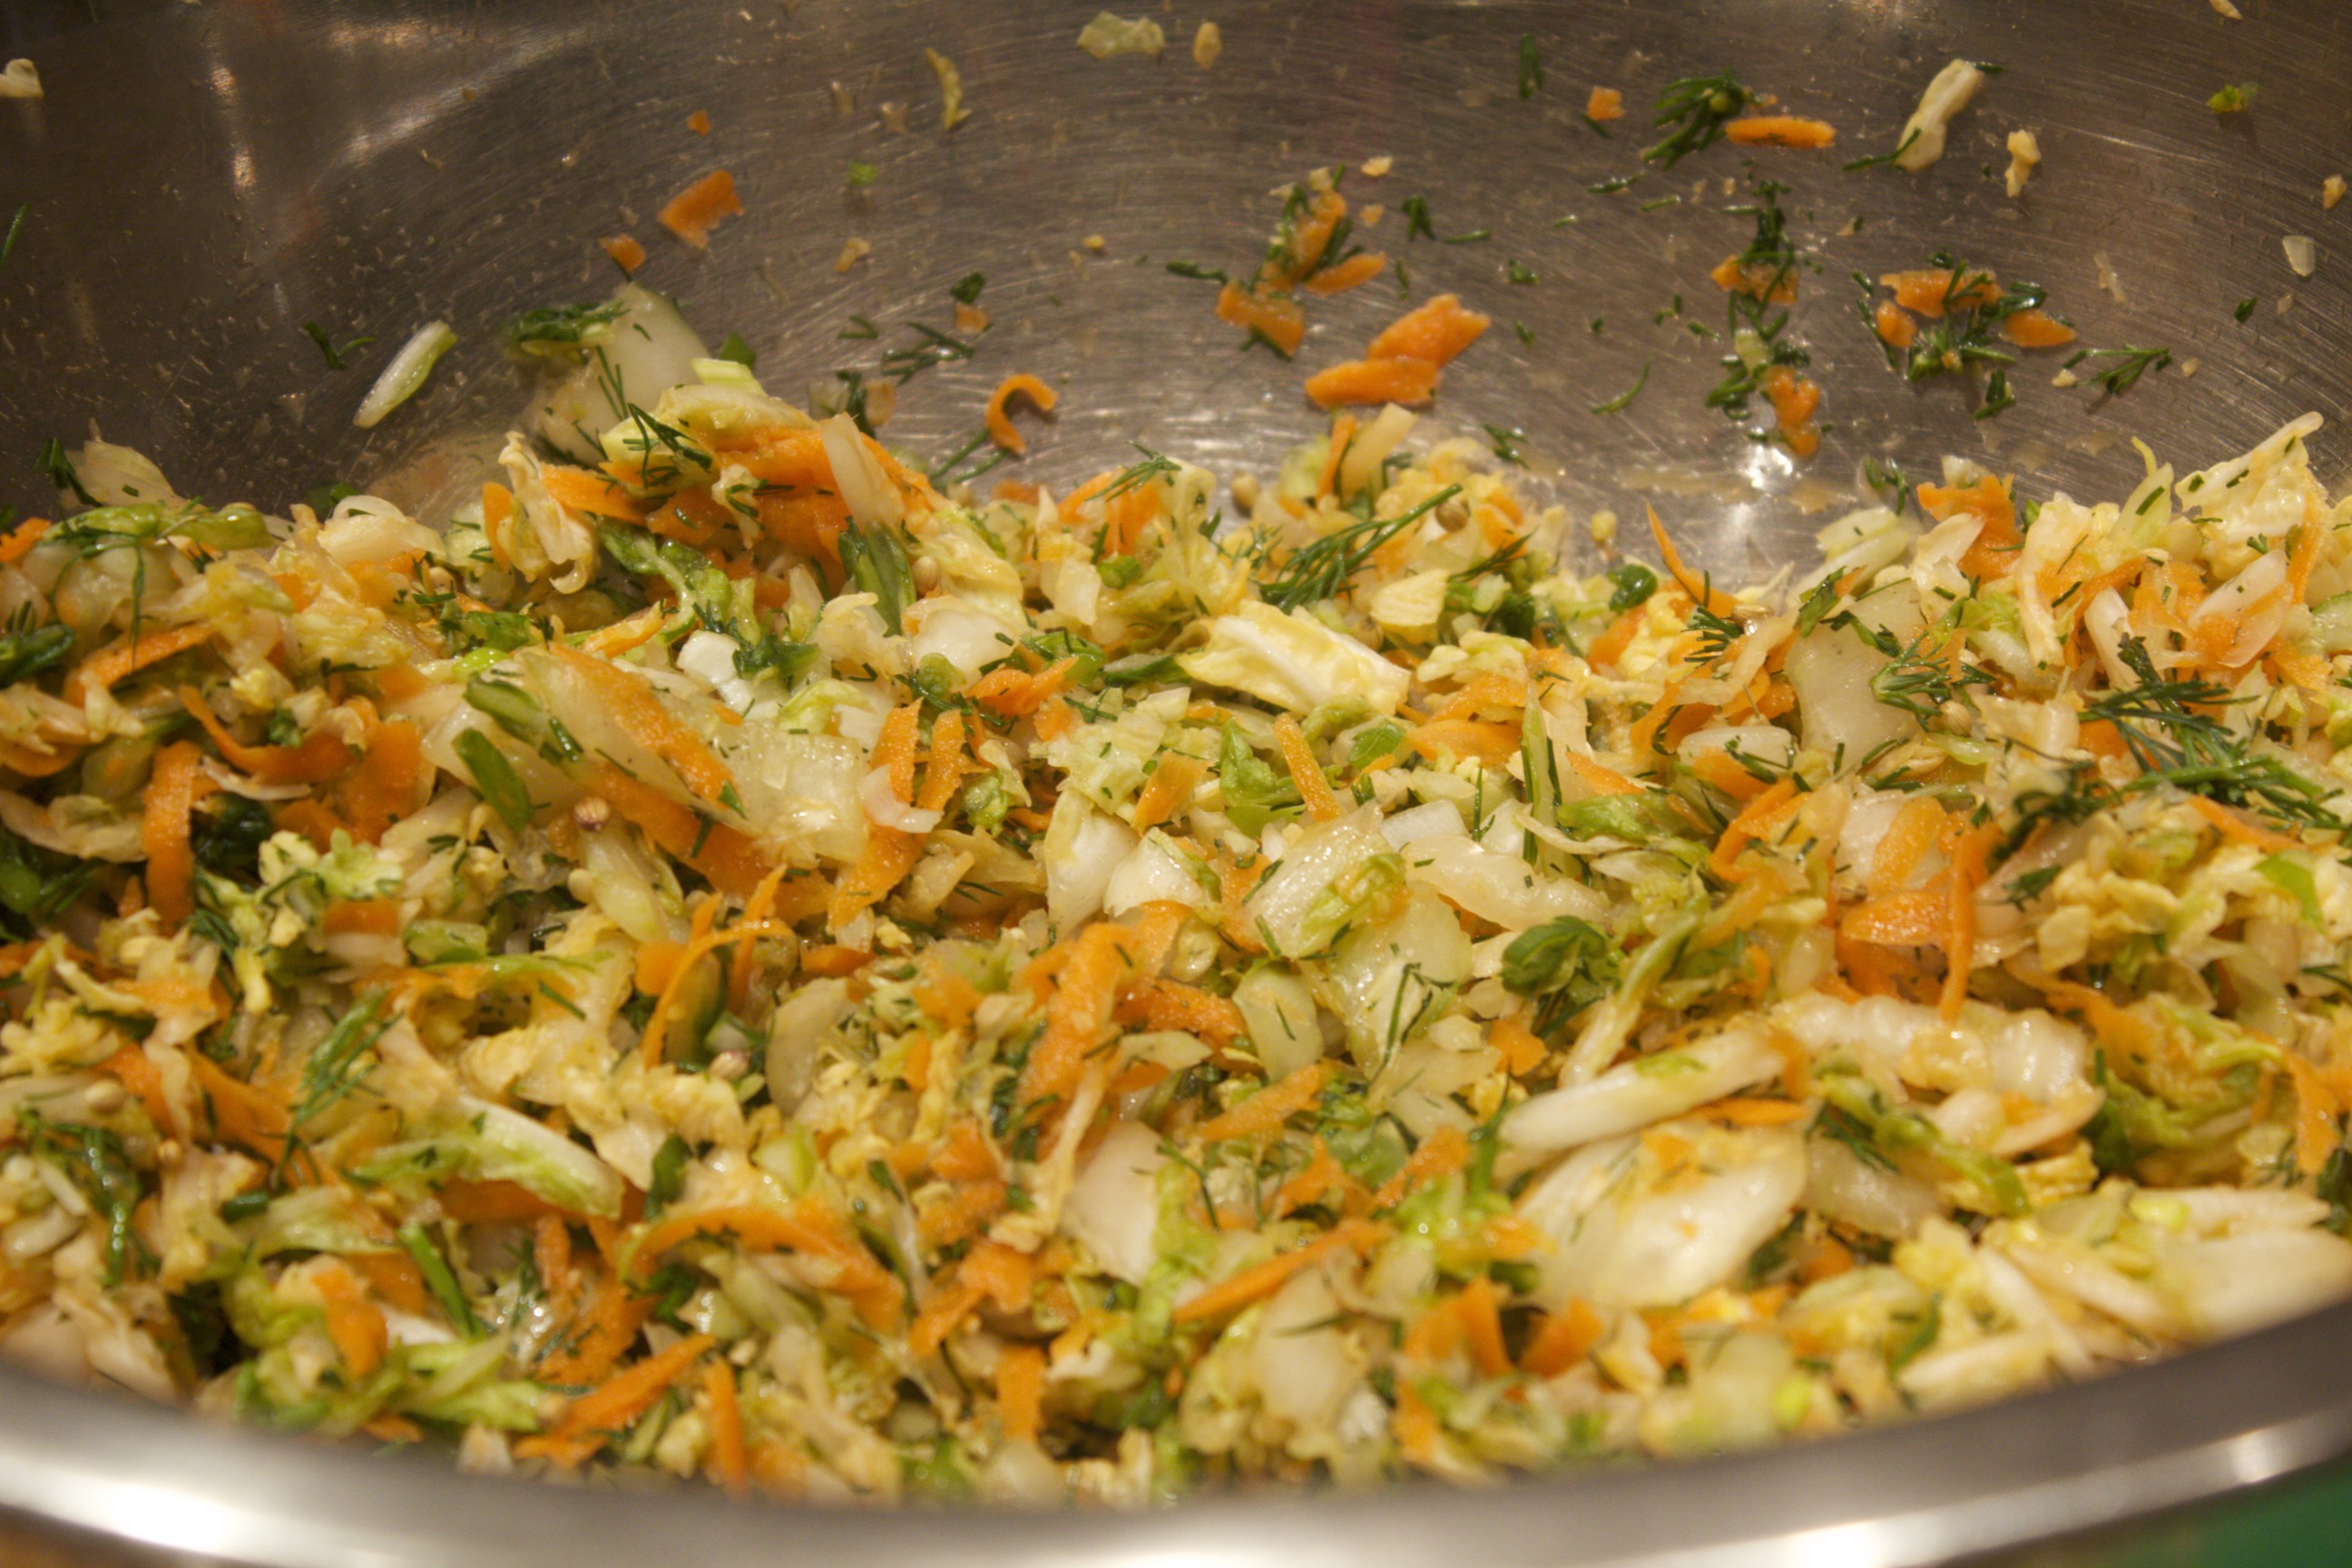 Cabbage ready to be packed Stuff the juicy cabbage mixture into a 1-quart bell jar, pressing down hard to make sure that there is liquid floating on the top. (A blunt, wooden, club-like instrument called a “kraut-pounder” is quite helpful for pressing down the vegetables, but you can improvise with the end of a tapered rolling pin as well.) Leave a generous inch of space at the top of the jar in order to prevent liquid from seeping out the top.  Make sure liquid covers the top. Let your imagination reign when it comes to the variations. Start with a base of cabbage: red, savoy, or nappa. I’ve enjoyed all kinds of additions to my slaws, including onions, fennel, daikon, fennel seed, juniper berries, chiles, and curry powder (but not all in the same slaw, of course). Leave the ferment on the counter from 5 days to 2 weeks. The insert in the middle of the bell jar will be hard to press down once the ferment really gets going. Start tasting the kraut at that point. It will be fermented after a few days; but, if you can leave the kraut for the full two weeks, you’ll have a tangier, richer flavor. (After tasting, make sure that the cabbage is still tightly packed and submerged in liquid.) Transfer the jar to the refrigerator; it’s ready to eat, but it tastes even better if you can leave it for a couple of additional weeks before opening. Once opened, the ferment stays fresh at least a good three months refrigerated. Start off slow; a few tablespoons added to your meals is sufficient. You can increase the amount as your belly becomes acclimated to all the additional probiotic flora. It’s deeply satisfying to make your own krauts; you might just find yourself with a refrigerator full of delicious varieties.
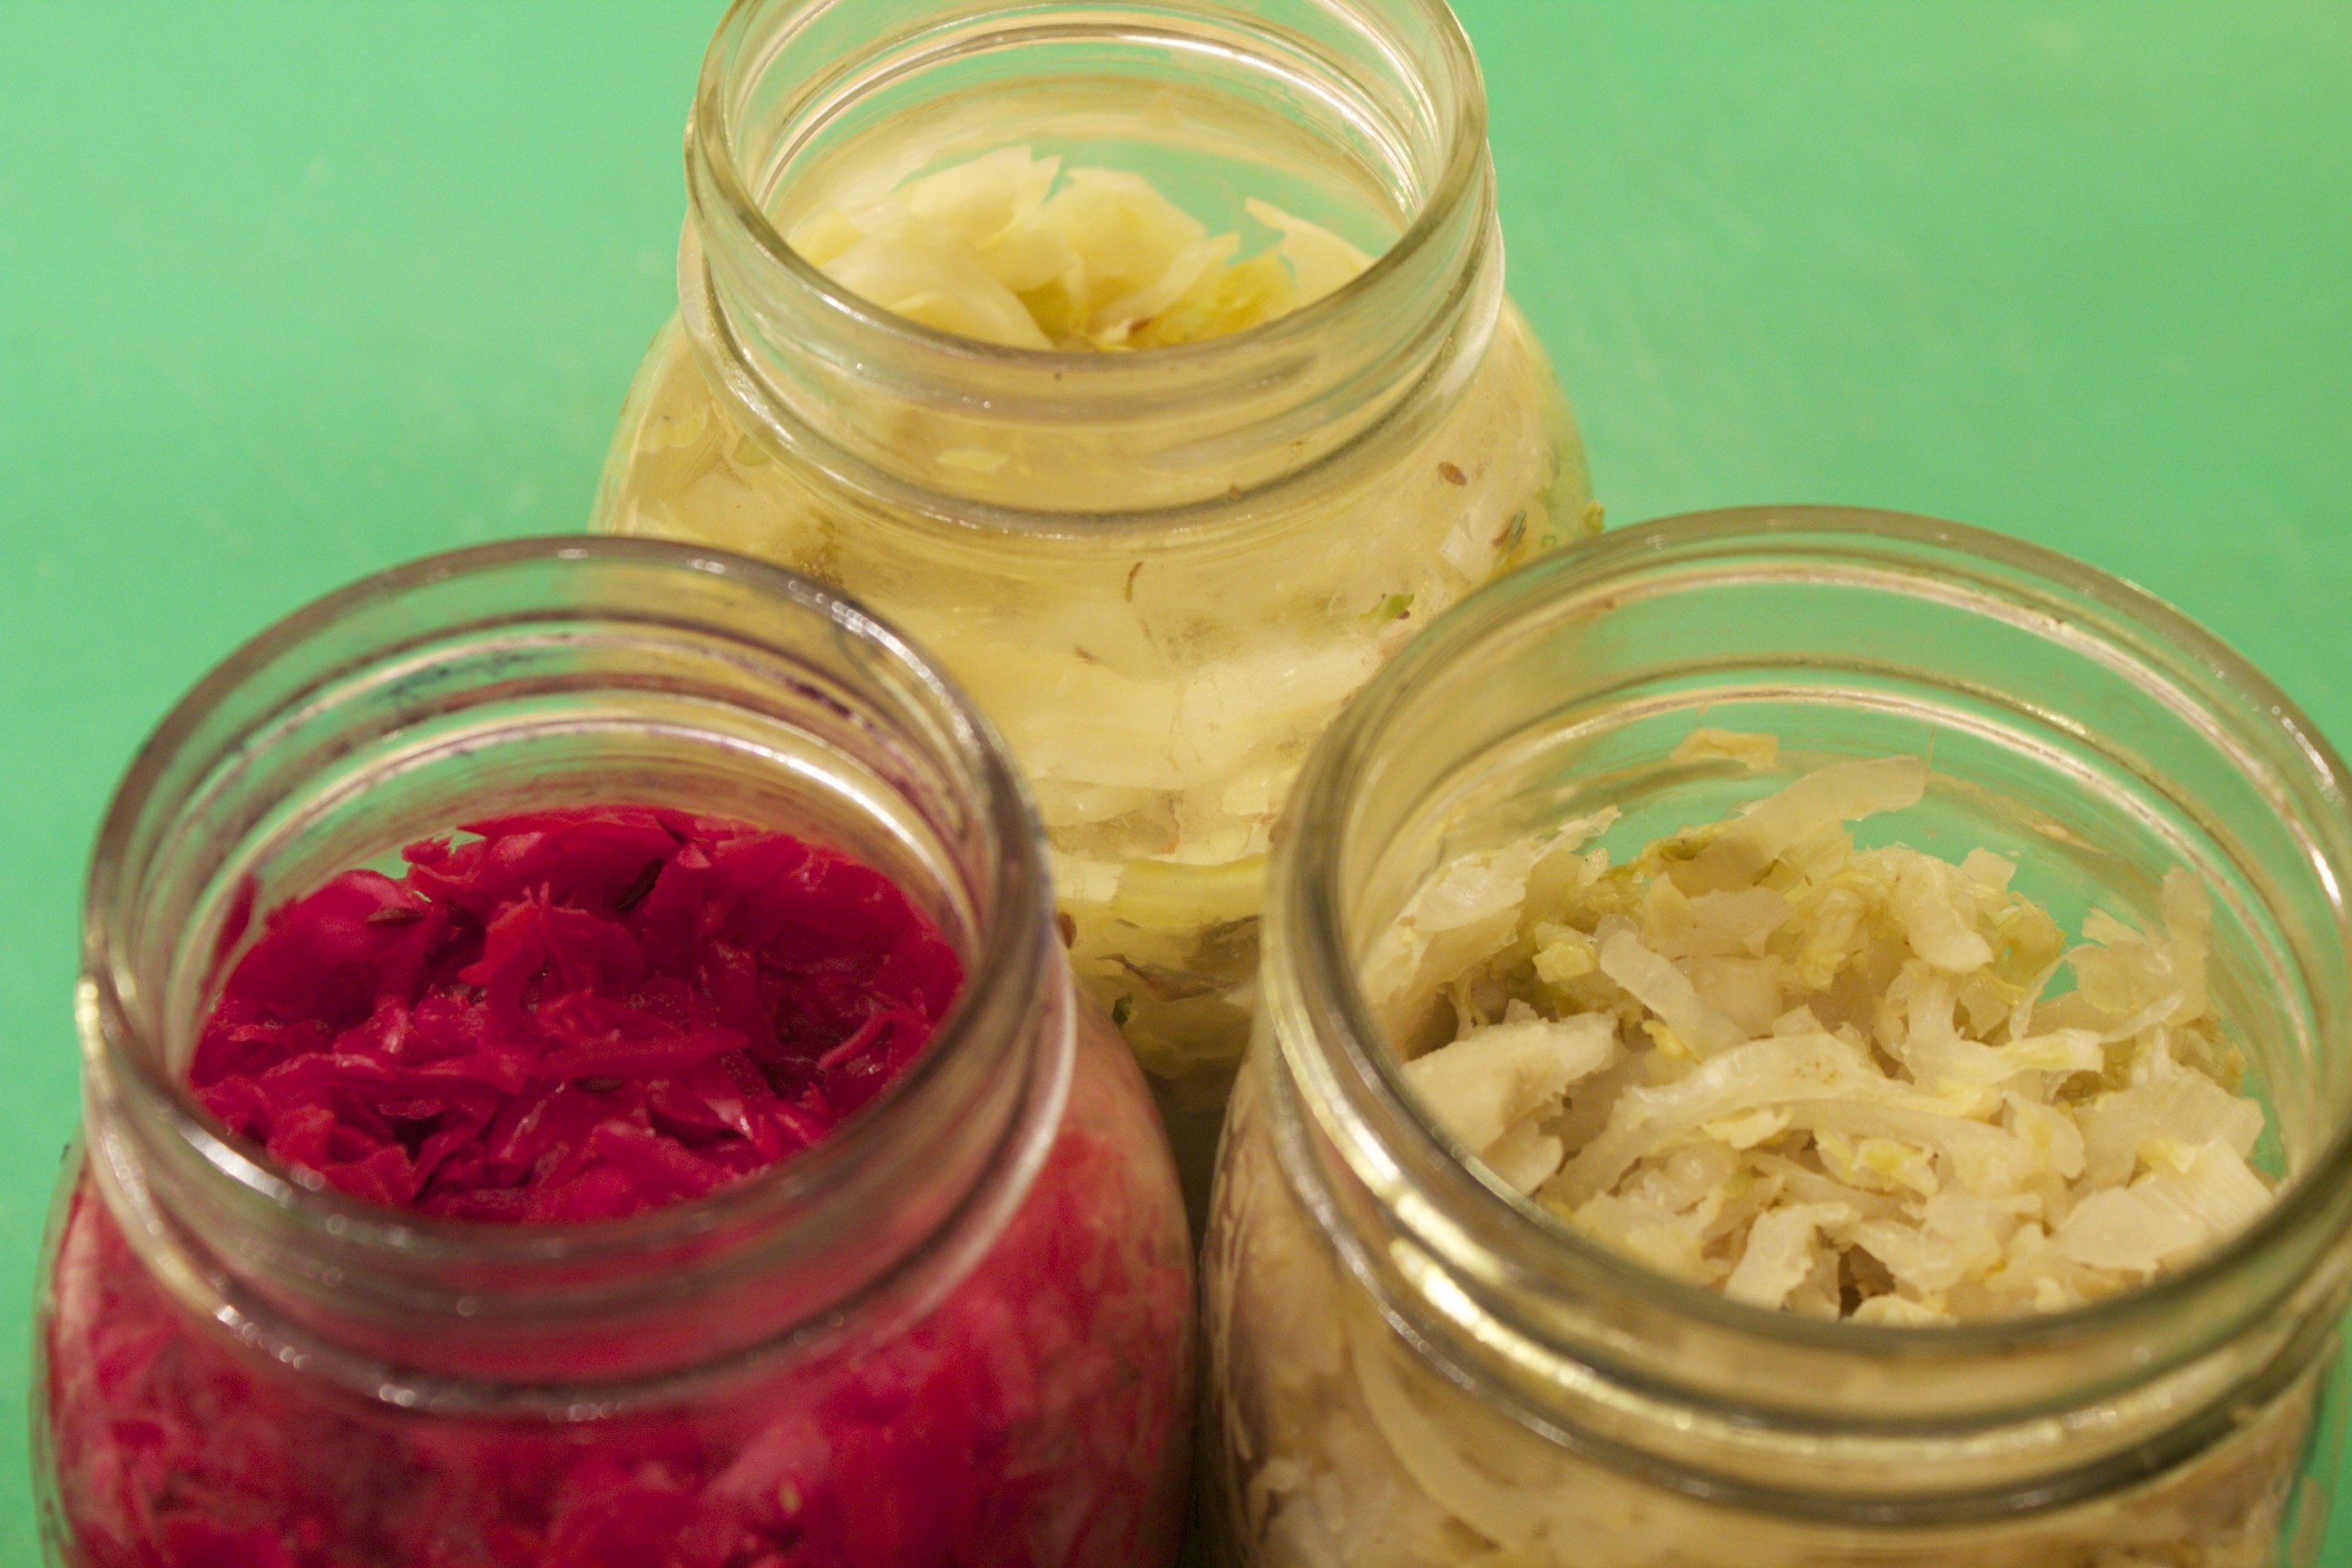 Finished lacto-ferments
Share on Facebook and Twitter | condiments, Health Tips, Kitchen Tips, Side Dishes, Vegetables | No comments
Lemon-Garlic Roasted Cauliflower with Fennel and Gremolata The January issue of Organic Gardening made it to the newsstands on January 1st. The theme for the food central section was garlic; my recipe for this issue is a lemon-garlic roasted cauliflower with fennel and gremolata. Garlic plays two exciting roles in this vibrant winter dish. One whole head is separated into cloves and mellowed as it roasts with the cauliflower and fennel, and a clove of raw garlic in the gremolata adds an enlivening finishing touch. The lemon slices meld into the dish as they roast, contributing a burst of citrus. Make sure to zest the lemon for the gremolata before slicing it. 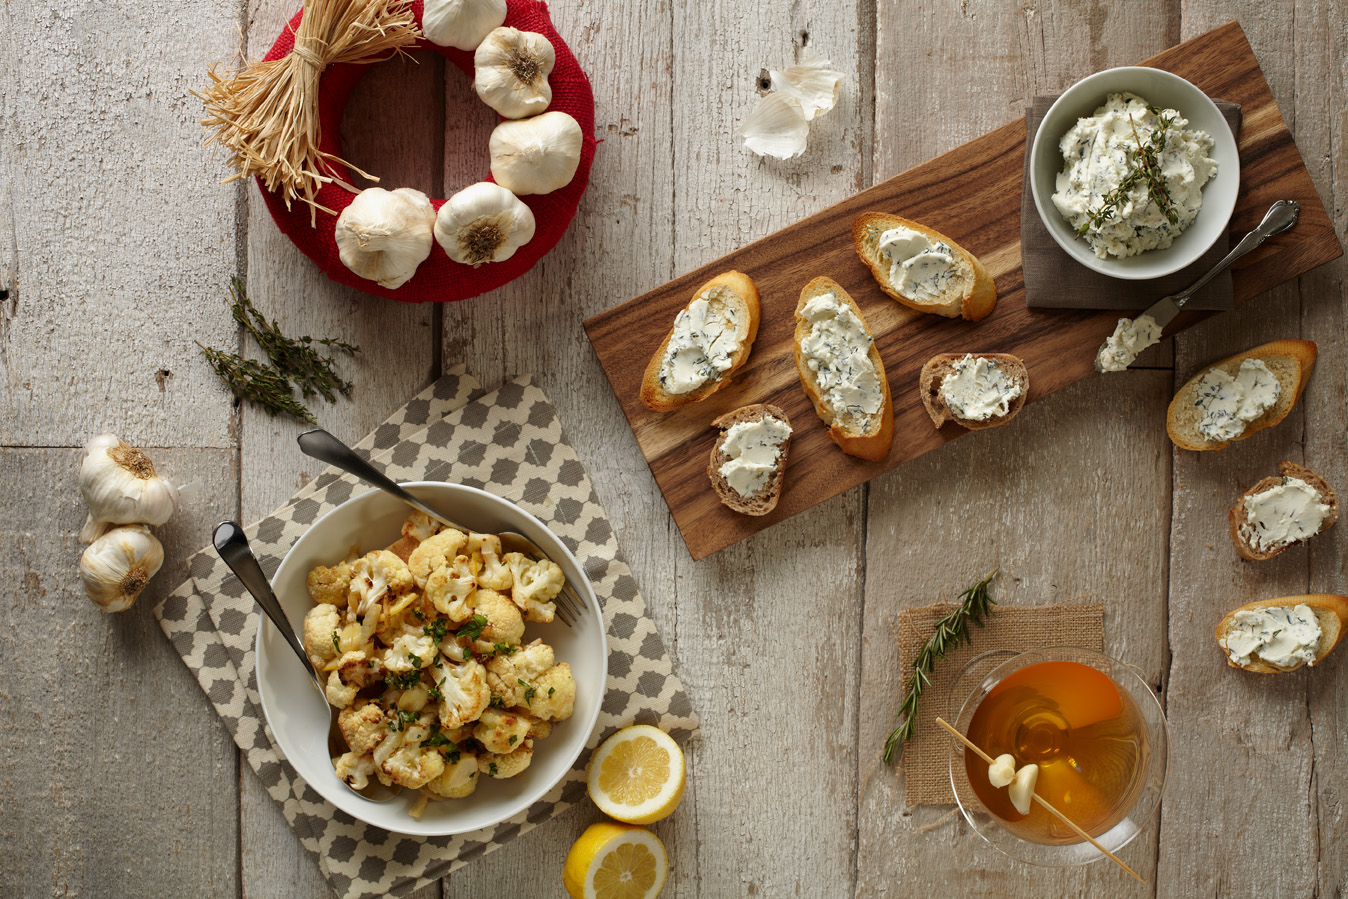 Foodcentral: garlic Lemon-Garlic Roasted Cauliflower with Fennel and Gremolata Serves 4 Gremolata: 1 teaspoon grated lemon zest 1 garlic clove, minced 2 tablespoons chopped flat leaf parsley Cauliflower: 1 lemon 1 medium head cauliflower, cut into medium florets 1 head garlic, cloves peeled and left whole 1 fennel bulb, cored and thinly sliced (2 cups sliced) ¼ cup extra virgin olive oil 1 ¼ teaspoons salt Freshly ground black pepper
Share on Facebook and Twitter | Side Dishes, Vegetables | No comments
Two Ways to Shred Brussels Sprouts I love shaved Brussels Sprouts. The thin wispy shreds sauté in minutes; they also make a hearty raw salad that holds up to assertive dressings. In the video I show two ways to shred the little globes: one is by hand, the other is with a plastic mandolin. To shred the sprouts by hand, position your hand in a tight claw, with your forefinger pushing against the blade. This helps you cut thinly, it gives you stability, and keeps your fingers safe; in essence, it turns you into a human mandolin. If that method is daunting, try the second one in which you use an actual mandolin. A mandolin is a cutting device that helps you to slice your produce paper thin. There’s no need to purchase a fancy metal one–the plastic Japanese keeps a sharp edge better than the pricier varieties. Since Brussels Sprouts are small, here’s a tip for making the shaving process safe and effective: stick a fork into the root end (Make sure not to trim the root end first.) Position a sprout against the mandolin and shave away; shred all the way down to the root. Repeat with the next Brussels Sprouts, and so forth, until you have a nice little pile of wispy pieces, ready to be tossed into your favorite recipe. Watch the video (it’s less than 1 1/2 minutes) to see both ways of shredding. Share on Facebook and Twitter | Kitchen Tips, Vegetables | No comments
Culinary Roulette Peppers The first time I tried a shishito pepper, I thought that they were unbearably hot. I didn’t know at the time that only about one in ten is hot, while the rest are mild and flavorful. This experience kept me away from these delicious peppers for a good couple of years, until I was seduced by the gorgeous overflowing bins at the Union Square greenmarket. Fortunately, I finally gave them another try, and have been happily eating them ever since. Not only do shishito peppers abound right now, there are another two varieties similar enough that they can be treated the same way. Here’s the rundown on the different types: There’s the shishito pepper, which are very aromatic. They have little ridges. 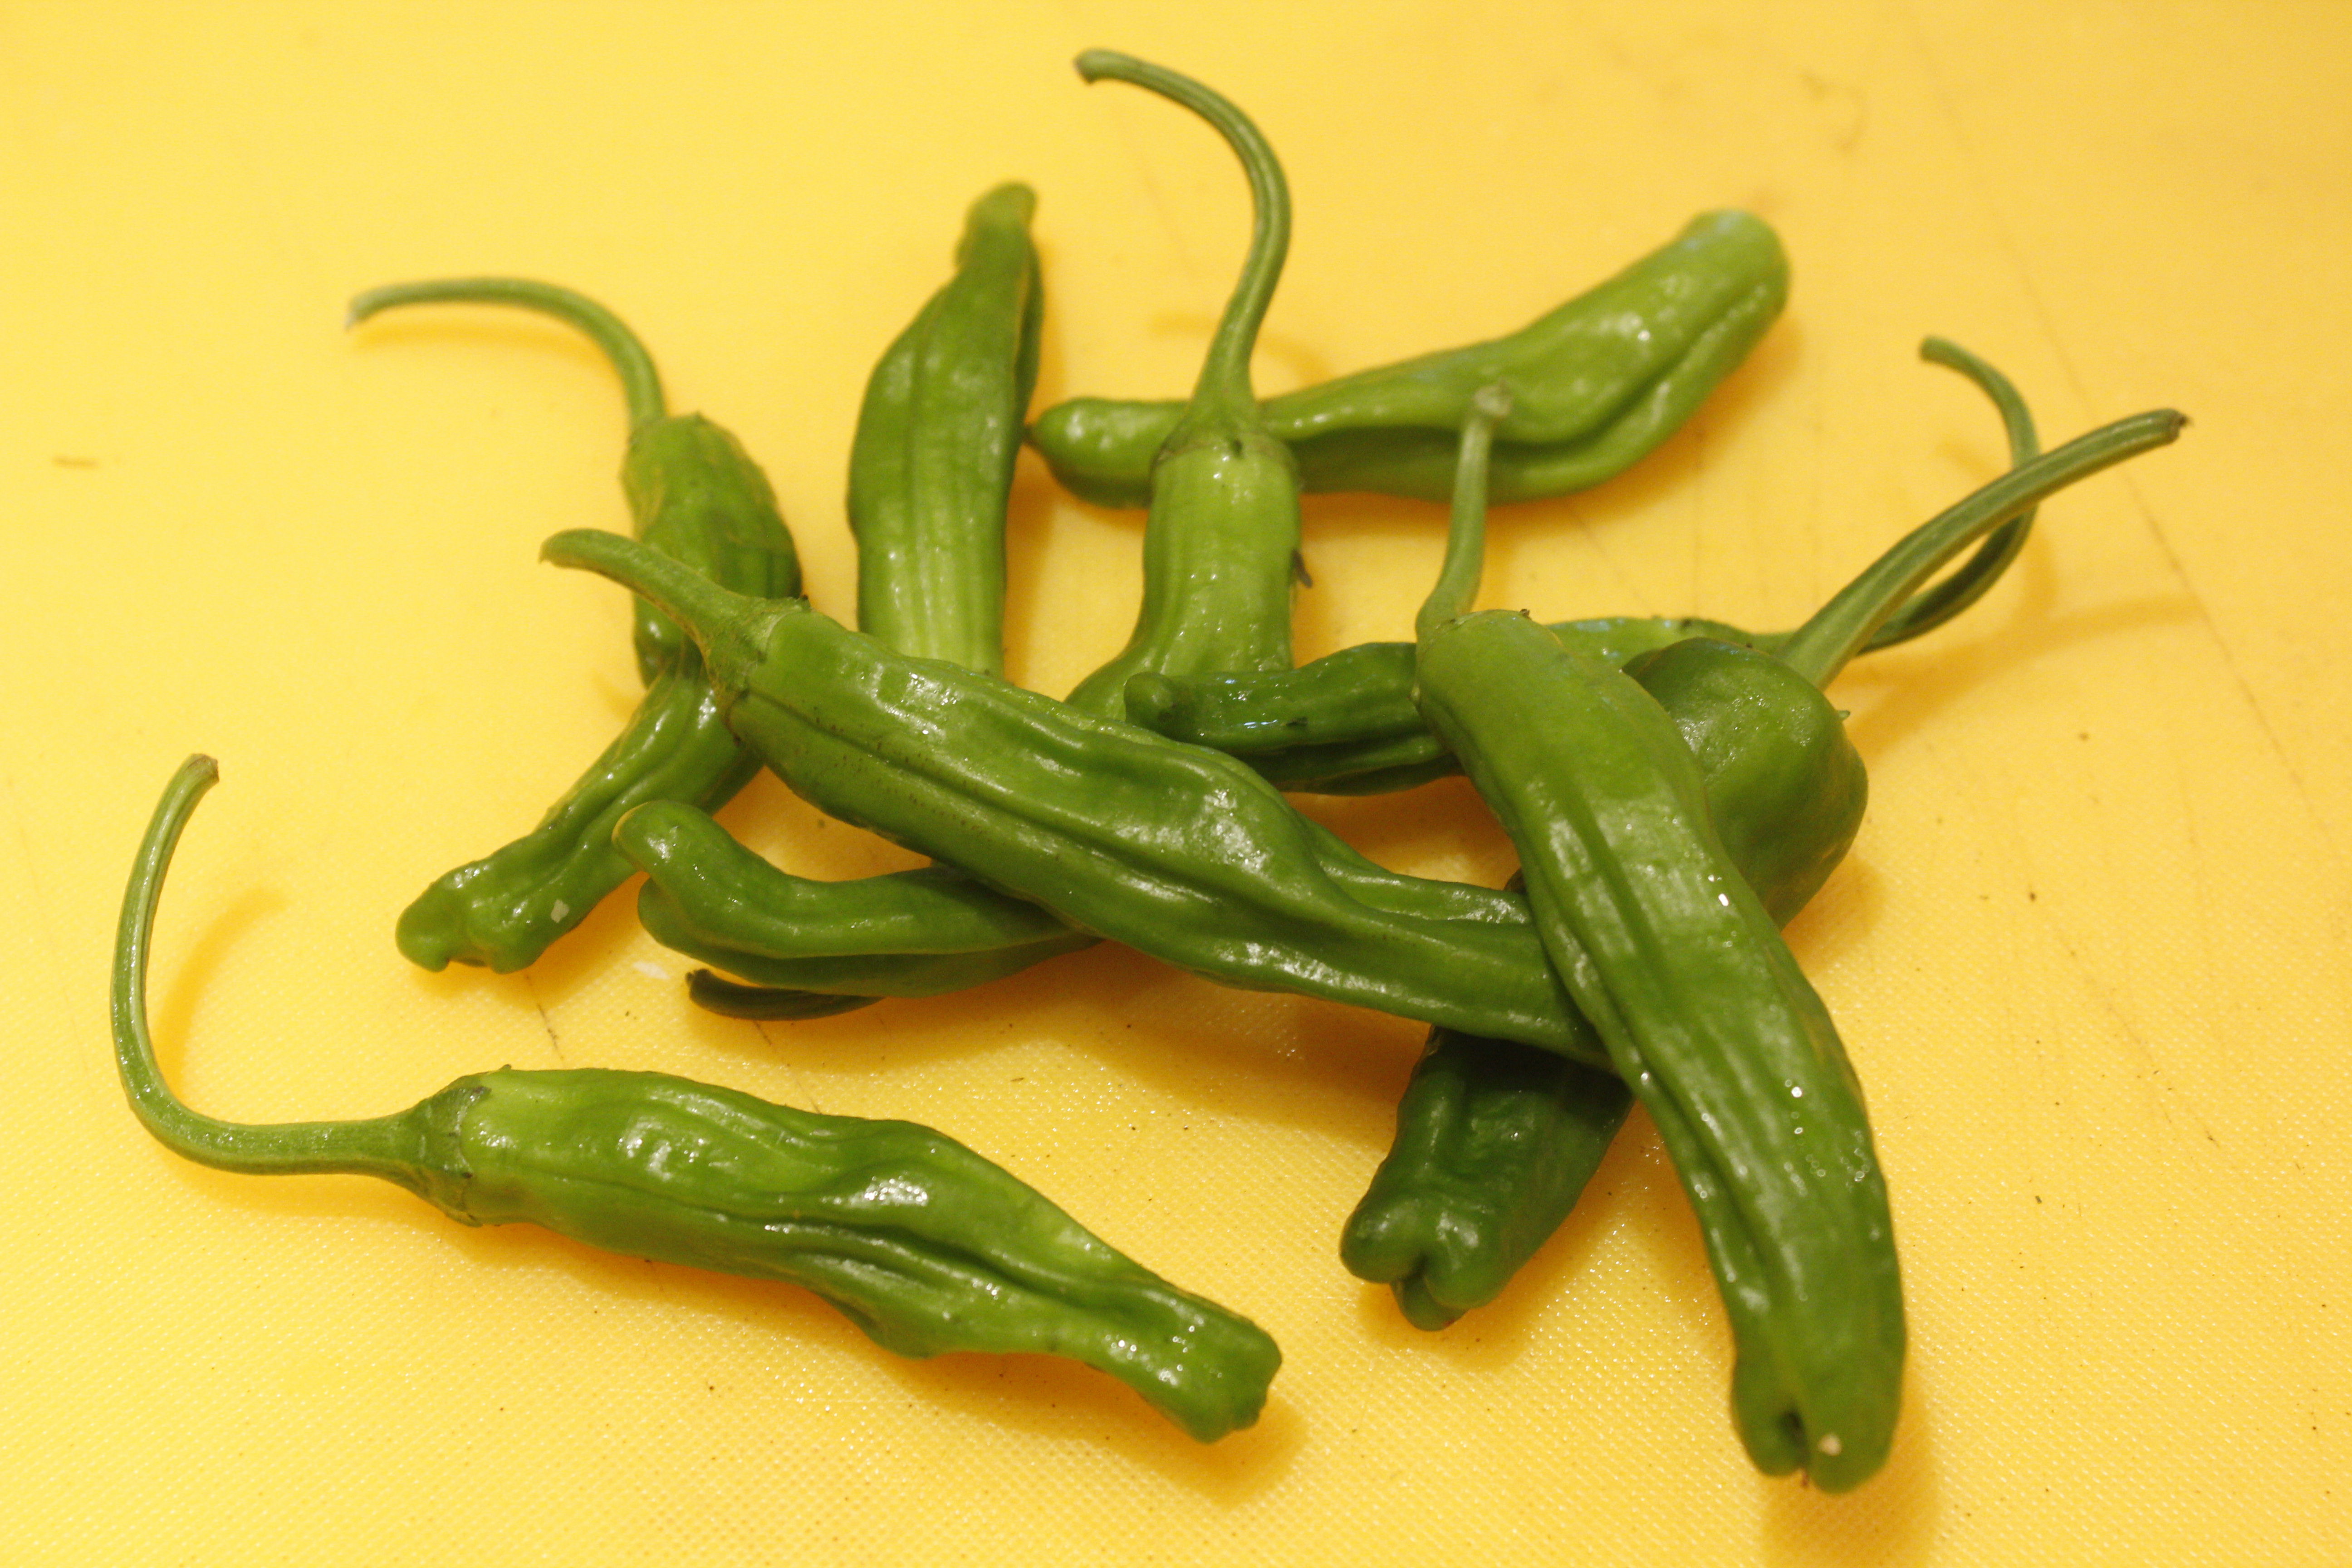 Shishito Peppers A pepper that competes with the shishitos is the Fushimi pepper. They have an even crispier skin and texture. You can eat these raw as well as cooked.  Fushimi Pepper Another squatter horn-shaped pepper with similar characteristics is the Pimento de Padrón, the heirloom variety from Spain. 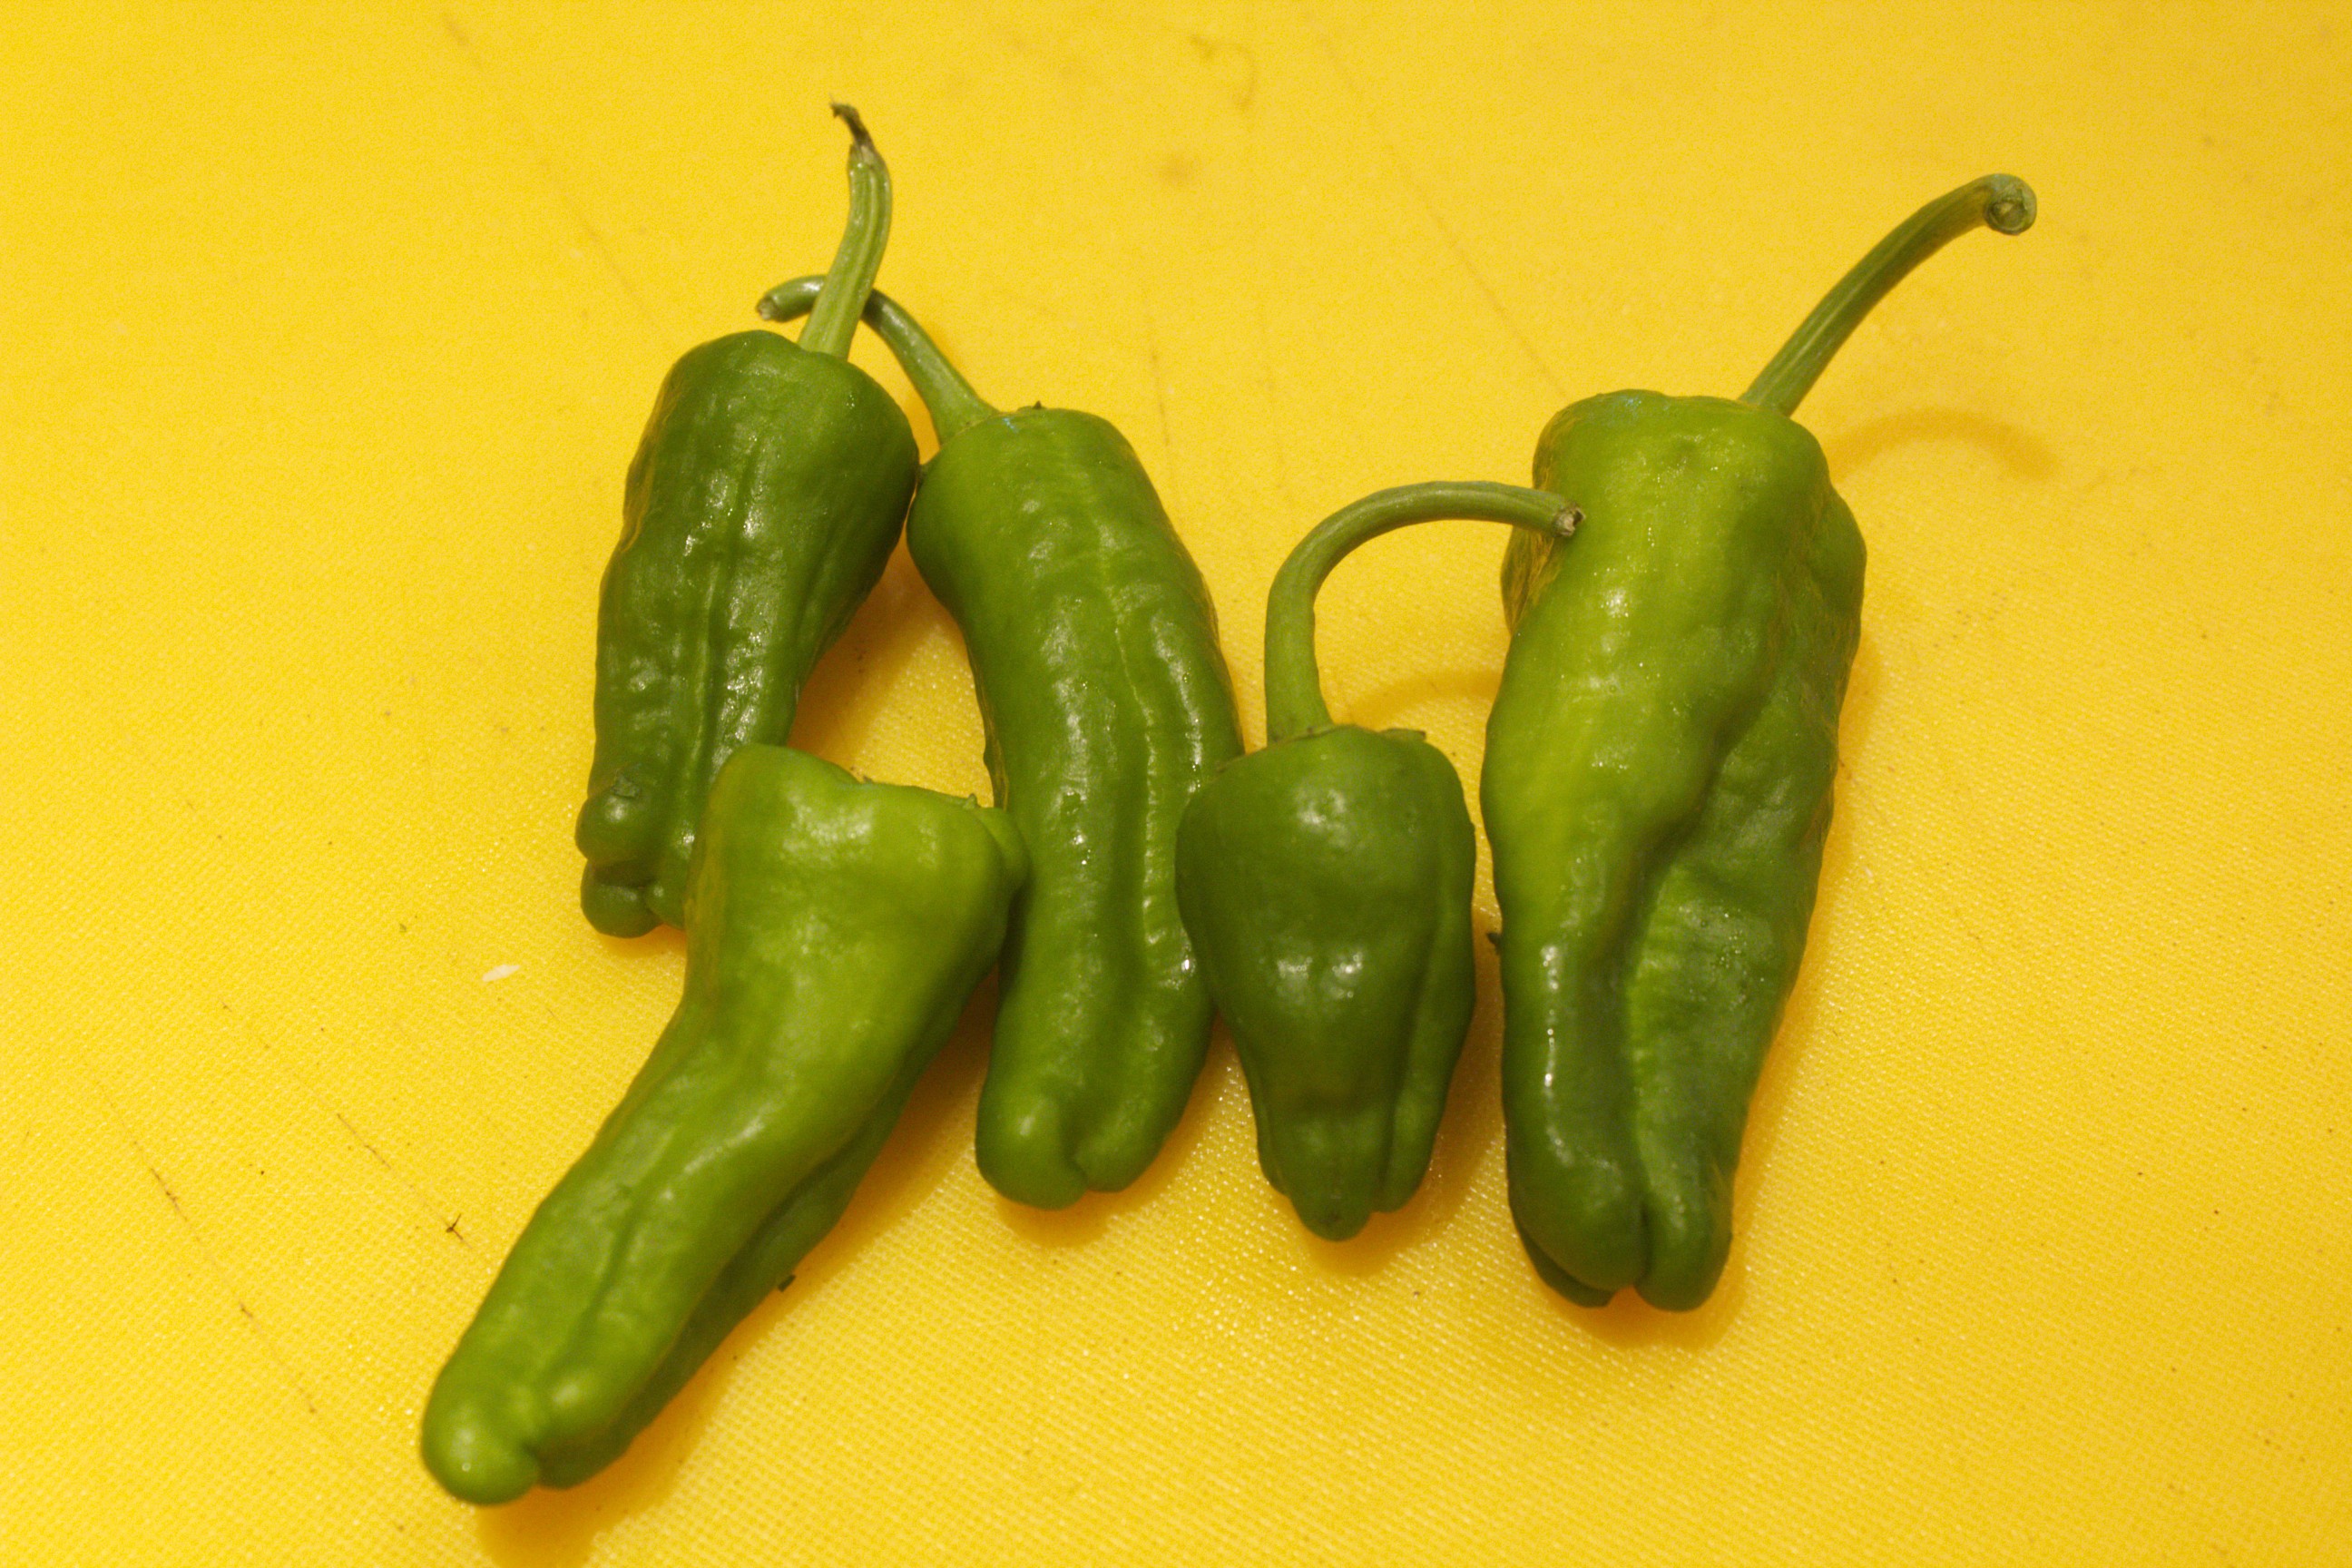 Pimento de Padrón All of the peppers have a lot of health benefits: high levels of vitamin A and C and carotenoids like lutein, which is helpful for maintaing healthy hair and skin, as well as providing resistance to colds. These retain their vitamins when they are pickled as well. My favorite way to cook all of these peppers is to toss them into a hot skillet that is filmed with oil and simply blister them. I then toss them with a course salt. Lately, I’ve been tossing them with lapsong souchong salt, so they have a delicious smokey tea flavor. 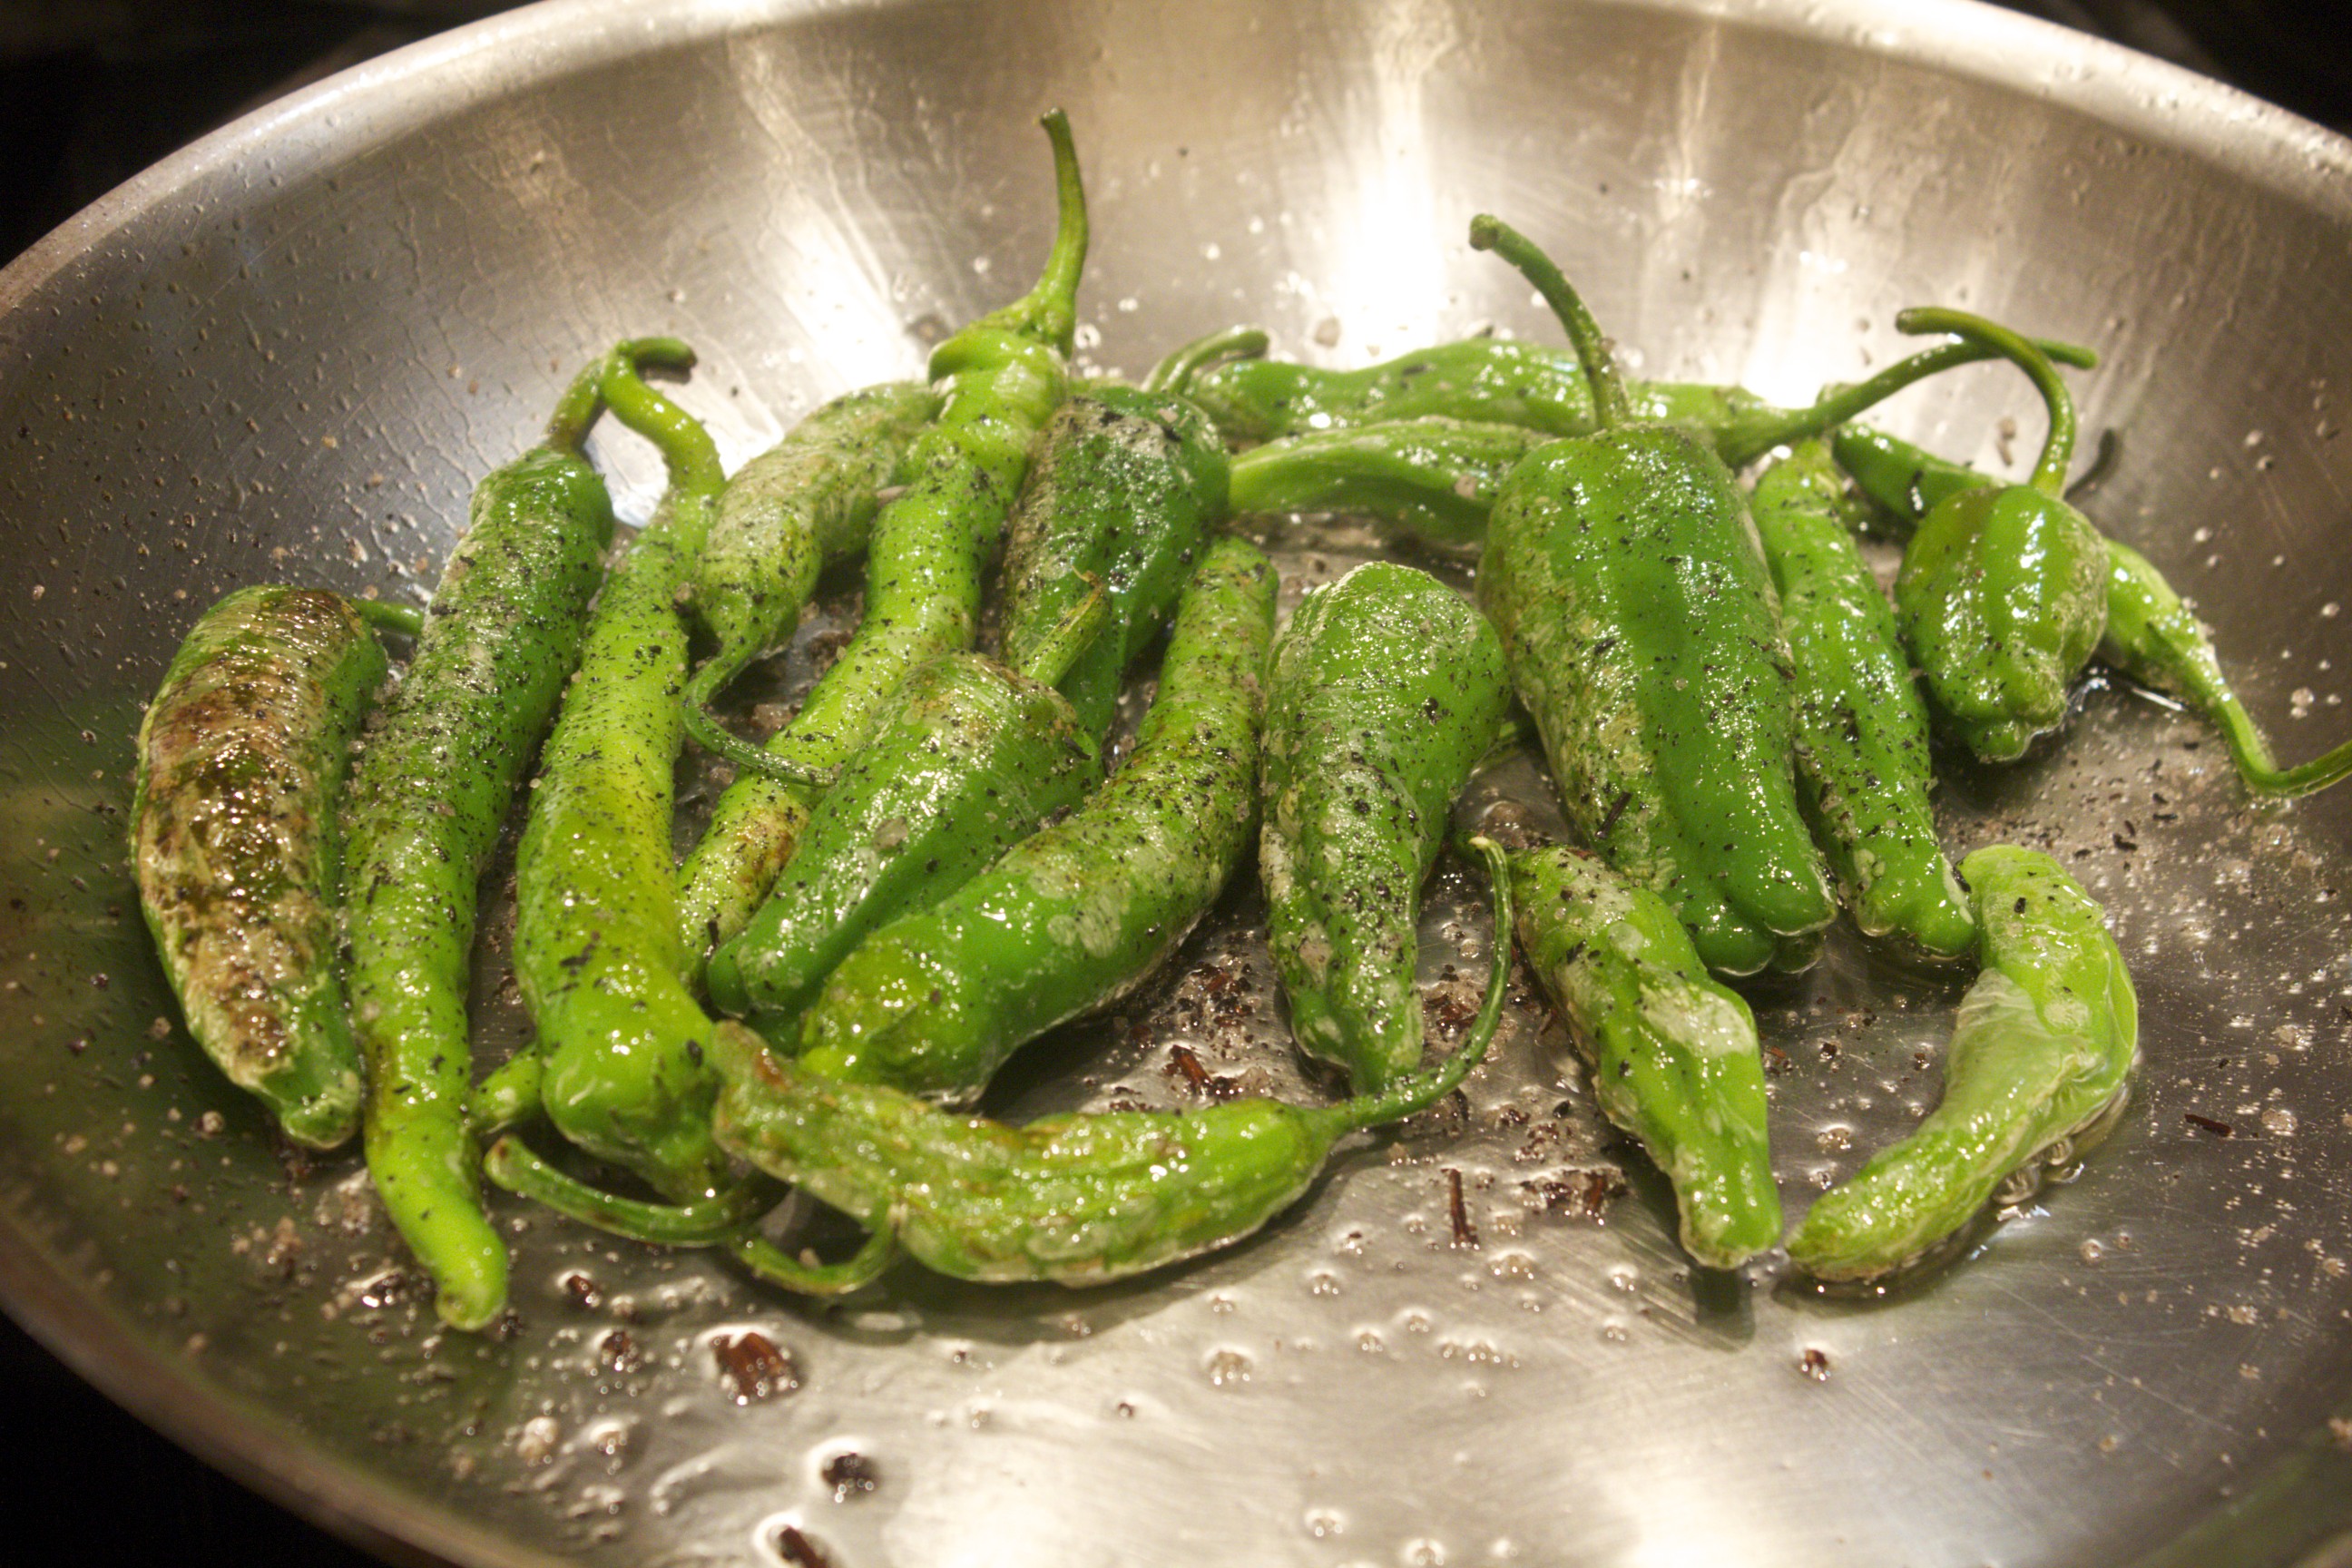 Blistered Peppers For more ideas on exciting salts, visit The Filling Station in Chelsea Market, where you can choose from a variety of flavored coarse salts. All of these peppers make for an exciting game of culinary roulette. I like to serve these to guests sitting around the table and watch their faces as they eat them. Since most of the peppers are sweet and mild, it’s a bit of a surprise when you get that one zinger in ten that is picante. Proceed with caution, and take a small first bite! Share on Facebook and Twitter | Health Tips, Side Dishes, Vegetables | No comments
Strawberry Guacamole 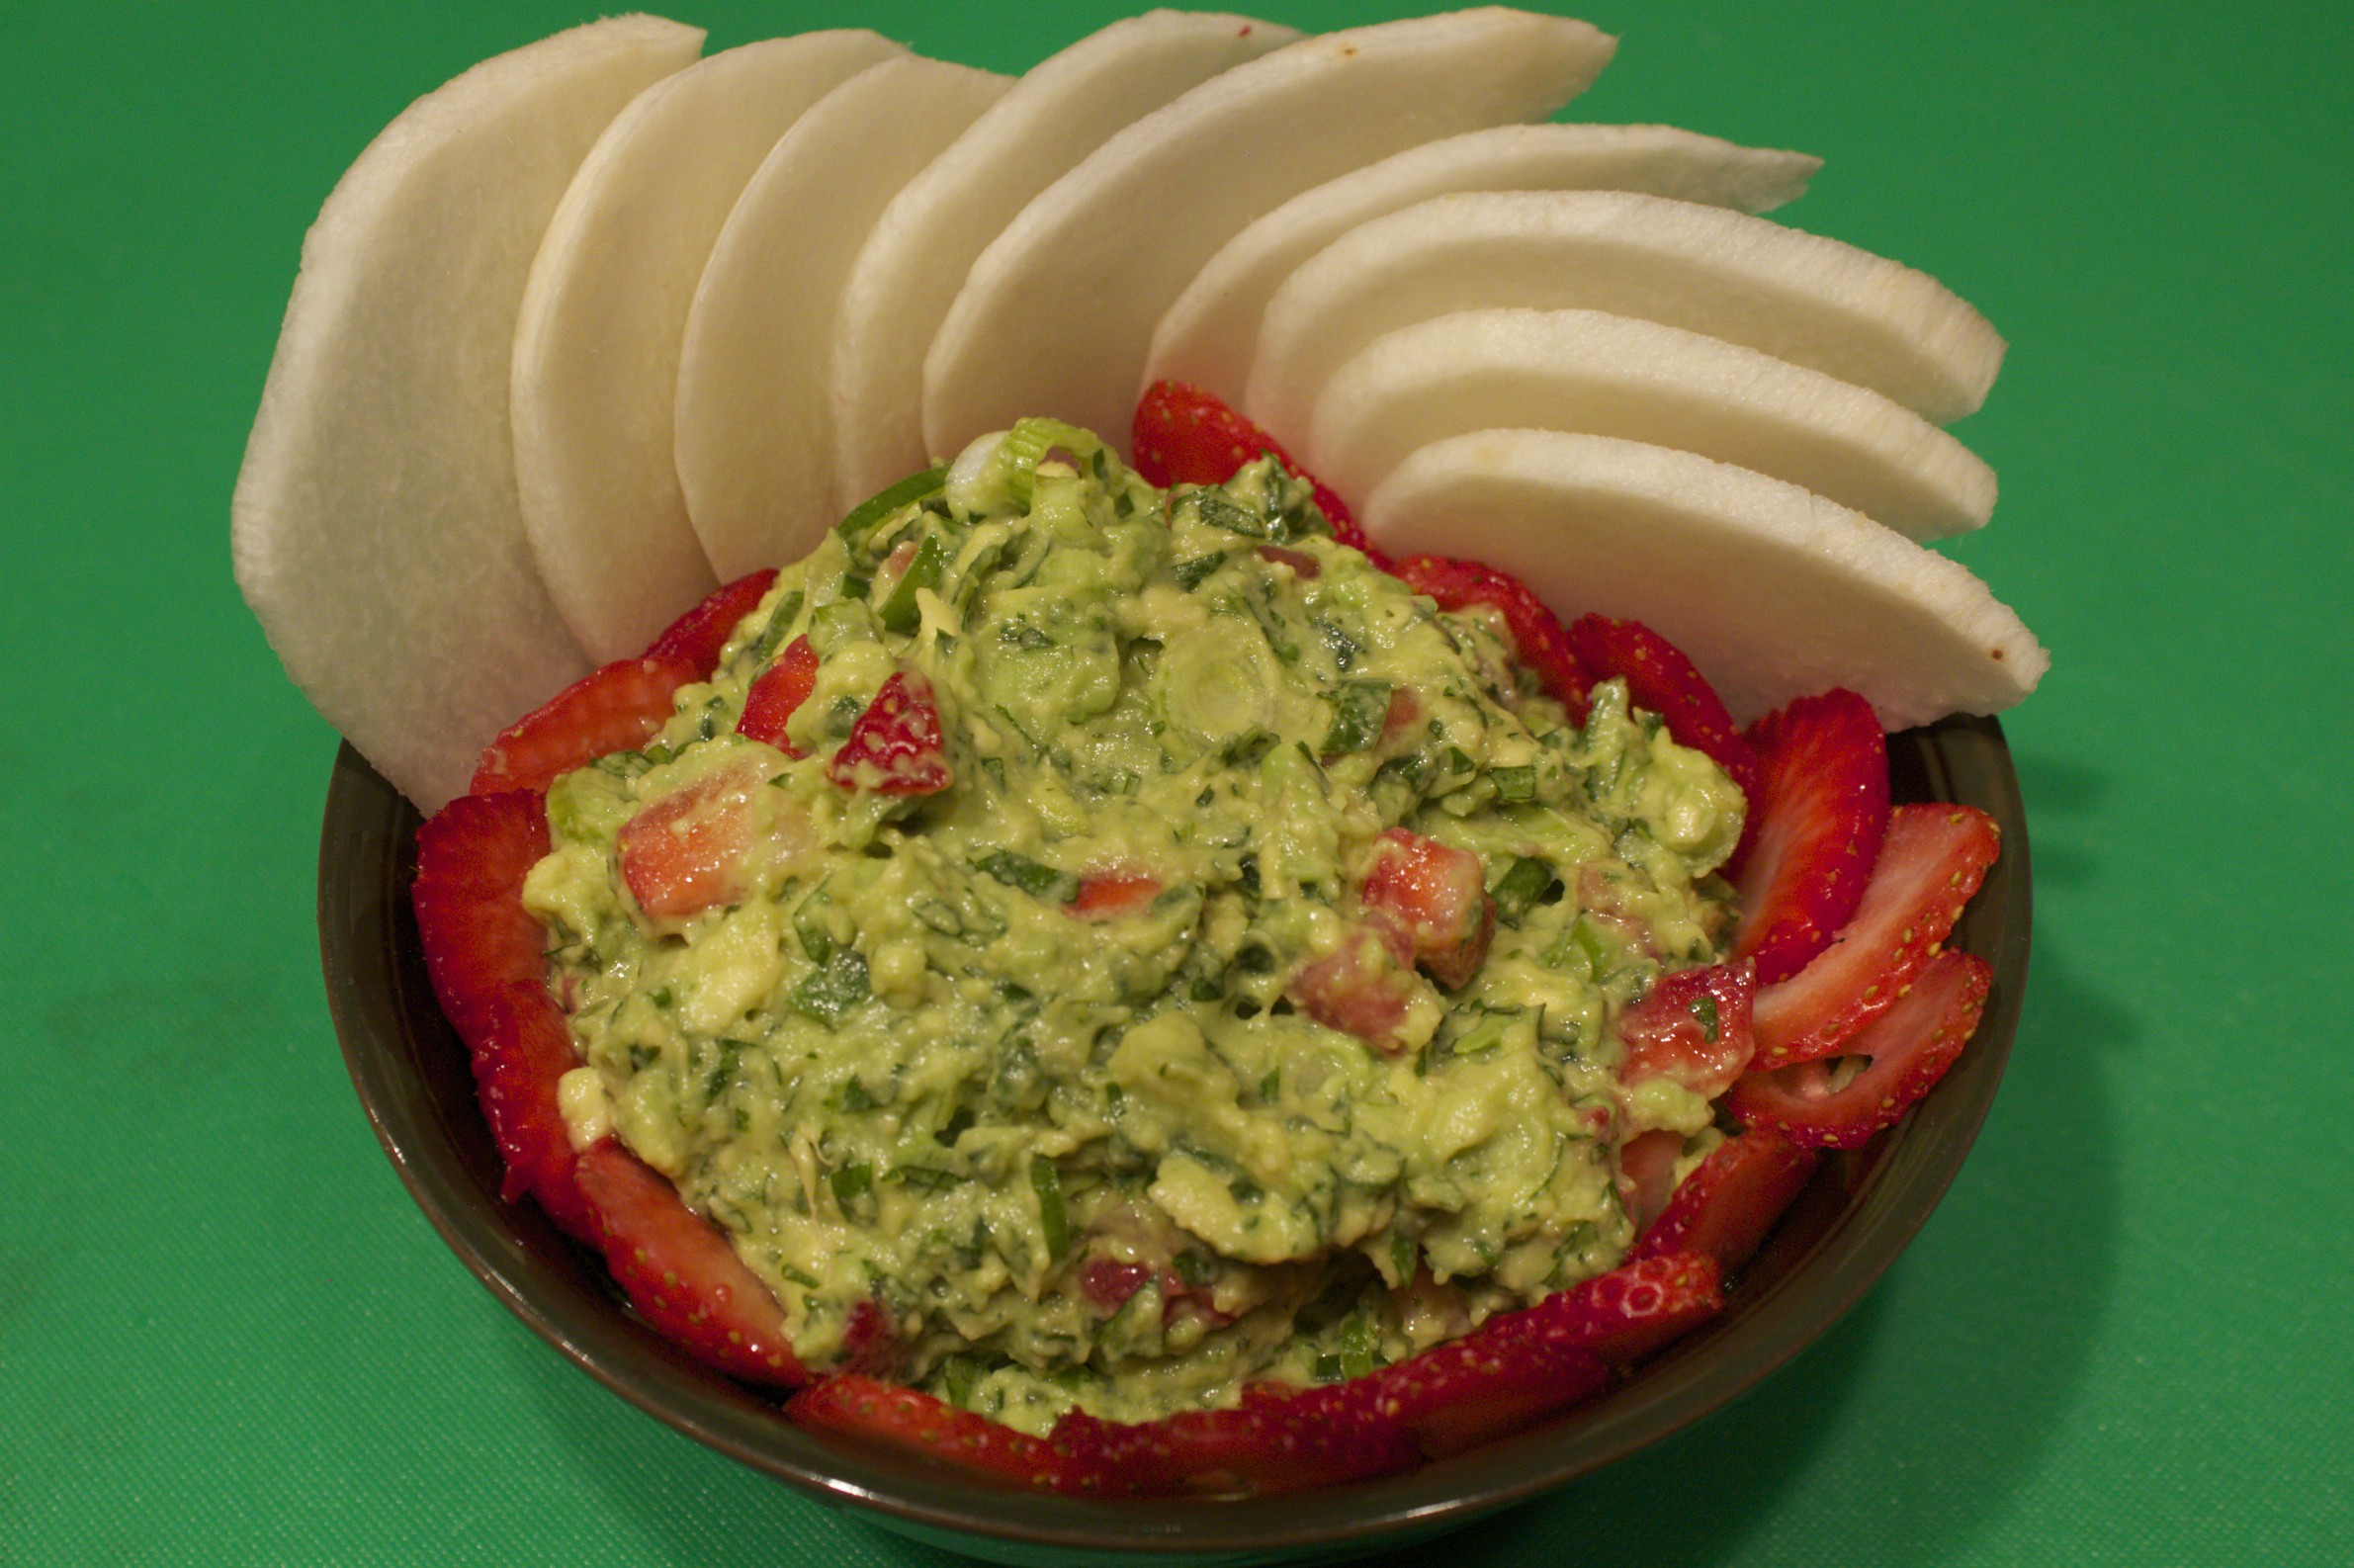 Strawberry Guacamole with Jicama Chips Fruit and avocado (which is technically a fruit itself) go well together, and it is traditional in Mexico to enjoy fruit-studded guacamole. Strawberries and guacamole are an especially refreshing and nutritious combination, containing lots of vitamin C from the strawberries and vitamin E from the avocados, as well as numerous phytochemicals and minerals from both. In the video, I show how to put this dish together in minutes. To make this attractive, summery version of a classic, start with a couple of ripe avocados. Cut them down the middle, and pop out the flesh into a bowl. Fork- mash them to break them up a bit, and then add a couple of tablespoons fresh lime juice as well as a teaspoon of salt. Mix in some essential guacamole ingredients: a couple of thinly sliced scallions, a quarter cup chopped fresh cilantro, and a couple of minced Serrano chiles. Mix all the green ingredients well before gently folding in a cup of chopped strawberries. Keep a few extra sliced strawberries as a garnish around the side of the bowl. I like to serve this colorful dip with jicama, the root vegetable that looks like a tuber but has a refreshing taste resembling that of a water chestnut. Make sure to choose a firm one free of too many blemishes. Peel the skin with a Y-shaped peeler, and cut it in half to safely position the vegetable cut-side down on the board. Then you can slice it into “chips.” Jicama makes a great alternative to the more typical corn chips. It is low-calorie and contains lots of fiber, as well as Vitamin C, making this a nutritious, light-but-filling snack or appetizer, as well a refreshing way to celebrate late spring and summer. Share on Facebook and Twitter | Fruit, Snacks, Vegetables | No comments
Butternut Squash Soup with Crispy Shallots and Sage Nothing screams autumn like butternut squash soup. The version shown in the video, from The Healthy Hedonist, is simple to prepare, yet velvety and delicious-tasting. I start with a 2 ½ to 3-pound butternut squash, slice it open down the middle, place it in a 375˚ oven and bake until it’s tender, about 45 minutes. With a soup as simple as this one, roasting the squash first to heighten its flavor is of the utmost importance. I then remove it from the oven, let it cool for a few minutes, and scoop out and discard the seeds. The seeds come out so much more easily after the squash is cooked. I then scoop out the flesh and set it aside. I start the soup by adding a splash of extra virgin olive oil to a medium pot. I stir in 1 cup of leeks, 6 cloves of garlic, and 1 ½ teaspoon ground cumin, and cook the mix over gentle heat until softened. I next add a couple cups of sliced sweet potatoes, the reserved squash flesh, a cup of apple cider, and 5 cups of water or stock. This is a good place to boost nutrient content and flavor with a homemade chicken or vegetable stock, but the soup is still delicious with water as the primary liquid. Add a teaspoon salt, and cook the soup partially covered at a gentle bubble for about fifteen minutes, until the sweet potatoes are tender. While the soup is simmering, I make the garnish. I slice shallots into thin rings and add them to ¼ cup extra virgin olive oil. At first, nothing seems like it is happening. Then the oil starts to sizzle, and slowly but surely the shallots start to fry around the edges of the pan. At that point, it’s important to stir continuously for the next three or four minutes, until the shallots are more or less evenly caramelized. At the final stage, some will be darker than others, but they should all have a golden hue. Have a strainer set over a bowl ready and close. When the shallots are colored as evenly as possible, you have to separate them from the hot oil quickly, to keep them from continuing to cook. About 15 seconds before the shallots are finished I add the sage, just to sizzle them in the oil. After I strain the oil, I remove the sage from the shallots and chop the leaves into small pieces. The sage, shallots, and oil are now ready lend flair to the soup. For simplicity’s sake, I blend the soup with a hand-held blender, also known as an immersion blender. I’m careful when using the immersion blender, to immerse it in the liquid before turning it on, as well as to turn it off before lifting the blender from the soup. At this last stage I always taste the soup, to see if it needs an extra dash of salt to pull up the flavors. I sprinkle in a dusting of black pepper as well. The soup has a delightful aroma and a rich taste. The silky texture is offset with the flourish of caramelized shallots and sage, and a drizzle of shallot oil.  Butternut Squash Soup with Crispy Shallots and Sage
Share on Facebook and Twitter | Kitchen Tips, Soups, techniques, Vegetables | No comments
Zucchini Salads Until recently, too many bad memories of thick chunks of raw zucchini in crudité platters made me shy away from ever eating the vegetable raw. I had assumed that the best way to coax and concentrate the flavor of the watery squash was to cook it. Before cooking, I’d often salt the zucchini to draw out the water. If I had grated it, I would squeeze out the excess; if I had sliced it, I would blot it dry before sautéing. I gave raw zucchini a second chance recently. The difference was that I sliced the vegetable paper thin. I then added a fat sprinkling salt to draw out the water. The slices wilted into an appealing texture that changed my assessment of raw zucchini. I’ve been making many delicious salad all summer with this technique. I repeat: the key is to slice the zucchini thin. This is where a mandolin comes in handy. I don’t use anything fancy—a plastic one or the slicer that is on some flat metal graters works fine. I then sprinkle some salt on the zucchini, along with something acidic like lemon and lime juice as well as all of the other ingredients. Sometimes I hold back on adding the oil until after the salad is completely softened. I let the zucchini wilt for about an hour, turning every so often.  Zucchini before Wilting These salads retain their good looks and flavor up to three days in the refrigerator. The salad pictured here includes lime juice, a few chopped anchovies, scallions, jalapeños, cilantro, dill, Thai fish sauce, and baby shrimp. I let it sit about an hour, mixing a couple of times, until the zucchini is wilted and tender. I then add some oil. Nowadays I’m using a blend of extra virgin olive oil, sesame oil, and filtered coconut oil. I serve this over a bed of mesclun for a delicious lunch.
The version I made the other day was with zucchini, salt, lemon juice, olives, mint, basil, and oil. If I had some cherry tomatoes I would have thrown those in as well. This humble vegetable (and use the yellow variety as well) lends itself to lots of possibilities for extraordinary dishes. Share on Facebook and Twitter | Kitchen Tips, Lunch, Main course, Vegetables | No comments
Red Cabbage Lacto-Fermented Sauerkraut Lately, I’ve been on a lacto-fermenting frenzy, fermenting everything from red cabbage to dill pickles to beet and fruit kvass. The lactobacilli, which are good bacteria, proliferate in fermented vegetables and fruit. The vegetables and fruit are easier to digest and the vitamin levels are increased as well. The main by-product of lacto-fermentation is lactic acid, which promote the growth of healthy flora throughout the intestine. What I like about these fruits and vegetables is that once they’re fermented, they last for a long time in the refrigerator. They’re an instant quick hit of super nutrition. Moreover, they are easy to produce. Here’s one of my favorites, a red cabbage ferment, that needs only salt to get the whole process of fermentation going. The salt inhibits any bacteria that could putrify the ferment until the lactic acid forms. I start with a head of finely shredded red cabbage. I add some shredded carrots, a piece of minced ginger, a tablespoon caraway seeds, and two tablespoons Celtic sea salt.
After stirring everything together, I massage the mix with my hands to help the cabbage release its juices. There’s no need to add water to the brine when you make a cabbage ferment.. You can pound that cabbage with a mallet or just put a weight on the cabbage ( a bowl with a weight in it works well). and it will start sweating away in no time.  Ready to Jar I then stuff the mix into a jar (a one quart bell jar is perfect) pressing down to make sure that there’s liquid floating on top. I make sure to have an inch of space at the top. (This is quite important to avoid leaks.) I leave this on my kitchen counter for 3 to 5 days. With a bell jar, the piece in the middle is hard to press down when the ferment is complete.  Make Sure There's Liquid on Top The red cabbage doesn’t look so bright in the beginning, but as it ferments it turns a beautiful magenta color. It’s best to transfer this to the refrigerator, where it can last a long time (up to a year) without opening. Once opened, it’s good for about three months.  Ready to Refrigerate  Hot Pink and Delicious Share on Facebook and Twitter | condiments, Health Tips, Kitchen Tips, Side Dishes, techniques, Vegetables | No comments
|