|
Not Your Ordinary Jello Shot
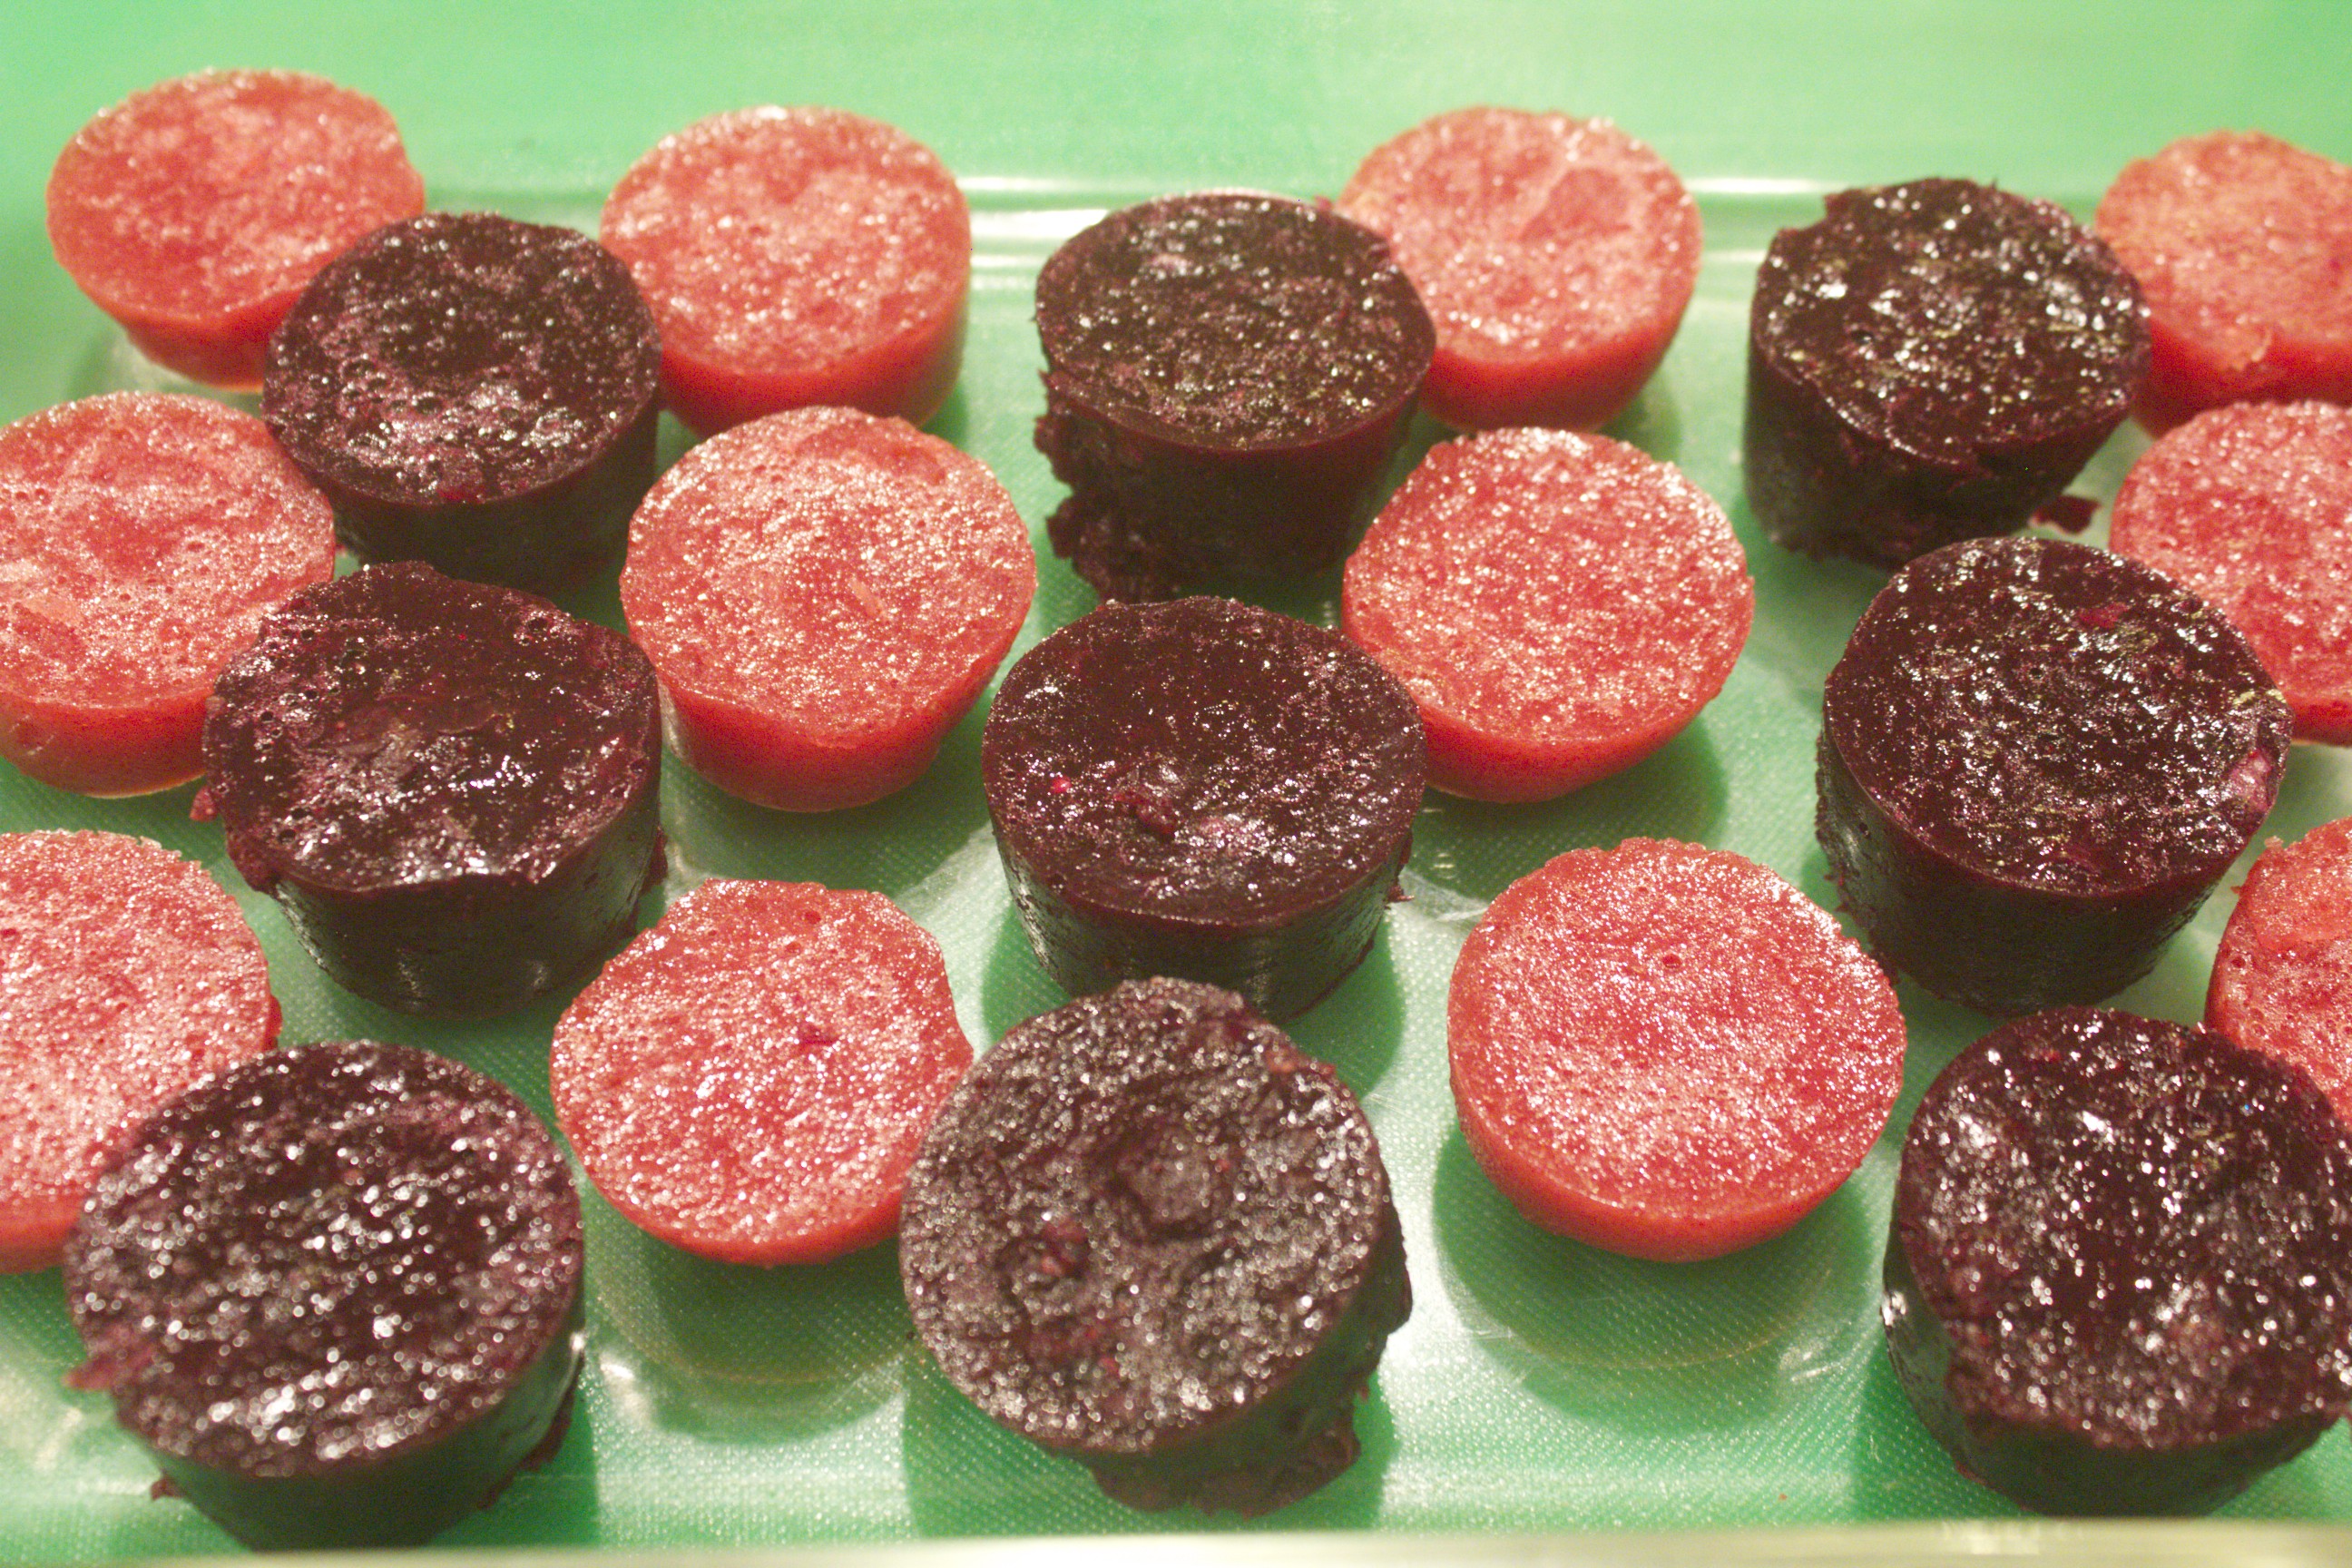
In today’s gelatin shot video, I demonstrate how to make berry jigglers, also known as gelatin shots. In case just hearing the word “gelatin” makes you think of images of wobbly neon molds popular in bygone eras, think again. These delightful bites are made purely from berries, so they’re more like gelled fruit bites. They have only the minimal number of ingredients; and good quality gelatin makes these refreshing nibbles extra nutritious. Gelatin has many healing properties: it soothes the gut lining; it strengthens bones, ligaments, skin and hair; and it regulates blood sugar. And that’s just the short list. To get the most healing benefits from these jiggers, make the effort to obtain powdered gelatin from grassfed cows, which is readily available nowadays. In the video, I demonstrate two flavors of jigglers, beginning with the blueberry version. It hardly matters whether you use fresh or frozen fruit. Add 2 1/2 cups berries to a medium pot or saucepan along with 1/2 cup of liquid. In the demonstration, I use coconut water, but apple or other fruit juice works as well. Let the berries heat to a gentle bubble to soften. Then, blend the berries until smooth. This is a good occasion to use an immersion blender if you have one. Tilt the pot to make sure to blend the berries evenly without splattering. Transfer them to a bowl to cool for about 10 minutes. Gelatin dissolves best in warm liquid, not super hot. I also demonstrate a version made with strawberries and raspberries. Working with berries with seeds requires an extra step; the seeds need to be strained. After the berries are heated and puréed, press them through a fine-meshed wire strainer. Use the bottom of a ladle, rotating it in a circular motion to push the puree through quickly and efficiently. You’ll be left with just a handful of seeds in the strainer basket, which you can discard or give to the compost worms. Make sure to use a spatula to collect any of the puree that is stuck to the bottom of the strainer—that’s good stuff you don’t want to waste. Since raspberries tend to be a bit tart, stir in a tablespoon or so of honey to sweeten them just a tad. Now it’s time to add the gelatin. Two tablespoons is the perfect amount to set each of these purees just right (neither too hard nor too loose). Sprinkle the powder evenly over the top, then stir the gelatin in until it’s completely dissolved. Next, pour the mix into molds and chill until set, about 2 hours or so. Use whatever you like or have for a mold. Some examples of kitchen favorites that make good molds include 8×8-inch baking pans, ice cube trays, or—my personal favorite, and the type that I show in the video—silicon mini muffin molds. These flexible molds make it especially easy to pop out the individual jigglers. After the stint in the refrigerator, unmold by running a blunt knife or small spatula around the edge of the mold, then lift—or in the case of the silicon—pop out the pieces. If you’ve poured your puree into a baking dish, simply slice the jigglers into squares before lifting out the pieces with an offset spatula. Stack the jiggers in a covered container, and refrigerate for up to two weeks. These shots are wonderful to keep on hand for an instant snack or low-key dessert. I like to eat a few of these in the morning instead of a piece of fruit. Once you’ve made these a couple of times, I’m certain you’ll want to keep a regular stash. I know I do. Share on Facebook and Twitter | desserts, Fruit, Snacks, Uncategorized | No comments
Acai Bowls
Acai berries contain many beneficial compounds, such as powerful antioxidants, fiber, monounsaturated fats (oleic acid), and anthocyanins, which are all clinically proven to have health benefits. Because they’re so low not only in sugar, but also in the acid that protects most fruits, they must be picked, processed, and flash frozen before being transported out of the Amazon. Otherwise the fruit would oxidize, turn brown, and lose its beneficial nutrients. The berries are squeezed into juice or—my favorite—pureed into frozen smoothie packs. These are sold in the freezer section of natural food stores. You can take advantage of the packs by making delicious frozen treats without using an ice cream maker. The only equipment required is a food processor. In today’s video, I demonstrate two delicious bowls that are suitable for dessert, snacks, or even breakfast. Each one has healthy fat added to keep your blood sugar stable and help you feel satisfied for hours. They’re quick to make: You whirl a few ingredients together, then immediately eat what you’ve made. You can store leftovers in the freezer, but you do have to let them thaw before eating. The first bowl that I demonstrate in the video is flavored with cherries, cocoa, and almonds, all of which complement the acai. Begin by adding 2 unsweetened smoothie packages to the bowl of a food processor. It’s best to let the acai pack sit out for 5 minutes or so to thaw slightly, so it’s not rock hard when you whirl it. Add a cup of frozen cherries, half a ripe avocado, a couple tablespoons cocoa powder, a tablespoon raw honey, and 1/4 teaspoon almond extract. Now you’re ready to whirl, except you need to add about 1/2 cup of liquid to loosen up the mixture. (In the demo video I add coconut milk, but almond and cashew milk are both delicious as well.) A quick whirl in the food processor melds these ingredients into a luscious concoction. To add a bit of texture, top the two servings with a sprinkling of almonds and cocoa nibs, and a dash of cocoa powder. The second bowl features bananas and almond butter. Again, start with two packages of acai smoothie packs, the contents broken into chunky pieces. Add one chopped frozen banana, 3 pitted medjool dates, a tablespoon almond butter, and a dash cinnamon. Loosen the whole mix with 1/2 cup of coconut milk. Again, a quick whirl transforms the whole mix into frozen ambrosia. Top this banana-almond acai bowl with large flakes of dried coconut and rosy goji berries. These simple blends are so easy to make with ingredients that you can keep handy in your freezer and pantry. These bowls (which can serve as a snack, a breakfast, or a dessert) underscore that a luscious frozen treat can both satisfy a sweet tooth and be truly health-promoting.
Share on Facebook and Twitter | Breakfast, desserts, Fruit, Gluten Free, ingredients, Recipes, Snacks, techniques, Uncategorized | No comments
Cauliflower-crusted Pizzas
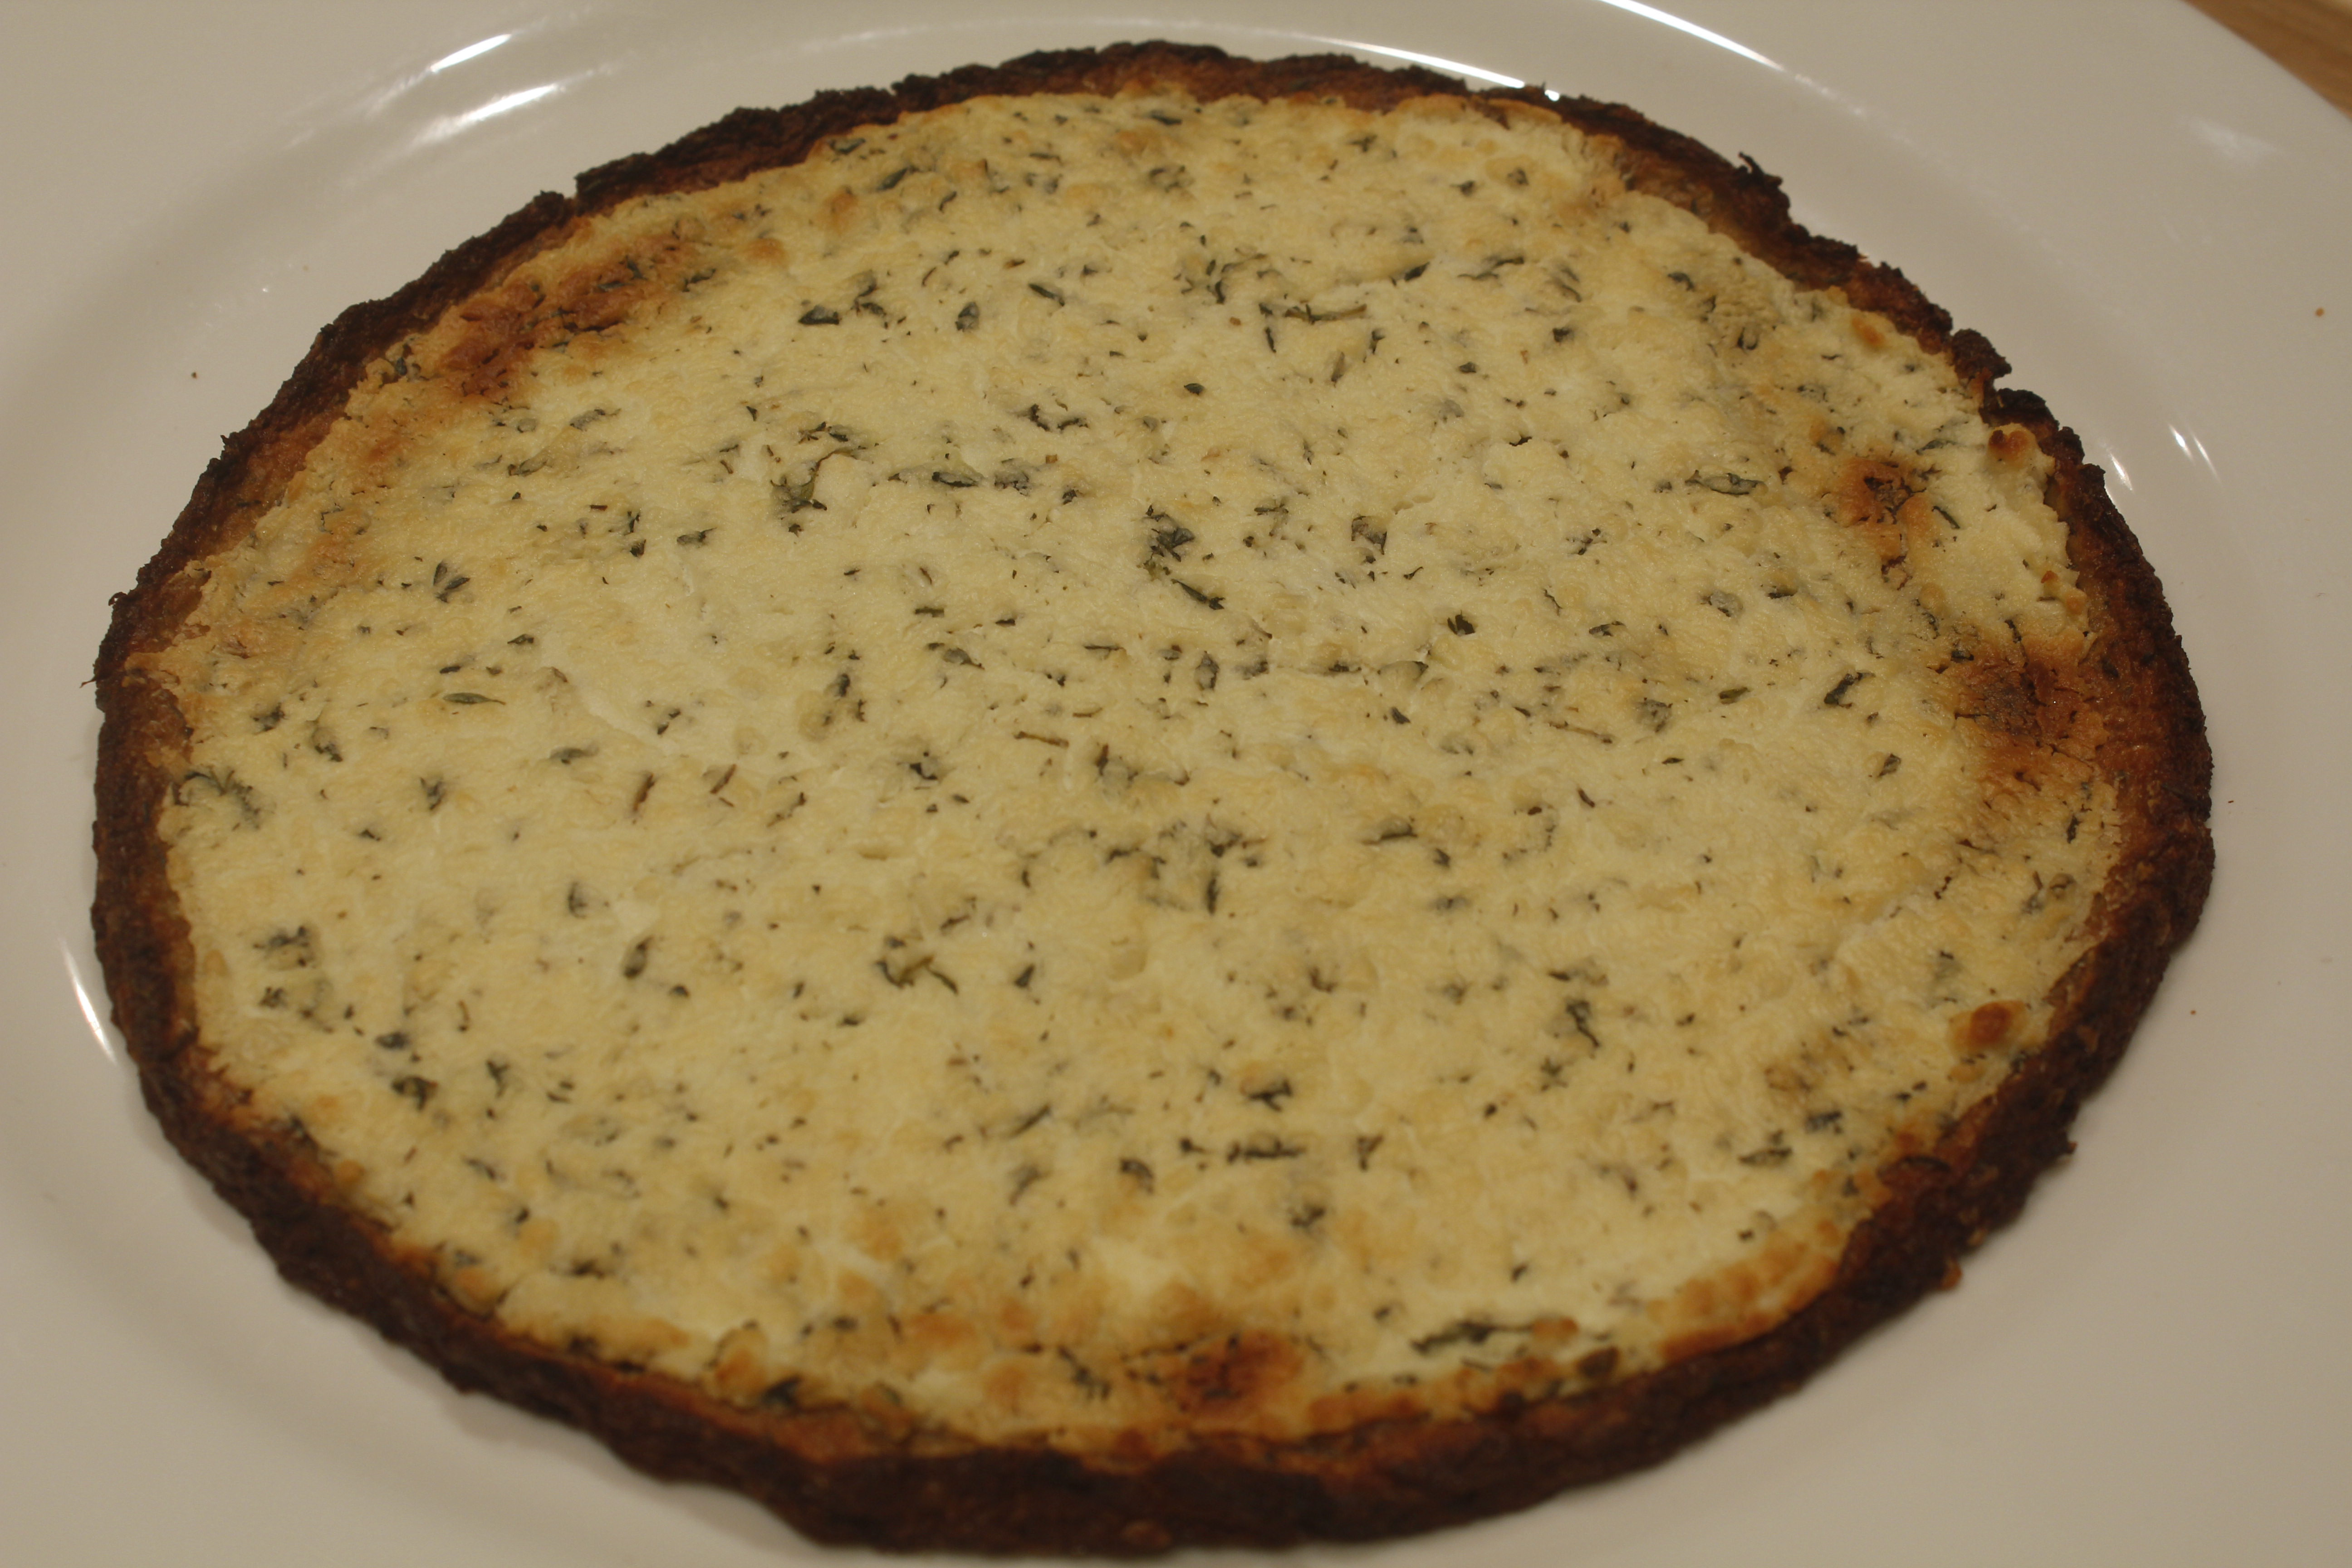
In today’s video on cauliflower-crusted pizzas, I show how to make a couple of variations on a cauliflower-crusted pizza. These delicious pizzas are light and low carb, yet as satisfying as traditional pizza. And, of course, you can vary the toppings to suit your preferences. To begin, cut a medium-sized cauliflower into florets. Pulverize the florets in a food processor until they take on a crumbly, couscous-like texture. Because you’re grinding the cauliflower raw, you’re not in danger of turning it into a puree. Next, have ready a pot with about an inch of boiling water. Add the cauliflower and blanch for 2 to 3 minutes, then pour into a fine mesh strainer to drain. Let the cauliflower cool for a few minutes. Now—and this part is very important—wrap the cauliflower granules in a tea towel and squeeze to extract as much liquid as you can. You may be surprised at just how much water comes out. Finally, turn the squeezed mass into a bowl; by this time, the cauliflower actually has the texture of a dough, and you’re ready to flavor it. The crust needs a binder; for this purpose, a couple of lightly beaten eggs are essential. To flavor the dough, stir in a teaspoon of dried thyme, and half that amount of garlic powder and salt. Next, decide whether or not you wish your crust to contain a little cheese or to be dairy free. Stir in 1/2 cup of grated Parmesan for a delectable cheese version. For an equally scrumptious dairy-free variation, replace the cheese with 1/4 cup almond flour and 1 tablespoon nutritional yeast. The nutritional yeast lends a cheese-like flavor to the combination. In the video, I demonstrate a half version of both the crust with cheese and the crust with almond flour. The next step is to press out the crust on a parchment-covered baking sheet. A medium sized head of cauliflower should press into about two 8-inch pizzas. Press the crust down to about 1/8-inch thickness, leaving a raised border around the edges. You do need to bake it until golden before topping. 30 to 40 minutes in a 400˚F oven will color the crust just right. You can assemble the crusts and bake them up to a day in advance; refrigerate them until you’re ready to add the toppings and bake the pizzas. I present two toppings in the video, but these are merely two ideas out of many. The first one is a classic combination of toppings: the requisite tomato pizza sauce and dollops of fresh mozzarella. Refrain from overdoing the mozzarella since it tends to spread a lot when it melts. This one also has crumbled cooked ground beef and wilted spinach. The surface is then dusted with grated Parmesan. The second is a goat cheese topping. Four ounces of soft cheese are mashed in a bowl with a clove of minced garlic, a dollop of Dijon mustard, a couple tablespoons fresh thyme, a tablespoon olive oil, and a sprinkle of salt. Using an offset spatula makes spreading the cheese over the crust smooth and effortless. Both pizzas return to the oven for 10 minutes, until the toppings have colored, the cheese is melted, and everything is heated through.
Transforming cauliflower into a crust is exciting, and the pizzas taste amazing. This is a deliciously fun way to have your pizza and your vegetables too! Share on Facebook and Twitter | Gluten Free, Main course, techniques, Uncategorized, Vegetables | No comments
The Myriad Uses of Cooked Squash
‘Tis the season to be savoring sweet squash. In today’s video, I demonstrate the richness and versatility of cooked squash. With a tub of the bright orange flesh on hand, you can quickly whip up any number of autumnal dishes. You can keep cooked squash refrigerated for up to a week, or you can freeze it. Although there are all kinds of wonderful varieties of squash and pumpkin available in farmers’ markets, in the video I demonstrate with butternut: the smooth, flavorful workhorse of the squash world. To prep the squash—use a 21/2 to 3-pound butternut—slice it down the middle, and place it face down on a parchment-covered baking sheet. Roast it at 325˚F to 375˚F (the temperature depends on what’s already in the oven cooking; anything within this range is good!) until very tender, about 45 minutes. Rest the squash until cool enough to handle, then scoop out and discard the seeds, which is much easier to do after the squash is cooked. Scoop the flesh into a bowl and reserve. The first recipe in the video is for a speedy soup. To begin, in a medium pot sauté 1/2 cup of chopped leeks along with a tablespoon or so of minced ginger in a couple tablespoons fat (coconut oil, ghee, or extra virgin olive oil are all good) over medium heat. When the vegetables are softened, add a quart of stock—this is a great place to use a homemade chicken or vegetable broth—a can unsweetened coconut milk, the reserved squash flesh, and 1 1/2 teaspoons salt. Let the soup cook a few minutes to marry the flavors, then finish with a flick of cayenne and a splash of lime juice. Voilà: a delicious soup! Serve up a hearty bowl dusted with chopped cilantro. The second recipe is for a light yet substantial pumpkin pie-spiced breakfast pancake. The recipe makes 2 servings, but you can easily scale it up. Start with a couple tablespoons coconut flour in a bowl. Add a mix of spices: 1/2 teaspoon cinnamon powder; and a pinch of nutmeg, ginger, and allspice. Add a large pinch baking soda and salt, and whisk together the dry ingredients. Then add 1/2 cup squash flesh, a couple of lightly beaten eggs, a tablespoon maple syrup, 1/2 teaspoon vanilla extract, and 1 tablespoons melted fat (butter or coconut oil). Mix vigorously, and you’re ready to make pancakes. To cook, film a griddle or nonstick skillet with oil until your hand held 1 inch above the pan is uncomfortable. This batter is a little more delicate than a typical flour-based batter; for best results, opt for medium-size pancakes, and above all, resist crowding the pan. Drop the batter—a tablespoon at a time—into the sizzling skillet until you have four swelling hotcakes. Leave the pancakes alone until browned and toasty on the bottom, then flip and cook a few more minutes on the second side. Transfer to a plate, and repeat with the remaining batter. Serve these airy cakes with butter, fruit, or a drizzle more sweet syrup. These are just two of the many wonderful dishes that you can make with squash flesh. Yes, it takes 45 minutes or so to cook the squash, but the oven does the work, so it’s not your time. With cooked squash on hand, you can whip any number of delectables together in minutes. Share on Facebook and Twitter | Breakfast, Kitchen Tips, Soups, Uncategorized, Vegetables | No comments
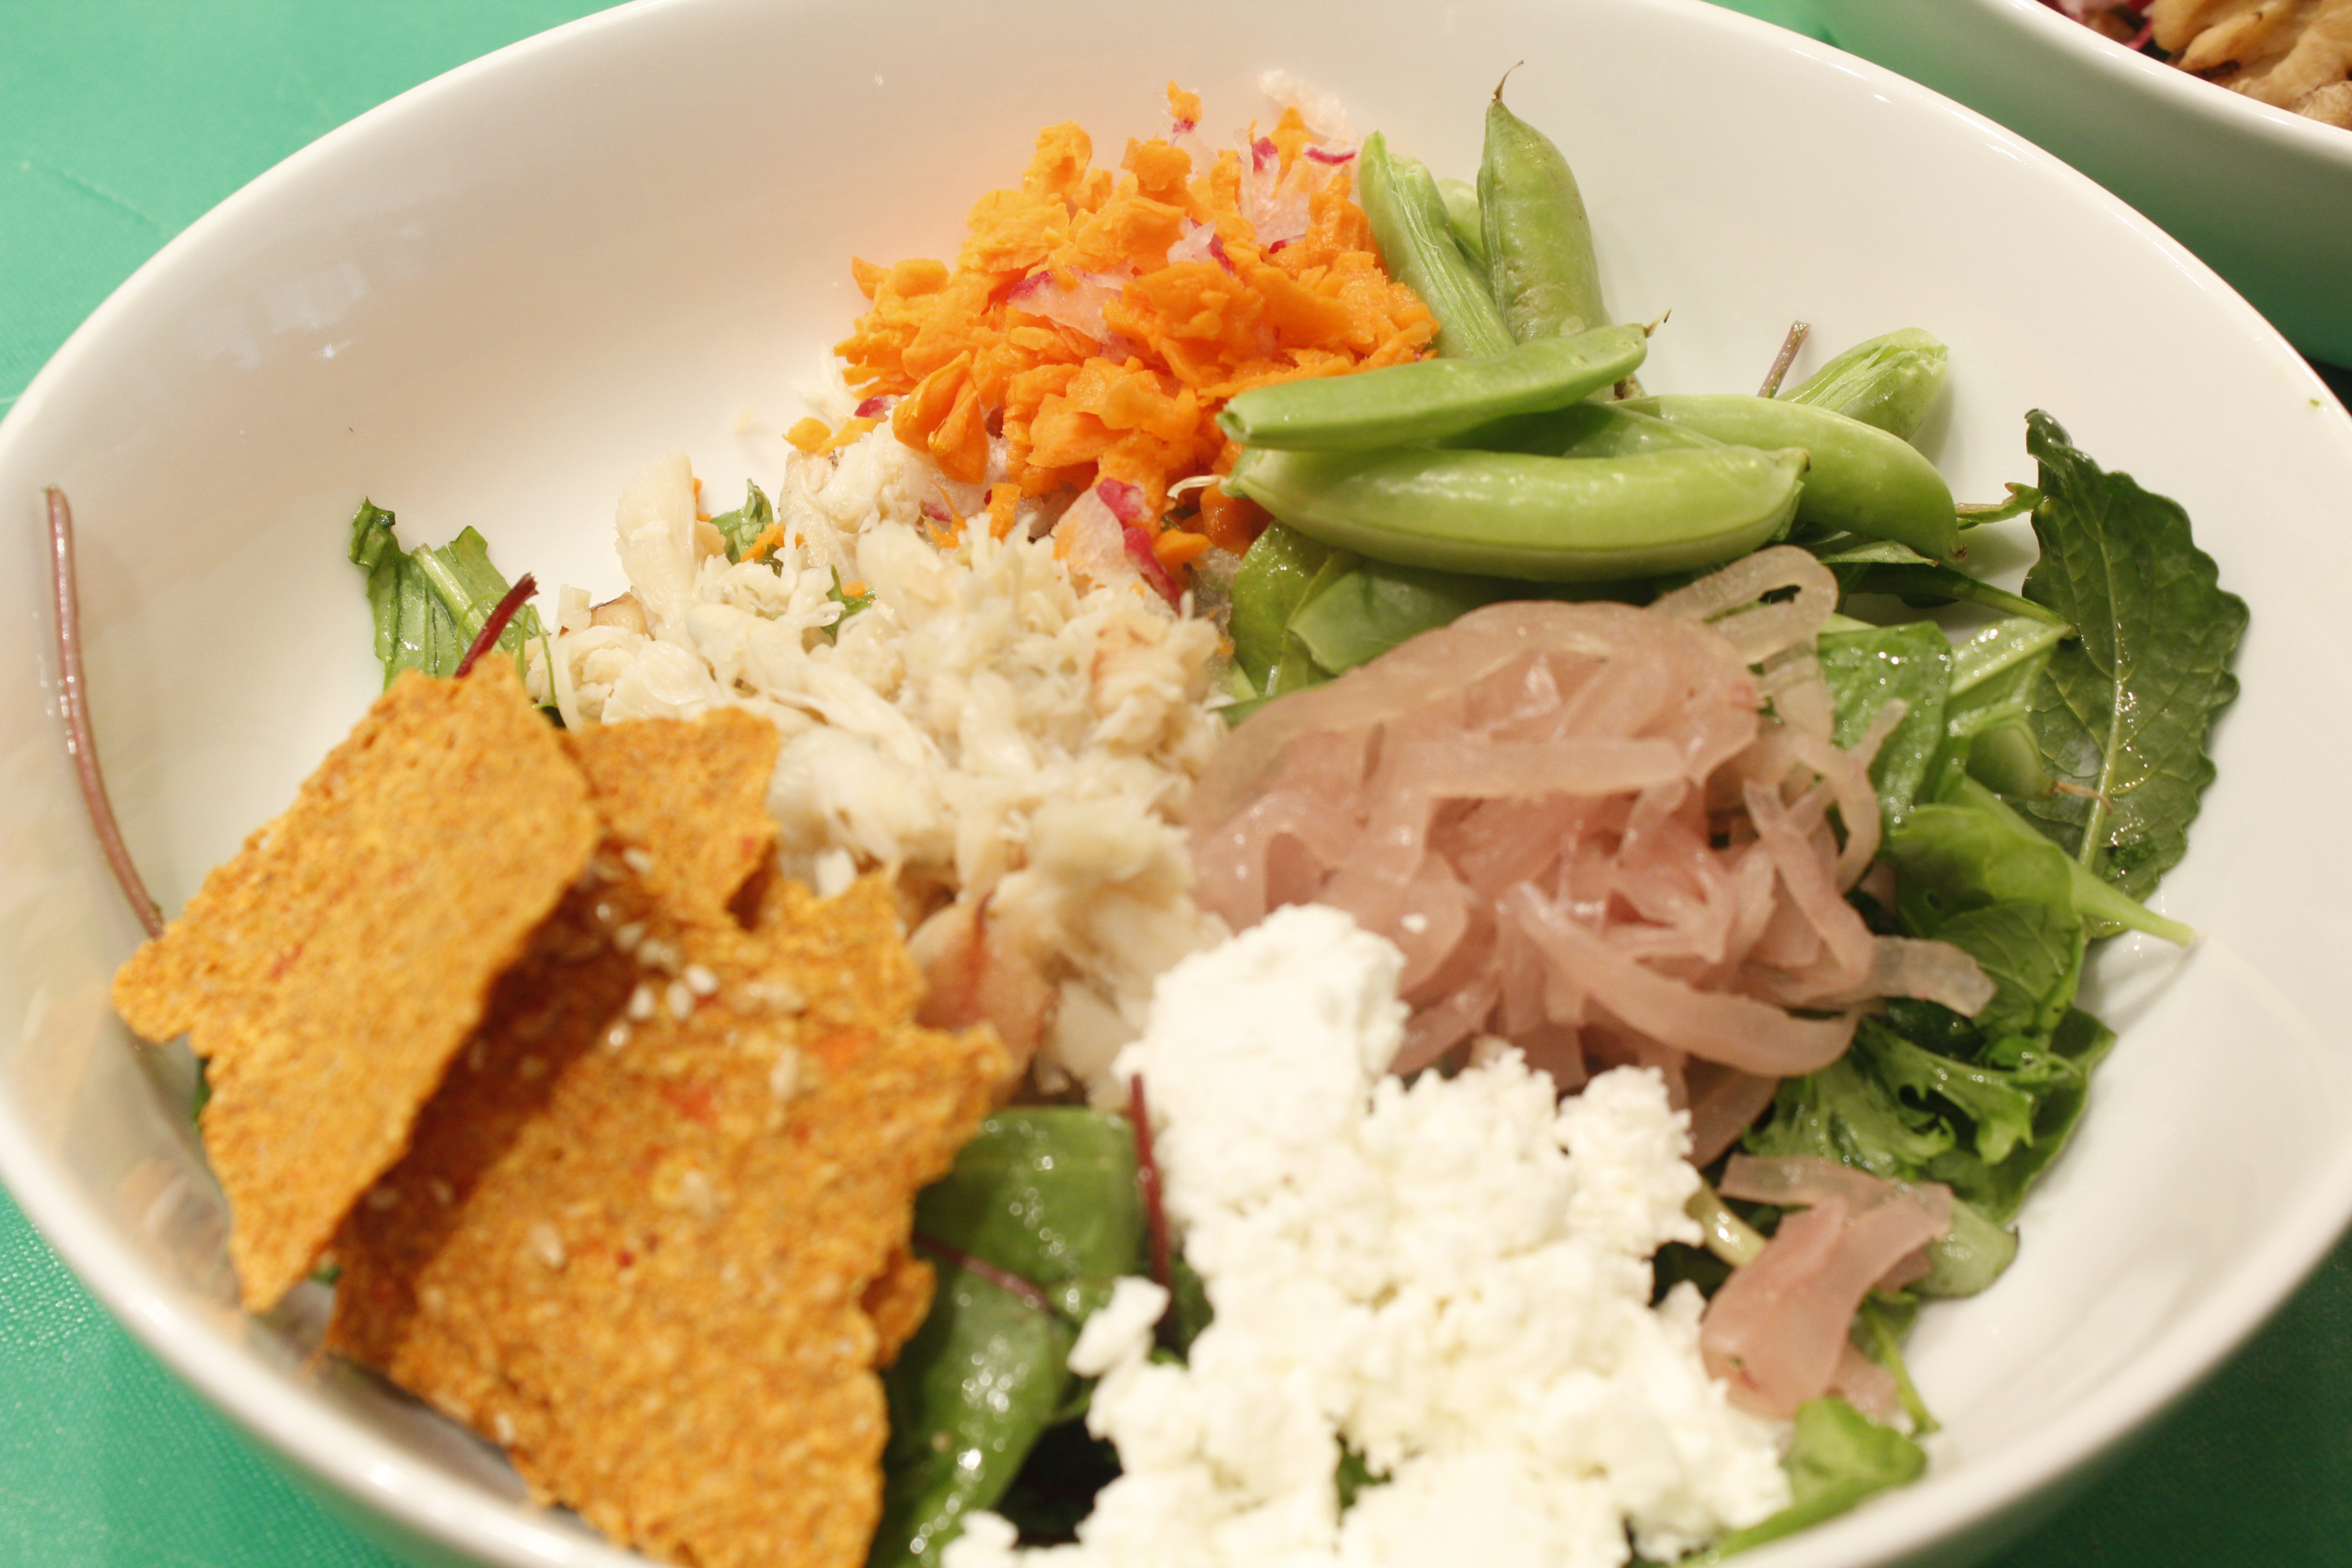
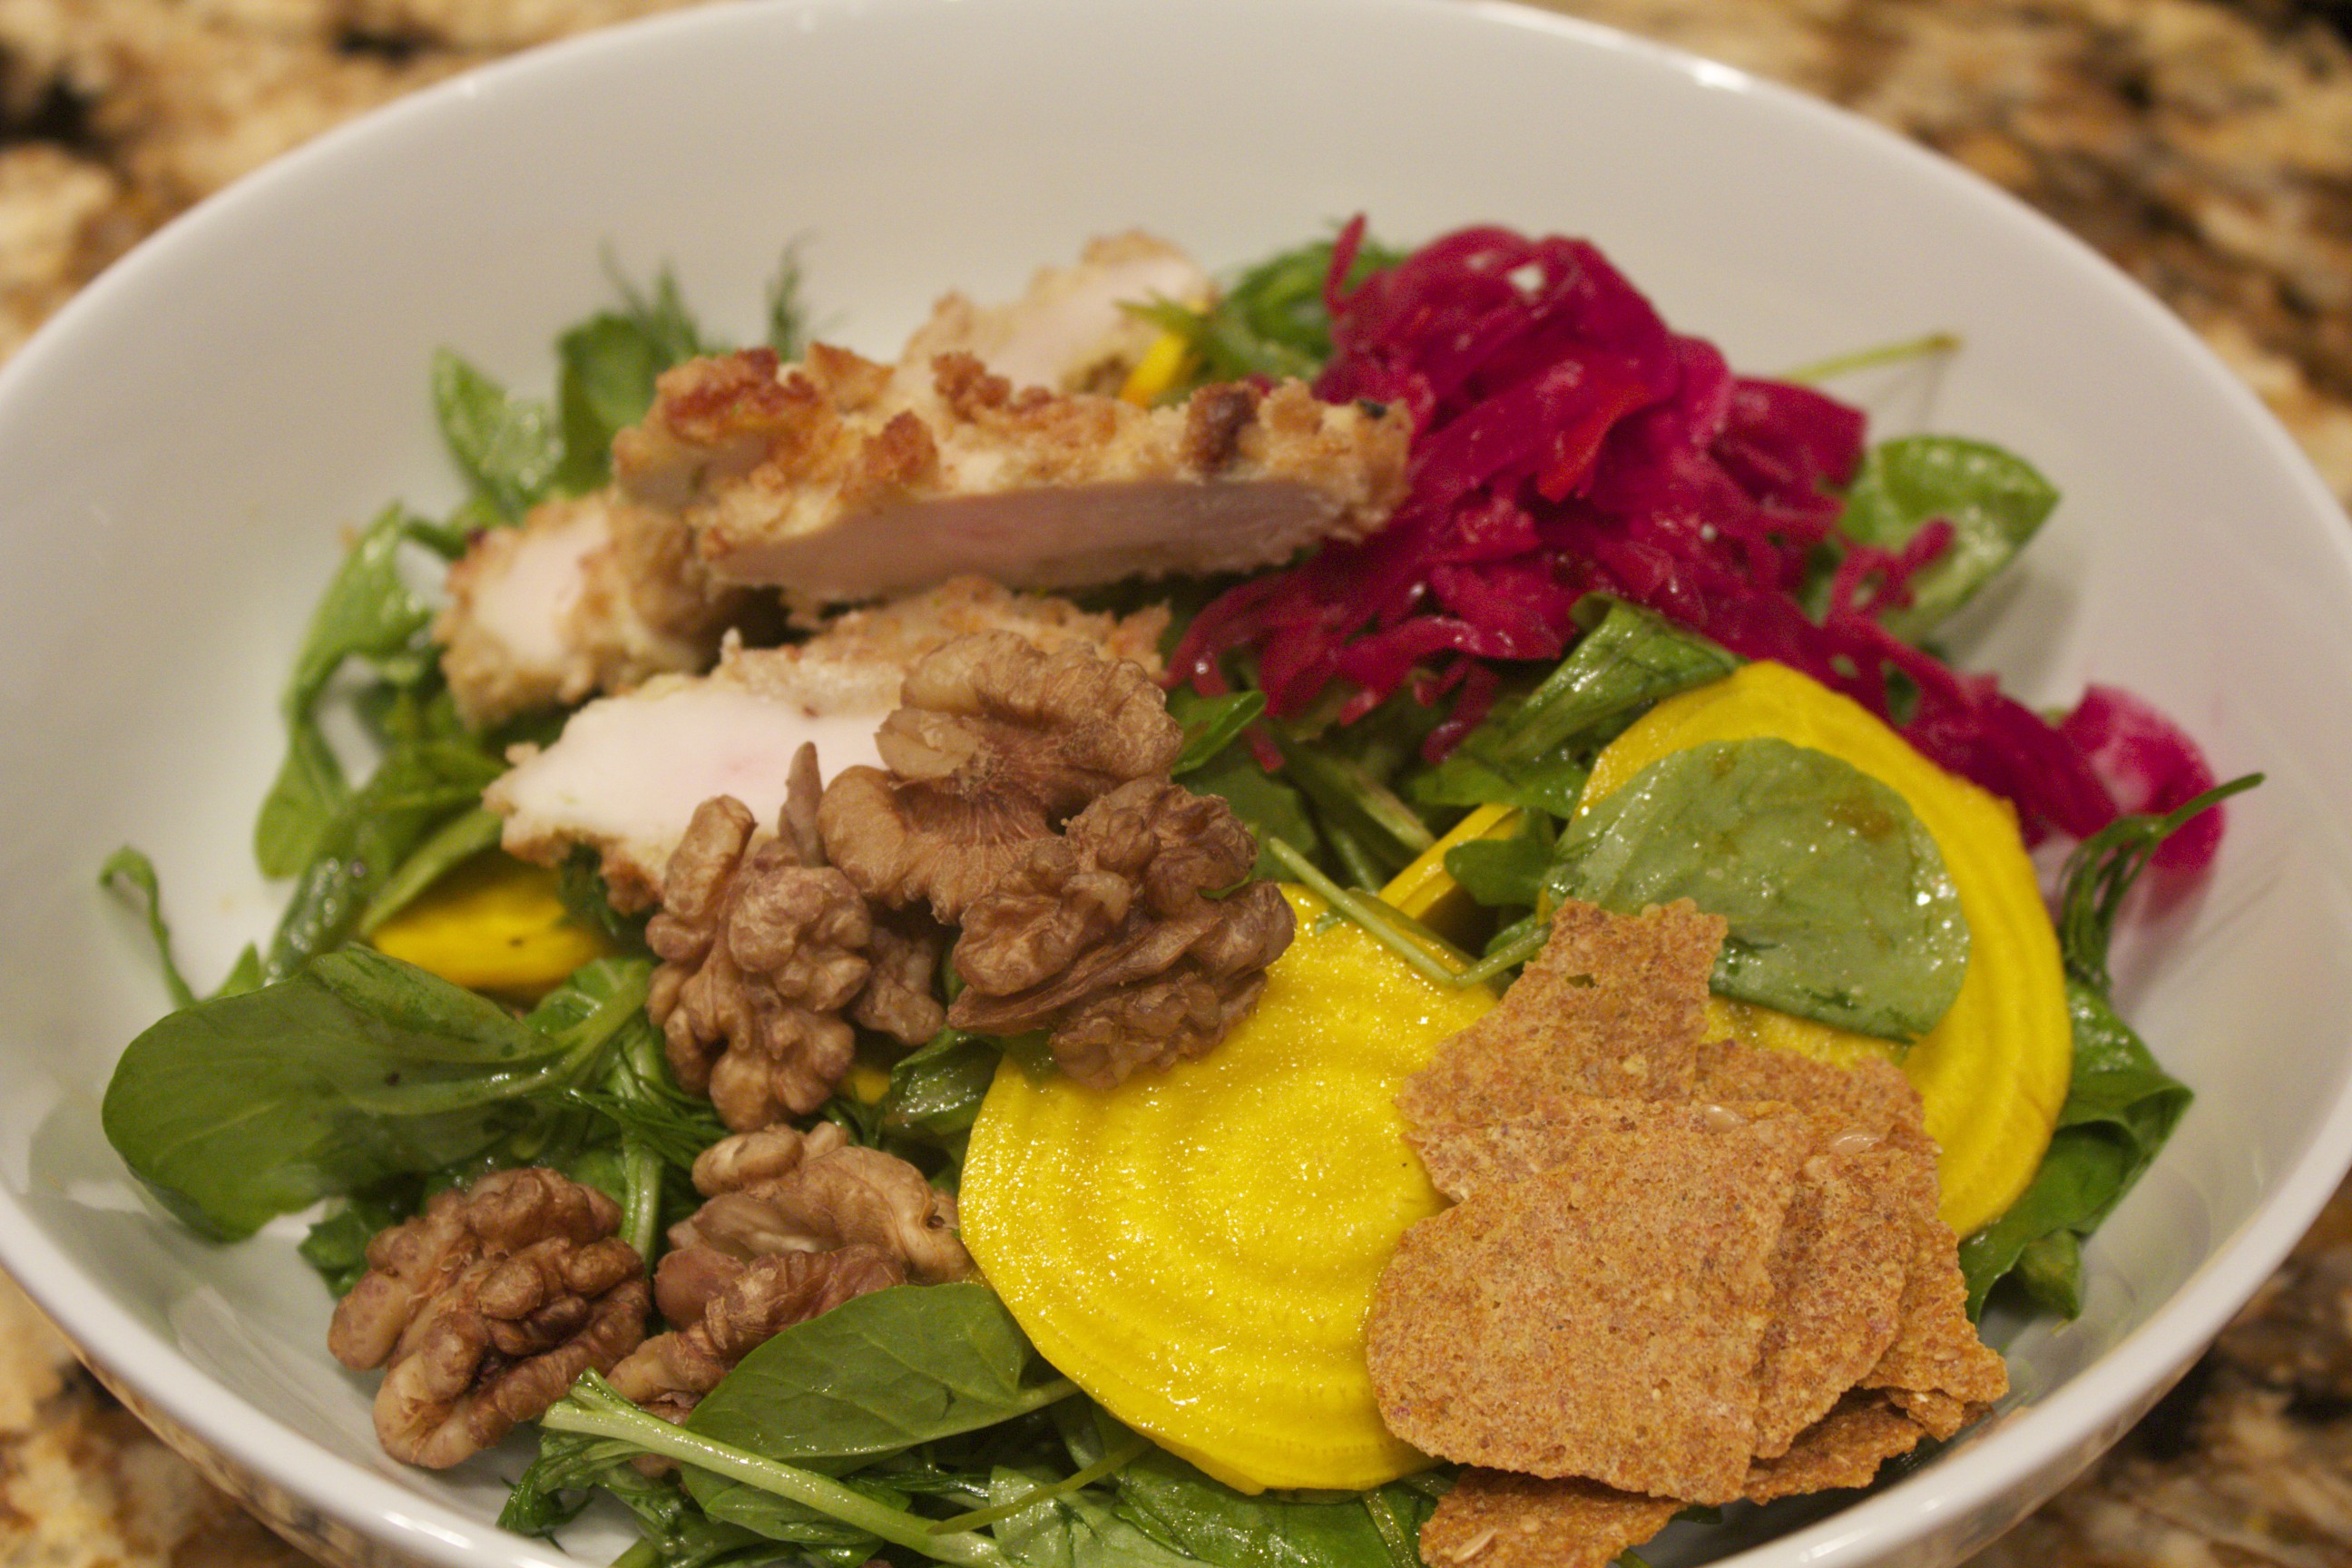
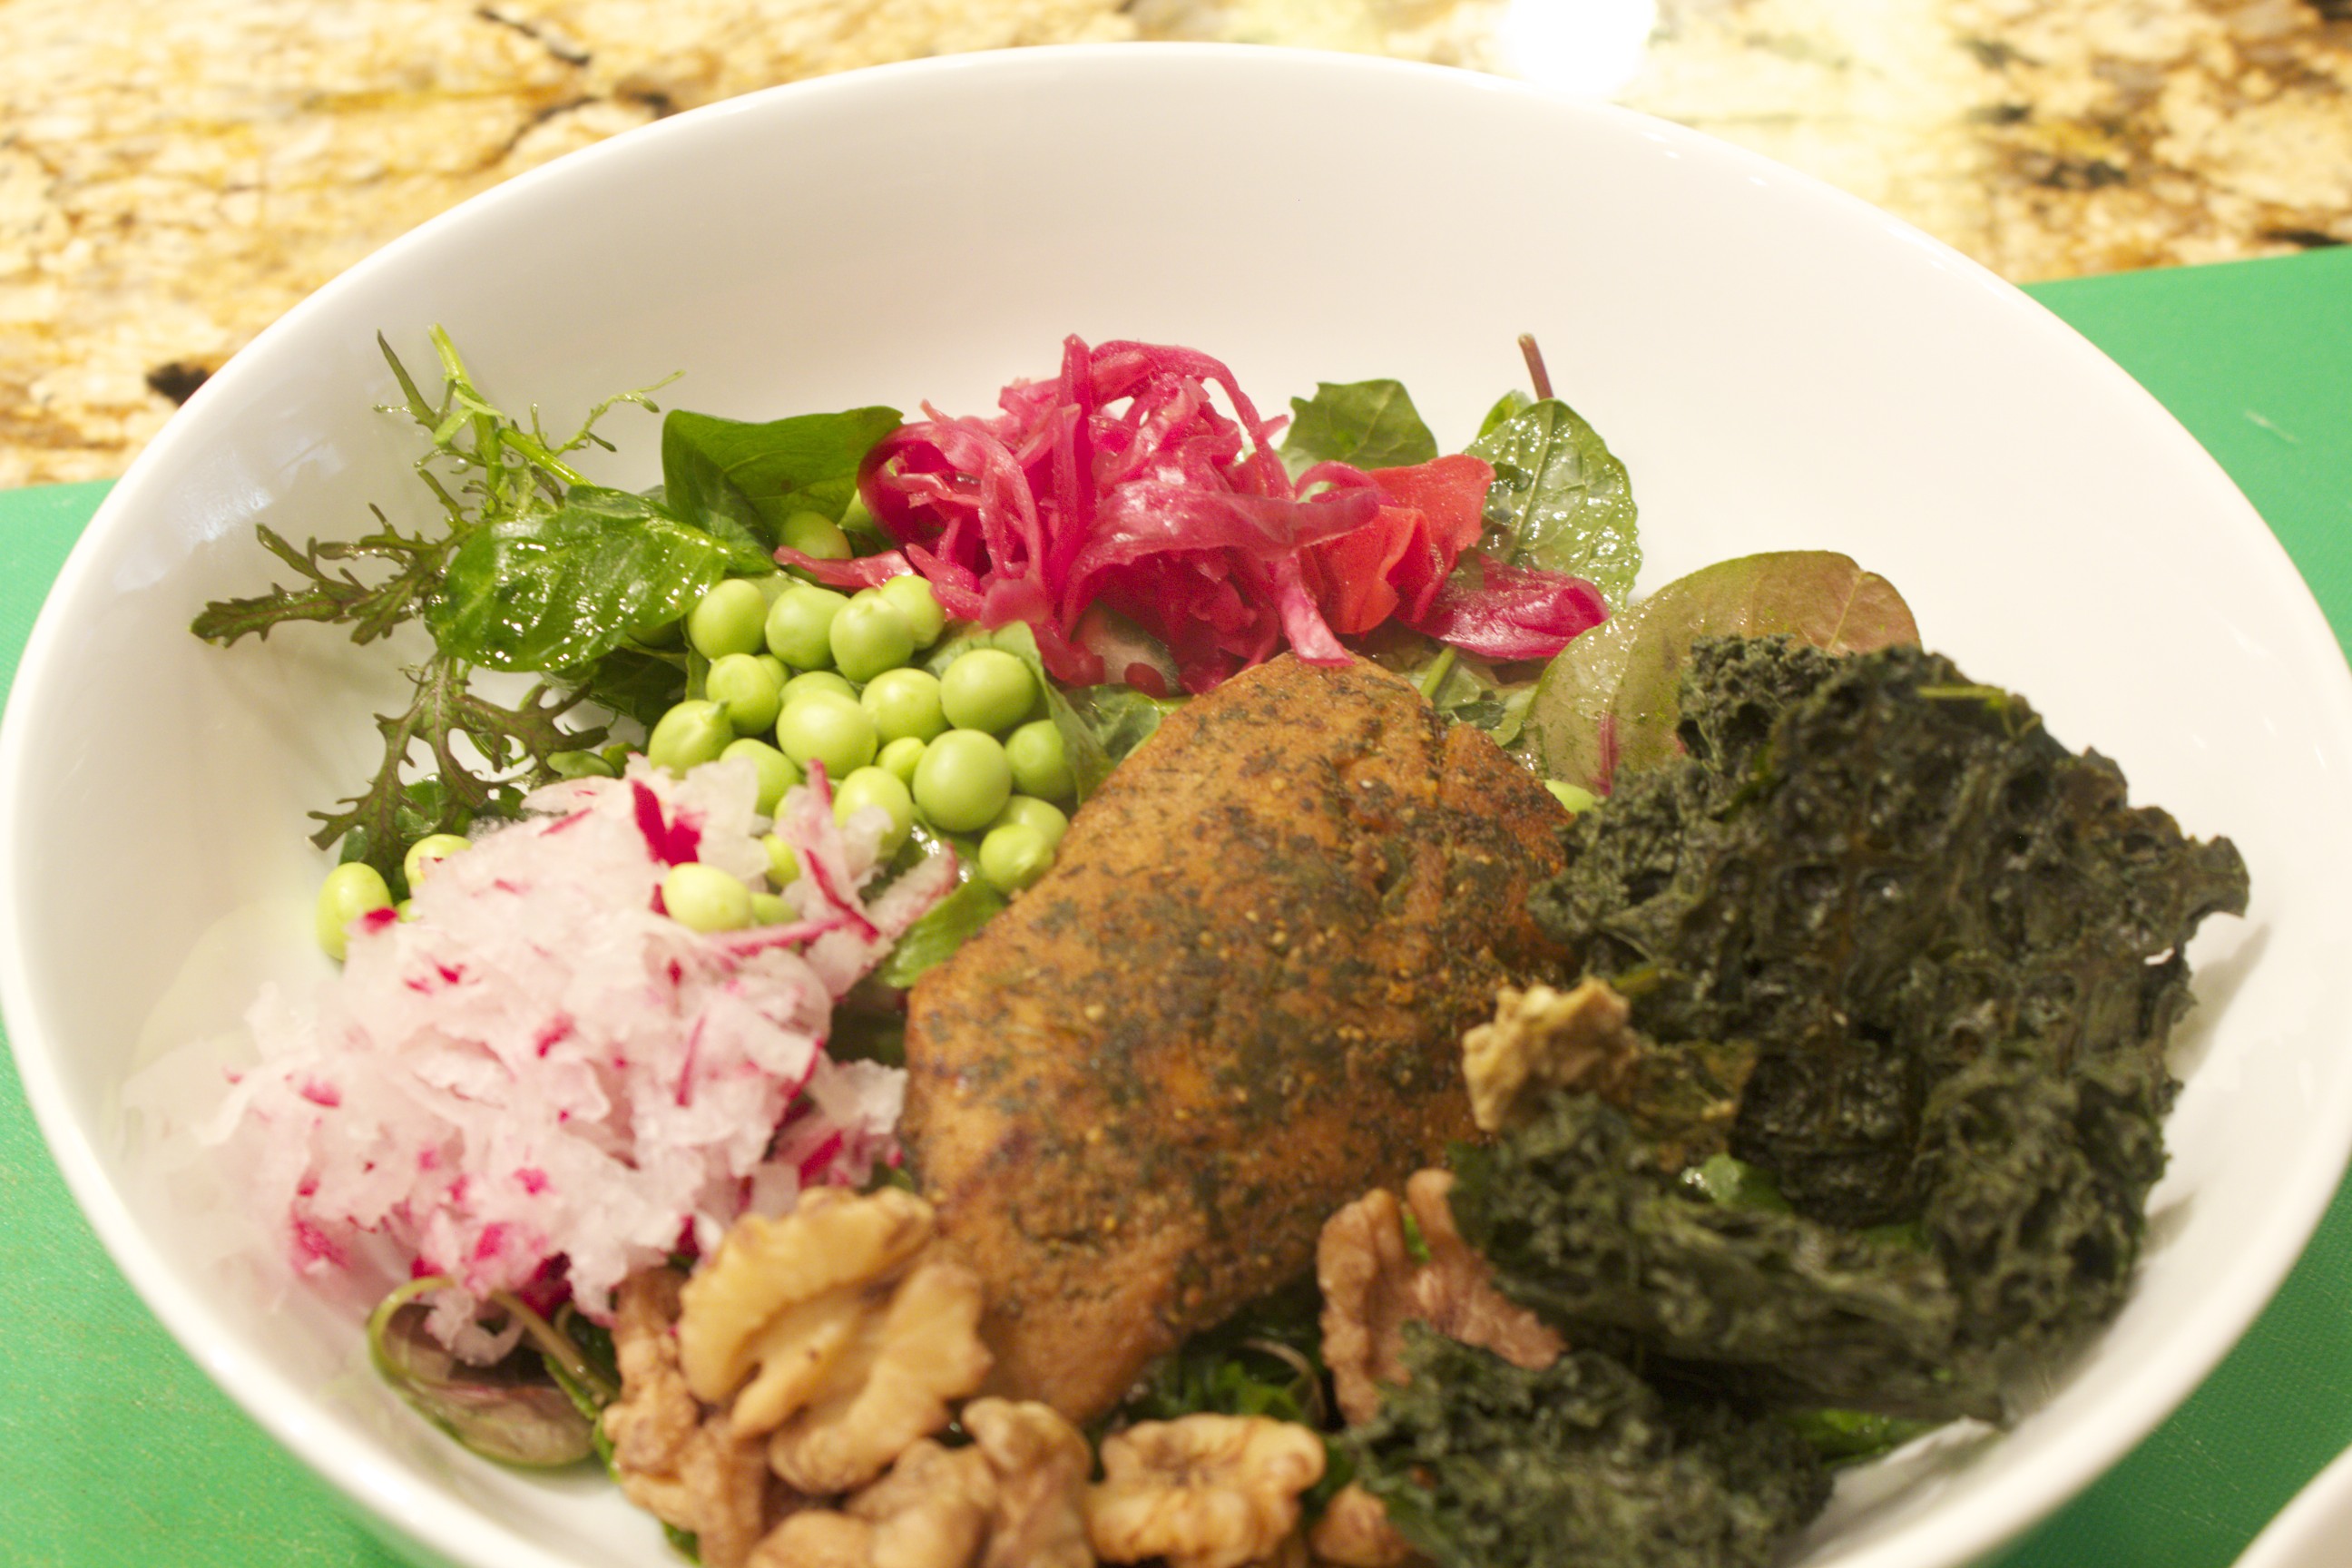
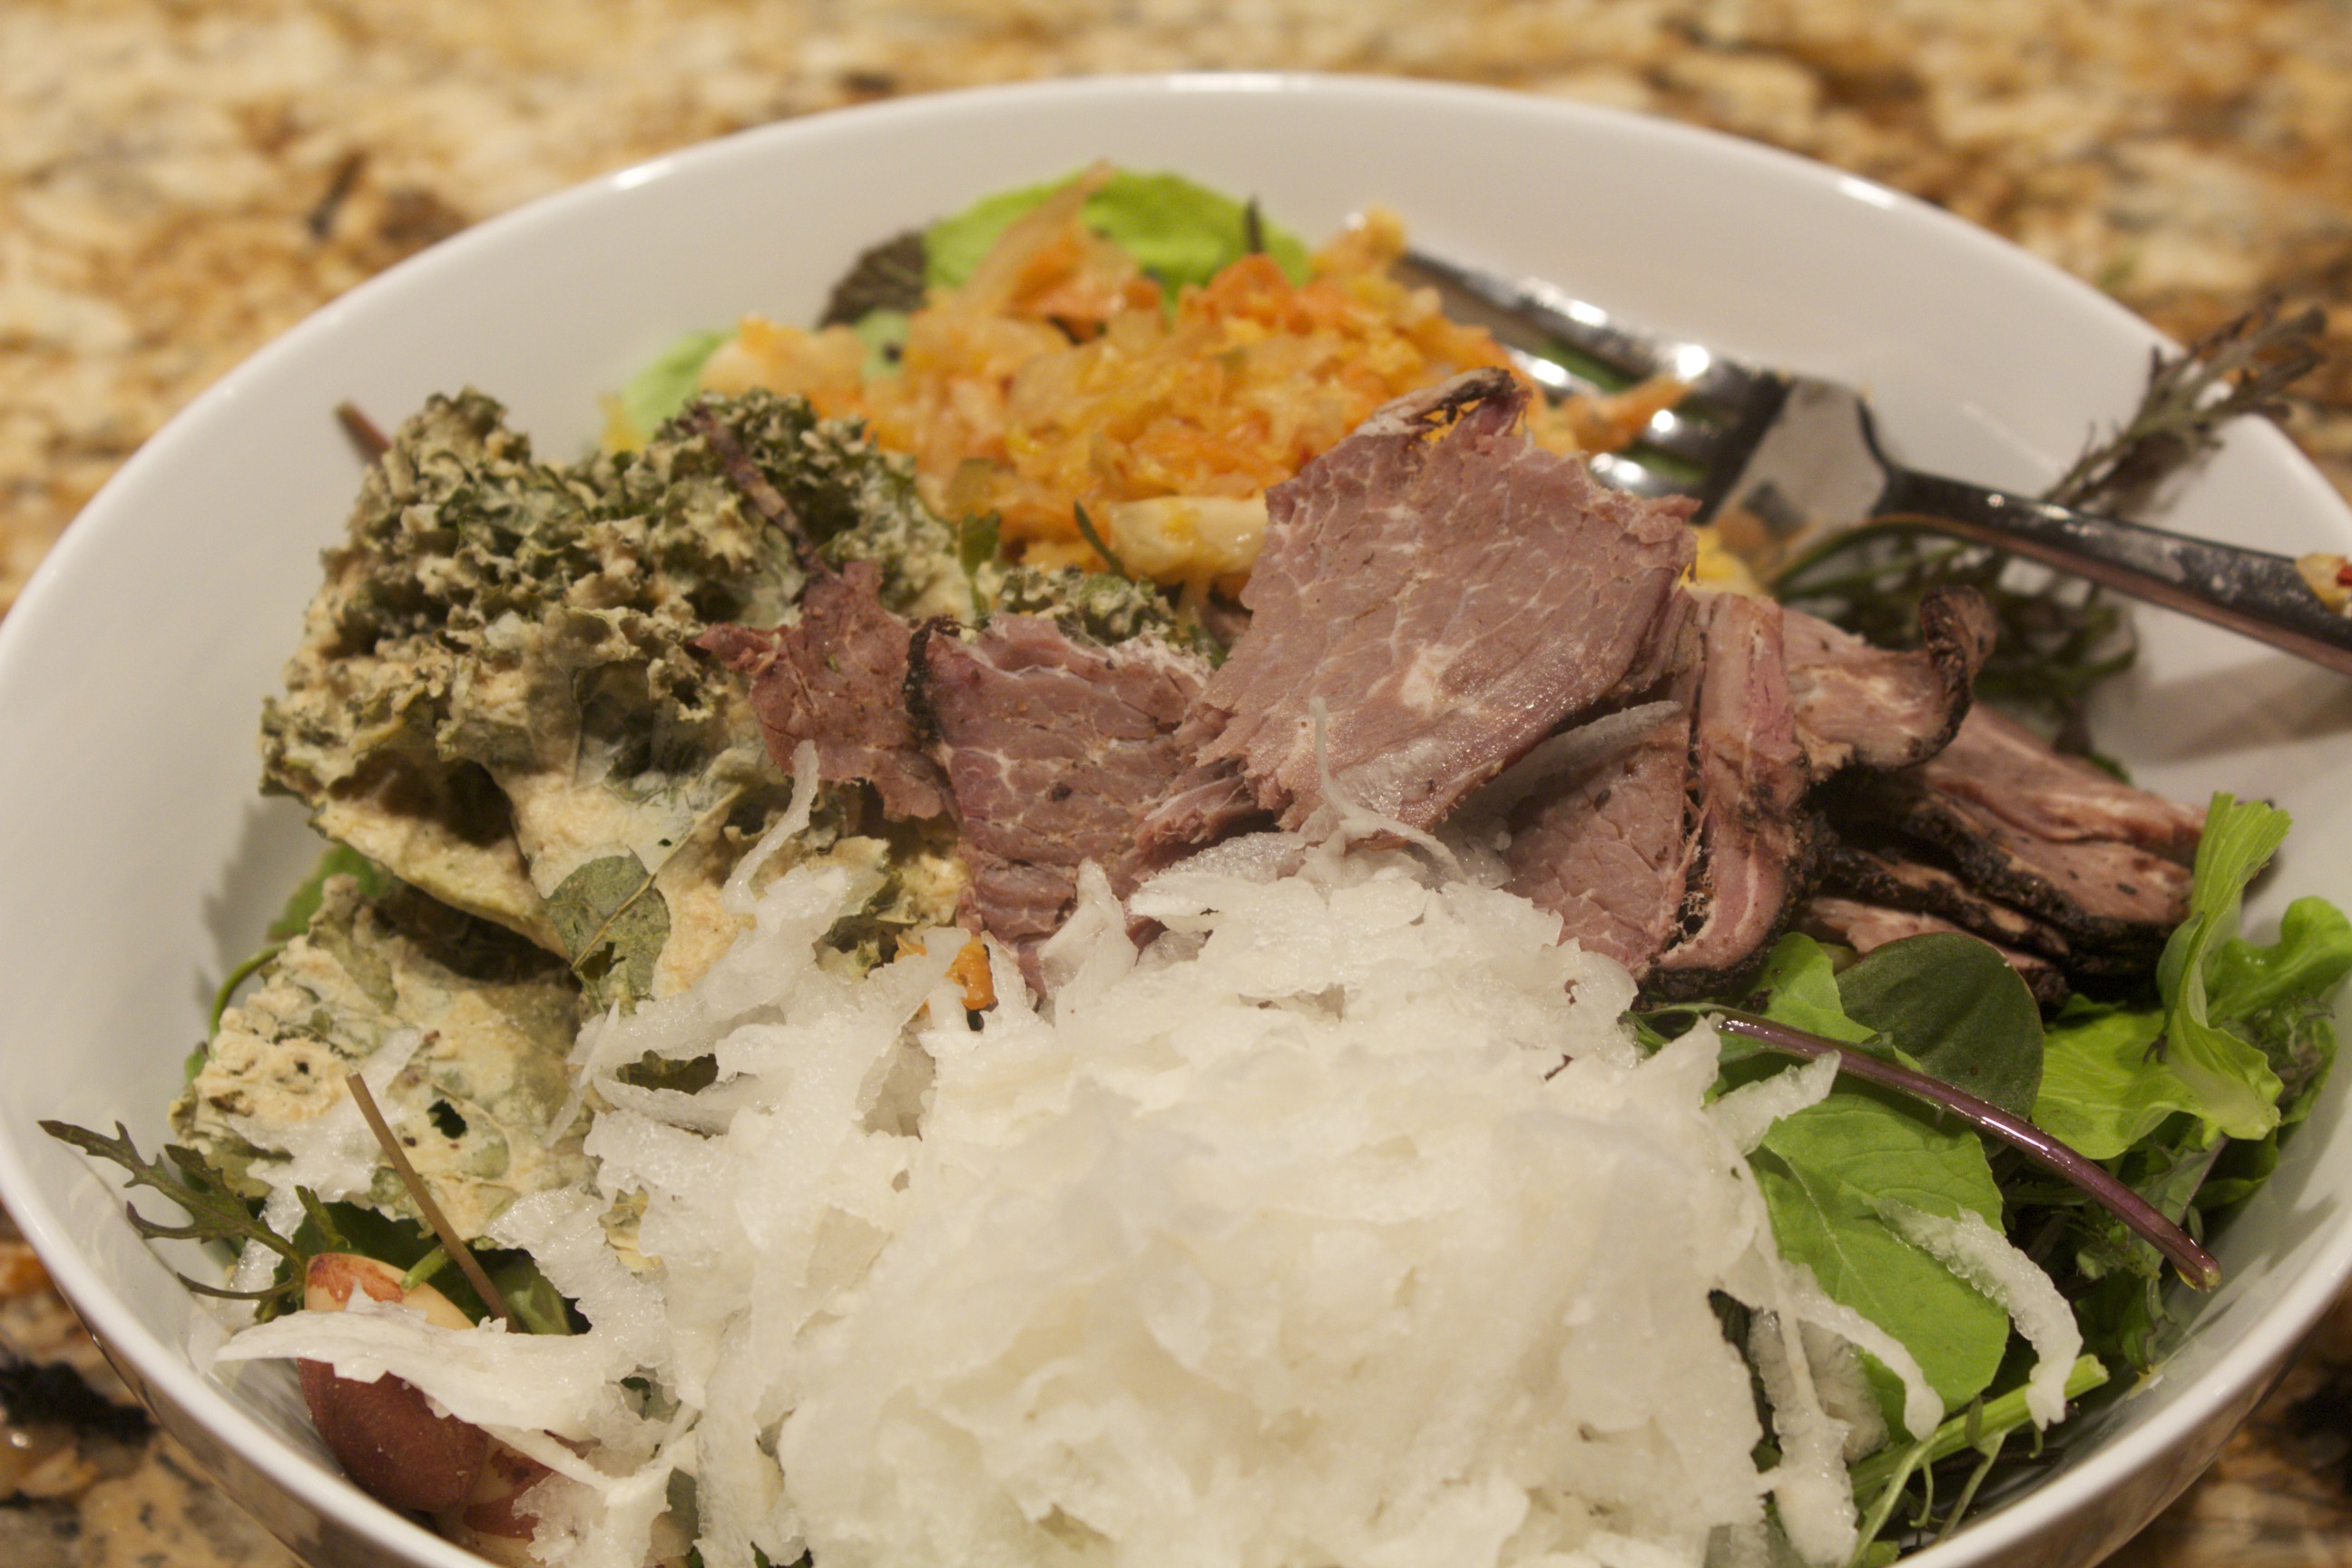
Building a Satisfying Salad In today’s video, I demonstrate one of my favorite summer lunches, a beautiful light yet substantial main course salad. The focus of the video is on the components that make up a satisfying salad. My ideal summer salad has a homemade dressing, a gorgeous mix of greens, a protein, a raw vegetable or two, a fermented vegetable, a sprinkling of something fatty, and some kind of crunchy, dehydrated vegetable or sprouted chip. This composed salad lends itself to infinite variations, and I explore three. Happily, all of these colorful, multi-textured salads take only minutes to assemble, and they are hearty enough to keep you going strong until dinner.
The most important factor in a salutary salad is the dressing. Bottled salad dressings are not healthy; they all contain inflammatory polyunsaturated oils, such as soybean oil, as their primary ingredient. Making your own dressing, however, is quick and cost-effective as well as healthy and delicious. Here’s how to make a basic vinaigrette: First, place a damp dishtowel in a ring shape on your counter to hold your bowl steady. Doing this will free both hands. Place a dab of mustard in the bowl, then add a tablespoon of minced shallots. Next, pour in a couple tablespoons of your favorite vinegar (the dressing used in the video is golden balsamic), then whisk in about 6 tablespoons of extra virgin olive oil. You can also add a splash of flax seed oil to boost the omega-3 content. Stir in a few tablespoons of fresh herbs, and make sure to include a generous sprinkling of salt and black pepper. Transfer the dressing to a jar, and refrigerate it for up to two weeks. You now have a delicious dressing available whenever you want to enjoy a salad.
Next, pick a selection of delectable greens. Bins at your local greenmarket contain the most exciting varieties; but mesclun, arugula, and watercress are readily available in most grocery stores. Toss the greens with just enough dressing to coat, and place in your salad bowl. Now for the composed part: Top the greens with a serving of protein. The three examples in the video feature tinned crab, smoked mackerel, and lamb pastrami. Other delicious pantry staples or ready-to-use proteins include tinned sardines, salmon, tuna, smoked oysters, and shrimp. Cold proteins, such as poached fish, chicken, turkey, or beef from a previous meal can be used as well.
Since so many fine fresh vegetables are available in the summer, be sure to add a fresh raw vegetable or two. In the video, I show grated radishes and carrots, thinly sliced beets, sliced snow peas, shelled English peas, and whole sugar snap peas, which, when fresh, are delicious eaten raw. I recommend also including a fermented vegetable; not only are fermented vegetables refrigerator staples, but they lend a wonderful tangy flavor to the salad, and they make the proteins in the salad easy to digest.
Next, sprinkle over your salad a “fatty” component such as nuts, olives, or crumbled cheese. A little of these go a long way. The last essential ingredient—again, something that keeps well in the pantry—is some kind of a crunchy vegetable chip. There are so many tasty dehydrated vegetable chips on the market now: kale chips, onion chips, arugula chips, and dehydrated vegetable crackers, to name a few. A little mound adds a fun element to the salad. Mix and match and come up with all kinds of salad variations. I hope that you develop your own hot weather favorite combinations and that you turn out to be as excited about these salads as I am!
Share on Facebook and Twitter | Gluten Free, Lunch, Main course, techniques, Uncategorized | No comments
Food for Travel: Bento Box Meal 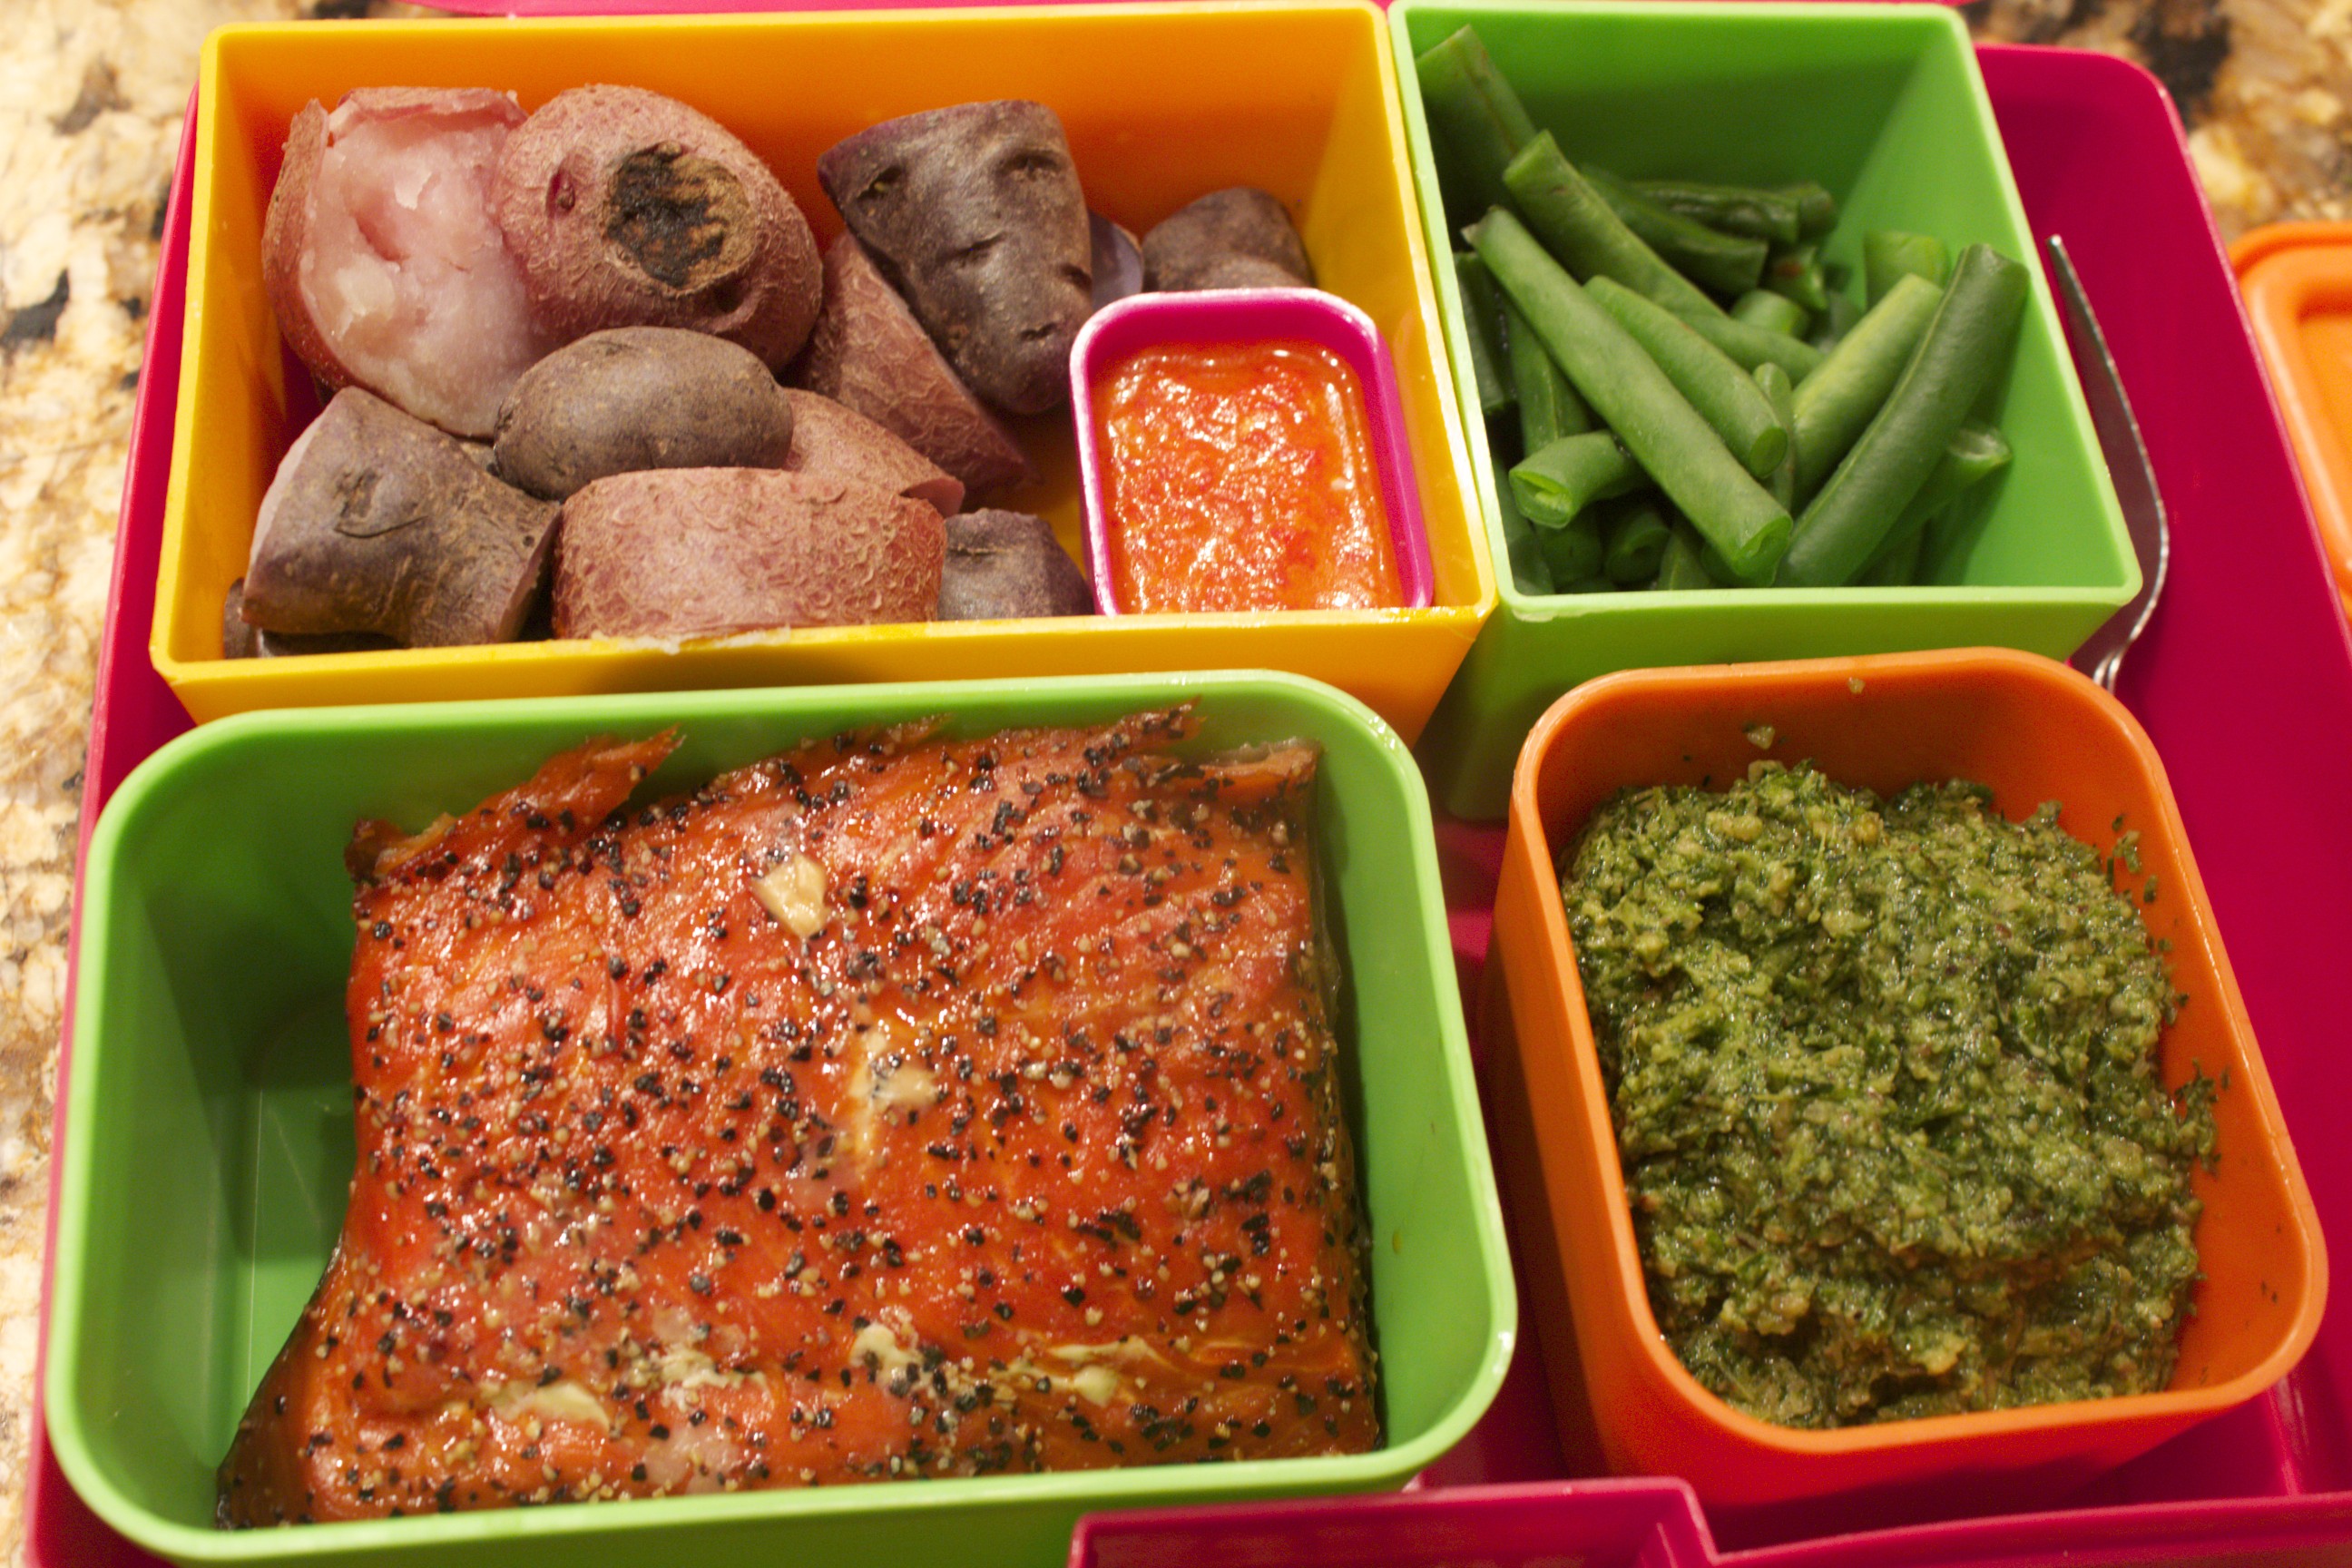 smoked salmon, purple potatoes, green beans, pesto, red pepper sauce Since I travel a lot, I’ve spent a considerable amount of time figuring out how to feed myself well in transit. In today’s video, I demonstrate a meal that is simple, nourishing, and travel-worthy. A bento box makes the ideal travel companion; it holds a single-sized meal in a compact container. Airplanes pose singular challenges. Because of the lack of moisture in the cabin and a flying altitude of 30,000 feet; a dry nose, a cottony mouth, and a subdued set of taste buds are common complaints. That is why, when it comes to packing some travel-worthy food, a little strategic planning is in order. I have developed specific criteria for a tidy bento box meal. The food I pack can’t be goopy or runny: I don’t want a drippy item spilling all over me when I’m in a passenger seat in which I can barely move. Every item also has to be hearty enough to hold up and stay fresh for hours at room temperature. Because of the inevitable last-minute rush before a trip, the meal must be easy to prepare. To minimize waste, I try to make use of the straggler herbs and leaves in my refrigerator. And importantly, I want my on-the-road or in-the-sky meal to be nourishing. In the video, I demo one favorite travel spread that fulfills all of my criteria, with room for variations. The meal is built around a thick slab of smoked salmon, which I keep stored in my freezer. Next come the vegetables: one starchy and one not. I simply blanch the vegetables in salted water until tender; it’s a good method for keeping the vegetables fresh for long periods of time. One of my current favorites is the purple potato, a hearty, antioxidant-rich, colorful vegetable. In the video I use green beans as my second vegetable, but I sometimes substitute sugar snap peas, asparagus, broccoli, cauliflower, and carrots, all robust travelers. The condiments keep the meal lively. To use up perishables left in my refrigerator and to jazz up the simple vegetables and salmon, I typically make a dairy-free pesto. The pesto I demonstrate includes 2 cups of a combination of parsley, dill, scallions, and sorrel to which I add ¾ cup walnuts. Most varieties of nuts and seeds make zesty pestos, so again, I use what I have around. I then add 1 teaspoon of light-colored miso, ½ teaspoon salt, a couple tablespoons lemon juice and 1/3 cup extra virgin olive oil. I give the whole mix a whirl until smooth. Not only do I have a zesty topping for the fish and vegetables, I have extra pesto to freeze. The other condiment demoed here is a roasted red pepper sauce. Taking only a few minutes to whirl together, it tastes delicious on both the vegetables and the salmon; it also is a good fit for the teeny compartment in the bento box. I blend together ½ cup of jarred roasted peppers (in the video I use the flavorful piquillo), 1 clove garlic, ½ teaspoon salt, 1 tablespoon vinegar (apple cider, sherry, or red wine), and ¼ cup extra virgin olive oil. Half a teaspoon honey balances the flavors perfectly. This zingy red dressing lasts refrigerated for over a week. Either one of the sauces is all you need to add spark to the meal, but the two together are exponentially delectable. When you pack a meal as satisfying as this one, traveling becomes a lot more enjoyable. Share on Facebook and Twitter | Uncategorized | No comments
Glorious Autumn Squash Glorious autumn squashes and pumpkins in a variety of shapes and sizes abound in greenmarkets and grocery stores at this time of year. In the video today, I go over a few ins and outs of cooking with these vegetables as well as demonstrate a delicious and easy recipe that work with many of the varieties available. Here are six of my favorite types of squash among those that you’re likely to see. Two that have sweet dry rich orange flesh include the forest-green kabocha squash and the flaming red kuri pumpkin. These are wonderful for soups, stews, roasting, or mashing. Of course, cutting into one of these tough guys can seem like a dangerous undertaking. Here’s my favorite tip for handling an intimidating squash: turn the oven to between 325˚F and 375˚F (whatever is appropriate for the recipe), and simply toss the whole pumpkin into the oven for 10 to 15 minutes. That little bit of precooking is enough to enable you to be able to cut down the middle of a hard squash with even a thin-bladed knife. You can even peel the skin easily and cube the squash as well. Here’s an alternative method: simply bake the entire pumpkin without cutting into it first at all. If this is what you plan to do, make sure to place your squash on a baking tray, however, or you’re in for a messy oven-cleaning job when the juices start to drip. Another one of my favorite varieties includes the oblong delicata squash, characterized by its pale yellow skin with green stripes. The thin skin is eatable, so no need to peel these. To prep the squash, cut it lengthwise down the center, scoop out the seeds, and cut it into wedges. Toss the wedges in a little olive oil and salt, and roast for 20 minutes or so at 400˚F on a parchment-covered baking sheet. The small sweet dumpling squash is a variety that is perfect for stuffing. Give it a preliminary 10-to 20-minute bake before cutting the top off and scoop out the seeds, then stuff the inside and bake until tender. The football-shaped spaghetti squash is a fun variety with a stringy spaghetti-like texture. Initially, just toss the whole squash in the oven for about an hour. After it sits out of the oven for a few minutes and is soft and cool enough to handle, slice it down the middle, scoop out the seeds, and then scrape out the stringy flesh with a fork. Treat the strands like pasta and toss them with your favorite spaghetti sauce. The workhorse of the squash world is the butternut. This variety is softer than some of the other types, so it doesn’t need a head start in the oven before being cut or peeled. Treat it like two separate vegetables when dicing. The oblong part in the middle is dense, and it can be sliced like a potato: the bulbous bottom part contains all of the seeds, so it’s best to cut that part into wedges first. Use a t-shaped peeler, the kind that takes thick skins off, to make peeling the squash efficient. For the oblong part, first cut a thin piece off the bottom to anchor the squash on your cutting board, then cut downward slabs. Cut the slabs into long “batons,”, then cut the batons into dice. When you roast the butternut squash, do so by slicing it down the center first and placing it face down on a parchment-covered baking sheet. It’s so much easier to take out the seeds after the squash is cooked. The recipe that I demo in the video is sautéed butternut squash with pears and ginger. The pears harmonize beautifully with the squash—they’re both in season at the same time—and the ginger and cayenne add warmth to the dish. I start with some extra virgin olive oil. I warm a couple of tablespoons over medium heat in a large skillet. I then add the cubed squash with one diced pear—comice, Anjou and Barlett are all good—and cook uncovered over medium heat until the pieces are just tender and starting to brown, (about 6 to 8 minutes). I then push the squash to one side of the pan and add a tablespoon or so of butter (you can also use extra virgin olive oil). When the butter melts, I add the ginger and cook it a minute or so until fragrant. I then stir the ginger—along with ½ teaspoon of salt and a pinch of cayenne—into the mix. I finish the dish by stirring in a splash of balsamic vinegar. This dish is fragrant, fast, and flavorful. What a good time to get creative with all of the delicious varieties of squash that are out right now. They’re not difficult at all to use, so have a wonderful time!
Share on Facebook and Twitter | Kitchen Tips, Recipes, Side Dishes, techniques, Uncategorized | No comments
Savory Salmon-Coconut Muffins Breakfast can be a challenge, especially during those hectic mornings when there’s limited time. I find it helpful to have on hand ready-made items that require no more time to prepare than it takes to pop a piece of toast in the toaster oven. That kind of healthy instant breakfast does requires a bit of planning. Today’s video features one of my favorite such breakfasts: savory salmon muffins. Most of the time we associate muffins with a sugary high carbohydrate load, but these muffins are different. They are nutrient-dense little parcels, full of protein and great fat, but low on carbohydrates. They’re filling, but they don’t weigh you down. To start, I whisk together ½ cup of coconut flour, 1 teaspoon baking power, and ¼ teaspoon salt in a medium bowl. Half a cup of coconut flour is not very much; but coconut flour—made from the flesh of the mature coconut after all of the liquid has been squeezed out—really absorbs liquid, so a little goes a long way. In another bowl, I whisk together 6 eggs, along with ½ cup of melted coconut oil. I use the aroma-free variety of coconut oil since I don’t want any coconut flavor coming from the oil. Aroma-free coconut oil still has the great nutritional benefits of the virgin variety: the short list is that it’s good for the thyroid, good for the digestive tract, and great for the metabolism. It keeps the muffins moist as well. Then I pour the wet ingredients into the dry, and whisk the two together. I stir in a large (7.5 ounce) can of salmon. I favor the kind with bones (these are soft enough to eat), which provide a good dose of calcium along with vitamin D, the omega three fatty acids DHA and EPA, and astaxanthin, the antioxidant that gives wild salmon its red-orange color. I add some walnuts, which, besides adding flavor and texture, have a whole host of great health properties, including the omega three fatty acid ALA. I also add ¼ cup of chopped fresh herbs. In the video, I use a combination of dill, tarragon, and chives; but other herbs, such as parsley, sorrel or cilantro, are delicious as well. I’m now ready to add my batter to the muffin tins. Instead of “tins,” I favor silicon muffin holders. This way, there’s no need to grease the tins, and the coconut muffins pop right out. I bake the muffins at 400˚ for 20 minutes, just until springy and lightly browned. It’s best not to over bake these or they run the risk of drying out. This recipe makes 7 large muffins, enough for seven full breakfasts. They keep refrigerated for up to a week, and you can freeze them (slice in half first) as well. I savor them toasted with a few slices of avocado, which lend more good fat, folic acid, vitamin E, and of course, deliciousness. These muffins are truly convenient for those busy mornings when you need to take breakfast on the run. Most importantly, they will keep you humming along all the way until lunch. 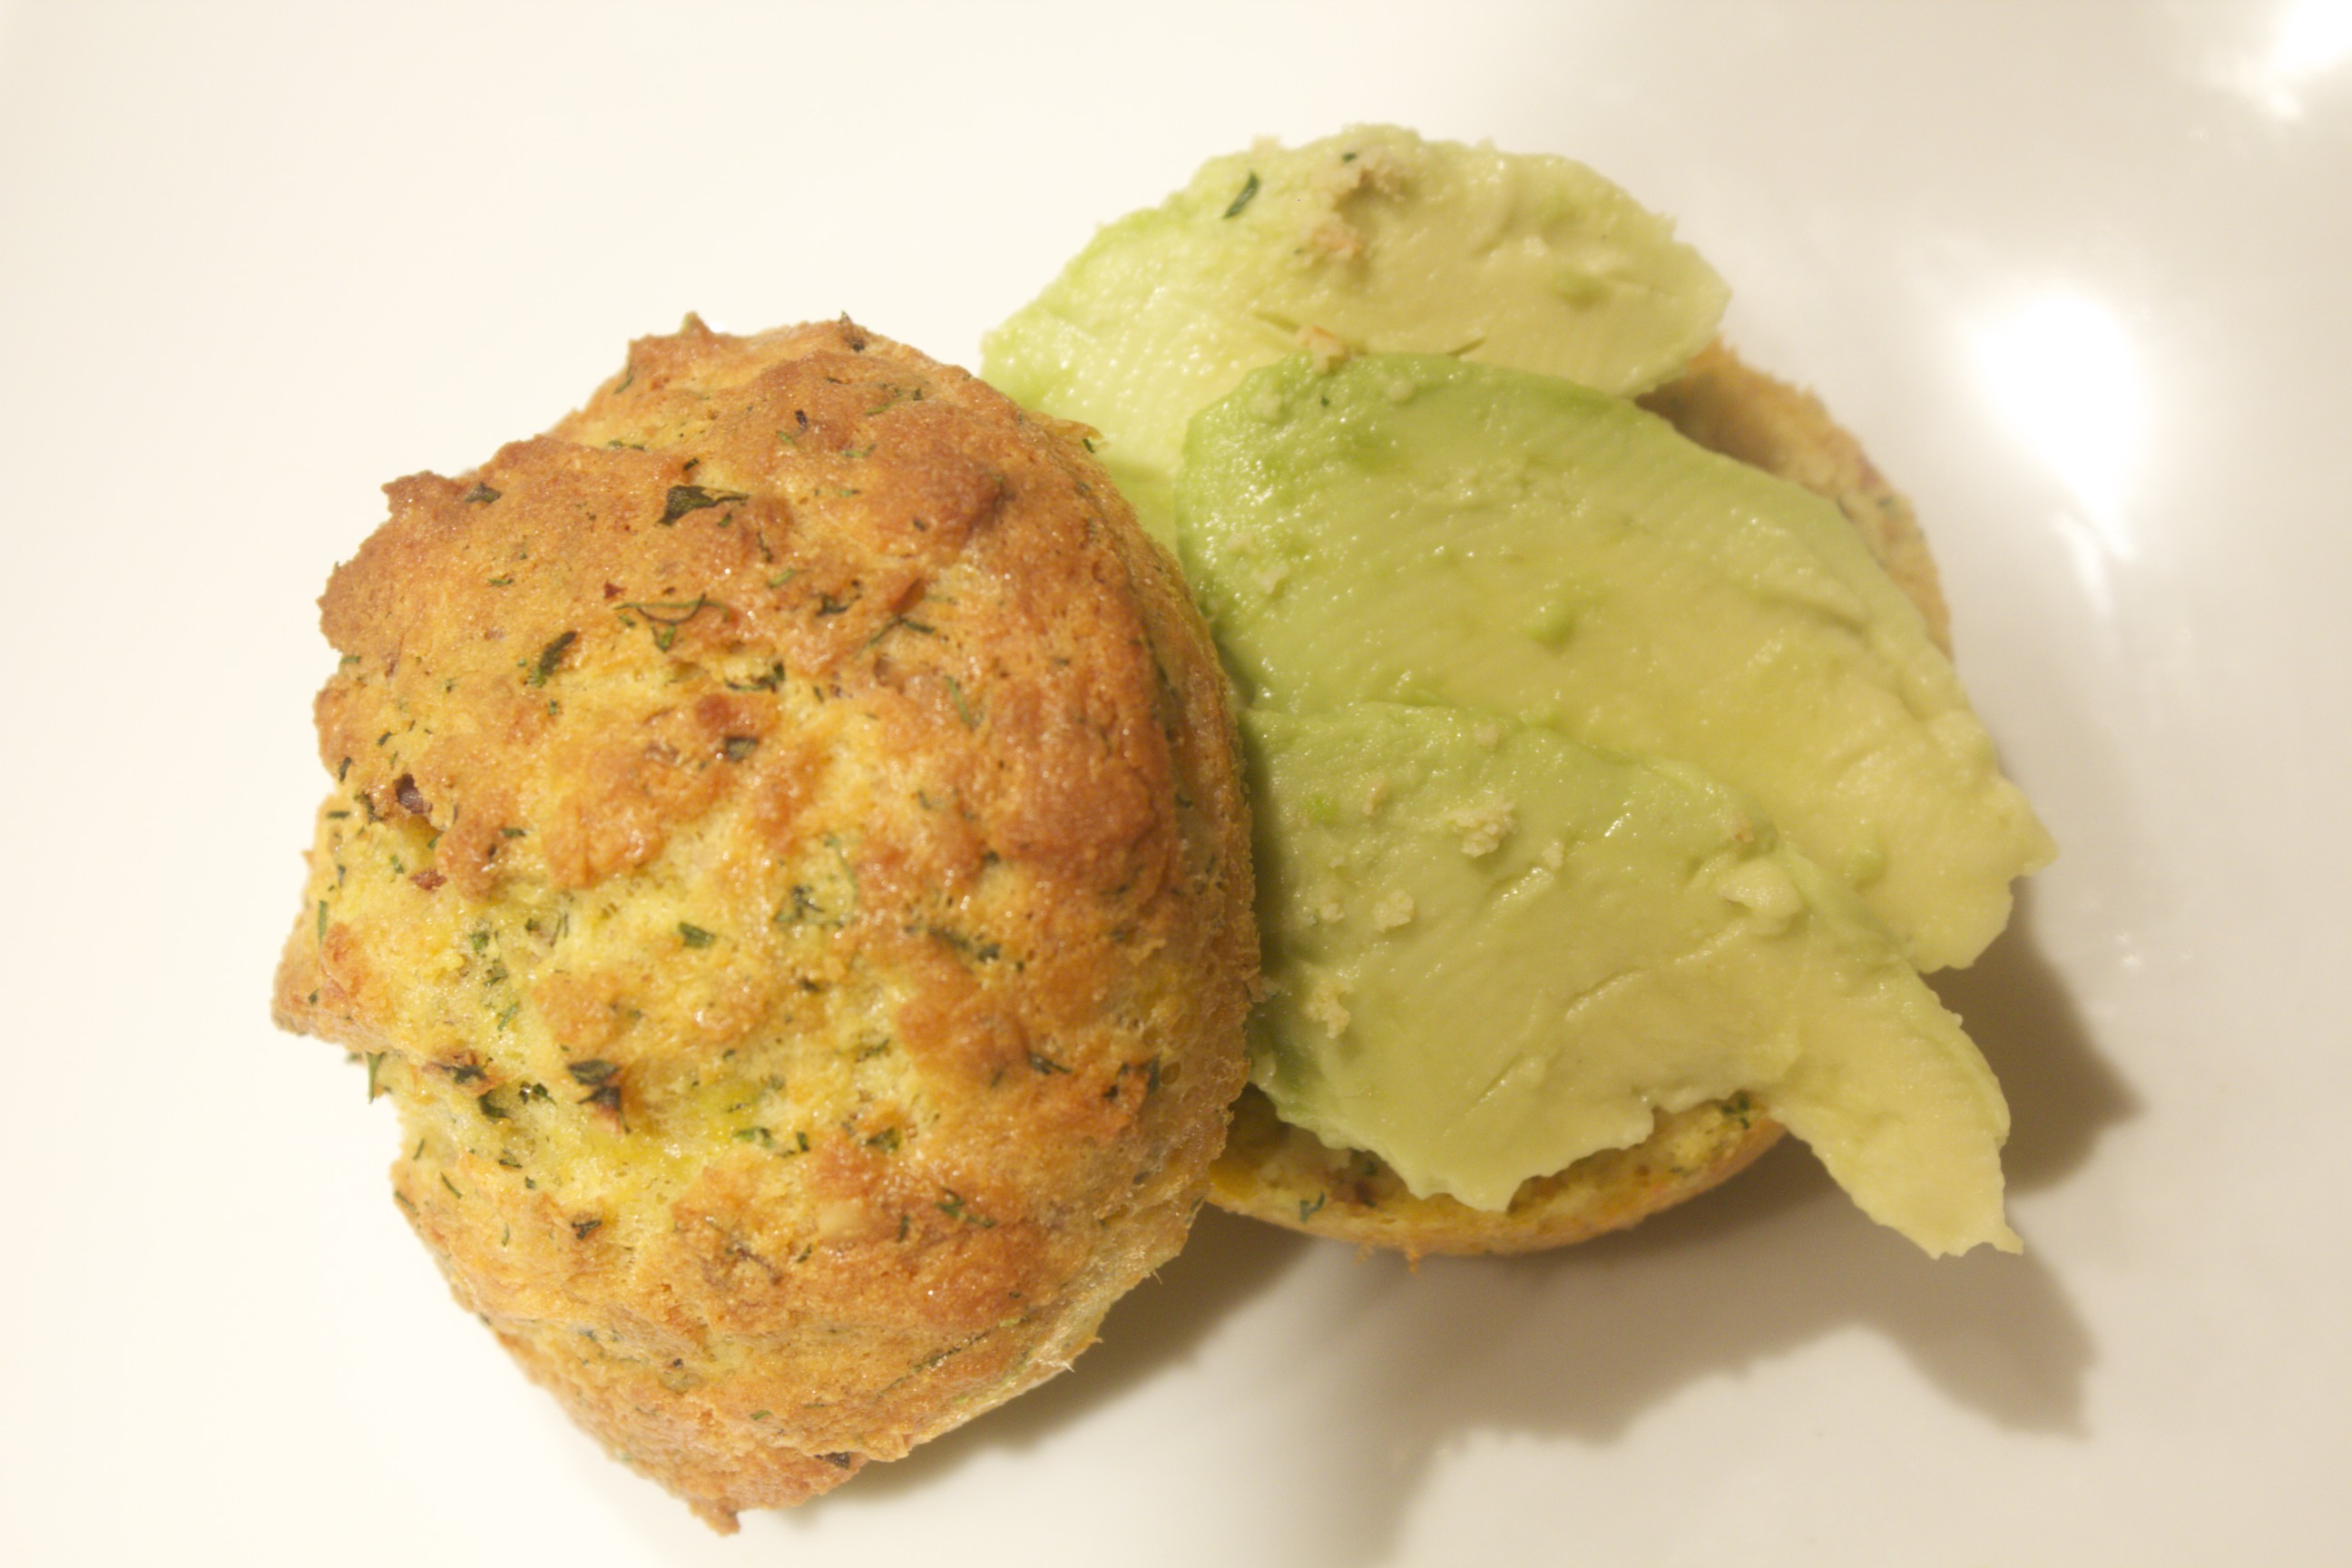 Savory Salmon-Coconut Muffins with Sliced Avocado Share on Facebook and Twitter | Breakfast, Health Tips, Uncategorized | No comments
Greensquare Tavern Do you know about Greensquare Tavern? Words like “organic” are thrown around too loosely these days. So-called “organic” and “free-range” chickens, for instance, are not raised outside on pasture, and they don’t have a natural diet. I buy pastured-raised meat and eggs myself, so when I find a restaurant that carries pasture-raised food, I know that’s a place that I can really trust. Greensquare Tavern is one such place. At Greensquare, the quality of the ingredients is among the best in New York, and the prices are quite reasonable in light of this extraordinary quality. Chef Proprietor John Marsh doesn’t toot his own horn nearly enough. The menu tells us that the eggs come from Clearview Farm, in Lancaster County. What it doesn’t say is that these are superlative eggs provided by Abner Lapp, an Amish Farmer who raises his chickens the traditional way, which means they move around outdoors and peck in the ground. These chickens produce nutrient-dense eggs with deep orange yolks. These eggs taste delicious. I know Abner, and he’s one of the true independents. The other ingredients are just as high-quality. In fact, John sources everything from local farms. The beef is from Creekstone Ranch; the Turkey is from Plainville Farms; and all the vegetables are from the local farms as well. He even fries his French fries in tallow, a traditional, healthy oil, which is remarkable for a restaurant. Don’t be fooled about the much-hyped move away from hydrogenated oils. Most venues today, even the most high-end restaurants, use the junkiest fry oil (in New York it’s called “interestified” oil), which is arguably one of the worst culprits when it comes to health concerns. The folks at Greensquare also make sure that there are good vegetarian and vegan choices. These include a good house-made vege burger and a delicious chipotle- marinated tofu with spiced portobello mushrooms and crispy kale. I want to see good neighborhood restaurants thrive, so please spread the word about this gem; and if you get a chance, stop by, and help it prosper. Share on Facebook and Twitter | Uncategorized, Where To Eat (Restaurants) | No comments
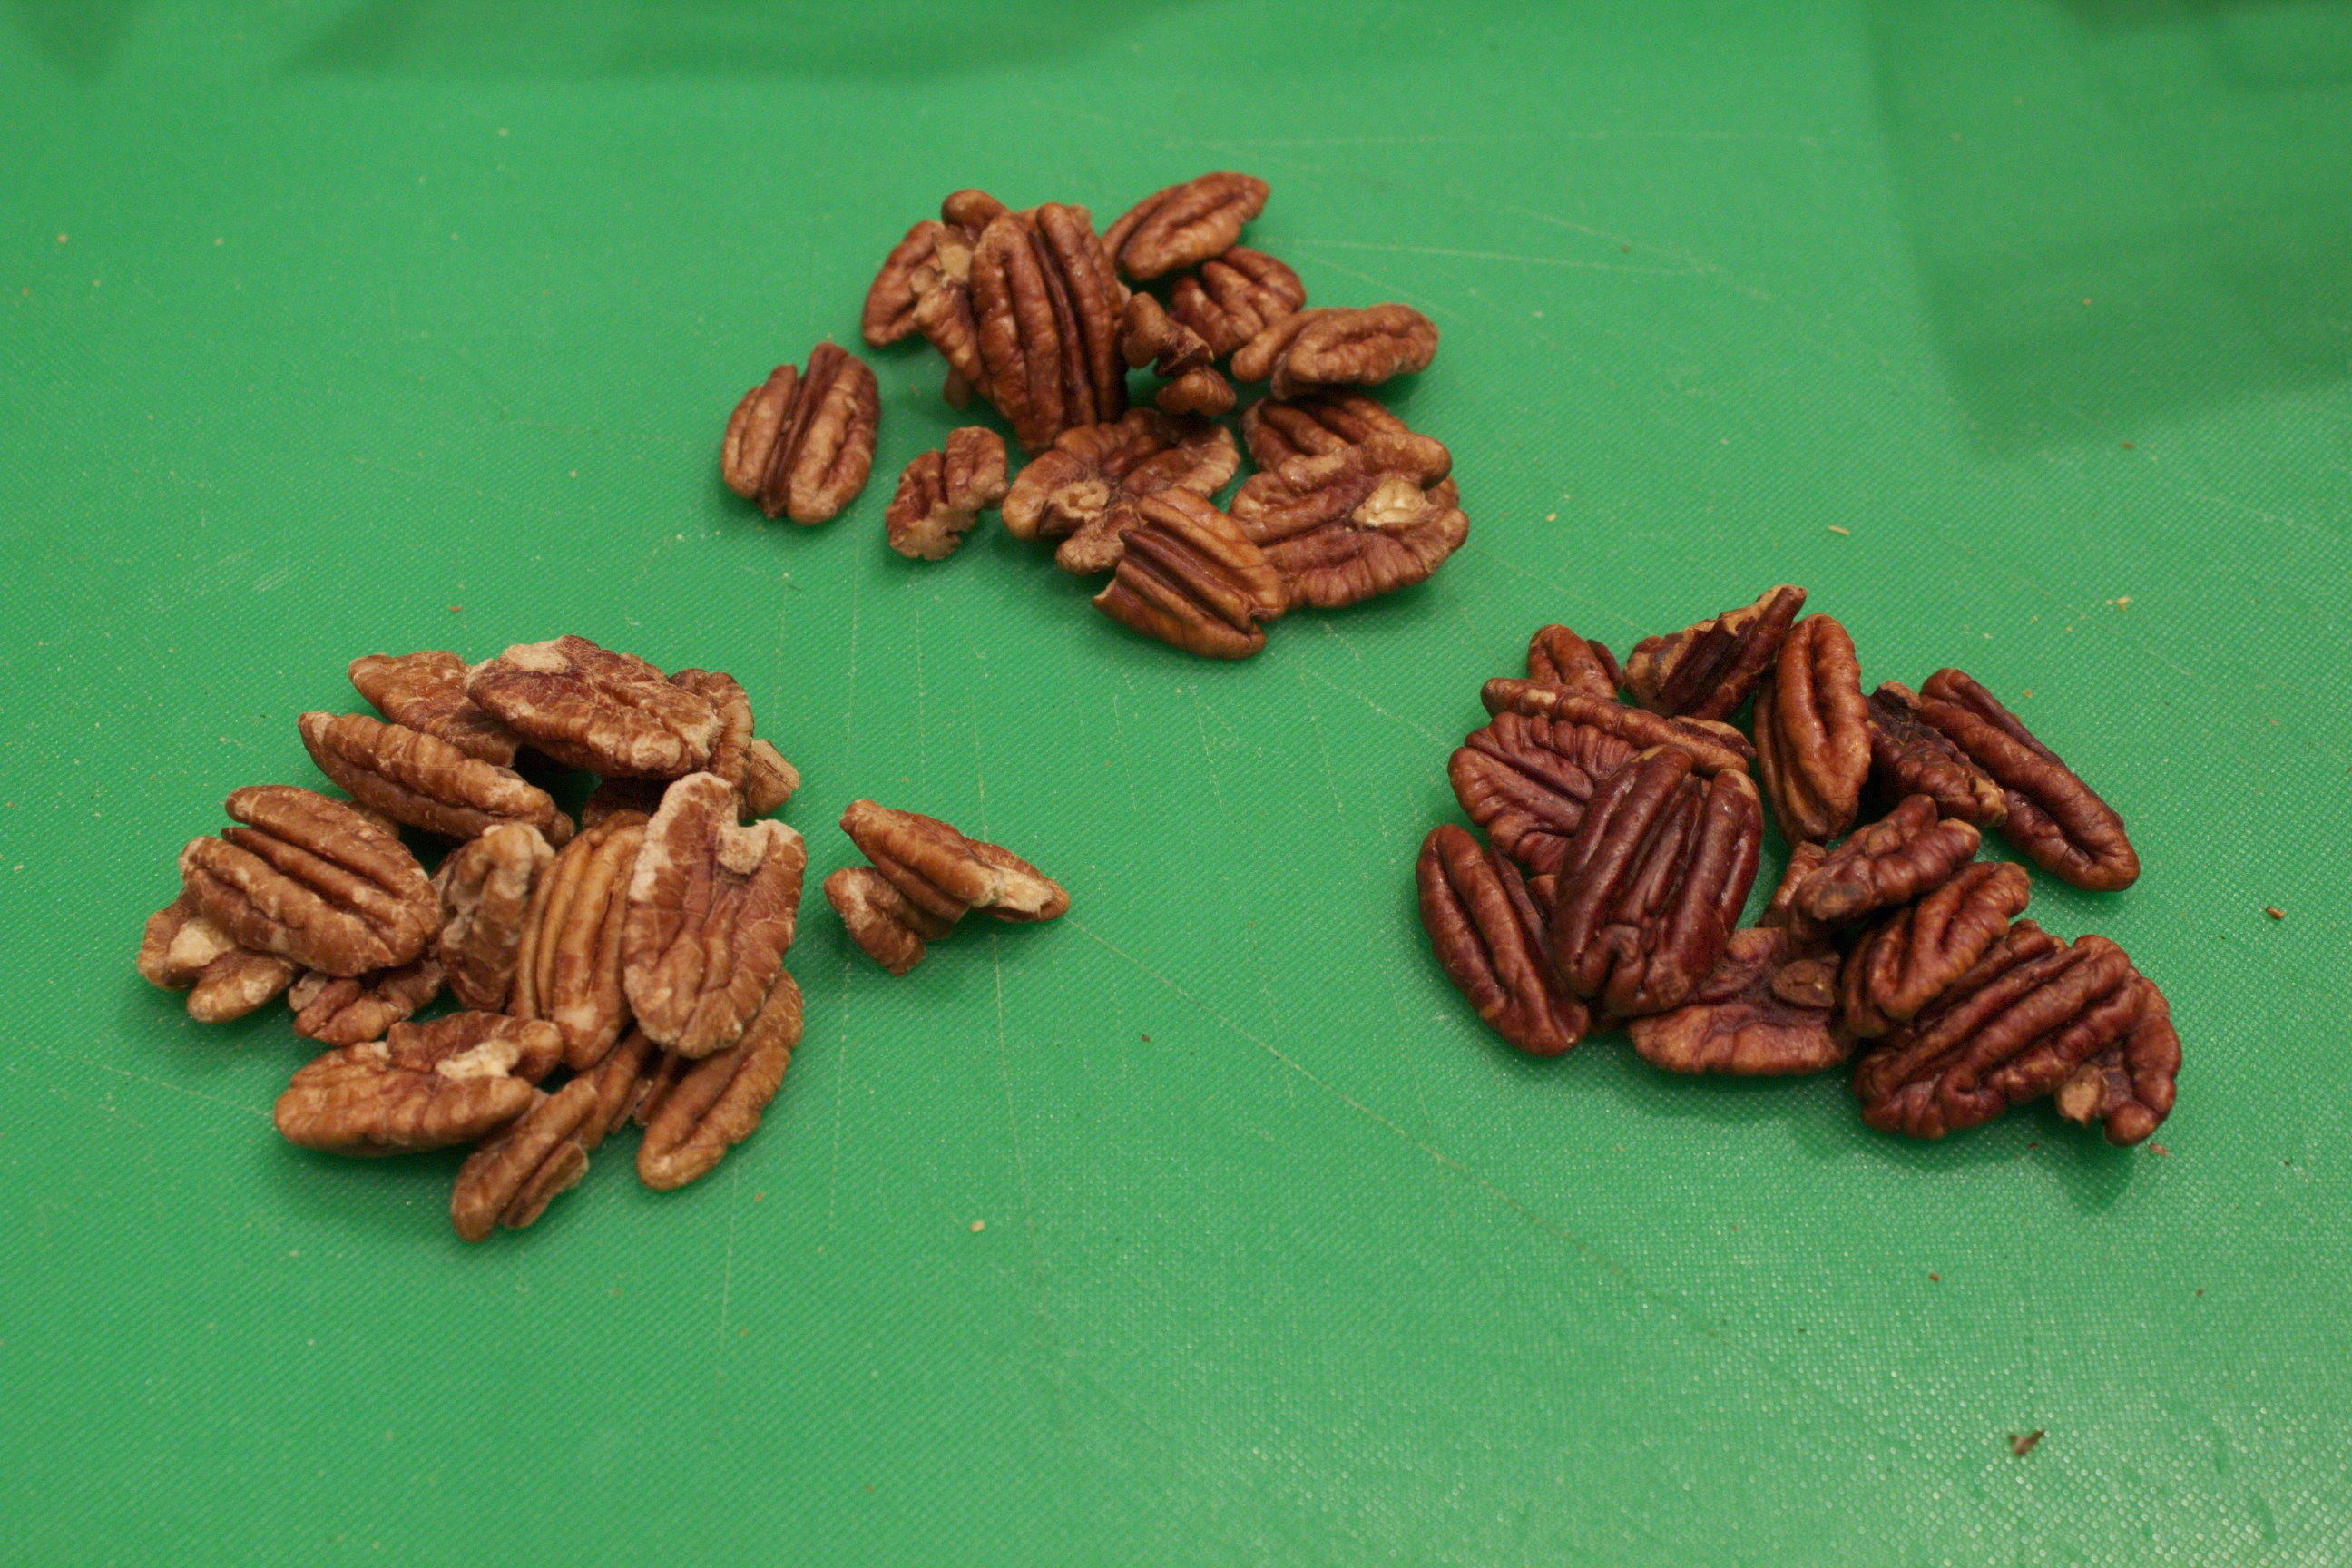
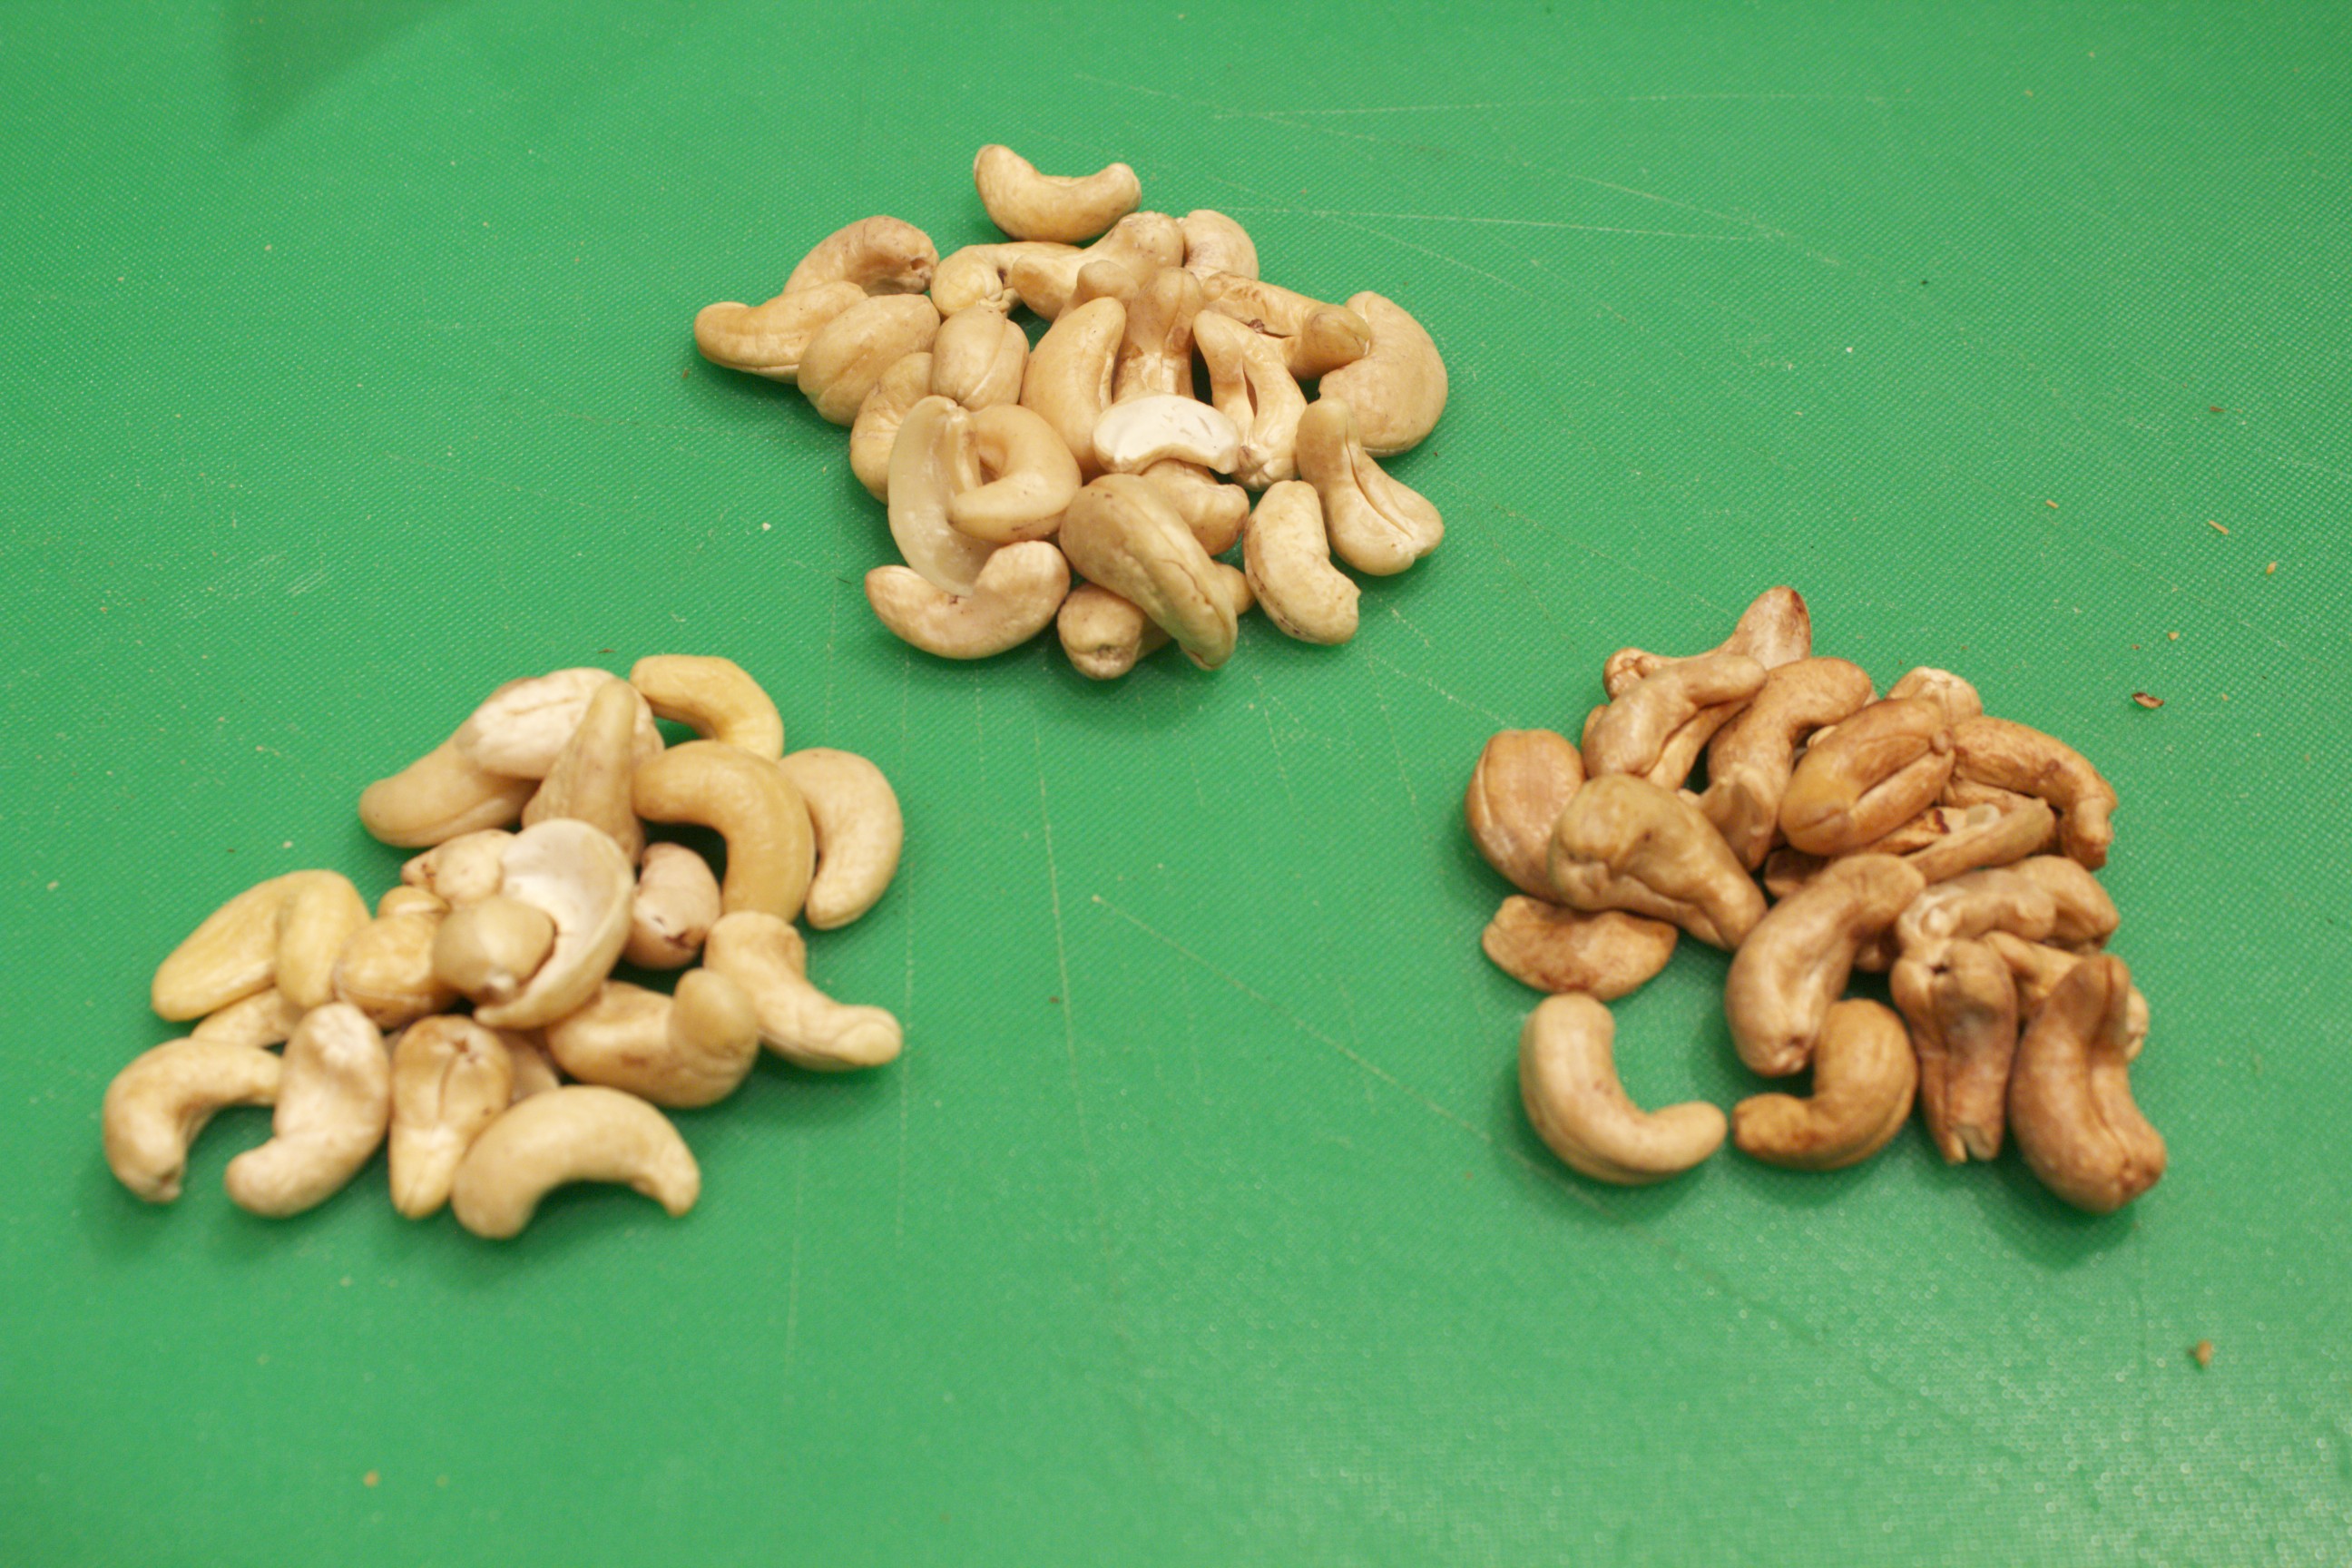
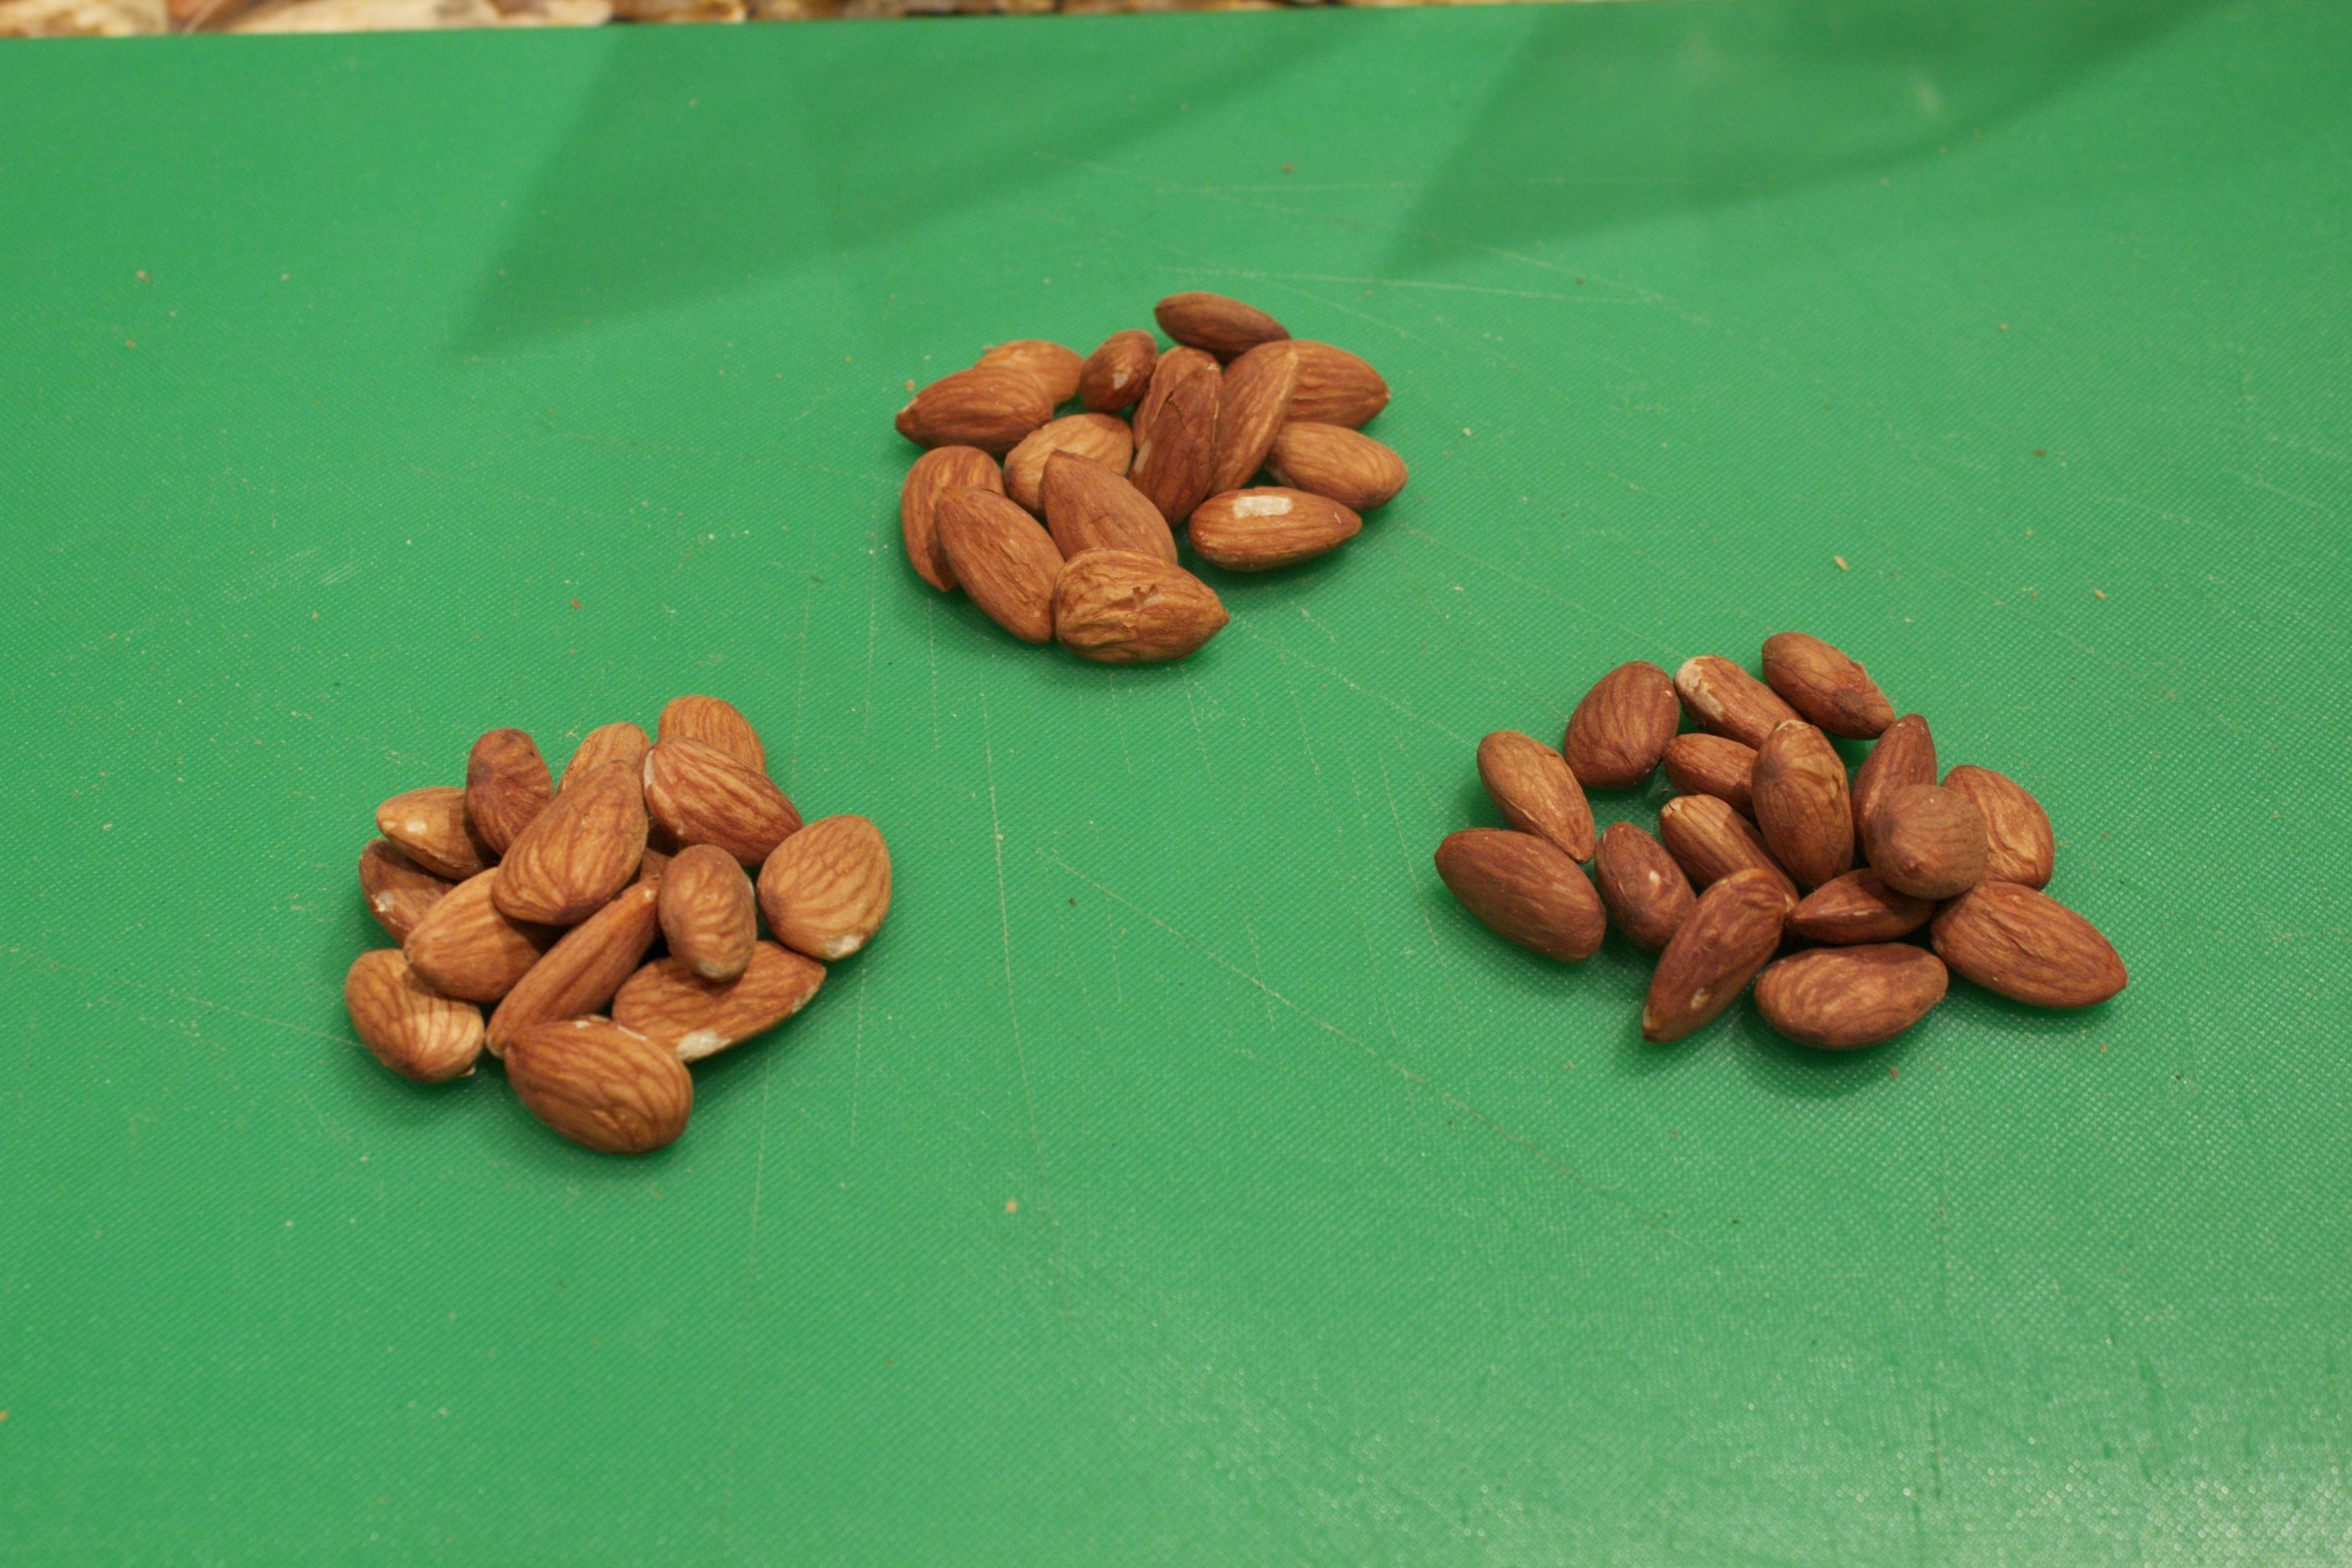
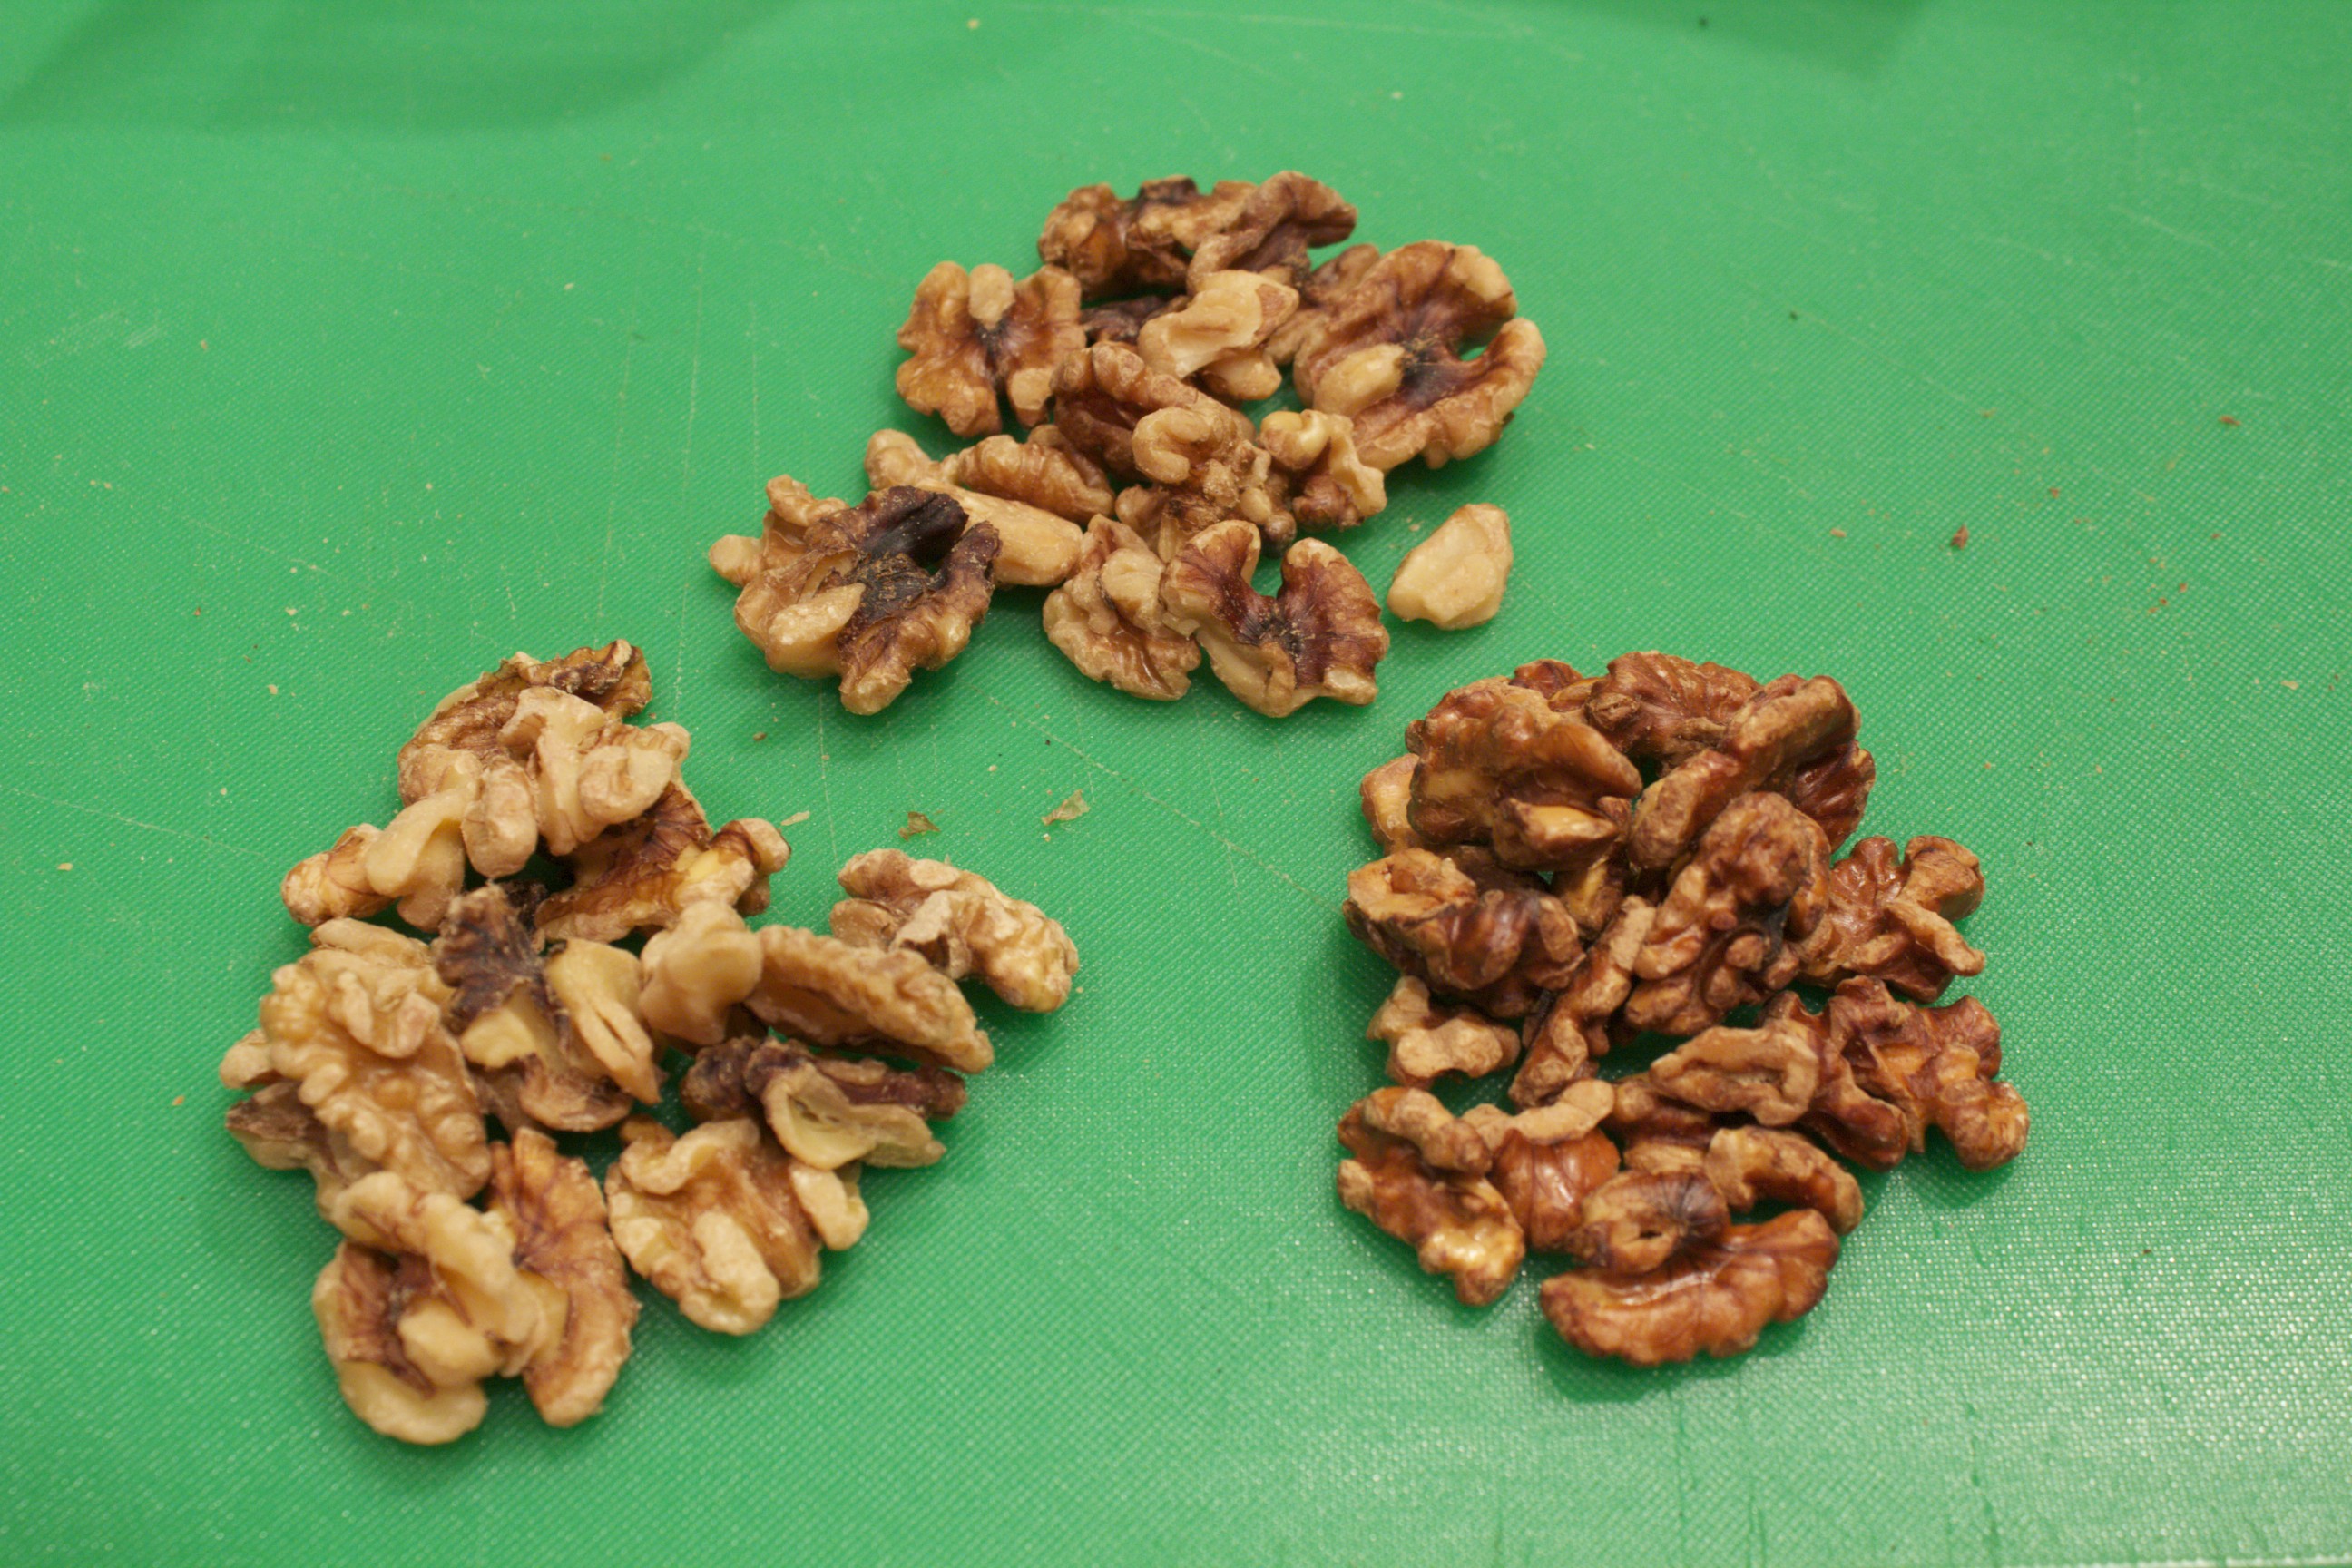
A Comparison of Soaked and Dehydrated and Toasted Nuts Soaking nuts serves to inactivate the phytates and enzyme inhibitors that make the minerals in them (zinc, magnesium, iron, and calcium) difficult to absorb. You can drain the nuts and leave them in the refrigerator for a couple of days. This is good if you wish to make nut milks, or if you don’t have time to dry them out immediately. If you want to have delicious nuts to munch on or add to your recipes, however, you need to dehydrate or toast them. There are a number of ways to do this, and it’s a matter of preference as to which ones suit your taste best. Yesterday, I compared the times and tastes of nuts that had been soaked then dried at 3 different temperatures. I did this for almonds, cashews, pecans, walnuts, and pumpkin seeds. I soaked them all over night–with the exception of the cashews, which got a four hour soak. It’s not good to soak cashews over seven hours: the texture changes for the worse. I drained the cashews, refrigerated them, and dried them with the other nuts. I included 1 tablespoon celtic salt in the the soaking water for each pound of nuts. The three comparisons included: a dehydrator at 115˚, an oven at 200˚, and an oven at 300˚. The nuts at 200 degrees took 3 hours for a beautiful light toast with delicious flavor. The nuts at 300 degrees should have come out at about 45 minutes. I left them in an hour; and while tasty, they were slightly over-toasted. The dehydrated nuts took about six hours. In a previous post I had listed the minimum times for soaking nuts. Nonetheless, I find it’s easiest to simply soak most of the nuts for about the same amount of time, about six hours. To repeat, cashews should not go longer than seven. Almonds need a minimum of six hours, but they are even better soaked longer. Here are the different nuts at different degrees of toasted. They range from light (dehydrator) to darkest (300 degree oven). My conclusion is that for eating nuts out-of-hand I prefer those toasted at the higher temperature. For a neutral nut that will later be used in cooking or baking, I would go with the lower temperature oven or the dehydrator. These delicious nuts stay fresh at room temperature for minimum of a month. Once exception is walnuts, which should be refrigerated. For super oily nuts like pine nuts, store them in the refrigerator or freezer. No need to toast them first. If this is too much for you, there is always Wilderness Family Naturals, which promptly delivers to your door already soaked and dehydrated nuts.
Share on Facebook and Twitter | Health Tips, ingredients, nuts and seeds, techniques, Uncategorized | No comments
|