|
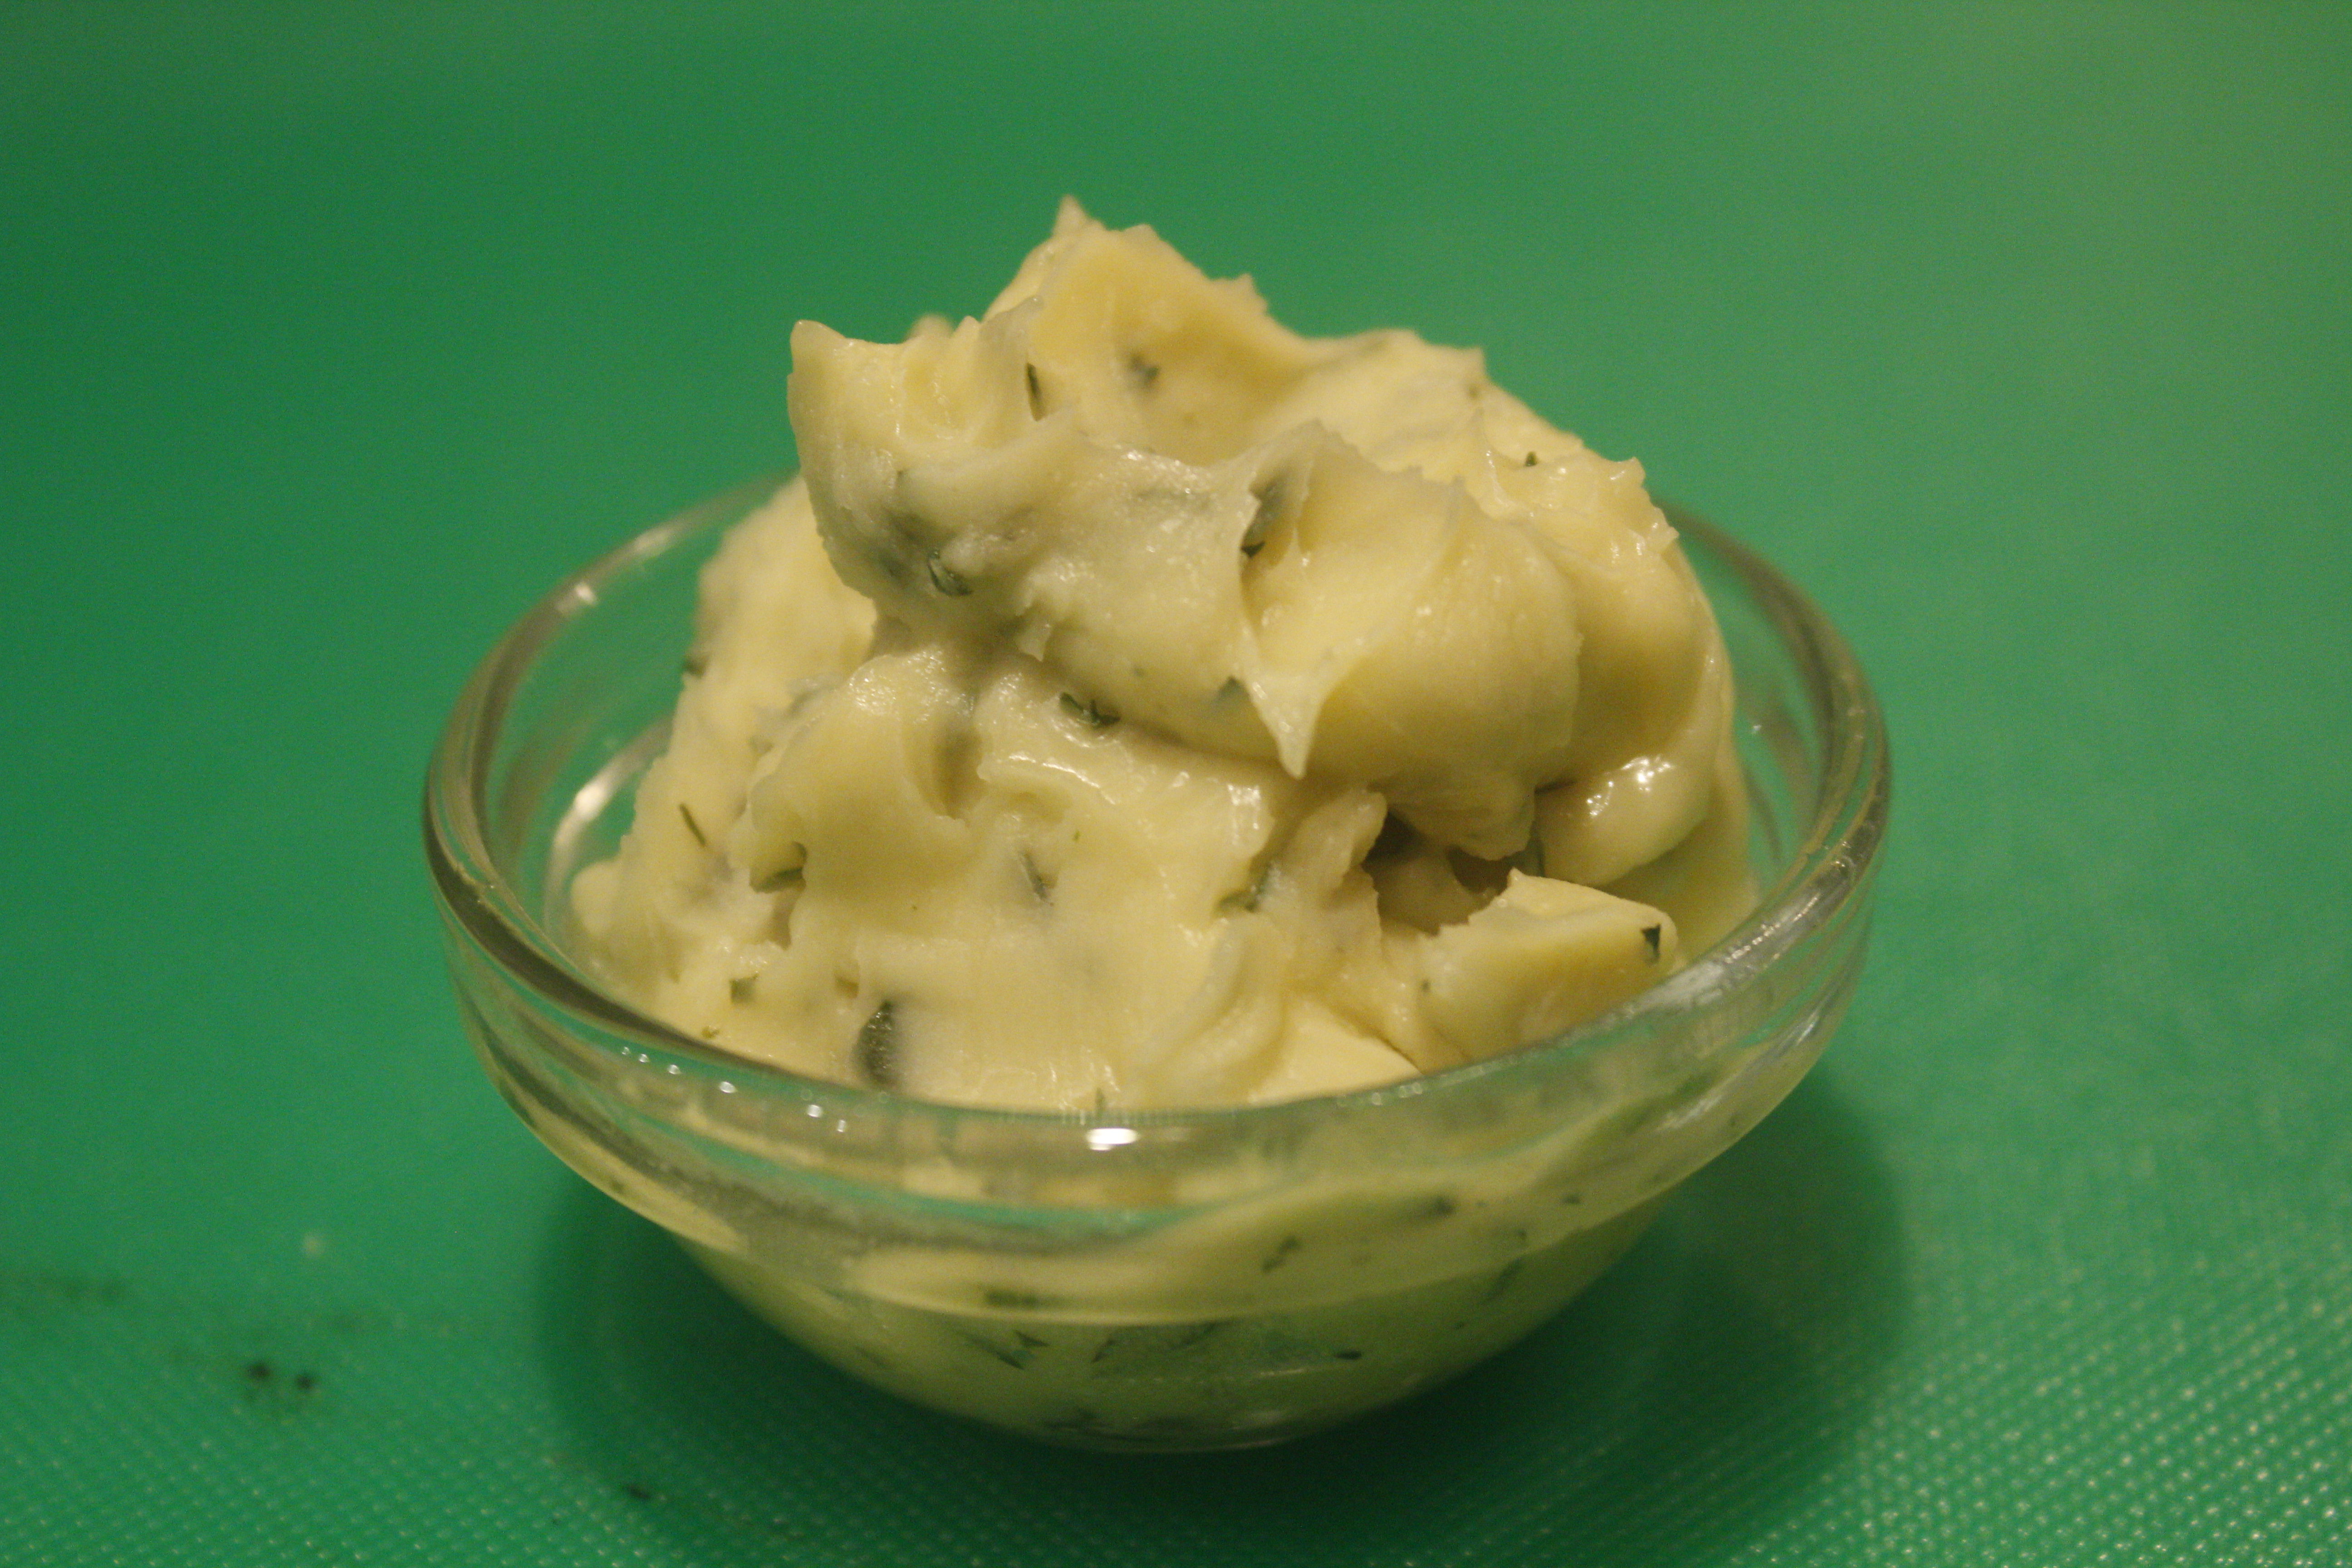
Lacto-fermented Mayonaise
In today’s Video, I show how to make homemade mayonnaise—two versions, actually— using a combination of oils. Homemade mayonnaise, unlike any that you can purchase, can be a healthful ingredient, a way to get high quality fats into your diet. Besides being made with great oils, these two versions contain a secret ingredient, whey, which keeps them fresh for much longer than the usual homemade versions. The key to a great mayonnaise is to start with good oil. I make my mayonnaise with one cup of oil in total, but I mix a combination of oils to make that one cup. In the video, I show two different combinations. The first one consists of 1/3 aroma-free coconut oil, 1/3 extra virgin olive oil, and 1/3 avocado oil. The second combination of oils include the same amounts of coconut and olive oils, but the avocado oil is replaced with 1/3 cup unrefined sesame oil, a combination inspired by the lipid researcher Mary Enig. Either oil combination has a mild flavor: the aroma-free coconut oil is neutral tasting, so the impact of the stronger flavored oils is diluted. Any one of the oils by themselves would not make a good mayonnaise, but the combinations are synergistic. The results are two delicious mixes containing stable healthful lipids— perfect for sautéing as well as for sauces. Keep these mixes in jars at room temperature to use any time. To make the mayonnaise (also known as an emulsion sauce), start with 1/2 teaspoon Dijon mustard and 2 egg yolks. Whisk these together in a medium bowl, then slowly whisk in the oil. It helps if you anchor your bowl with a wet towel so that both of your hands are free, one to pour and one to whisk. Start slowly; then, as the mixture begins to emulsify, you can pour and whisk faster. You can speed up the process by using a food processor; leave the motor running as you slowly drizzle in the oil. When you’ve worked in all of the oil, add a splash of lemon juice, a sprinkle of salt, and a tablespoon of whey. You make whey by draining full-fat unflavored yogurt in a cheesecloth-lined strainer. The longer you let the yogurt drip, the more whey you’ll have. You’ll also have thick yogurt, and if you leave it to drain long enough (24 hours), you’ll have thick yogurt “cheese.” Transfer the whey to a jar and keep for up to 6 months in the refrigerator. (Use a splash when soaking grains to deactivate mineral-inhibiting phytates.) When you add just a tablespoon of whey to your mayonnaise, it will keep fresh for 2 weeks to a month in the refrigerator. Because of the coconut oil, this mayonnaise also will thicken up beautifully. I add tarragon to the mayonnaise presented in the video, and then I use it to dress two salads. One is a potato salad mixed with hard-boiled eggs, celery, and scallions. The second starts with tinned salmon mixed with red onion, celery, and scallions. Of course, these are just two of the myriad dishes you can whip together quickly with this delicious sauce. You’ll find this mayonnaise as tasty as it is versatile!
Share on Facebook and Twitter | Kitchen Tips, techniques | 1 comment
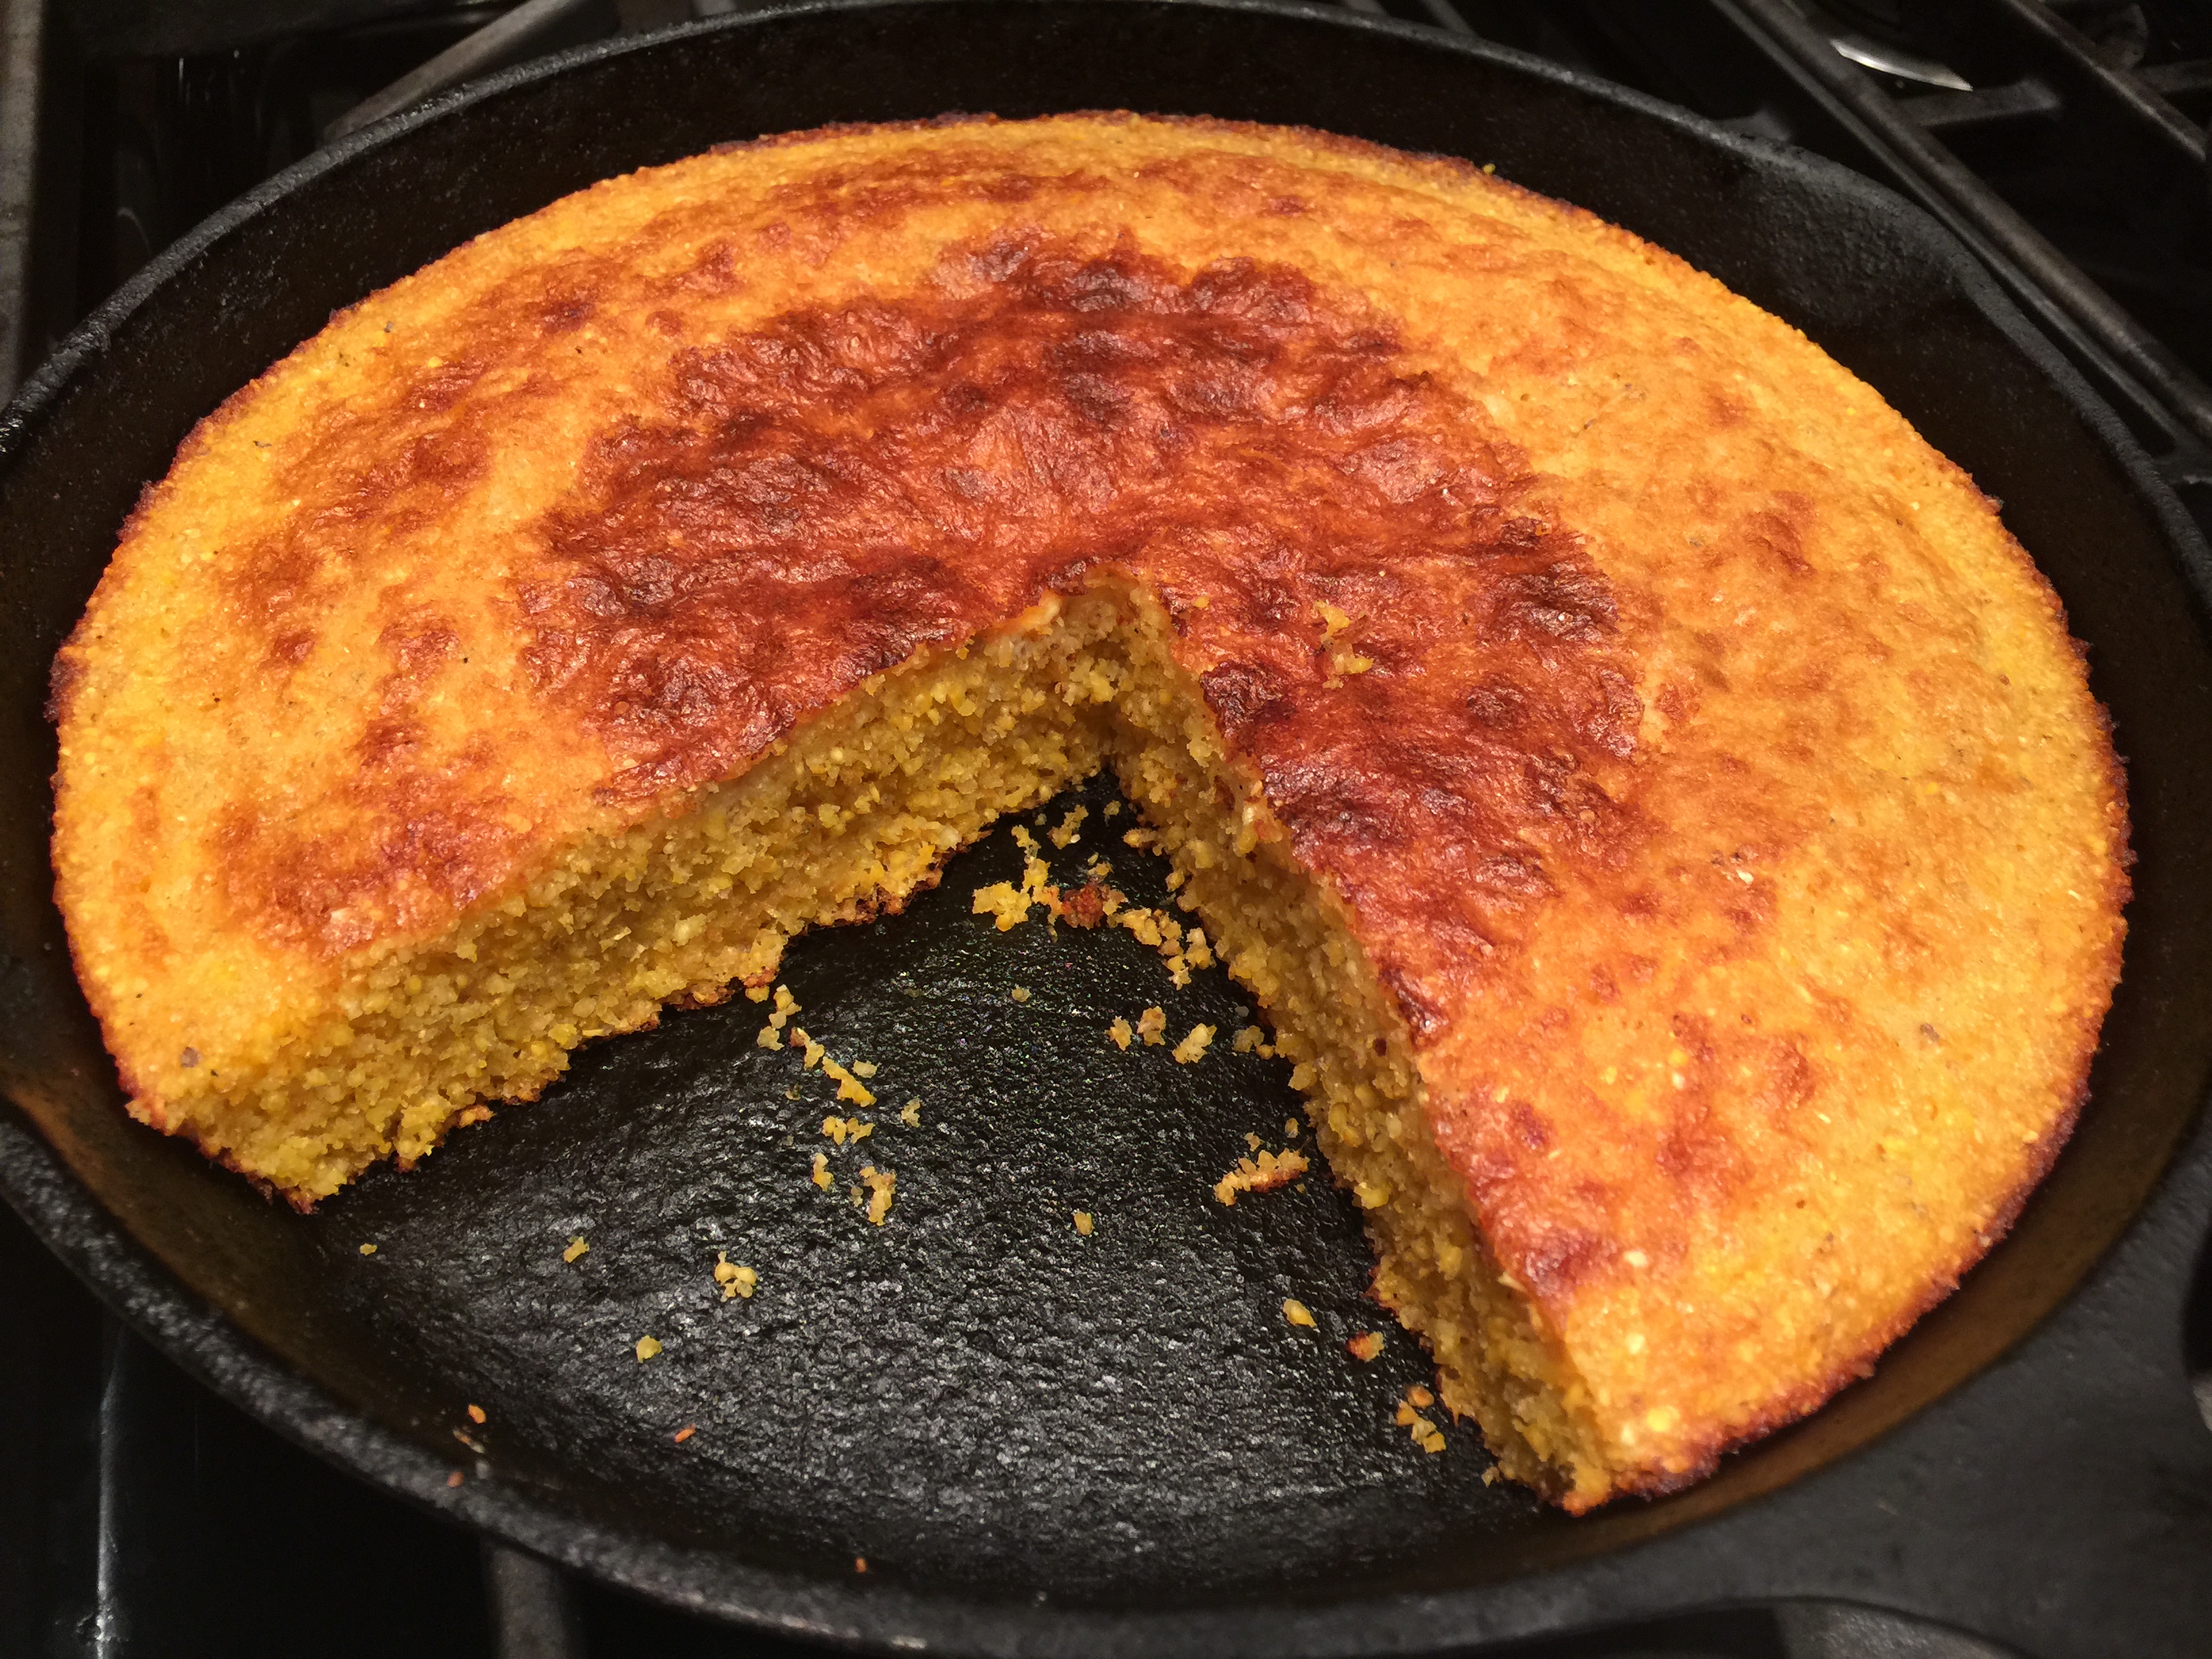
Southern Skillet Cornbread My new favorite cornbread is adapted from a recipe in Cook’s Country magazine. It’s made from pure cornmeal, so it’s got super corny flavor. It’s easy to make, baked at high temperature in a cast iron skillet.
In today’s video, I show how to make a delicious Southern-style skillet cornbread. This cornbread is made completely from cornmeal, without any other flours, making it gluten free. Besides the cornmeal, there are just a few other ingredients besides good quality fat (a mix of coconut oil and butter). The dish is baked in a 10-inch cast iron skillet, and it’s quick to make. The technique for making this dish is also a little unusual. You can make this cornbread using either course cornmeal or fine-grind cornmeal, which yields very different results; or you can mix the two. In the video, I demo a mix; I use 1 1/4 cups of a course-grade polenta and 1 1/4 cups of a fine grind masa harina, cornmeal that’s been treated with edible lime (calcium carbonate) to make it digestible and impart that distinctive tortilla flavor. The two together give the cornbread a delightful texture. To begin, spread both types of cornmeal on a parchment-covered sheet tray and toast in a very hot (450 degree) oven for 10 minutes. Once the cornmeal has been in the oven for 5 minutes, add 1/4 cup aroma-free coconut oil to a 10-inch cast iron skillet, and place that in the oven on a higher shelf to melt and heat. Remove the sheet tray and the cast iron skillet at the same time after 5 more minutes. The cornmeal will have started to brown around the edges. To the melted coconut oil, add 1/4 cup butter and return that to the oven to melt. Transfer the cornmeal to a bowl (it’s still warm) and whisk in 2 cups buttermilk. Add the remaining ingredients: 2 beaten eggs, 1 teaspoon each baking powder and baking soda, and 3/4 teaspoon salt. Notice how the mix starts to bubble as soon as the leaveners are stirred in. By this time, the butter will have melted. Remove the cast iron skillet from the oven, and pour off all of the fat into the bowl with the other ingredients, leaving just enough fat in the skillet to coat the bottom. Thoroughly mix the coconut oil-butter mixture into the other ingredients; then pour the entire contents of the bowl into the prepared skillet. Give the skillet a shake to even and smooth out the batter. Return it to the oven and bake it from 12 -16 minutes, rotating the pan after about 7 minutes. Remove the pan when the top is crusty and golden. Let the cornbread cool for a few minutes before slicing. Make sure to wrap a towel or kitchen mitt around the handle so that you don’t inadvertently touch the skillet. Even though you know you just took it out of the oven, you’re liable to forget out of sheer habit. Cut the cornbread into wedges. Marvel at the lightness of the texture, the corniness of the flavor, and the ease of assembly. Enjoy this luscious treat with your favorite cold weather dish or holiday meal.
Share on Facebook and Twitter | Gluten Free, Grains, Kitchen Tips, Recipes, Side Dishes | No comments
The Myriad Uses of Cooked Squash
‘Tis the season to be savoring sweet squash. In today’s video, I demonstrate the richness and versatility of cooked squash. With a tub of the bright orange flesh on hand, you can quickly whip up any number of autumnal dishes. You can keep cooked squash refrigerated for up to a week, or you can freeze it. Although there are all kinds of wonderful varieties of squash and pumpkin available in farmers’ markets, in the video I demonstrate with butternut: the smooth, flavorful workhorse of the squash world. To prep the squash—use a 21/2 to 3-pound butternut—slice it down the middle, and place it face down on a parchment-covered baking sheet. Roast it at 325˚F to 375˚F (the temperature depends on what’s already in the oven cooking; anything within this range is good!) until very tender, about 45 minutes. Rest the squash until cool enough to handle, then scoop out and discard the seeds, which is much easier to do after the squash is cooked. Scoop the flesh into a bowl and reserve. The first recipe in the video is for a speedy soup. To begin, in a medium pot sauté 1/2 cup of chopped leeks along with a tablespoon or so of minced ginger in a couple tablespoons fat (coconut oil, ghee, or extra virgin olive oil are all good) over medium heat. When the vegetables are softened, add a quart of stock—this is a great place to use a homemade chicken or vegetable broth—a can unsweetened coconut milk, the reserved squash flesh, and 1 1/2 teaspoons salt. Let the soup cook a few minutes to marry the flavors, then finish with a flick of cayenne and a splash of lime juice. Voilà: a delicious soup! Serve up a hearty bowl dusted with chopped cilantro. The second recipe is for a light yet substantial pumpkin pie-spiced breakfast pancake. The recipe makes 2 servings, but you can easily scale it up. Start with a couple tablespoons coconut flour in a bowl. Add a mix of spices: 1/2 teaspoon cinnamon powder; and a pinch of nutmeg, ginger, and allspice. Add a large pinch baking soda and salt, and whisk together the dry ingredients. Then add 1/2 cup squash flesh, a couple of lightly beaten eggs, a tablespoon maple syrup, 1/2 teaspoon vanilla extract, and 1 tablespoons melted fat (butter or coconut oil). Mix vigorously, and you’re ready to make pancakes. To cook, film a griddle or nonstick skillet with oil until your hand held 1 inch above the pan is uncomfortable. This batter is a little more delicate than a typical flour-based batter; for best results, opt for medium-size pancakes, and above all, resist crowding the pan. Drop the batter—a tablespoon at a time—into the sizzling skillet until you have four swelling hotcakes. Leave the pancakes alone until browned and toasty on the bottom, then flip and cook a few more minutes on the second side. Transfer to a plate, and repeat with the remaining batter. Serve these airy cakes with butter, fruit, or a drizzle more sweet syrup. These are just two of the many wonderful dishes that you can make with squash flesh. Yes, it takes 45 minutes or so to cook the squash, but the oven does the work, so it’s not your time. With cooked squash on hand, you can whip any number of delectables together in minutes. Share on Facebook and Twitter | Breakfast, Kitchen Tips, Soups, Uncategorized, Vegetables | No comments
Fermented Tomato Salsa
In today’s Video, I show how to ferment a tomato salsa; making this lactoferment is a great way to celebrate and enjoy the luscious tomatoes available right now. You may not be familiar fermented salsa: but it is truly delicious and you get to reap the benefits of your labor quickly. Just 24 to 48 hours of fermentation results in a salsa with a delightfully tangy flavor and a long-lasting life. Salt (or a mixture of salt and whey) initiates the fermentation process; it inhibits the growth of undesirable bacteria long enough for the lactobacilli, the delightful microorganisms already present on plants, to be converted to lactic acid. The nutrient content of the salsa is increased; the versatile condiment turns into a healthy probiotic. I demonstrate the two versions in the video: one made with salt, and one made with a combination of salt and whey. Fresh whey is simple to make. You place a cheesecloth-lined strainer over a bowl and add a couple cups of yogurt to the strainer. Within an hour or so, you’ll have a decent amount of liquid in the bowl: that’s the whey. You can transfer it to a covered jar and keep it stored in the refrigerator for up to six months. The longer you strain the yogurt, the more whey you’ll have and the thicker your yogurt will be. You can strain it for a few hours to produce thick, rich Greek-style yogurt, or you can strain it overnight to produce even thicker yogurt cheese. Whey gives the ferment a jumpstart, and the version with whey is usually ready within one day. Alternatively, you can leave out the whey and just add salt; you’ll still get wonderful results within two days. For either version, start with 1 ½ pounds tomatoes, diced small. The salsa is especially vibrant with a mélange of colorful tomatoes; a quart’s worth of quartered cherry tomatoes is also suitable. Next add a couple cloves minced garlic and 1 or 2 minced jalapeños to the tomatoes. It’s also good to add something oniony: I favor a mix of red onion and scallions, about ½ cup of each. No salsa is complete without a mound of chopped cilantro, so add at least ½ cup. To this, add ¼ cup lime juice. Now it’s up to you either to add 2 teaspoons salt or 1 teaspoon salt plus ¼ cup whey. Either way, make sure to push the salsa down into your 1-quart jar so that the liquid covers the top. Cover tightly; then leave the jar out on the counter for 1 to 2 days. Within a day or two, you’ll notice bubbles in the liquid. At that point, transfer your ferment to the refrigerator, where it will stay fresh for a few months. Use it to add zest to your meals and snacks.
Share on Facebook and Twitter | Fruit, Gluten Free, Kitchen Tips, Side Dishes | No comments
Homemade Nut Milk In today’s video, I show just how easy it is to make your own nut milks. Homemade versions are not only fresher than the store-bought (which contain synthetic vitamins, thickeners, and sweeteners): they are also healthier and more flavorful. You can use these versatile beverages as a base for smoothies, hot chocolate, or cereal, or as an alternative to dairy in your baked goods. Or, add a touch of natural sweetener and a dash of spice to make a simple nut-milk drink. The basic prep technique is the same for most nuts. Step one is to soak the nuts. Almonds require a good overnight soak; it’s even okay to let them go for as long as 12 hours. The reason for the soak is as follows: nuts and seeds are naturally adapted to lie dormant in nature until proper sprouting conditions are present. When it rains, nuts and seeds get wet; then they germinate, and the plants grow. When we soak the almonds, we are mimicking nature’s incubating process. When there is moisture, enzyme inhibitors and toxic substances called phytic acid are washed away naturally. In other words, phytic acid is nature’s padlock, and water is the key. Once the nuts are soaked, all of the enzymes & minerals available in them—almonds have phosphorous, magnesium, manganese, & copper—become available to the body. These soaked nuts become swollen and soft so that they blend easily into a rich nut milk, and they are noticeably easy to digest. Next you rinse and drain the nuts. If you’re not ready to make nut milk right away, leave the drained nuts refrigerated for up to 3 days. When ready, blend them with fresh water at a ratio of 3 parts water to 1 part nuts. A high-speed blender, such as a Vitamix, is convenient for whizzing the nuts into a foamy beverage in a blink; other blenders take a couple of minutes. The last step is to squeeze the frothy liquid through a nylon mesh nut bag, which you can conveniently use over and over again, or a double layer of cheesecloth draped over a strainer. The leftover pulp has all the flavor squeezed out of it; you can simply compost or discard it. Cashew milk is different from the typical nut milk. Cashews blend up so pulverized that the particles squeeze through the fine mesh of the bag, so don’t bother to strain them! Do add an extra cup water for a 4 to 1 ratio of water to cashews; this way your milk won’t be too heavy or too thick. In the last part of the video, I demo a speedy hot chocolate made with only two other ingredients besides the cashew milk. I stir a tablespoon of cocoa powder and 2 tablespoons maple syrup in the bottom of a small pot until bubbling; then I add a couple cups of nut milk and let the liquid come to a boil. That’s it: soothing and delectable, and just one of the many luscious comestibles that you can concoct with homemade nut milk.
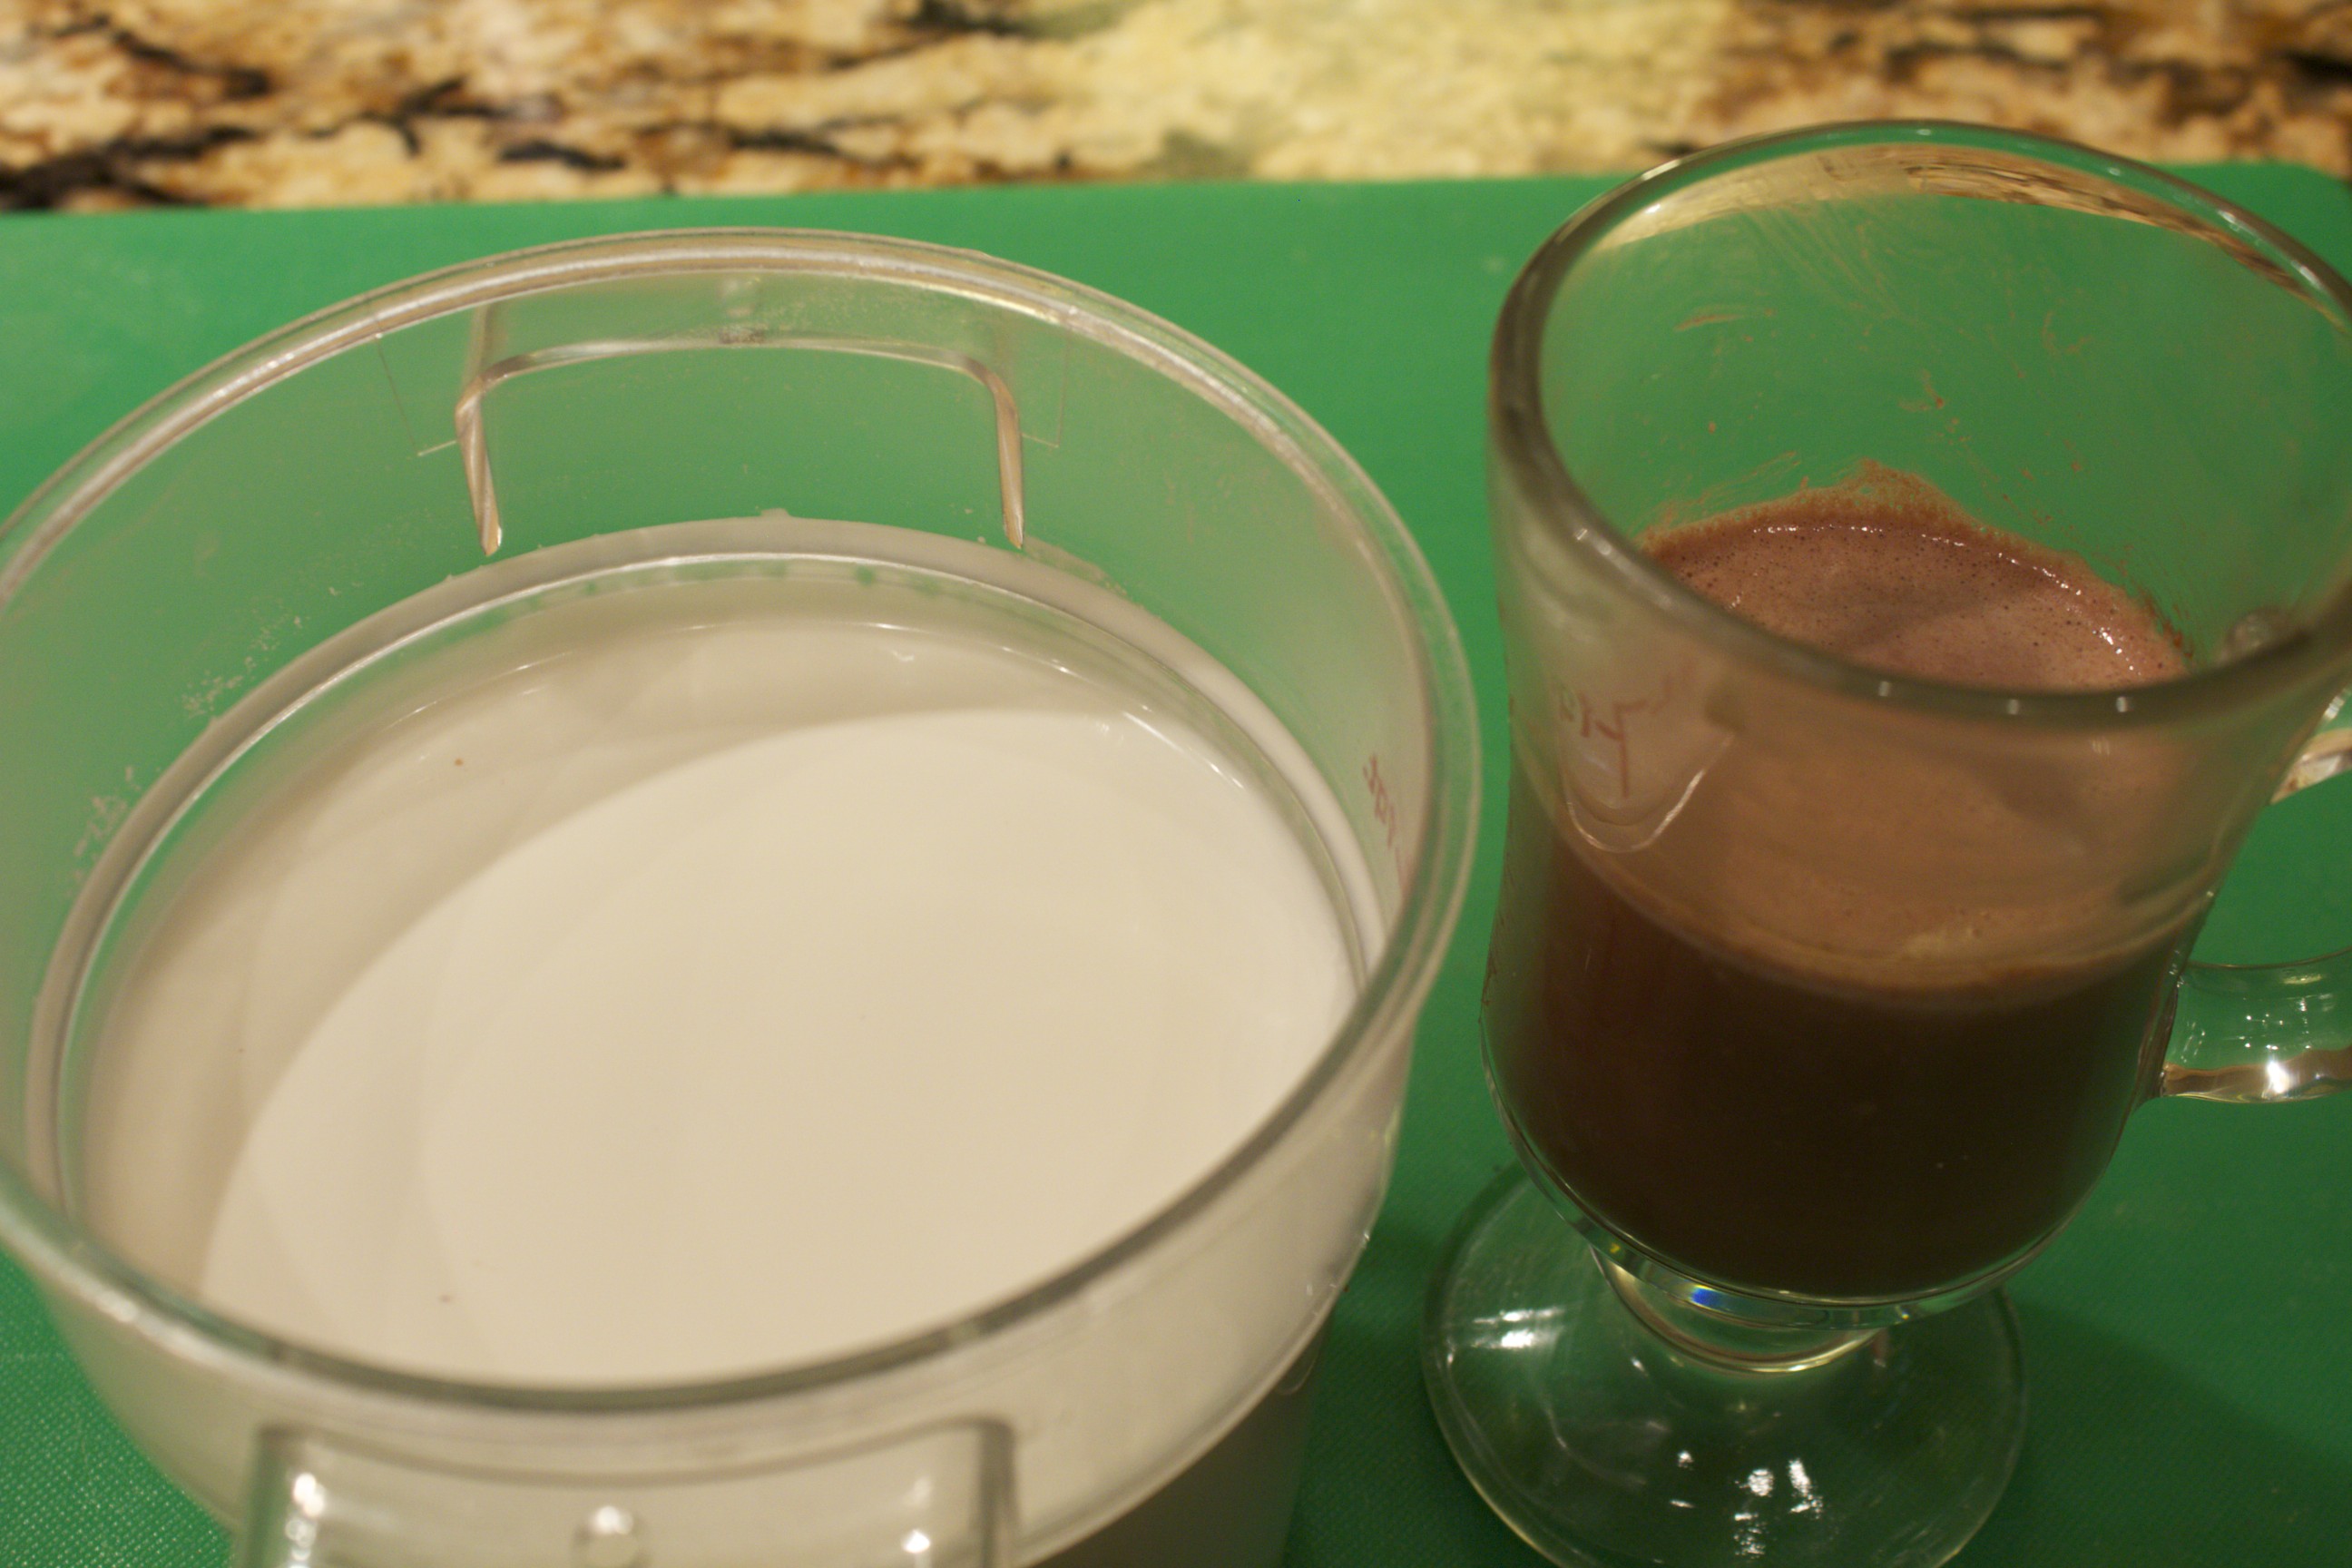 Cashew Milk and Hot Chocolate Share on Facebook and Twitter | Beverages, Chocolate, Gluten Free, Kitchen Tips, Natural Sweeteners, nuts and seeds, Snacks, techniques | No comments
Lacto-fermented Sauerkraut In today’s video, I show how to make traditional sauerkraut, one of the popular dishes that Eastern Europeans of yore would put up in storage in November so that they could have vegetables that would last the entire winter. Cabbage is especially amenable to culturing. While giving it a delightfully tangy flavor, the time-honored fermentation process turns pedestrian cabbage into an uber-raw natural probiotic. Lactobacilli are delightful microorganisms already present on the leaves and roots of plants. With a little encouragement, they convert the starches and sugars in the leaves to lactic acid—thus the term “lacto-fermentation.” Salt initiates the process; it inhibits the growth of undesirable bacteria long enough for the lactic acid to start forming. Enzymes break down the cabbage into more digestible molecules, and the lactic acid preserves it by eliminating unwanted organisms and increases the level of Vitamin C. In the end, “predigested” fermented cabbage also promotes the growth of healthy flora throughout the intestines, making harder-to-digest foods much more digestible. Here’s how you make the ferment: In the video I demonstrate the process with a medium head of green cabbage, shredded finely; you should have 10 cups or so. Stir in a couple of grated carrots and four teaspoons salt, a good amount for a quart-worth of packed kraut. Use a good quality unadulterated salt that has trace minerals, such as celtic sea salt. To help get the juices of the cabbage flowing, massage the cabbage with your hands; get in there and squeeze hard. You can also pound the cabbage with a mallet to help it start to sweat. Once you have a lot of shiny, juicy cabbage in the bowl, stir in the other ingredients. In today’s ferment, I’m adding a tablespoon each of minced ginger and garlic, about ½ cup of sliced scallions, and a minced red Fresno chile, a mild and colorful chile which I found at my local grocer. 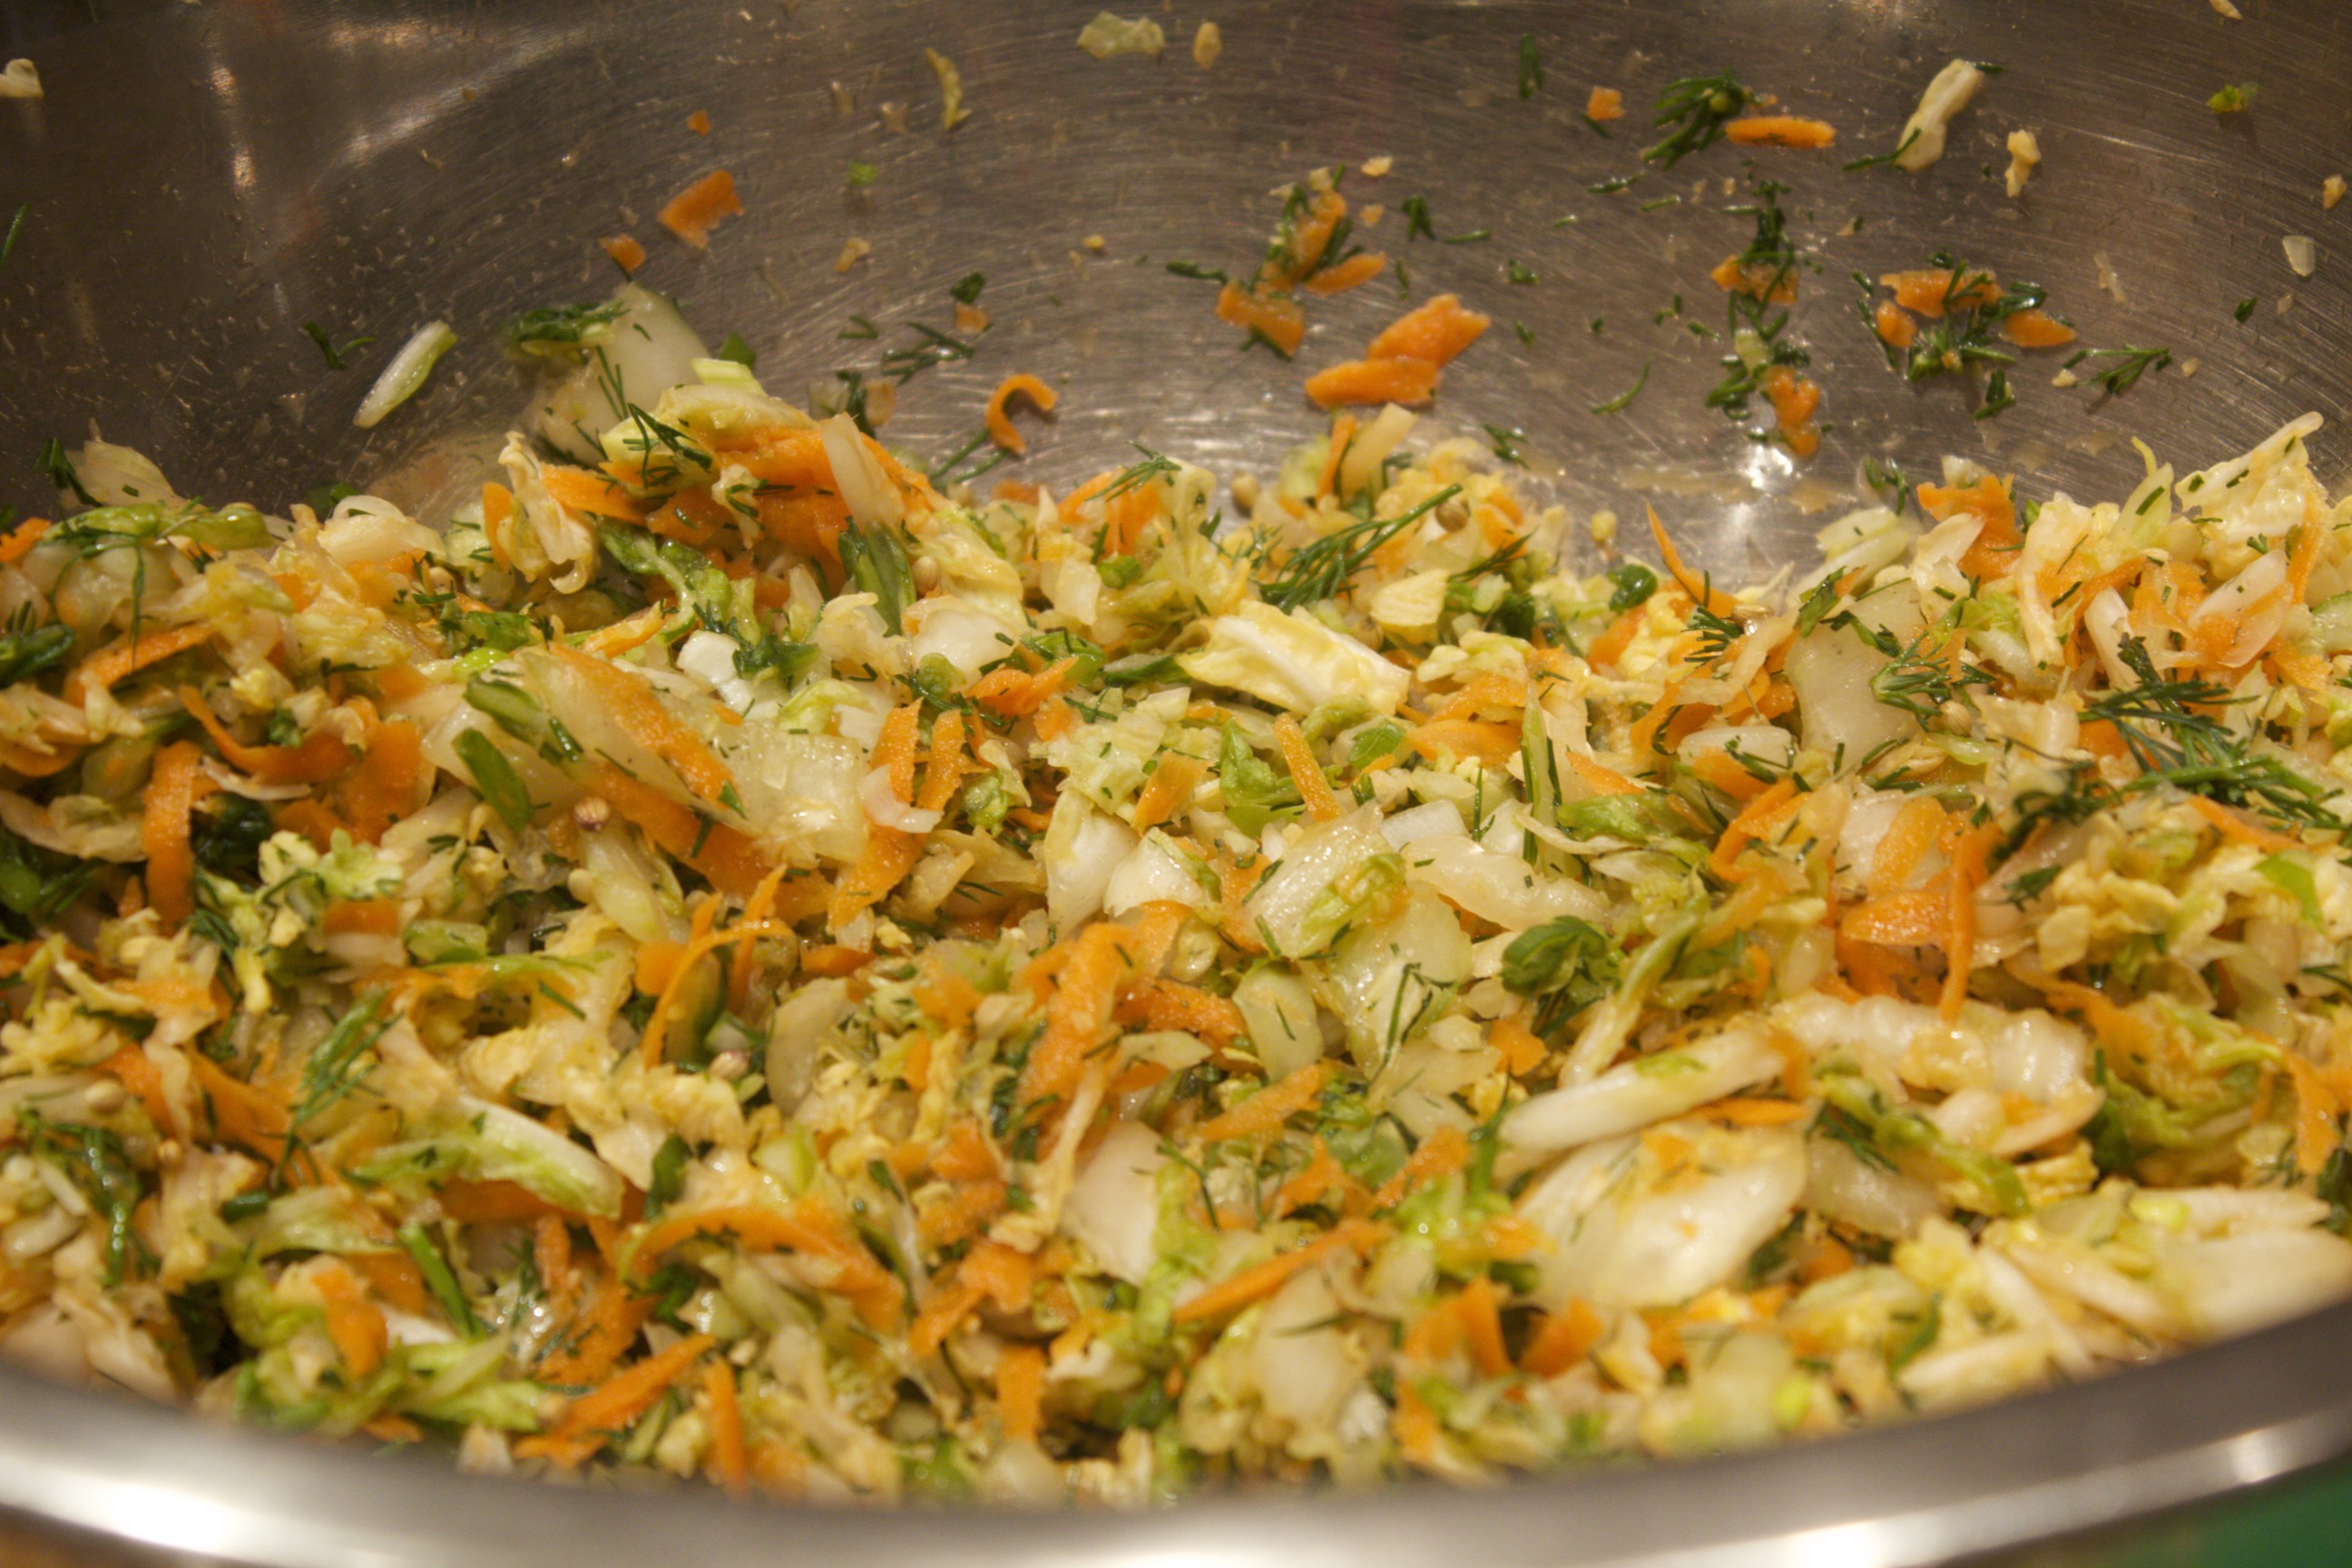 Cabbage ready to be packed Stuff the juicy cabbage mixture into a 1-quart bell jar, pressing down hard to make sure that there is liquid floating on the top. (A blunt, wooden, club-like instrument called a “kraut-pounder” is quite helpful for pressing down the vegetables, but you can improvise with the end of a tapered rolling pin as well.) Leave a generous inch of space at the top of the jar in order to prevent liquid from seeping out the top.  Make sure liquid covers the top. Let your imagination reign when it comes to the variations. Start with a base of cabbage: red, savoy, or nappa. I’ve enjoyed all kinds of additions to my slaws, including onions, fennel, daikon, fennel seed, juniper berries, chiles, and curry powder (but not all in the same slaw, of course). Leave the ferment on the counter from 5 days to 2 weeks. The insert in the middle of the bell jar will be hard to press down once the ferment really gets going. Start tasting the kraut at that point. It will be fermented after a few days; but, if you can leave the kraut for the full two weeks, you’ll have a tangier, richer flavor. (After tasting, make sure that the cabbage is still tightly packed and submerged in liquid.) Transfer the jar to the refrigerator; it’s ready to eat, but it tastes even better if you can leave it for a couple of additional weeks before opening. Once opened, the ferment stays fresh at least a good three months refrigerated. Start off slow; a few tablespoons added to your meals is sufficient. You can increase the amount as your belly becomes acclimated to all the additional probiotic flora. It’s deeply satisfying to make your own krauts; you might just find yourself with a refrigerator full of delicious varieties.
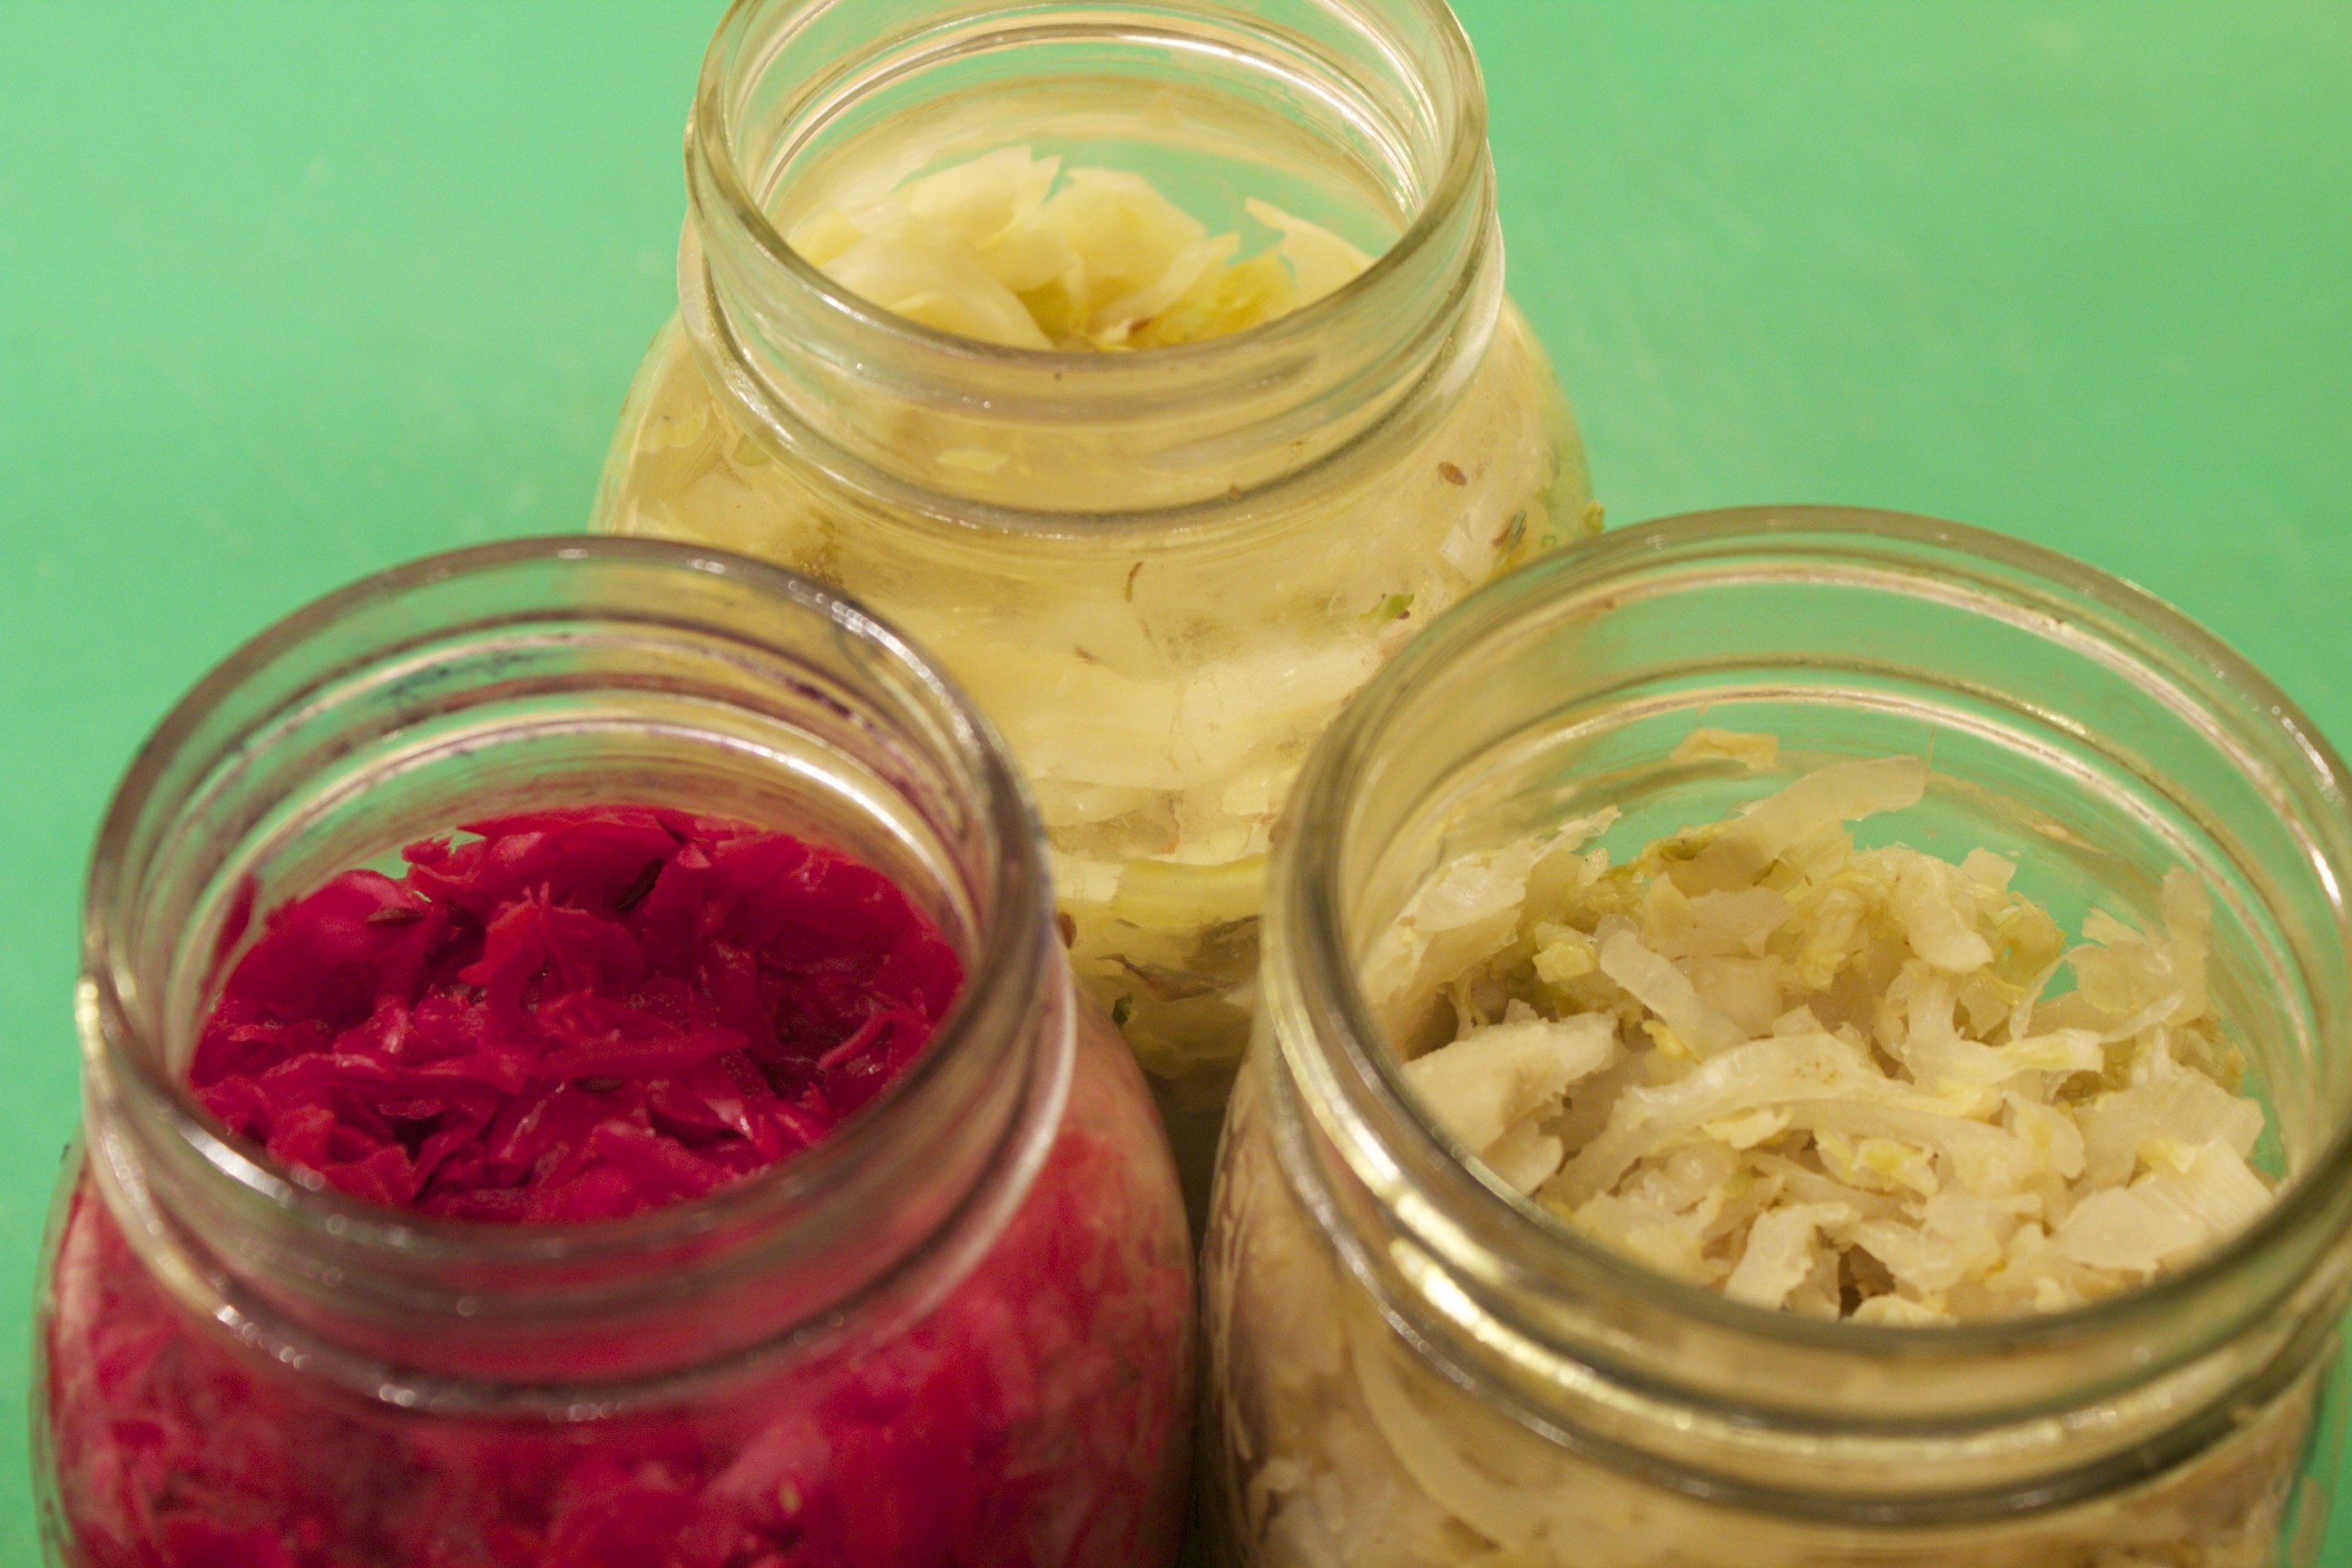 Finished lacto-ferments
Share on Facebook and Twitter | condiments, Health Tips, Kitchen Tips, Side Dishes, Vegetables | No comments
Chicken Bone Broth In the video presented here, I show how to make a nutrient-dense bone broth. There’s a South American proverb that goes “good broth will resurrect the dead.” If only that were true. What is true is that slow-cooked stocks that are made from bones aid in healing the chronically compromised as well as in keeping the healthy robust. What’s more, good broths—something which every chef knows—are the basis for delicious soups and sauces. What distinguishes a nutrient-dense broth from a mediocre stock is the gelatin. Gelatin is what is found in the joints of animal bones. A word first about Dr. Weston A. Price, author of the tome Nutrition and Physical Degeneration. Price was a Cleveland dentist who, in the 1920’s and 30’s, traveled the world to find existing cultures that had not yet been exposed to the processed foods of Western civilization. Over the course of ten years, he visited a dozen isolated healthy peoples around the world. Without fail, all of the people with these isolated food traditions not only had robust health, but straight gorgeous teeth without dental decay—and none of the societies had modern dentistry. Price meticulously recorded his findings and observed that, although each culture’s diet varied tremendously, they had in common ten times higher levels of fat soluble vitamins and four times higher level of minerals than those of the mainstream American diet. All of the peoples he visited consumed soups or stews based on bone broths made from fish, fowl, or meat. In the video shown here, I focus on chicken broth. There are so many ways to make chicken broth; the method can be varied every time, depending on what you have around. I generally use about five pounds of bones. These invariably include a raw carcass, a few feet, a few necks, and any backs or cooked carcasses that I have around. I’ve made chicken bone broth from several raw carcasses or from just necks and feet as well. Chicken feet are perhaps the most important, underrated element in a great broth. Even using two can add so much gelatin to your brew. If you use a bagful, your chilled stock will be so gelatinous that you can stand a spoon straight up in it! Place all of the bones in a tall stockpot and cover them with water. Then add two tablespoons of apple cider vinegar to draw out the minerals. Let the stock sit for half an hour before turning on the flame. You can add an onion, a couple of carrots and celery if you like, but it’s not necessary. The next step is to bring the stock up to a boil. At that point you have to spend a few minutes skimming the scum that rises to the surface. You really do want to get rid of the scum, since it will compromise and muddy your stock. Next, lower the heat until there is barely any movement on the surface of the liquid; let the stock cook anywhere from six to twenty four hours. You can turn off the stock at any point if you need to go out. You can leave it untouched for up to nine hours at a stretch. When you start the broth again, simply bring the liquid to a boil again, skim off the scum, lower the heat, and let it roll. When you’ve cooked the broth for as long as you like, strain the liquid through a sieve, then transfer it to containers. I favor one-quart heavy-duty food-grade plastic. Next, chill the stock, and scrape off the fat that has risen to the top. Notice how wobbly and gelatinous your stock is after it’s been chilled. Now you can keep the stock refrigerated for up to five days, or longer if you reboil it; or, you can freeze it for months, keeping it ready to turn quickly into a delicious dish whenever you like. The gelatin in meat broths has the unusual property of attracting liquid (the term is hydrophilic) even after it has been heated. Gelatin acts as an aid to digestion. Furthermore, it acts as a protein sparer, allowing the body to more fully utilize complete proteins that are ingested. It is useful in the treatment of many chronic disorders, including but not restricted to anemia, diabetes, hyperacidity, colitis, and Crohn’s. Again, to emphasize: in order to make a stock truly nutrient-dense, it’s important to use some joint bones along with some of the other bones that provide minerals. Truly, bone broth is one of the mainstays of my kitchen—a real life saver. Share on Facebook and Twitter | Health Tips, Kitchen Tips, Soups, techniques | No comments
Two Ways to Shred Brussels Sprouts I love shaved Brussels Sprouts. The thin wispy shreds sauté in minutes; they also make a hearty raw salad that holds up to assertive dressings. In the video I show two ways to shred the little globes: one is by hand, the other is with a plastic mandolin. To shred the sprouts by hand, position your hand in a tight claw, with your forefinger pushing against the blade. This helps you cut thinly, it gives you stability, and keeps your fingers safe; in essence, it turns you into a human mandolin. If that method is daunting, try the second one in which you use an actual mandolin. A mandolin is a cutting device that helps you to slice your produce paper thin. There’s no need to purchase a fancy metal one–the plastic Japanese keeps a sharp edge better than the pricier varieties. Since Brussels Sprouts are small, here’s a tip for making the shaving process safe and effective: stick a fork into the root end (Make sure not to trim the root end first.) Position a sprout against the mandolin and shave away; shred all the way down to the root. Repeat with the next Brussels Sprouts, and so forth, until you have a nice little pile of wispy pieces, ready to be tossed into your favorite recipe. Watch the video (it’s less than 1 1/2 minutes) to see both ways of shredding. Share on Facebook and Twitter | Kitchen Tips, Vegetables | No comments
Glorious Autumn Squash Glorious autumn squashes and pumpkins in a variety of shapes and sizes abound in greenmarkets and grocery stores at this time of year. In the video today, I go over a few ins and outs of cooking with these vegetables as well as demonstrate a delicious and easy recipe that work with many of the varieties available. Here are six of my favorite types of squash among those that you’re likely to see. Two that have sweet dry rich orange flesh include the forest-green kabocha squash and the flaming red kuri pumpkin. These are wonderful for soups, stews, roasting, or mashing. Of course, cutting into one of these tough guys can seem like a dangerous undertaking. Here’s my favorite tip for handling an intimidating squash: turn the oven to between 325˚F and 375˚F (whatever is appropriate for the recipe), and simply toss the whole pumpkin into the oven for 10 to 15 minutes. That little bit of precooking is enough to enable you to be able to cut down the middle of a hard squash with even a thin-bladed knife. You can even peel the skin easily and cube the squash as well. Here’s an alternative method: simply bake the entire pumpkin without cutting into it first at all. If this is what you plan to do, make sure to place your squash on a baking tray, however, or you’re in for a messy oven-cleaning job when the juices start to drip. Another one of my favorite varieties includes the oblong delicata squash, characterized by its pale yellow skin with green stripes. The thin skin is eatable, so no need to peel these. To prep the squash, cut it lengthwise down the center, scoop out the seeds, and cut it into wedges. Toss the wedges in a little olive oil and salt, and roast for 20 minutes or so at 400˚F on a parchment-covered baking sheet. The small sweet dumpling squash is a variety that is perfect for stuffing. Give it a preliminary 10-to 20-minute bake before cutting the top off and scoop out the seeds, then stuff the inside and bake until tender. The football-shaped spaghetti squash is a fun variety with a stringy spaghetti-like texture. Initially, just toss the whole squash in the oven for about an hour. After it sits out of the oven for a few minutes and is soft and cool enough to handle, slice it down the middle, scoop out the seeds, and then scrape out the stringy flesh with a fork. Treat the strands like pasta and toss them with your favorite spaghetti sauce. The workhorse of the squash world is the butternut. This variety is softer than some of the other types, so it doesn’t need a head start in the oven before being cut or peeled. Treat it like two separate vegetables when dicing. The oblong part in the middle is dense, and it can be sliced like a potato: the bulbous bottom part contains all of the seeds, so it’s best to cut that part into wedges first. Use a t-shaped peeler, the kind that takes thick skins off, to make peeling the squash efficient. For the oblong part, first cut a thin piece off the bottom to anchor the squash on your cutting board, then cut downward slabs. Cut the slabs into long “batons,”, then cut the batons into dice. When you roast the butternut squash, do so by slicing it down the center first and placing it face down on a parchment-covered baking sheet. It’s so much easier to take out the seeds after the squash is cooked. The recipe that I demo in the video is sautéed butternut squash with pears and ginger. The pears harmonize beautifully with the squash—they’re both in season at the same time—and the ginger and cayenne add warmth to the dish. I start with some extra virgin olive oil. I warm a couple of tablespoons over medium heat in a large skillet. I then add the cubed squash with one diced pear—comice, Anjou and Barlett are all good—and cook uncovered over medium heat until the pieces are just tender and starting to brown, (about 6 to 8 minutes). I then push the squash to one side of the pan and add a tablespoon or so of butter (you can also use extra virgin olive oil). When the butter melts, I add the ginger and cook it a minute or so until fragrant. I then stir the ginger—along with ½ teaspoon of salt and a pinch of cayenne—into the mix. I finish the dish by stirring in a splash of balsamic vinegar. This dish is fragrant, fast, and flavorful. What a good time to get creative with all of the delicious varieties of squash that are out right now. They’re not difficult at all to use, so have a wonderful time!
Share on Facebook and Twitter | Kitchen Tips, Recipes, Side Dishes, techniques, Uncategorized | No comments
My Favorite Winter Salad After a season of holiday indulgence and too many meals out, it’s time to begin the new year with a little lighter fare. I’m busy with obligations, but I don’t want to skimp on good food. So I turn to my favorite nourishing winter salads that I can make in minutes. This hearty winter salad that I show on the video consists of arugula, oranges, fennel, and sardines, with a complement of olives, walnuts and feta cheese. It’s composed in such a way that I don’t even need a separate dressing.  Sweet, Salty, Crunchy, Juicy I start with a nest of baby arugula, or watercress, or mesclun greens. In the video, I use arugula with some farmer’s market pea shoots mixed in. I next add an orange that is cut into segments known as supremes. I cut the orange over a bowl to make sure to catch the juices that will become part of the dressing. I sprinkle the greens and orange with salt and then add a layer of paper-thin sliced fennel, which is arguably the most appealing way to eat raw fennel. Using the mandolin is the easiest way to get such slices. Next, I sprinkle in some black olives—a flavorful variety such as kalamata or nicoise—followed by a handful of walnuts. I then crumble my favorite feta cheese, a sheep’s milk feta, over the salad. Finally, I crown the salad with sardines. I use sardines packed in extra virgin olive oil, so that the oil from the tin of the sardines becomes part of the dressing, mixing with the juice of the oranges. Every bite is exciting—a medley of sweet, salty, juicy, and crunchy. Moreover, this salad is a nutritional winner, packed with a range of nutrients, from omega 3’s to vitamins C and E, and loaded with phytochemicals and minerals as well. You can pack this salad to take on the go. Layer the greens with the fennel, olives, walnuts, and feta. Put the juicy orange slices in a separate container. Salt the salad, add the oranges, and top with the sardines right before eating. Share on Facebook and Twitter | Fish, Greens, Kitchen Tips, Lunch, Main course, techniques | No comments
|