|
Strawberry Guacamole 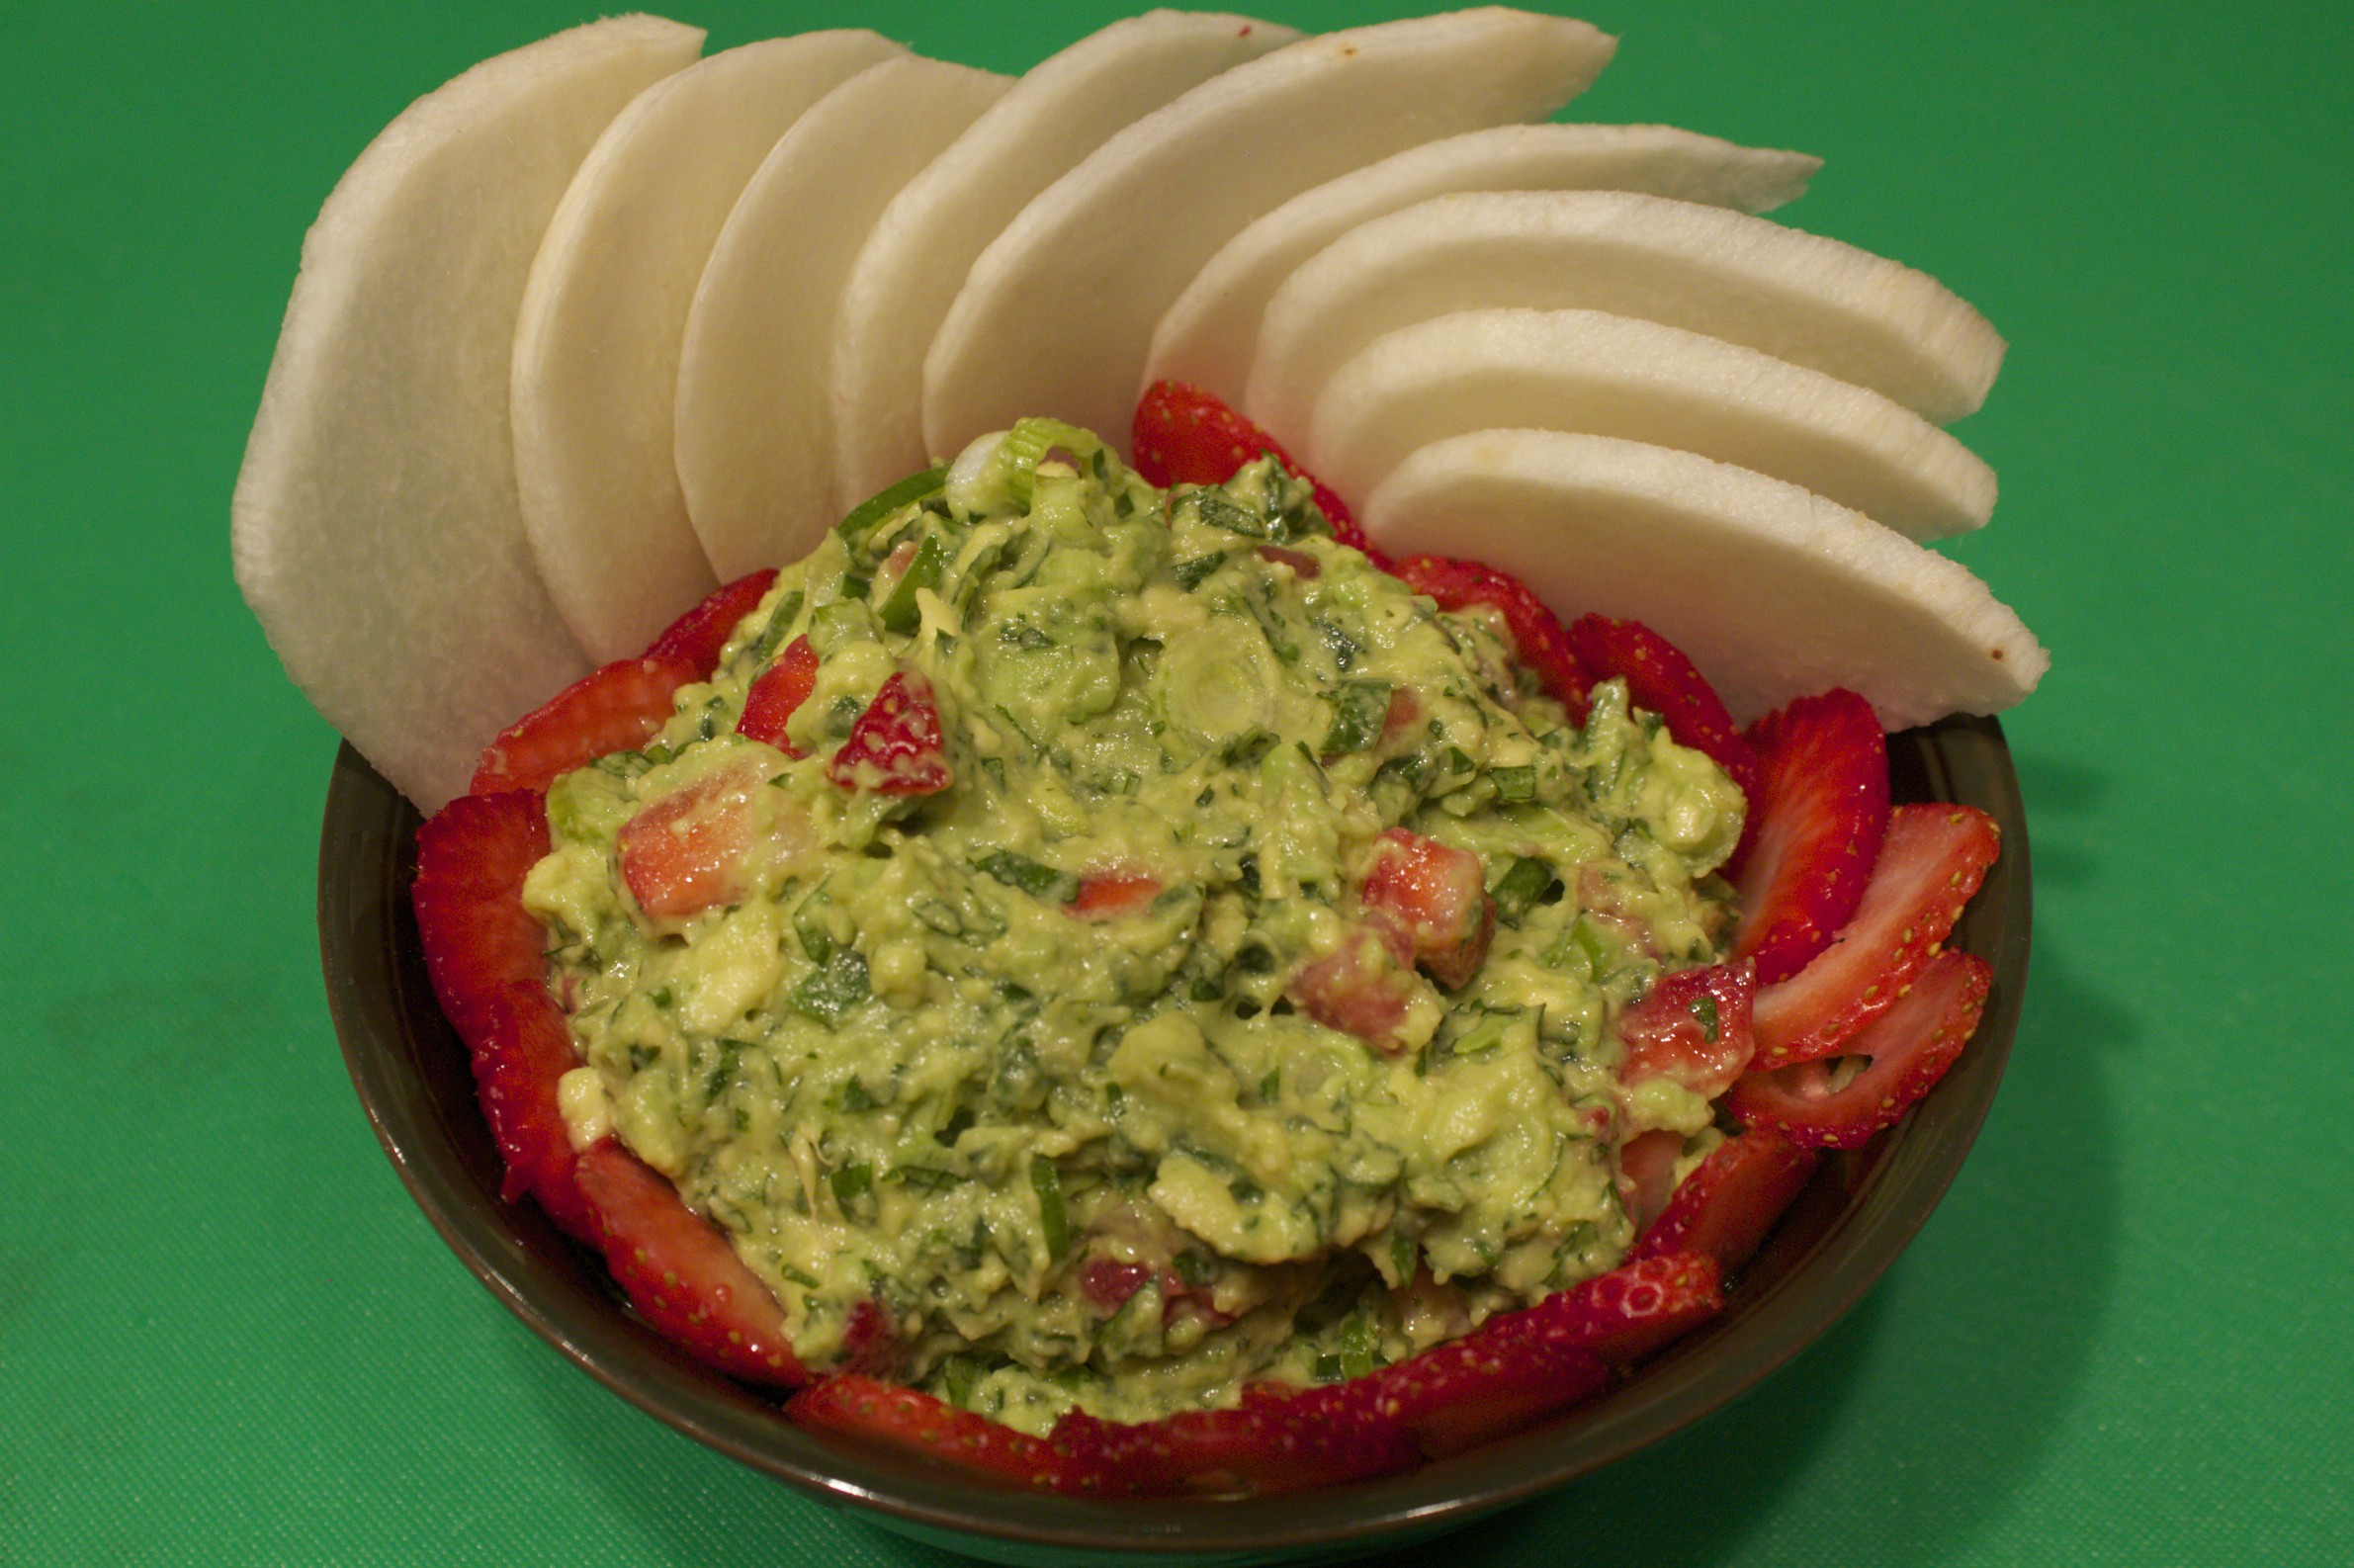 Strawberry Guacamole with Jicama Chips Fruit and avocado (which is technically a fruit itself) go well together, and it is traditional in Mexico to enjoy fruit-studded guacamole. Strawberries and guacamole are an especially refreshing and nutritious combination, containing lots of vitamin C from the strawberries and vitamin E from the avocados, as well as numerous phytochemicals and minerals from both. In the video, I show how to put this dish together in minutes. To make this attractive, summery version of a classic, start with a couple of ripe avocados. Cut them down the middle, and pop out the flesh into a bowl. Fork- mash them to break them up a bit, and then add a couple of tablespoons fresh lime juice as well as a teaspoon of salt. Mix in some essential guacamole ingredients: a couple of thinly sliced scallions, a quarter cup chopped fresh cilantro, and a couple of minced Serrano chiles. Mix all the green ingredients well before gently folding in a cup of chopped strawberries. Keep a few extra sliced strawberries as a garnish around the side of the bowl. I like to serve this colorful dip with jicama, the root vegetable that looks like a tuber but has a refreshing taste resembling that of a water chestnut. Make sure to choose a firm one free of too many blemishes. Peel the skin with a Y-shaped peeler, and cut it in half to safely position the vegetable cut-side down on the board. Then you can slice it into “chips.” Jicama makes a great alternative to the more typical corn chips. It is low-calorie and contains lots of fiber, as well as Vitamin C, making this a nutritious, light-but-filling snack or appetizer, as well a refreshing way to celebrate late spring and summer. Share on Facebook and Twitter | Fruit, Snacks, Vegetables | No comments
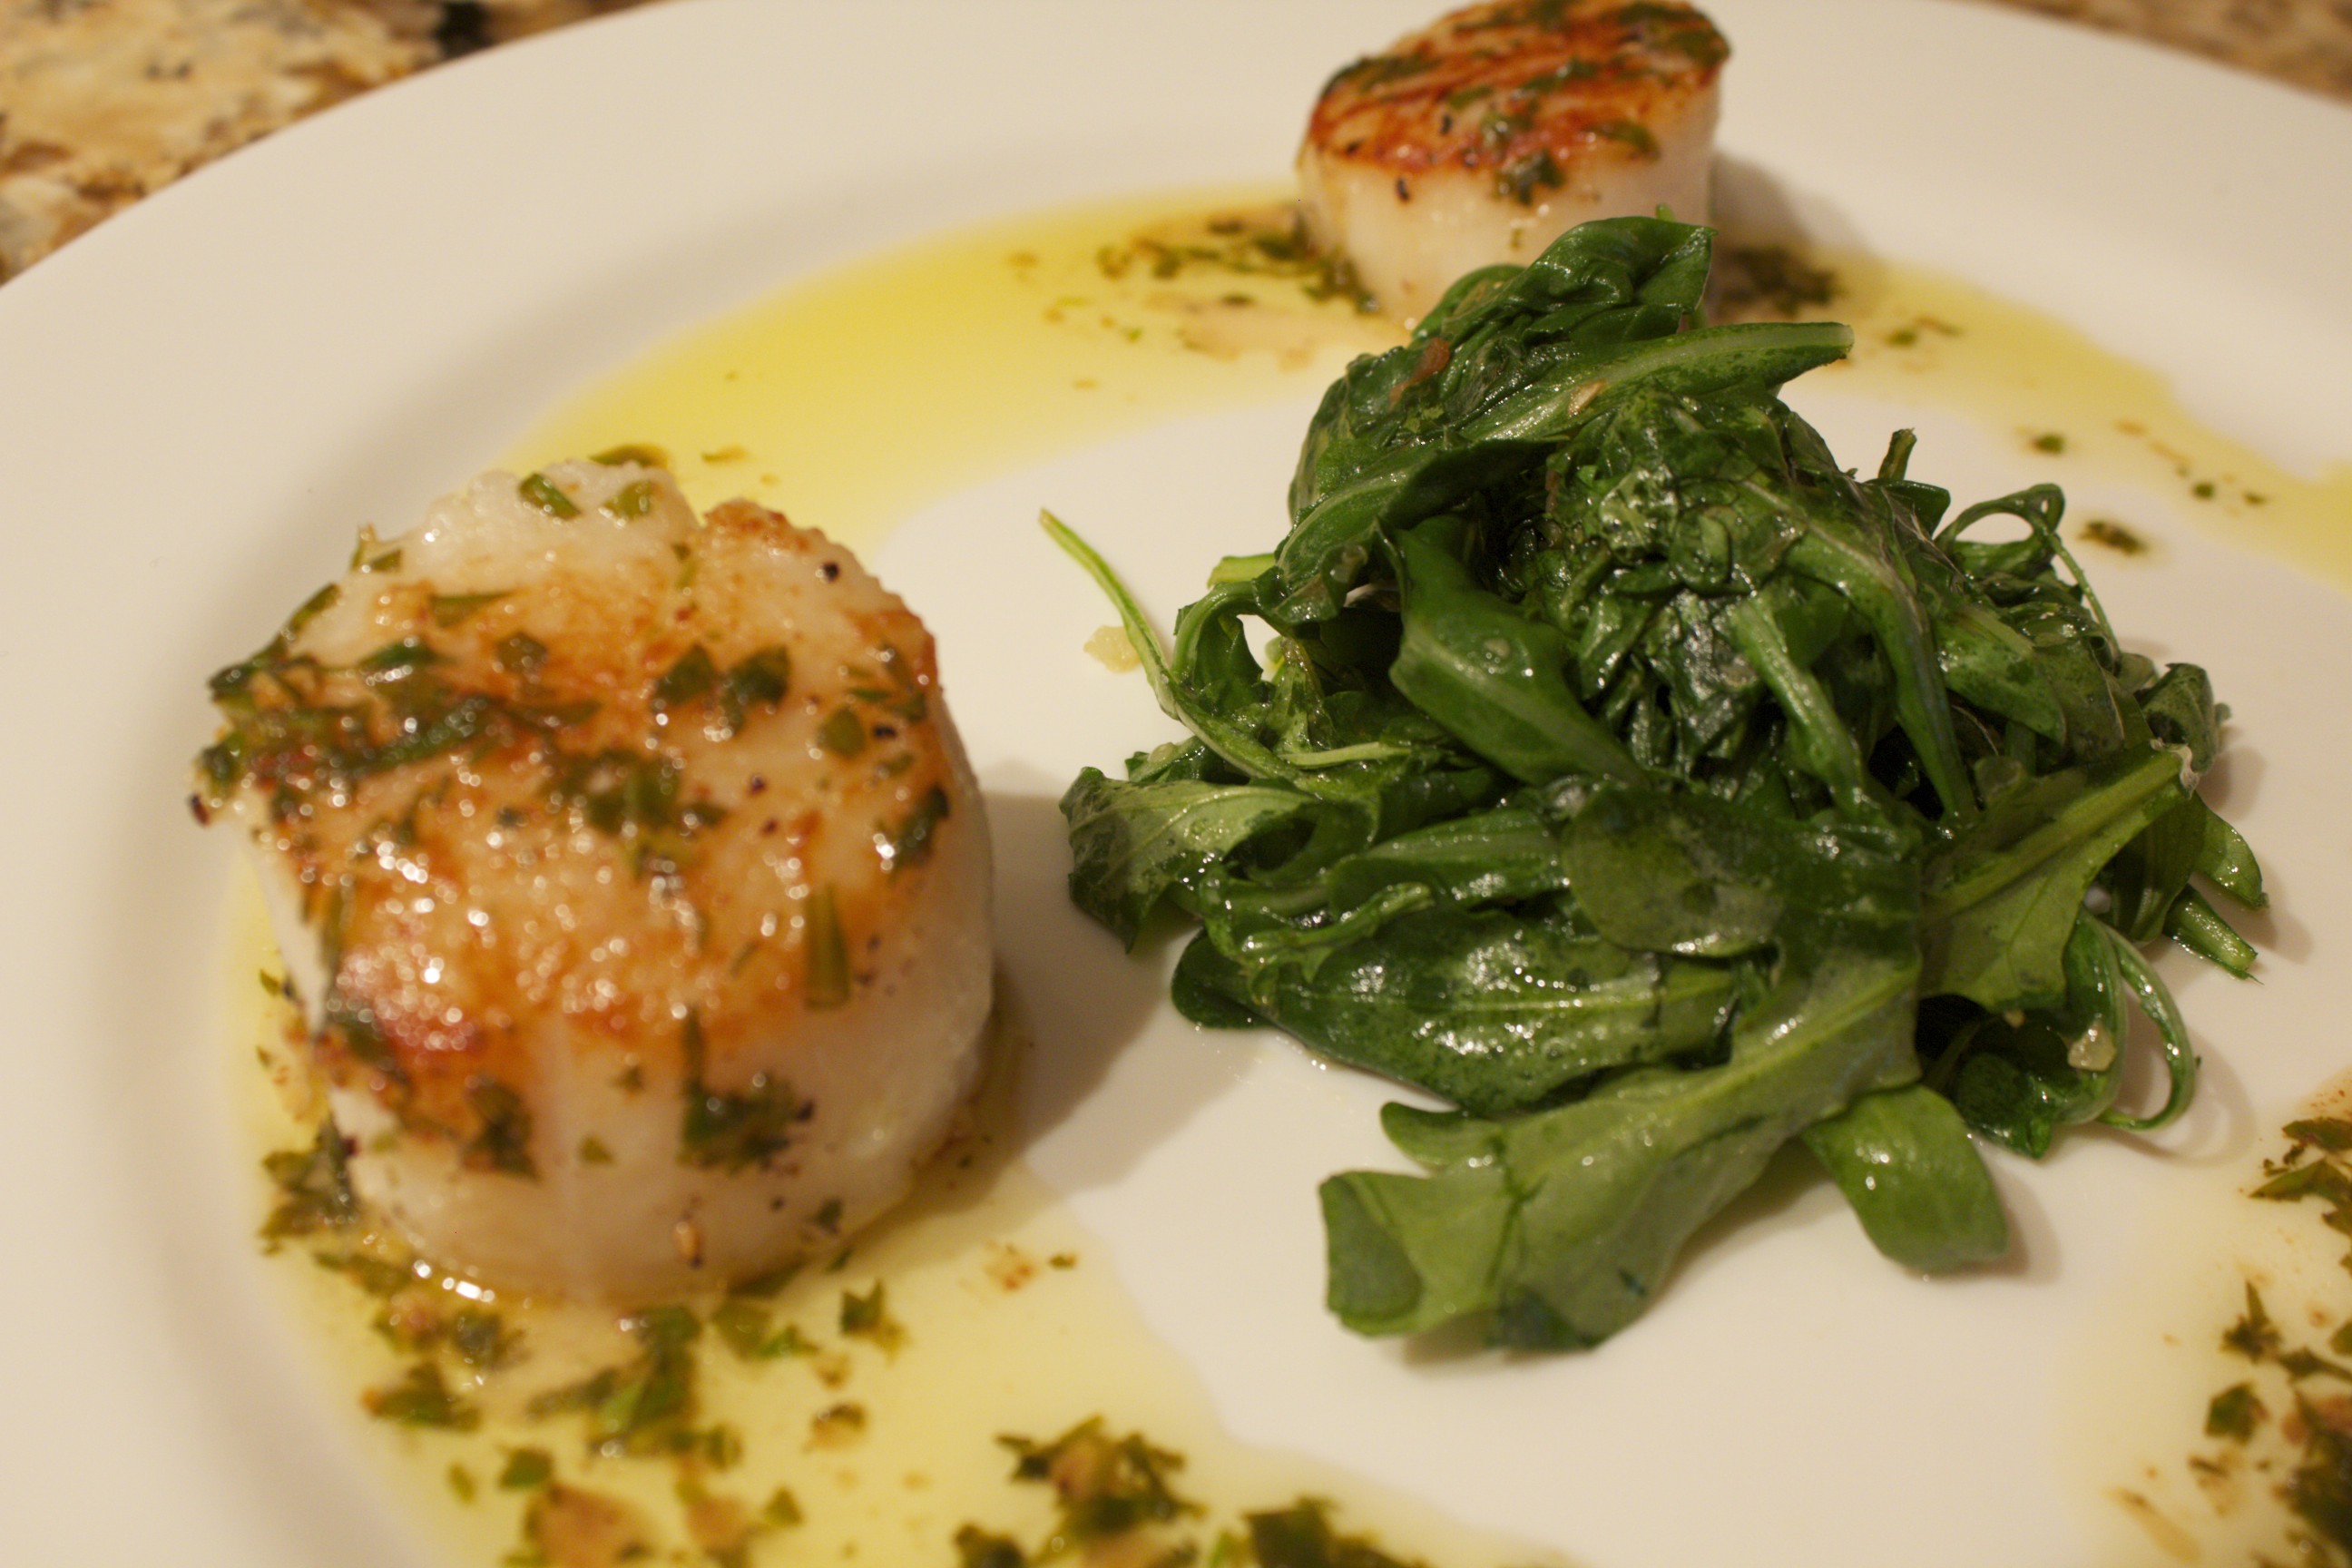
Scallops with Lemon-Tarragon Browned-Butter Sauce and Garlicky Arugula After the heavier foods of winter, spicy and bitter spring greens are cleansing to the body and taste delicious. Peppery lettuces such as arugula and watercress are typically served raw in salads, but they are very tasty when cooked as well. In this video, I show how to make a quick spring meal that you can put together in just 10 minutes. It features seared scallops in a lemony tarragon browned-butter sauce as well as garlicky sautéed arugula. Scallops in Lemon-Tarragon Browned-Butter Sauce Start with the scallops, since they take longer to cook than the greens. Make sure to purchase dry scallops that have not been soaked in any solution. Dry them well with a paper towel, and pull the tough little muscle off. (It is often attached at the side.) Toss the scallops with a little salt and freshly ground black pepper. Heat a thin film of fat in a non-stick or cast iron skillet over medium flame. Fats that are good for this dish include ghee, aroma-free coconut oil, or extra virgin olive oil. Heat the oil over a medium-high flame until your hand, when it’s held one inch above the pan, feels hot. Add the scallops—they should sizzle—and cook for about three minutes, until seared on the first side. Using a tongs, flip the scallops and cook them on the second side for another three minutes or so until they feel firm, with just a little give. Meanwhile, melt 4 tablespoons butter in a small pot on another burner over medium-high heat. You’ll notice that the butter starts gurgling right away, which means that the water content of the butter is evaporating. After about three minutes, the butter will foam and smell nutty. Use a spoon to push the foam aside and see the color of the butter, which should have turned a burnished chestnut color. Immediately remove the pan from the heat and pour in a couple of teaspoons or so of lemon juice to stop the cooking process. Add a tablespoon chopped tarragon to infuse the lemony buttery sauce with a fresh herby flair. Now you have a delicious sauce that is versatile as well. In a medium skillet, add a splash of olive oil with a couple cloves minced garlic. Start heating the oil and the garlic at the same time, which will keep the garlic from burning. When the oil starts to sizzle, and the garlic just starts to take on some light color, add a pile of greens and toss to cook. In the video, I use arugula, but watercress is delicious as well. The greens wilt and are ready in under a minute. Sprinkle with a dash salt and a splash lemon. Greens cook down a lot, so make sure you plan for two cups of loosely packed greens per person. Serve the scallops drizzled with the browned butter sauce accompanied by a mound of the garlicky greens. You’ll marvel at how something so tasty was so easy to make.
Share on Facebook and Twitter | Dinner, Lunch, Main course, Recipes, techniques | No comments
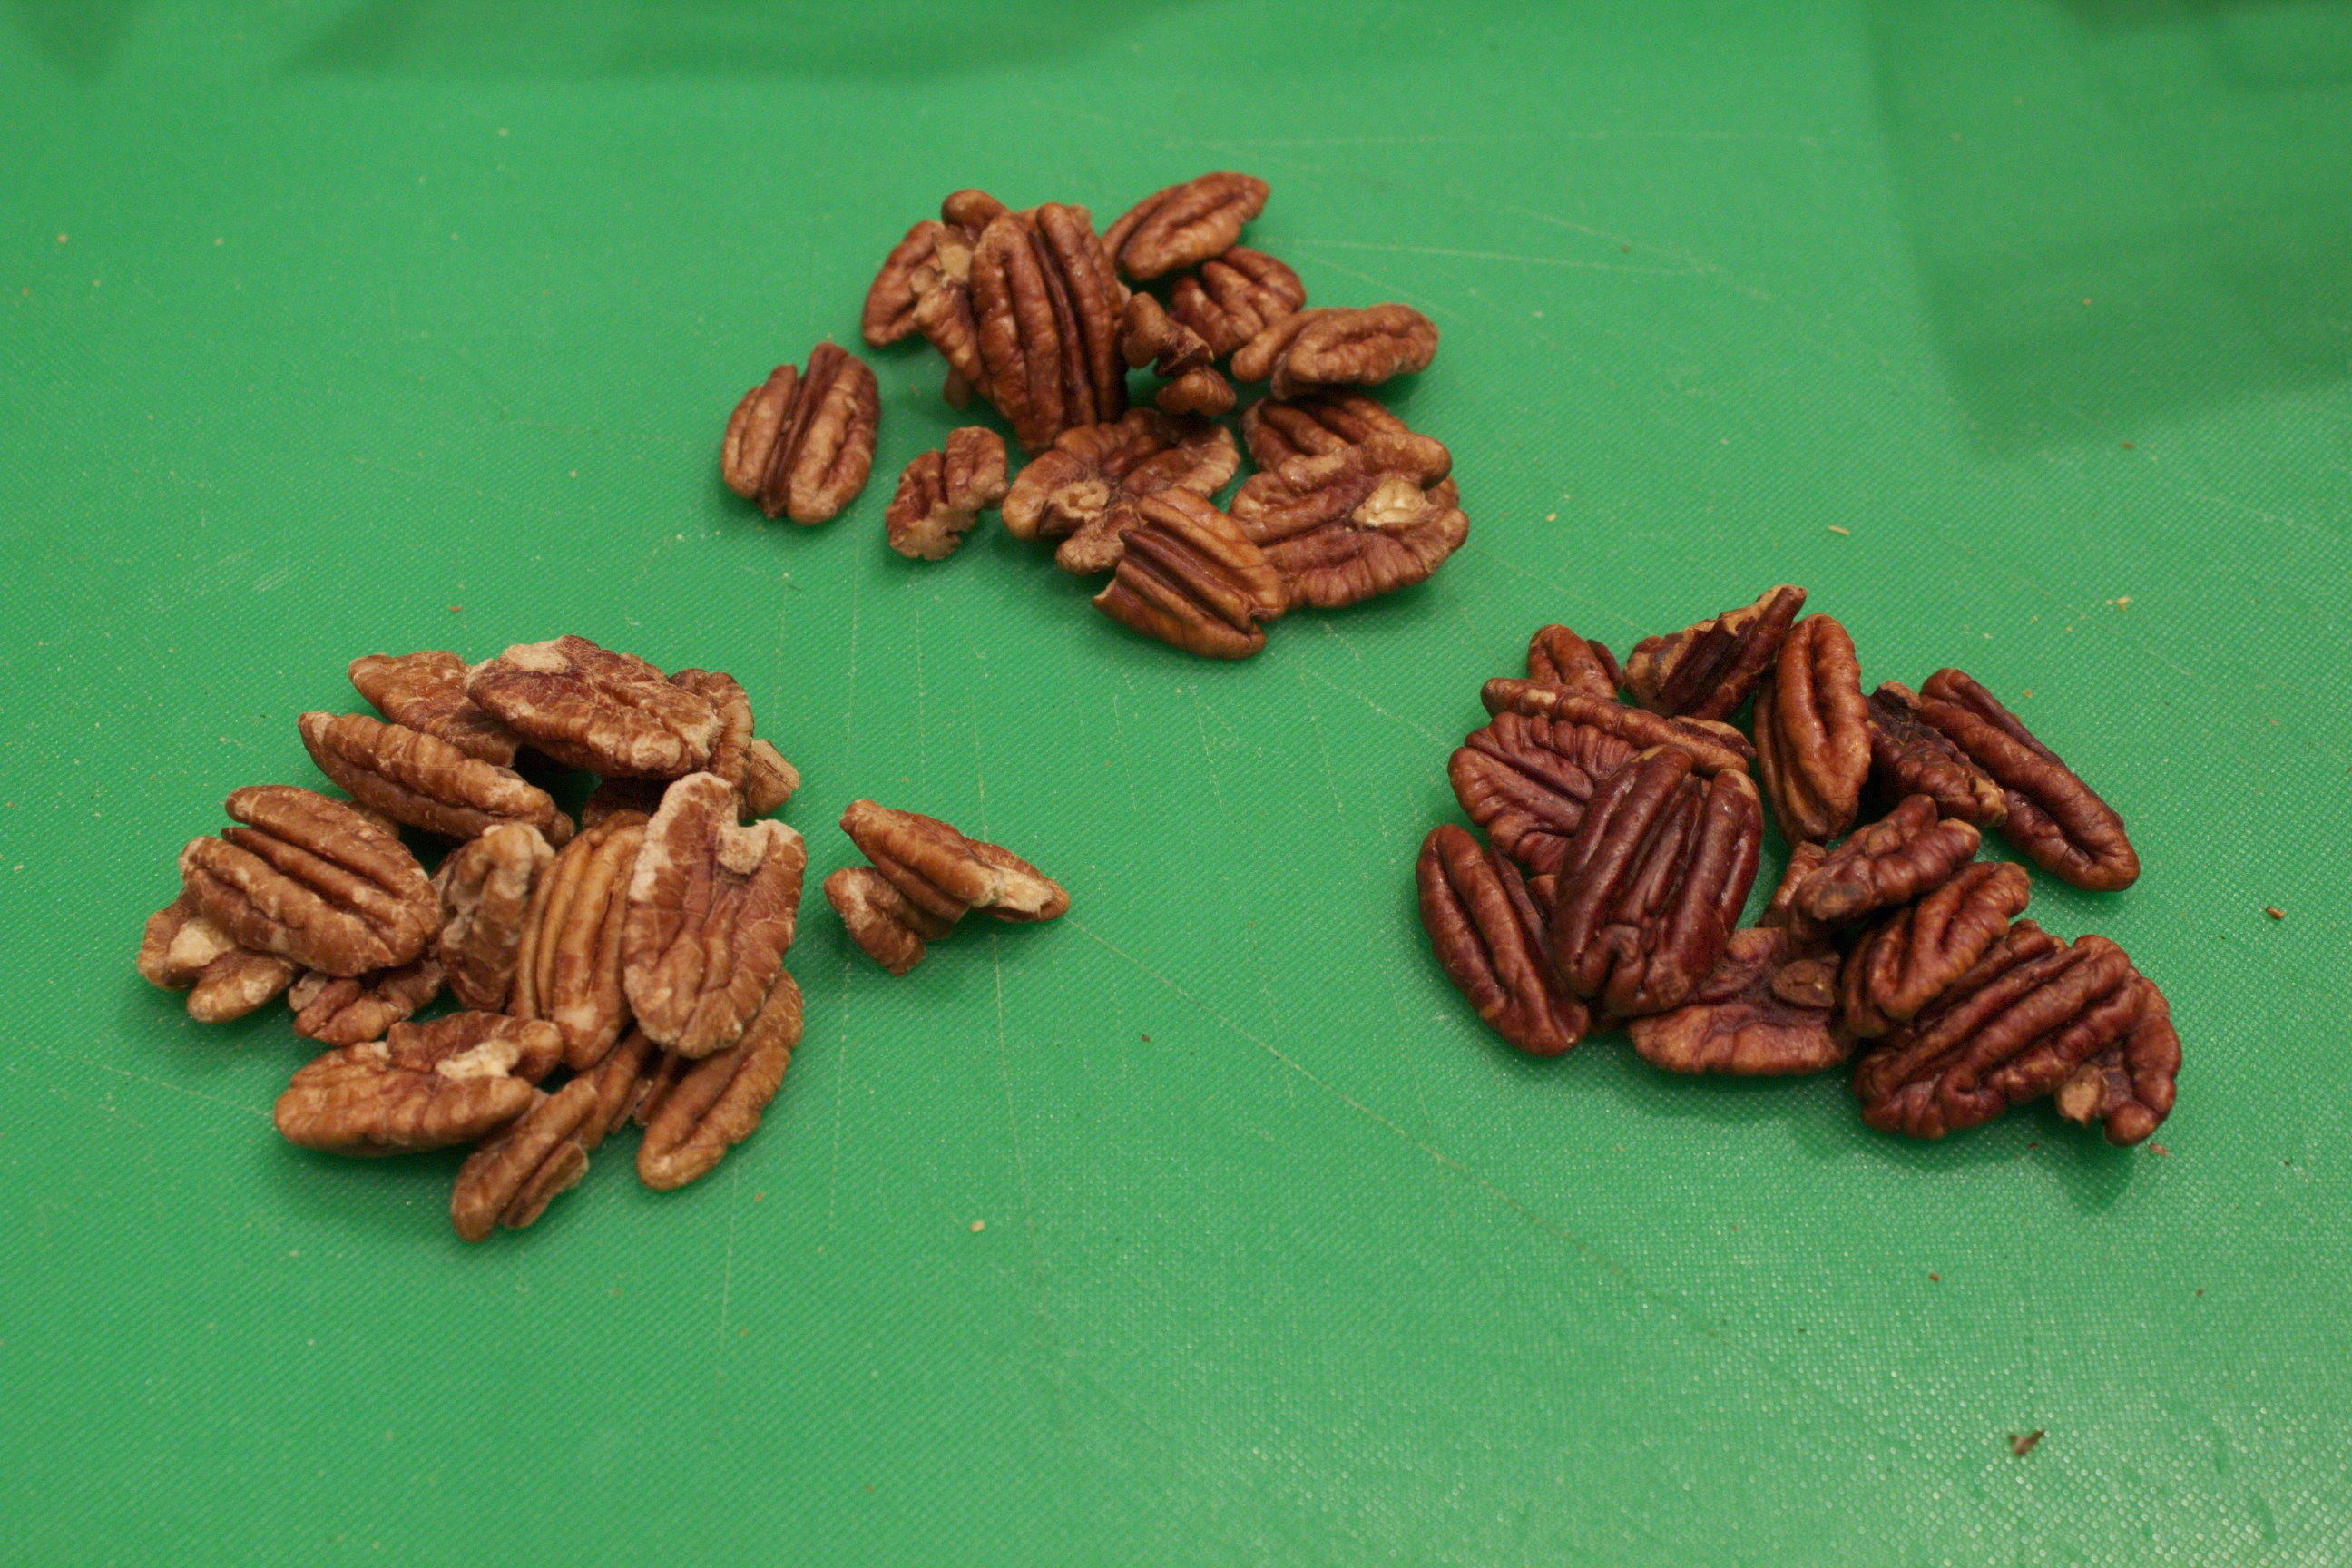
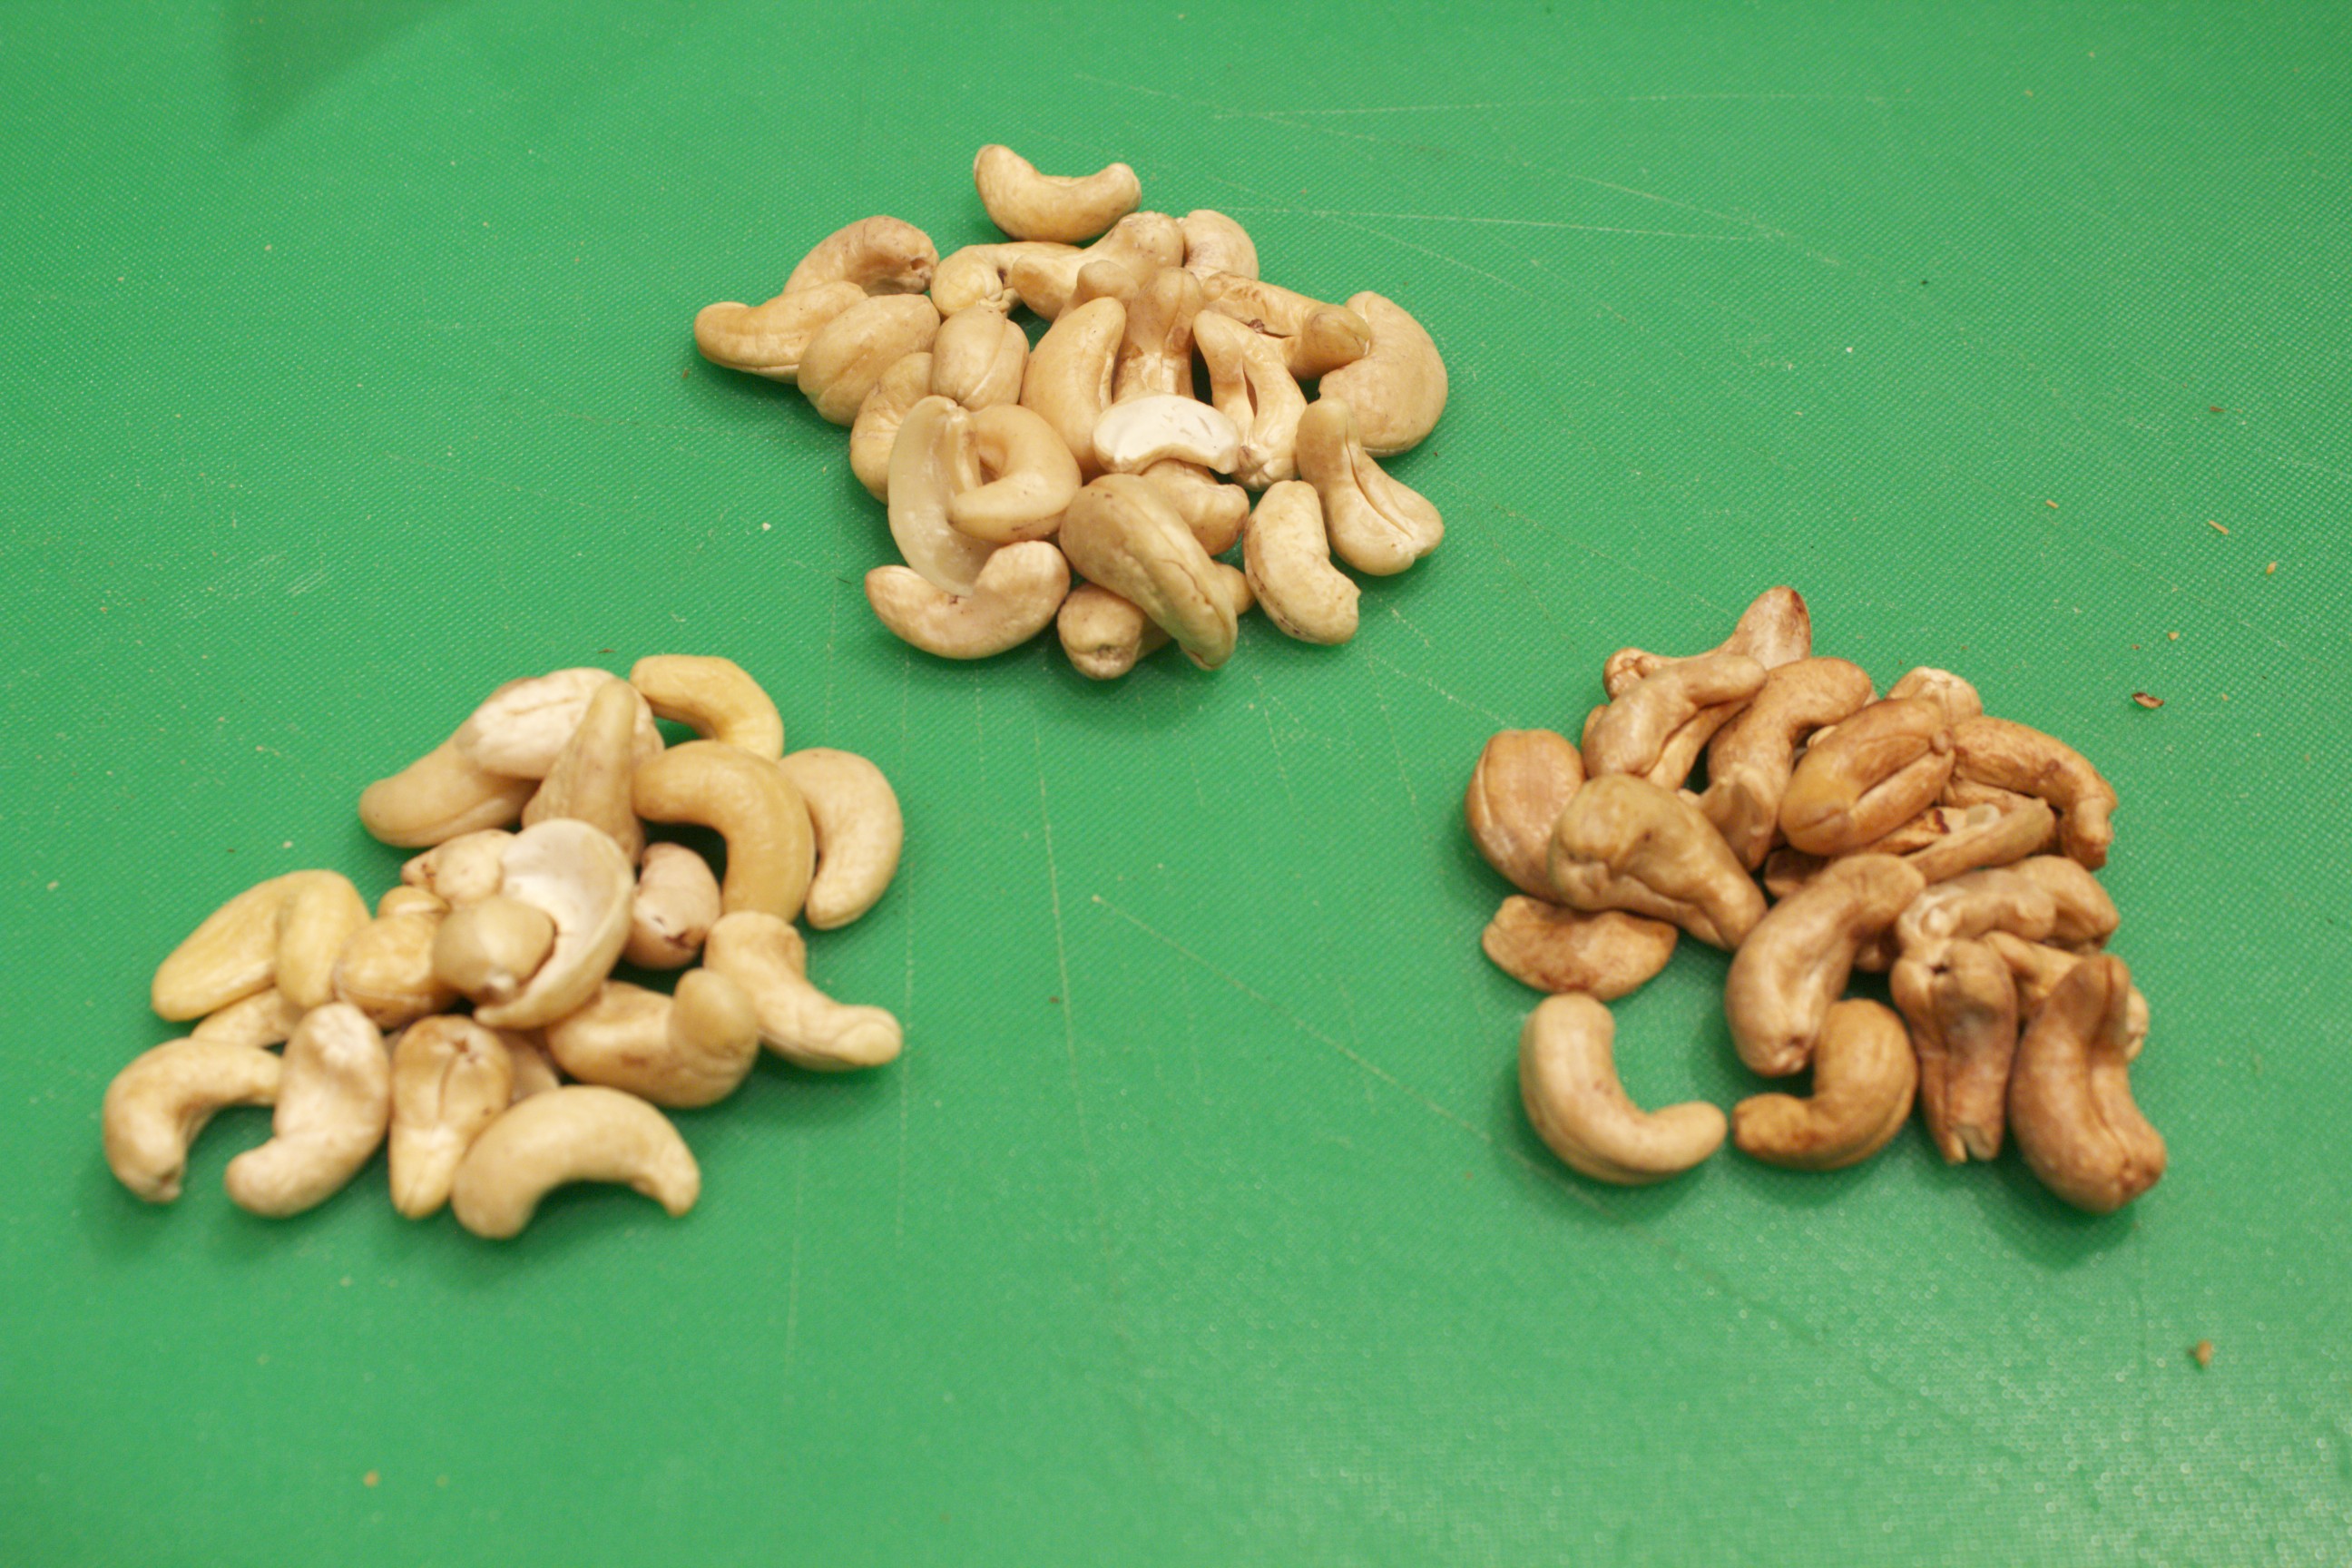
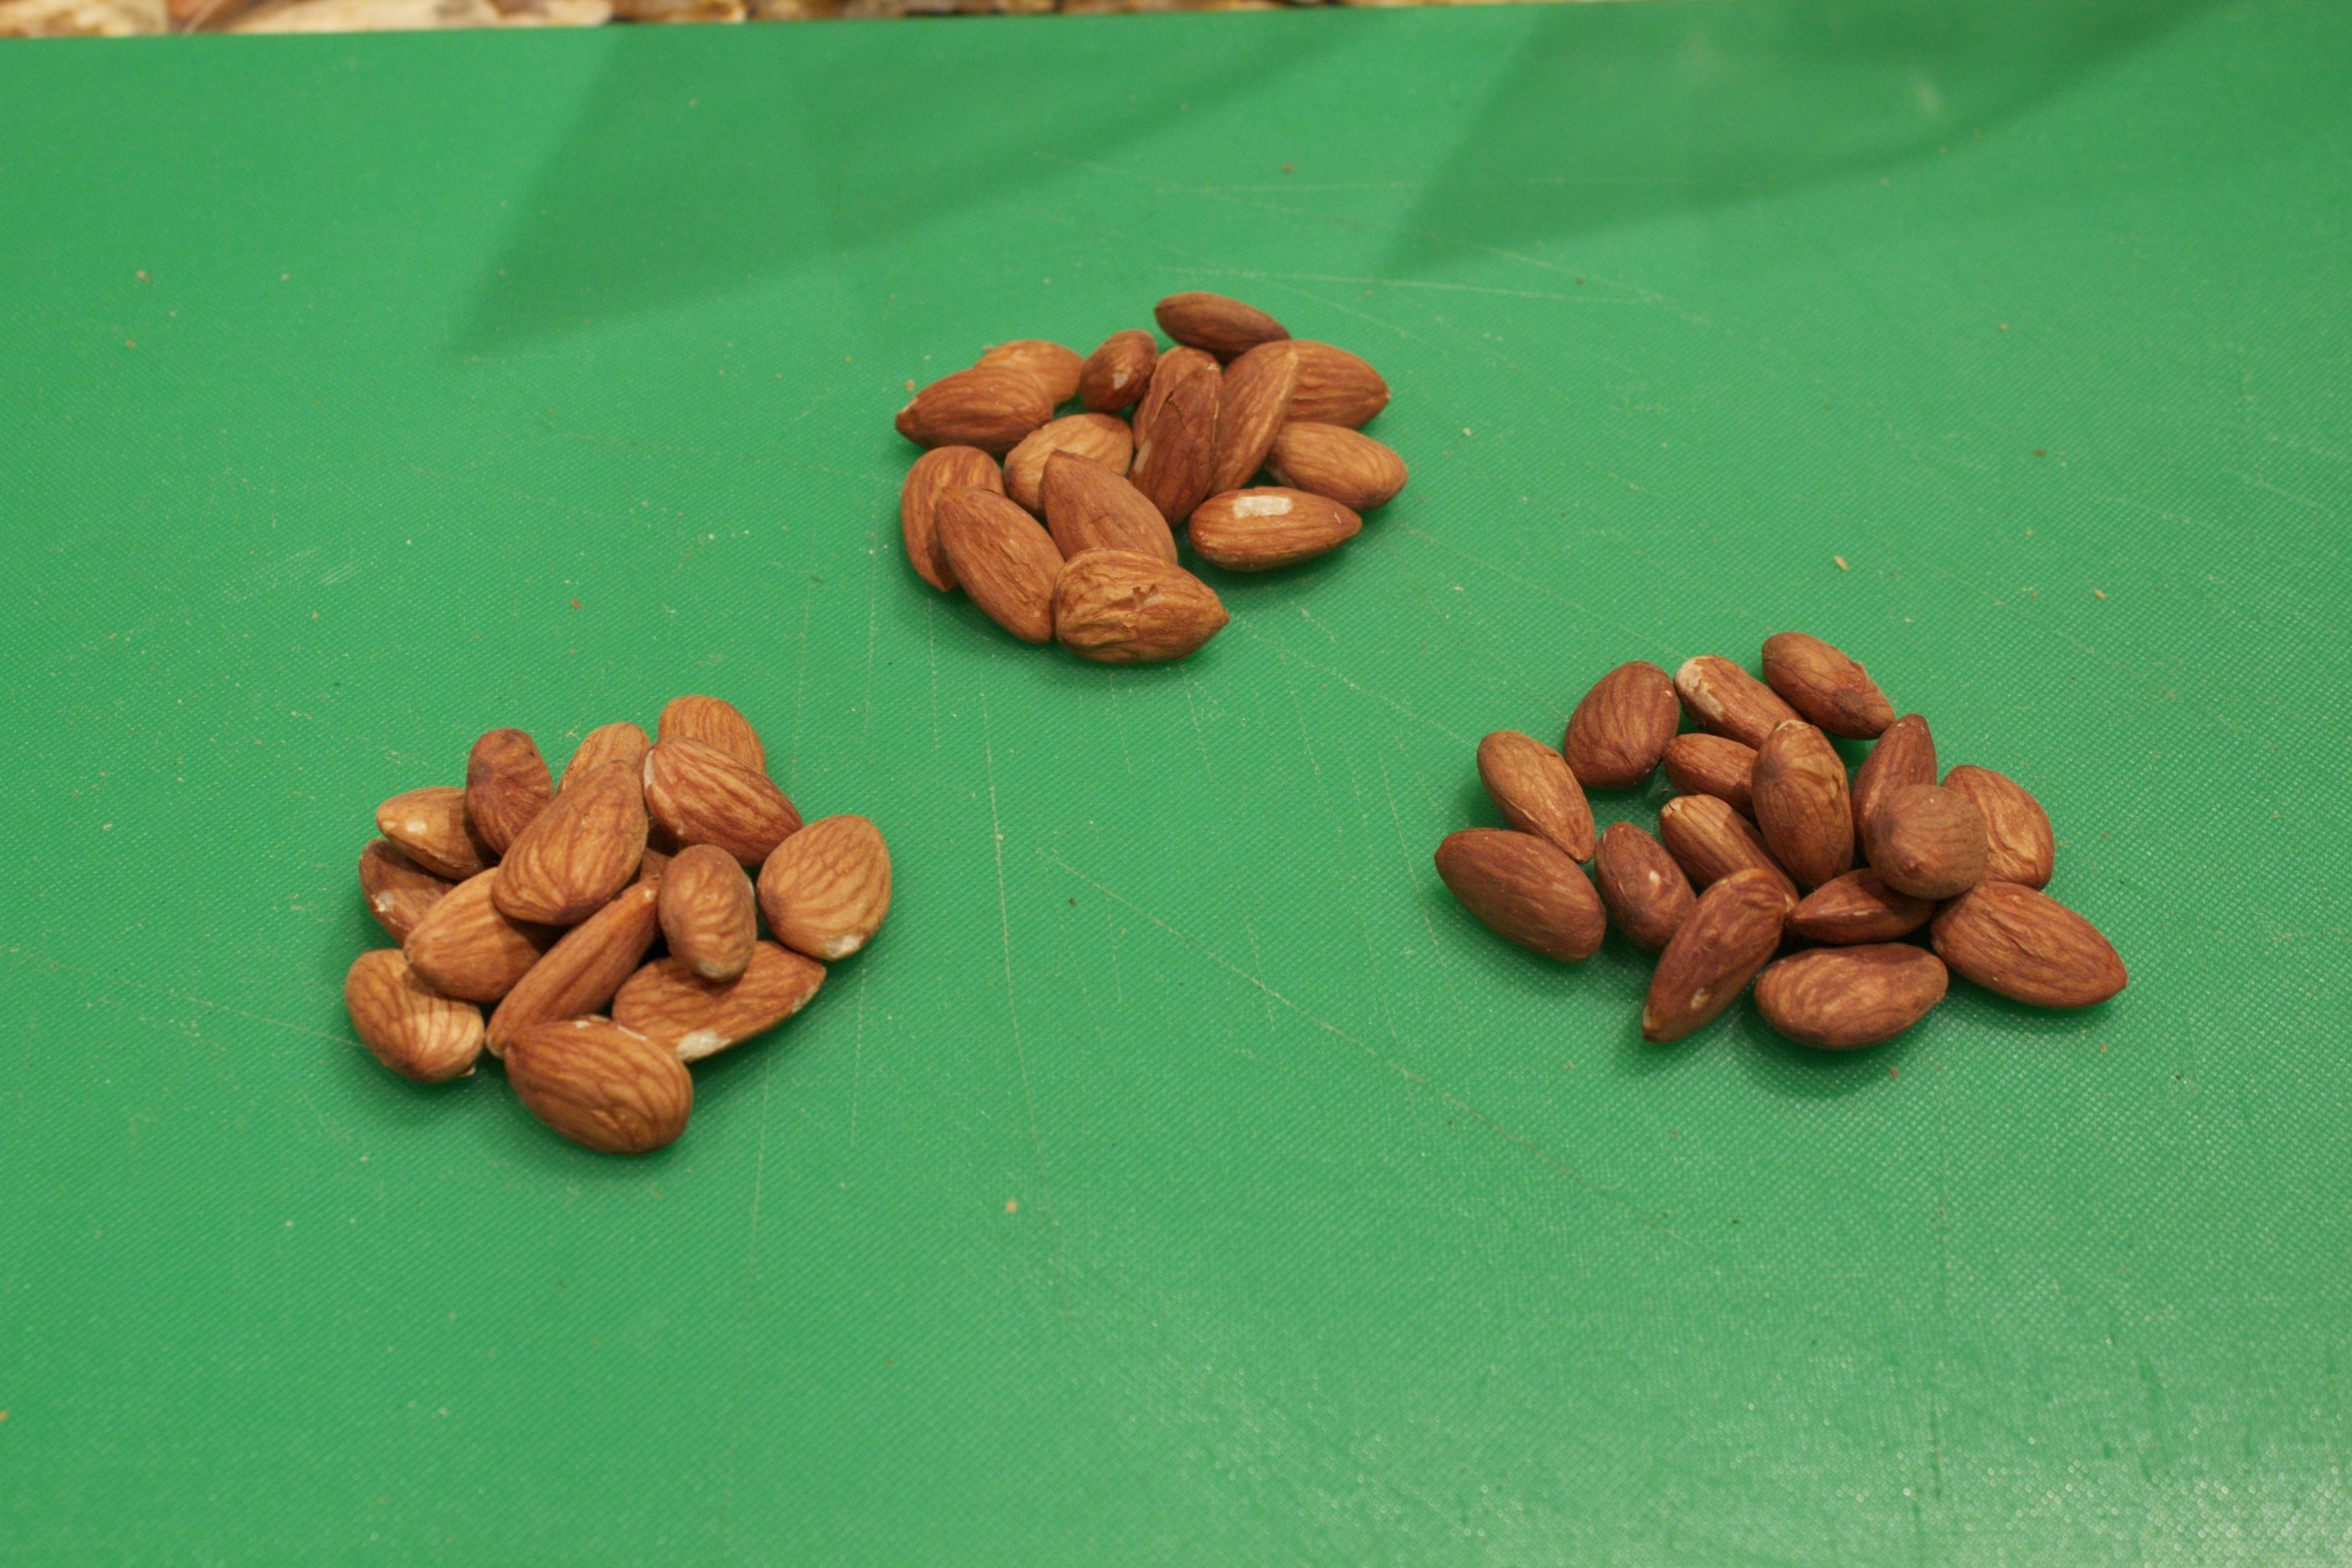
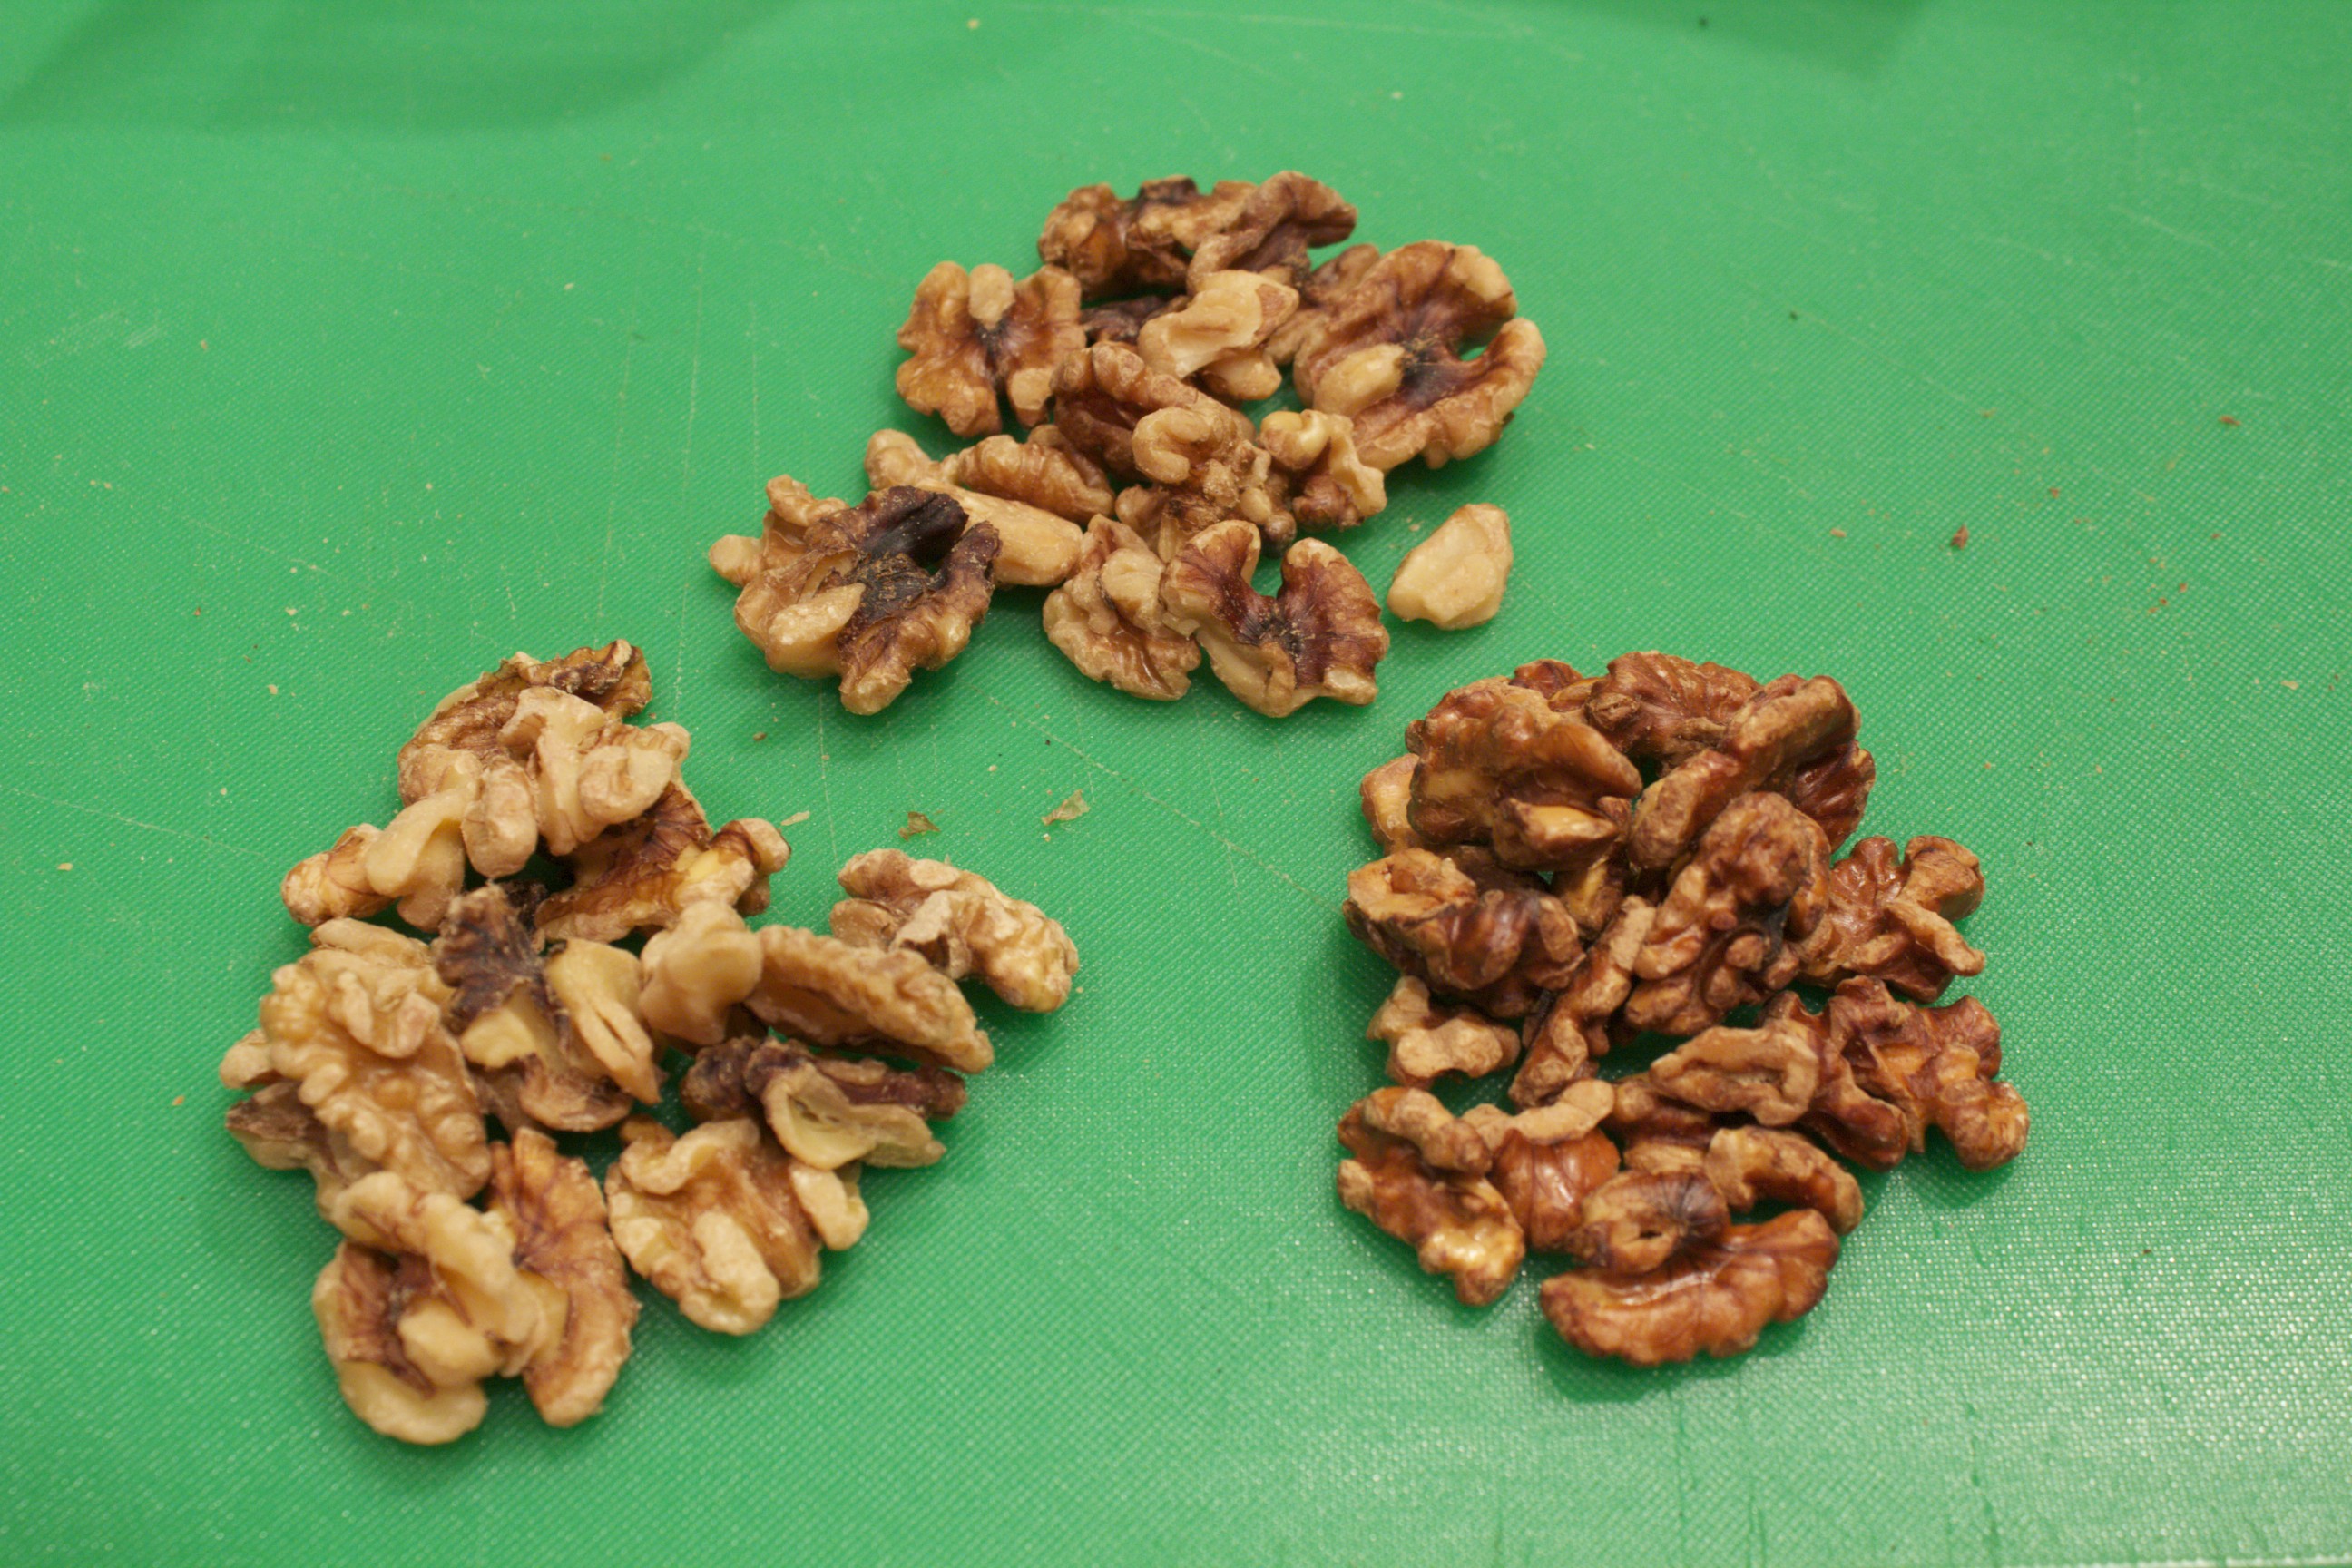
A Comparison of Soaked and Dehydrated and Toasted Nuts Soaking nuts serves to inactivate the phytates and enzyme inhibitors that make the minerals in them (zinc, magnesium, iron, and calcium) difficult to absorb. You can drain the nuts and leave them in the refrigerator for a couple of days. This is good if you wish to make nut milks, or if you don’t have time to dry them out immediately. If you want to have delicious nuts to munch on or add to your recipes, however, you need to dehydrate or toast them. There are a number of ways to do this, and it’s a matter of preference as to which ones suit your taste best. Yesterday, I compared the times and tastes of nuts that had been soaked then dried at 3 different temperatures. I did this for almonds, cashews, pecans, walnuts, and pumpkin seeds. I soaked them all over night–with the exception of the cashews, which got a four hour soak. It’s not good to soak cashews over seven hours: the texture changes for the worse. I drained the cashews, refrigerated them, and dried them with the other nuts. I included 1 tablespoon celtic salt in the the soaking water for each pound of nuts. The three comparisons included: a dehydrator at 115˚, an oven at 200˚, and an oven at 300˚. The nuts at 200 degrees took 3 hours for a beautiful light toast with delicious flavor. The nuts at 300 degrees should have come out at about 45 minutes. I left them in an hour; and while tasty, they were slightly over-toasted. The dehydrated nuts took about six hours. In a previous post I had listed the minimum times for soaking nuts. Nonetheless, I find it’s easiest to simply soak most of the nuts for about the same amount of time, about six hours. To repeat, cashews should not go longer than seven. Almonds need a minimum of six hours, but they are even better soaked longer. Here are the different nuts at different degrees of toasted. They range from light (dehydrator) to darkest (300 degree oven). My conclusion is that for eating nuts out-of-hand I prefer those toasted at the higher temperature. For a neutral nut that will later be used in cooking or baking, I would go with the lower temperature oven or the dehydrator. These delicious nuts stay fresh at room temperature for minimum of a month. Once exception is walnuts, which should be refrigerated. For super oily nuts like pine nuts, store them in the refrigerator or freezer. No need to toast them first. If this is too much for you, there is always Wilderness Family Naturals, which promptly delivers to your door already soaked and dehydrated nuts.
Share on Facebook and Twitter | Health Tips, ingredients, nuts and seeds, techniques, Uncategorized | No comments
Musings on the traditional Swiss I remember vividly the 1940 edition of Heidi that my mother had given me when I was ten years old. Heidi was a girl whose grandfather would send her out onto the grassy knolls for the day, where she would spend her time romping barefoot among the goats. Her lunch was a chunk of hearty bread with a big wedge of cheese. When she returned home at night, her grandfather would offer her, along with a bowl of fresh milk, another chunk of cheese that he had just toasted in the fire at the end of a long stick. This meal and lifestyle sounded like my idea of heaven. As I ate my breakfast of cheese-topped bread that I had placed in the broiler to blister, I would fantasize that I was Heidi. In hindsight, this version of bread and cheese was rather sad. The bread was store bought, and the cheese was that kind that came packed in individual plastic wrappers. When I read about the Swiss in the Loetschental Valley that Dr. Price visited, scenes of Heidi came flooding back in my mind. Here were a people that mostly lived on bread and cheese and milk. Their cheese was extraordinary, made from cows grazing on verdant pastures near the glaciers. According to Price, the people “recognize the presence of divinity in the life-giving qualities of the butter made in June when cows have arrived for pasturage near the glaciers.….. The natives of the valley are able to recognize the superior quality of their June butter, and, without knowing exactly way, pay it due homage.” Their bread was rye bread that had been thrashed by hand and ground in stone grinders. Each family would take turns using the community oven, and would bake the amount of rye bread that they would need for a whole month. The isolated Swiss also ate small amounts of butter, vegetables and barley, frequent bone broths, and meat about once a week. Ramiel Nigel does a breakdown of their caloric intake in his book Cure Tooth Decay that I found fascinating. Their calories in a given day averaged 800 calories of rye bread, 400 calories of milk, 400 calories of cheese, 100 calories of butter, 100 calories of barley, 100 calories of vegetables, and 100 calories of meat. What impressed me most about these people is how hardy they were. Just like in Heidi, children would scamper around barefoot in temperatures low enough to have Weston Price and his wife don heavy clothing. The isolated villagers made their own clothes and were self-sufficient. They had cheerful temperaments, great facial bone structures and bodily physiques, and almost no dental caries. Upon analysis of the nutrient density of their food, Dr. Price found that they, like the other primitive cultures he studied, had 4 times the calcium and phosphorous of the modern day Swiss and 10 times the fat soluble vitamins. It is interesting to note that this was accomplished on such a seemingly limited diet. They didn’t have the food of the world at their fingertips, but the foods that they had were sufficient to build beautiful and sturdy bodies. Of course, as in all of the other cultures, when the refined foods (or displaced foods of modern civilization as Dr. Price called them) made their way into the Swiss villages, all of the immunity from dental caries and other diseases (like tuberculosis, for example), along with the fine physiques, disappeared within one generation. It is also interesting to me that these people lived on food that happens to currently be the most demonized food in the world. I have just returned from the Wise Traditions conference, and a lecture on “the diet cure” identified gluten and dairy as two of the most addictive foods in the world. Yet these primitive peoples in remote Alpine towns were getting over 75 percent of their food intake from gluten (rye) and dairy. It seems that in a healthy individual, high quality dairy is a life-giving elixir, and a grain (glutinous or not) that is fresh and prepared properly is also mineral-rich and salubrious. It seems that now so many people have compromised systems that they cannot even tolerate the highest quality dairy or properly prepared grains. We are in a strange time. While the majority of the food in a supermarket is devoid of real nutrition, it is possible to enjoy a diet of excellent food, provided one has the interest and motivation. I am fortunate enough to live one block from the Union Square green market in New York City (a four times weekly farmer’s market that sells all kinds of animal foods as well as vegetables and breads) as well as belong to a club where I can get an impressive variety of raw dairy products and pastured animal food. I recently started to buy traditional dense sourdough rye breads from my local green market, and I sampled an excellent specimen at this year’s conference as well. Now when I have a slab of bread with a hunk of raw milk cheese on it, I’m more in keeping with the spirit of the traditional Swiss villagers. I make bone broths and lacto-fermented foods regularly. I eat a lot of pastured eggs, I eat homemade liver paté rich with butter, I take fermented cod liver oil and high vitamin butter oil daily, and I soak my beans, grains, nuts, and seeds. It sometimes seems as if life would be simpler if I were one of the primitives in the Swiss valley. I would eat my hunk of nutrient dense cheese a couple of times a day, eat my soup, and drink my milk. Since I have the whole world at my fingertips now, at every meal I have such a huge choice. I have to make an effort not to gorge at the “buffet”, even the nutrient-dense “buffet”. I am truly grateful for my good health, which I attribute chiefly to good nutrition. I summon my inner “Heidi,” a fearless, robust, and happy little child romping about in nature, enjoying being alive. Share on Facebook and Twitter | Musings | No comments
Quick Vietnamese Pho with Fresh Herbs This quick Vietnamese pho, pronounced fuh, as in fun, is a soothing one-pot meal that’s flavorful and light, especially after the heavier foods of winter. Watch the Video Quick Vietnamese Pho with Fresh Herbs The first step is to toast some spices—a couple of tablespoons of coriander, a few cloves, a pieces of star anise, a spoonful of black peppercorns— in a dry heavy-bottomed skillet over medium heat until the spices smell fragrant, which takes only a couple of minutes. I then wrap the spices in a cheesecloth along with some chunks of ginger and onions. l add this bouquet to two quarts of chicken broth (this is where a homemade one really shines) along with a pound of boneless chicken (breasts or legs are fine), a tablespoon of natural brown sugar, a couple of tablespoons of Vietnamese fish sauce, and a few pinches of salt. The fish sauce consists simply of fermented anchovies, which gives the broth authentic Southeast Asian pizazz. After bringing the liquid to a boil, I lower the heat and simmer the broth very gently (so as not to toughen the chicken) for 20 minutes or so, until the chicken is cooked through. I love that I can flavor the broth and cook the chicken all at the same time. While the chicken is cooking, I pour hot water over fettuccine rice noodles, and I assemble the garnishes. I chop some fresh mint, cilantro and basil, cut some limes, slice some red onions, and finely chop a couple of hot chile peppers. When the chicken is cooked, I remove it from the broth and discard the spice bag. As soon as the chicken is cool enough to touch, I tear it into chunky pieces. To assemble the final dish, I ladle the broth over the noodles and chicken, then add the garnishes. I start with the onions and bean sprouts and then add a big handful of the fresh herbs. A sprinkle of the hot chiles and a squeeze of fresh lime at the last minute makes the dish sing! Assembling the dish to order allows me to adjust the spice level for all who are eating. The flavorful herbed broth is nourishing and cleansing, not to mention delicious! 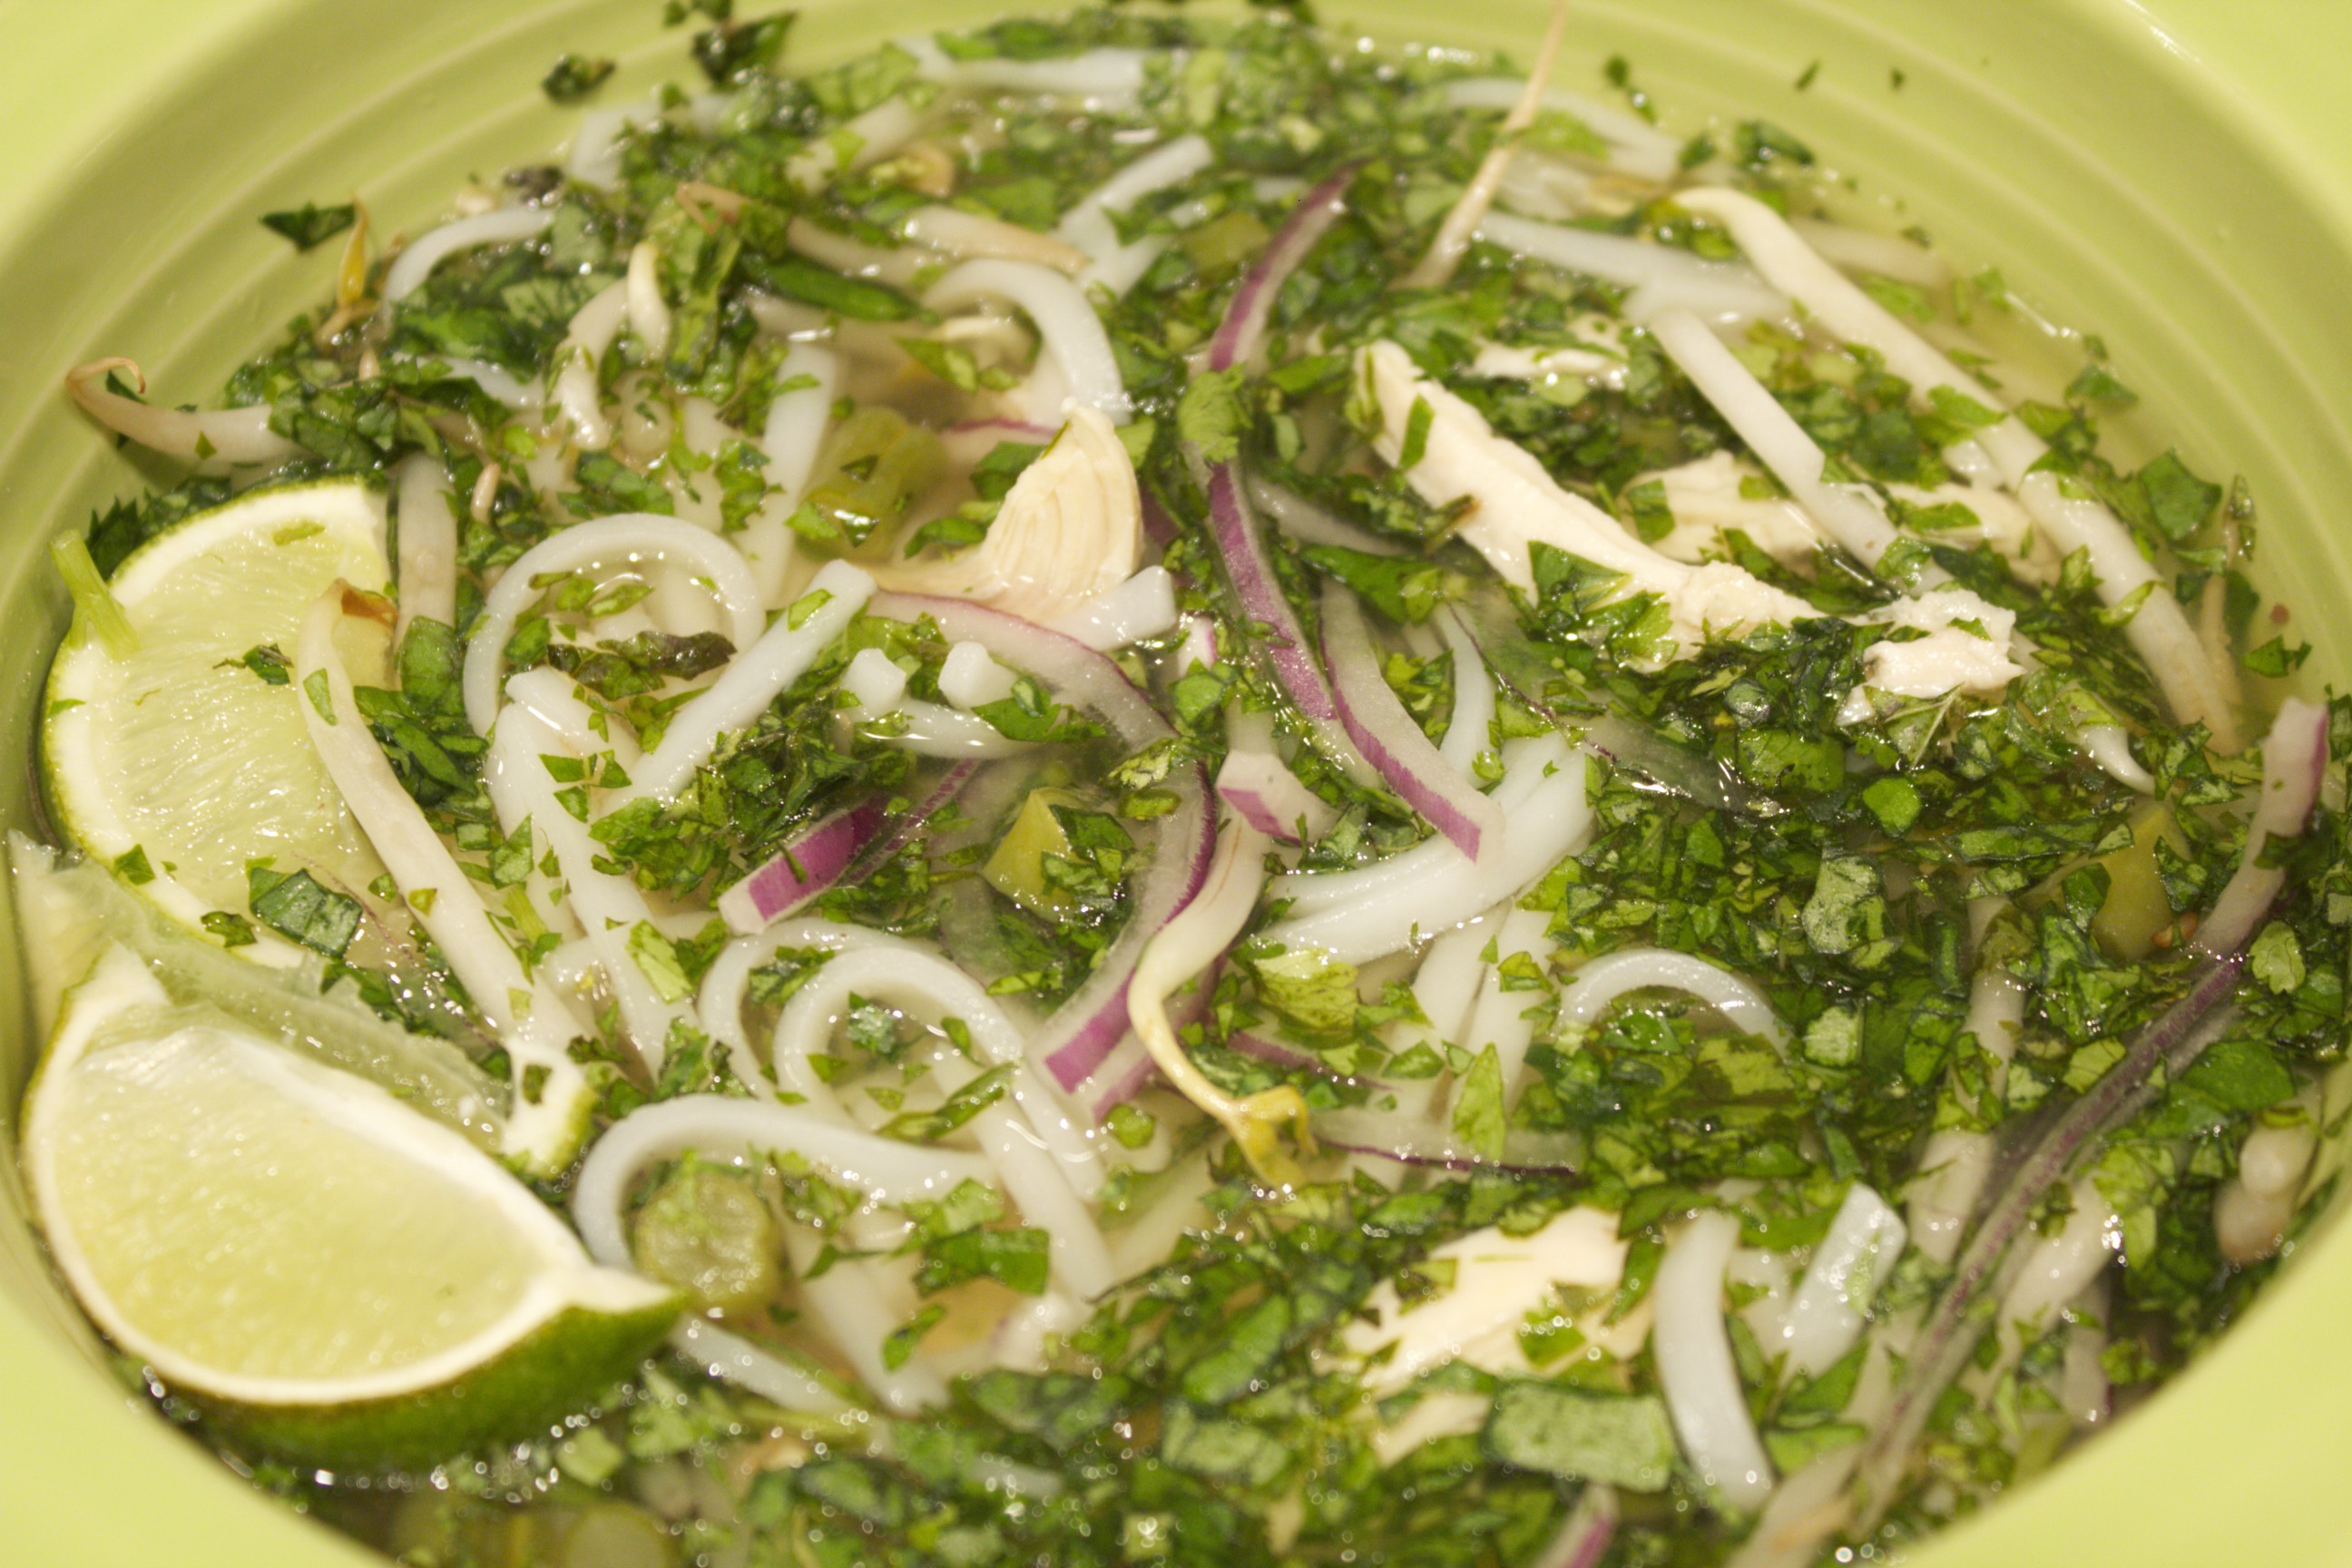 Vietnamese Chicken Pho Share on Facebook and Twitter | Dinner, Gluten Free, Main course | No comments
Sautéed Apples in Ghee One of my favorite quick morning dishes to make throughout the winter is sautéed apples in ghee. Ghee—clarified butter with the milk solids and water removed—is ideal for high heat cooking since it doesn’t burn as easily as regular butter. It still contains all the good qualities of butter, however, such as fat-soluble vitamins, short- and medium-chain fatty acids, and selenium. To get the most nutrition and best flavor, it’s best to purchase good quality ghee from cows that have been pasture-raised, or you can make your own from your favorite high quality butter. Sautéed apples are quick and simple enough to make for breakfast. In the video, I show my favorite way to peel and cut an apple. With a Y-shaped peeler—my favorite—I make a ring around the top and one around the bottom as well. I then peel the sides and quarter the apple. I lay the quarters on their sides, and cut out the core in one easy-angled cut. This is the most efficient way to core an apple, and you don’t need any special equipment. Best of all, it’s safe because, after coring the apple, you then have a flat side that rests firmly on the board. I then slice each quarter into 3 or 4 pieces. The next part is simple: I warm some ghee in a medium skillet over medium heat, add the apples and a dash cinnamon powder, and cover the skillet. I check on the apples after about 2 or 3 minutes, give them a toss, and cook them a couple of minutes more. That’s all there is to it: the tender apples smell and taste heavenly. They make a great topping for oatmeal, pancakes, waffles, or yogurt. They can also serve as a succulent side dish with scrambled eggs or other protein. 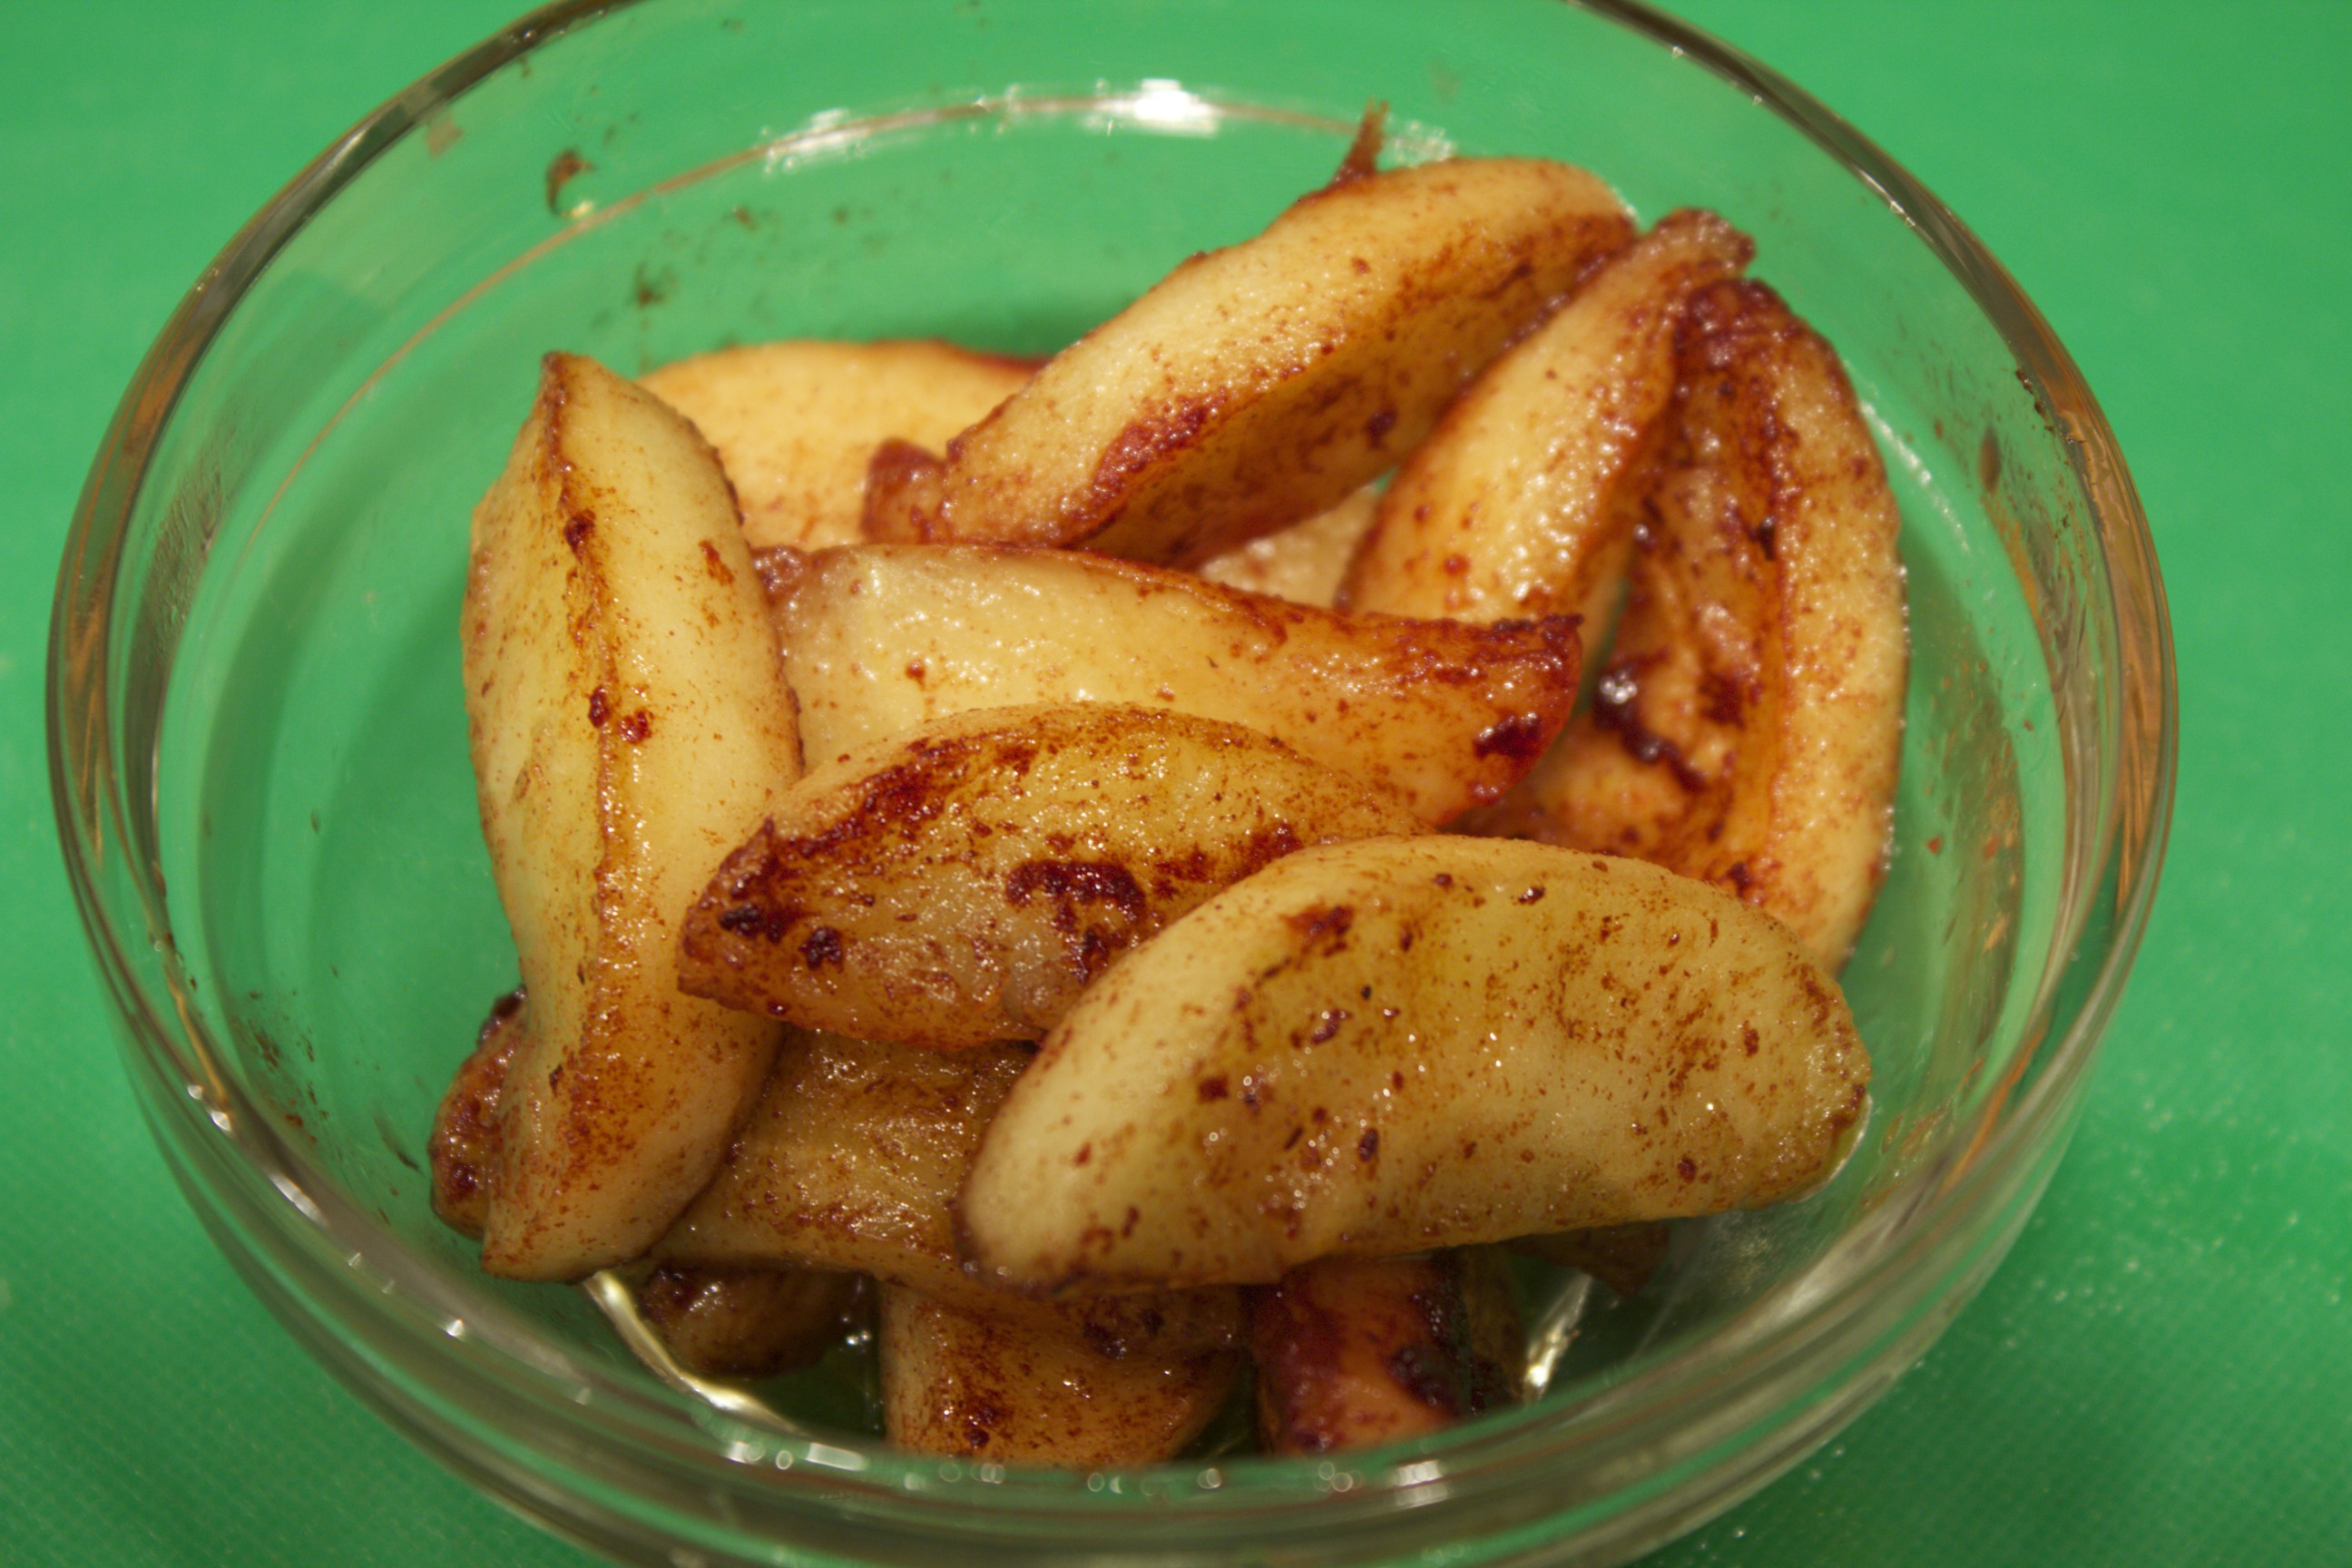 Sautéed Apples in Ghee Share on Facebook and Twitter | Breakfast, Fats & Oils, Fruit | No comments
Immersion Blender Having the right equipment for the job makes cooking a whole lot easier. I’m going to be writing a series on essential equipment. I’m starting with one of my favorite tools, the immersion blender. While it doesn’t replace a good stand blender or a food processor, an immersion blender is a convenient way to blend a soup right in the pot. It’s speedy and tidy, as long as you remember not to lift the immersion blender out of the pot while blending. For a long time I resisted buying one, since the weak small models don’t compare to the powerful industrial strength varieties I was accustomed to using back in my restaurant days. The industrial-sized blender was essential for blending soups and sauces in pots that were 20 quarts or bigger. My graduate class last week took place in a commercially outfitted kitchen with large equipment. While it was quite thrilling to pulverize a small pot of soup in a matter of seconds, the equipment was clearly a bad fit for the job. All this brings me to my favorite home model, the Waring blender, which is appropriately powerful for small to medium-sized pots. It’s stronger that most of the other brands on the market.  Waring Blender This size is more than good enough for what most of us make at home. On the other hand, should you find most of your cooking is in pots larger than 20 quarts, then the jackhammer-sized model would be a good fit.
Share on Facebook and Twitter | Kitchen Items/Gadgets | No comments
My Favorite Winter Salad After a season of holiday indulgence and too many meals out, it’s time to begin the new year with a little lighter fare. I’m busy with obligations, but I don’t want to skimp on good food. So I turn to my favorite nourishing winter salads that I can make in minutes. This hearty winter salad that I show on the video consists of arugula, oranges, fennel, and sardines, with a complement of olives, walnuts and feta cheese. It’s composed in such a way that I don’t even need a separate dressing.  Sweet, Salty, Crunchy, Juicy I start with a nest of baby arugula, or watercress, or mesclun greens. In the video, I use arugula with some farmer’s market pea shoots mixed in. I next add an orange that is cut into segments known as supremes. I cut the orange over a bowl to make sure to catch the juices that will become part of the dressing. I sprinkle the greens and orange with salt and then add a layer of paper-thin sliced fennel, which is arguably the most appealing way to eat raw fennel. Using the mandolin is the easiest way to get such slices. Next, I sprinkle in some black olives—a flavorful variety such as kalamata or nicoise—followed by a handful of walnuts. I then crumble my favorite feta cheese, a sheep’s milk feta, over the salad. Finally, I crown the salad with sardines. I use sardines packed in extra virgin olive oil, so that the oil from the tin of the sardines becomes part of the dressing, mixing with the juice of the oranges. Every bite is exciting—a medley of sweet, salty, juicy, and crunchy. Moreover, this salad is a nutritional winner, packed with a range of nutrients, from omega 3’s to vitamins C and E, and loaded with phytochemicals and minerals as well. You can pack this salad to take on the go. Layer the greens with the fennel, olives, walnuts, and feta. Put the juicy orange slices in a separate container. Salt the salad, add the oranges, and top with the sardines right before eating. Share on Facebook and Twitter | Fish, Greens, Kitchen Tips, Lunch, Main course, techniques | No comments
My Favorite Farm-to-Table Restaurants in Lower Manhattan First two are for a quick lunch: City Bakery, on 18th St. between 5th and 6th. They have a beautiful fresh pay-by-the-pound “salad” bar with green market choices, as well as soups, hot foods, and lots of baked goods. I stick to the savory food and avoid most of the baked with one exception. I relish the pretzel croissants, which are strikingly fresh and buttery and sprinkled with sesame seeds. Hu Kitchen, a new addition to Union Square (they are on 5th Avenue ½ block below 14th street), has pasture-raised rotisserie chicken, cauliflower-coconut milk mash, chia seed puddings, and lots of fresh pressed juices. Greensquare Tavern on 21st between 5th and 6th, right off of 5th Avenue. All of their animal food is pasture-raised, they use good-quality fats (French fries cooked in tallow, kale in coconut oil), and they have substantial down-to-earth food. It gets a little loud at night, so I tend to go on the early side. For upscale meals, I favor Veritas, located is on 43 E. 20th street. It has an especially relaxing ambiance and it is a bit of a sleeper still, so I’m usually able to get in without reservations. I go there when I want a lovely meal out of the New York city fray. A wonderful place for brunch is Locanda Verde, located on 337 Greenwich St on the corner of N. Moore and Greenwich, in Tribeca, in the Greenwich hotel. It has beautiful ambience. Eggs are from an upstate farm. They have breakfast every day 8 to 11 and Brunch on Saturday and Sunday from 10 to 3 p.m. Northern Spy Food Company on 511 E. 12th St. is a hole-in-the-wall farm-to-table with really delicious food, good for lunch and dinner. Il Buco Alimetari on 53 Great Jones St. is a rustic Italian with gorgeous bread made on the premises. One of my favorite dishes is a harissa-roasted pastured chicken, and they have a scrumptious short rib sandwich as well. This is one of my favorite brunch spots in the city. One lucky Duck (all food is raw) is a great place to get dessert (2 locations, one at 125 E. 17th St. and one in Chelsea market at 425 W. 15th St.) or a juice, smoothie, or even a big salad. The best dessert is the malamar. For two more upscale restaurants there’s also Blue Hill, 75 Washington Place. They grow a lot of their own food on their farm up at Stone Barns and ABC Kitchen, on 35 East 18th street, is in the beautiful ABC building. If you visit Chelsea Market, The Green Table on 75 ninth avenue (between 15th and 16th) has local market comfort food. Share on Facebook and Twitter | Uncategorized, Where To Eat (Restaurants) | No comments
Amaretti Cookies Amaretti cookies are chewy Italian cookies studded with pine nuts. These are festive enough for your holiday gift-giving but simple enough to make any time. This video shows the ins and outs of making these gluten-free cookies. I start with 2 cups almond flour, then add 1½ cups natural sugar. My favorite sweetener for these is maple sugar, but succanat ™ and rapadura™ work as well. Keep in mind that different natural sugars affect the flavor and moisture and can alter the texture slightly. I then stir in a pinch of salt and a couple teaspoons almond extract to heighten the almond flavor. The next step is to whip three egg whites in a separate bowl until they form peaks. You can do this by hand or with a hand-held or stand mixer, but my tool of choice to make the job efficient is an immersion blender. I then stir the fluffy egg whites into the flour mix. Finally, I brown the butter. I melt half a stick of butter, and cook it until it is copper-colored and fragrantly nutty. I keep a watchful eye on the pot after the butter melts—the process takes only a few minutes, and I want to make sure to stir the butter into the batter when it is browned, not burnt. At this point, I’m ready to form cookies. The batter is sticky, so using 2 spoons is the easiest way to drop the batter onto a parchment-covered baking tray. In order to leave enough room for these cookies to spread, I use 2 trays and drop the batter 1 ½ inches apart, making about 30 cookies. I sprinkle each cookie with pine nuts before it goes into a 300˚F oven to bake. Halfway through the cooking, after ten minutes, I rotate the trays to help them to color evenly. They smell heavenly while they bake. Once I’ve let the cookies cool, I store the extras in the refrigerator for up to two weeks, or I freeze them for up to two months. What a wonderful way to start off the holiday season.
Share on Facebook and Twitter | desserts, Gluten Free, Natural Sweeteners | No comments
|